Today, touch input panels are ubiquitous. They are installed on smartphone and tablet displays, laptop touchpads, graphics tablets, payment terminals and ATMs, as well as medical and industrial equipment. Manufacturers are making touchscreen all-in-one PCs and TVs, but most PC displays are still not touch sensitive.
About how to make a regular monitor a touchscreen, many have probably thought about it. Indeed, in some operations (reading, working with graphics, editing texts), scrolling through a page, selecting the desired item, or selecting an area on the screen with a pen or finger is much easier, faster and more convenient than moving the cursor or turning the mouse wheel. At first glance, it seems that this idea is a fantasy, and it is difficult to implement it. But in reality, everything is a little simpler. Howmake the monitor touchscreenindependently – this material will tell you.
A little theory
The touch screen surfaces are structurally a separate element that is not directly connected to the display matrix. Of course, the latest generations of smartphones and tablets use so-called OGS panels, in which the sensitive element is built between the pixels, but it is still controlled via a separate bus. In total, there are three types of touchscreens, each with its own characteristics.
Resistive
Resistive technology for constructing touch screens is the simplest and cheapest. Based on the principle of operation, such touchscreens are similar to computer keyboards. On two layers of a transparent substrate, tracks of almost transparent conductive material are applied. These two layers are located on top of each other with a gap of several micrometers. The upper one is necessarily flexible and bends when touched by a finger, closing the tracks. The further away the fault is, the longer the path the current travels and the higher the resistance. Based on its value (accurate to an ohm), the sensor controller calculates where the click occurred.
Resistive touch screens are cheap, simple, responsive to any object, but not reliable enough (a small cut can damage the touchscreen) and have limited transparency (at a certain angle, conductor tracks even become visible).
Capacitive

Capacitive touchscreen is the most common nowadays (as of 2016). It is more advanced and reliable. The number of layers was reduced to one, its thickness became smaller. A grid of transparent conductors with low resistance is applied to the surface of the touch glass or film. The human body is a poor conductor of electricity and is capable of accumulating electrical charge, therefore, when a finger touches the glass, a small current leak occurs, the location of which is determined by the controller.
Wave
A wave touch screen uses acoustic (ultrasound, surfactant technology) or light (infrared, ultraviolet, PSV technology) waves to register touches. A frame is installed around the perimeter of the screen, combining the emitter and recorder. When a finger touches a surface, it absorbs and partially reflects the wave, and sensors register the location.
.
SAV and PSV screens are reliable, absolutely transparent (no mesh of electrodes), have an inexhaustible theoretical resource (in reality depends on the quality of the components), if there is a protective frame, the sensor itself cannot be damaged, and the use of armored glass makes the screen matrix invulnerable. Therefore, they are often used in ATMs, payment terminals, industrial machines and medical equipment. But their accuracy in determining finger coordinates is mediocre. Also, wave touchscreens require regular wiping (dirt on the glass causes phantom reactions).
There are other types of display sensors, but they are much less common. In addition, these methods are difficult to implement at home, so they are not discussed.
Application of sensors in practice
All three technologies are in demand when applied to touch monitors. The resistive type was widely used in the past, but is still found today. It is he who is interesting in terms of, but more on that below. Capacitive sensors are used in almost all modern displays that were originally touch-sensitive. Wave touchscreens, as mentioned above, are used in banking, industrial, medical and other specific equipment. Thanks to the enterprising Chinese, they are also interesting when converting a regular monitor into a touch screen.
It’s worth noting right away that converting a regular monitor into a capacitive touchscreen is out of the question: such touchscreens are relatively expensive, specific, and almost never found separately. But resistive and wave technologies are much more interesting in this regard. It is also worth mentioning the purely light (not PSV, but infrared) version.
Method 1: Light
The first method is the simplest and most accessible, but requires certain skills and desire to work. Beforehow to make a monitor touchscreen, you need to stock up on a webcam, an infrared diode (like in a TV remote control), a piece of photographic film (undeveloped), a battery and a housing for a homemade stylus (for example, a laser pointer will do), as well as the Community Core Vision program. What to do with all this goodness - in more detail and point by point below.

Before how to make a regular monitor touchscreenWith this method, you need to make sure that the level of technical skills is sufficient, and the situation does not interfere with the implementation of the idea. After all, the webcam needs to be positioned precisely, and for this you need space on the table, which not everyone has. In addition, a slight shift of it or the screen forces you to set everything up again.
The method is cheap: the only equipment you will have to buy is the cheapest camera for 500 rubles (most already have one), an IR diode (you can pull it out of a broken remote control), a laser pointer (you can take a marker or other thin tube instead), batteries ( “mini fingers” or “tablets”). The most difficult thing is with photographic film: most people last held film point-and-shoot cameras in their hands more than 10 years ago. In addition, the disadvantages of this method are the difficulty of setting up, the instability of the structure, and not the highest level of convenience.
Some Chinese manufacturers offer ready-made solutions of this type, allowing you to make the monitor touch-sensitive. Such products consist of a special wide-angle webcam mounted on the display and a stylus. This option is not without the mentioned disadvantages, but it looks attractive and does not require skills in working with homemade products. 
Method 2: Wave
There are ready-made touch panels on sale that operate on the principle of surface light (SLW) and surface acoustic (SAW) waves. They are a glass with a frame, to which a special controller with a USB or COM interface (RS-232) is connected. Such solutions are intended, first of all, for creating terminals and special equipment, but no one forbids using them at home. 
The process of redesigning the display with them is extremely simple.
- Before how to make a monitor touchscreen, you need to wipe it with microfiber with a special cleaning agent or a universal glass cleaner. It is important to remember: if the screen has an anti-reflective coating, you cannot use products containing ammonia (ammonia) for this, as they wash off this layer!
- After this, a touch glass is placed on the screen, which is secured with the included devices or placed on high-quality double-sided tape (but it’s better to screw it on anyway).
- The further setup procedure consists of installing a proprietary driver and other software (supplied on a disk with the sensor or downloaded from the manufacturer’s website) and calibrating the touchscreen.

The main disadvantage of such a conversion of a monitor into a touchscreen is its relative high cost. A new sensor costs from several thousand to tens of thousands of rubles, depending on the diagonal. In addition, finding the right size for modern wide-format large-diagonal matrices is often difficult. This is due to the fact that narrow-format (4:5 or 3:4) screens have a better ratio of diagonal to usable area, so such touchscreens are produced for them more often. In addition, glass with a frame can spoil the aesthetic appearance of the monitor, not fitting into its exterior.
Method 3: Resistive
In terms of price, efficiency and ease of use, a resistive touchscreen is most preferable. Chinese manufacturers create special touch films of varying levels of accuracy, durability and functionality, with different sizes. 
Some of them can be trimmed to fit the display, while others do not support such modification. Therefore, before you buy such a touchscreen, you need to study its description and characteristics.

- Before how to make a regular monitor touchscreen, it also needs to be wiped clean from dust and stains.
- Next, you should remove the front frame from the screen (usually this is done using a pick, an unnecessary bank card, or another thin object made of durable plastic that is inserted into the gap) and wipe the display again with microfiber.

- If the touchscreen does not fit, but supports cropping, you need to take measurements from the matrix to fit the sensor to it. This must be done in accordance with the sensor manufacturer's instructions. It is also recommended to watch the video instructions for disassembling the display so as not to accidentally break it. Finally, it's important to remember that modification will void your display manufacturer's warranty.
- Along the edges of the monitor matrix (outside the visible area) you need to stick special gaskets on which the touchscreen will be placed. This is required to protect the display from finger pressure during operation.
- Next, you need to position the sensor and stick it on top of the matrix.
- To hide the touchscreen controller and secure it, you need to remove the back cover of the monitor. To do this, you need to disconnect the leg or stand and unscrew the screws on the back (if any).

- It is advisable to find a free space near the scaler board (matrix controller) where the controller will be placed on a screw or double-sided tape (the first option is more reliable).
- The controller power and data cable must be routed into the existing hole near the VGA/HDMI/DVI connector or other connection interface. If there is no hole, it can be made with a drill or using a hot nail (select the diameter in accordance with the thickness of the cord).

- When installing the controller, it is important to monitor the integrity of the cable, preventing it from twisting, sharp bends, etc.
- If the matrix fits closely into the monitor body, in the place where the cable will go back, it is better to make a cut on the body with sandpaper, a needle file, or remove the plastic layer with a hot knife.
- The back of the housing can then be put back on.
- In order for the monitor frame to fit back in place, it will have to be modified. Depending on the design features, you will have to file the fasteners, cut off or grind off the inner sides a little, etc. After adjustment, it can be installed.

- The final stage is connecting the sensor and calibrating it. To do this, you need to install the driver (downloaded from the sensor manufacturer's website or supplied on disk), and then adjust the accuracy by touching the dots that the driver program displays on the screen.

Instructions
Find out the diagonal of your monitor. If it does not exceed 22 inches, you can easily turn the screen into a touch screen using the Duo Digital gadget specially developed in Korea. This device is a scanner attached to the top. It is he who tracks movements on the device and sends a signal to the computer. The second device of the Duo Digital system is a pen, which acts as a manipulator and at the same time fully replaces the functions of a mouse, since it has two buttons similar to those present on standard devices.
Order a Duo Digital device. Its price now fluctuates around $50 for one set, it does not depend on the diagonal of your monitor. The device can be used not only for laptops, but also for regular monitor screens, however, simultaneous use of it and a monitor in some cases is impossible due to inconsistencies in screen diagonal sizes, as well as proportions.
Purchase this product only from reputable online stores and do not buy from sellers with a dubious reputation. Since this is a fairly new product segment, it has not yet become widespread, so finding it in stores in your city may be problematic.
After you purchase Duo Digital, fix the position of the scanner on the top edge of the monitor using a special mount (these are usually found in webcams). It is advisable to install it right in the middle of the width of the monitor. Turn it on, install the software on your computer (supplied as standard), and perform the initial setup according to the attached instructions.
Please note that this type of product is not yet available on the market with a Russian interface option, therefore, select another language more or less known to you from those offered by the installer. Pair your devices.
Useful advice
Think carefully about the need to use such a device before purchasing it. Perhaps its use will simply be inconvenient for you.
Touch monitors are convenient substitutes for standard pointers. These can be made from ordinary monitors using special devices that are already commercially available.
You will need
- - touch receiver.
Instructions
Order a special device from the online store that turns the screen of a computer monitor or into a touch panel. The device is mounted on top of the monitor body, connected to the USB connector of the computer and then becomes ready for use. When enabled, a certain area of the screen will respond to or with a special pointing device and will recognize it as a pointing device. The kit also includes a special pen that acts as a mouse and a stylus at the same time - it has buttons on the sides for performing control functions, so it can fully replace your pointing device.
When ordering such a device in an online store, please note that they are sold specifically for a specific monitor diagonal. Also, devices for monitors over 22 inches diagonal are often unavailable.
You can find such devices in computer stores in your city; the price for them depends on what diagonal your monitor is. Your monitor can only function as a touch surface if the device is connected to a USB port.
In recent years, more and more devices are equipped with touch screens. However, in order to enjoy the convenience of touch controls, it is not at all necessary to buy a “new model” of this or that device, because even a traditional display can easily be turned into a touch screen. So, in this article we will talk about how to make a touch screen at home without much effort.
Laptop and PC display
At the first stage, you will have to purchase a special Duo Digital gadget, developed by Korean engineers. With its help, you can turn any regular display, up to 22 inches diagonal, into a touch screen. The presented device is a special scanner that is installed at the top of the monitor. It monitors the user's manipulations and sends data about them to the computer for processing. The second part of the Duo Digital system is a pen that replaces the mouse. It, like the manipulator we are all familiar with, has two control buttons.
Continuing the conversation about how to make a laptop screen touchscreen, it should be said that the Duo Digital system is inexpensive - about 40-50 dollars for one set. Therefore, this approach to upgrading an old laptop is completely economically justified. By the way, the price of the device does not depend on the diagonal of a particular display. The main thing is that your device, as already mentioned, does not have a matrix larger than 22 inches.
Once you have purchased your Duo Digital system, secure the scanner to the top edge of your monitor. For this purpose, it has a special mount, similar to a webcam holder. It is advisable to install the scanner exactly in the middle of the screen width. Next, turn on Duo Digital and install special software on your computer. All the necessary drivers are included with Duo Digital, so there should be no problems finding the software. At the next stage, we make individual settings and that’s it - your laptop or monitor has turned from a regular one into a touchscreen one!
Phone display
As for how to make a touch screen on your phone, there are somewhat more difficulties here. And the main one is the price. There are also devices like Duo Digital for mobile phones and smartphones. However, they are unreasonably expensive. So, for example, at the end of 2007, the famous Finnish manufacturer of communications equipment, Nokia, released a special Bluetooth pen. With this device, you could write messages, phone numbers, notes, and other information on a standard Bluetooth phone without using a traditional keyboard. In 2008, this pen appeared on the Russian and Ukrainian markets. However, with a price of 240-280 dollars, this gadget did not gain much popularity. Indeed, for that kind of money these days you can buy two full-fledged touchscreen phones at once and not spoil yourself with similar accessories from Nokia.
Now you know how to upgrade your device and how much it costs to make a touch screen for a regular monitor, phone or laptop.
Unlike desktop computers, functions and programs in tablets are controlled by lightly pressing the fingertip on the screen at the desired point. The tablet reacts to touch thanks to a thin transparent glass plate superimposed on the display screen. When you press on the glass (touchscreen), depending on the type of sensors, the resistance, inductance or capacitance of the mesh applied to the glass changes and thus the tablet receives instructions for a specific action.
The touch glass is very thin, but strong enough to break with your finger. But if the tablet is dropped on a hard surface or hit with a sharp object, the touch screen cracks, which is what happened with the glass of the children's MonsterPad tablet shown in the photograph.
Checking the tablet's functionality using the mouse
The image on the screen was uniform without defects or distortions. The tablet remained operational, since when you pressed the Power button, a window popped up with a menu to turn off the tablet, but it became impossible to control its operation by touching the screen with your finger.

To fully check the functionality of the tablet, and the ability to turn it off before repair, it was necessary to connect a mouse to the Micro USB connector located on the side of the tablet. Mice usually have a USB connector. Therefore, I had to buy a USB-Micro-USB adapter.

When a mouse was connected, the tablet system automatically detected it, and an arrow-shaped mouse cursor appeared on the screen. Diagnostics showed that the tablet’s electronics are in good condition. Therefore, to repair the tablet, it is enough to replace the touchscreen with your own hands. After diagnostics, the tablet was turned off using the mouse.
While waiting to purchase a touchscreen, it is necessary to keep the tablet's battery charged, since deep discharge sharply reduces the tablet's battery life.
Where can I buy a touchscreen for a tablet?
The search for a store to purchase a touchscreen for a children's tablet MonsterPad at a minimal cost led to the website of the time-tested Chinese online store AliExpress. The site presented a large assortment of sellers of touchscreens for the MonsterPad tablet.

A seller with a large number of positive reviews and a high rating with an average price and free shipping was selected. When choosing a touchscreen, pay attention to the presence of double-sided tape on it. If the screen is without adhesive tape, then replacing it will be complicated by the need to purchase such adhesive tape, cut it and secure it.

If you can’t find a touchscreen by the name of the tablet, you can try searching by its markings, which are usually applied to the flat cable running from the touchscreen.
The touchscreens of many tablet models are interchangeable. The main thing when choosing is to pay attention to the type of sensor and its diagonal size, expressed in inches. For example, the MonsterPad requires a 7" touchscreen.

The resulting parcel was a large, compared to the size of the touchscreen, polystyrene box completely wrapped in adhesive film. It is convenient to open such packaging by cutting the film with a knife along the line of connection of the box halves.

The touchscreen was removed from the packaging and carefully inspected for defects. Everything was in perfect condition. Trying on the glass on the tablet confirmed the size matches. To check its functionality, all that remains is to disassemble the tablet and connect the touchscreen to the motherboard.
How to disassemble the MonsterPad children's tablet
Before starting to repair the tablet, to avoid scratches on its case and display and dust getting between the display and touch glass, you need to wipe the table with a damp cloth and cover its surface with a soft, lint-free cloth. The only tools you need are a knife and a couple of small screwdrivers with a Phillips and a flat blade. After preparing the workplace, you can begin repairs.

The MonsterPad children's tablet can be disassembled easily thanks to the screw fastening of the back cover. Using a sharp tool, remove the four plug legs glued with adhesive and unscrew the four screws using a Phillips screwdriver.

Then, even without the help of a plastic card, grab the case halves with your fingernails in the area where the tablet's power button and connectors are installed, and carefully move the halves apart. The power and volume buttons must be immediately removed and set aside so that they do not get lost or scratch the tablet screen if they fall under it.

The tablet has been disassembled sufficiently to begin replacing the touch glass. All that remains is to remove the cable coming from the touchscreen from the connector. In the photo the connector is in the far right corner.
If the tablet was disassembled to replace the battery, then its type is clearly visible in the photo. To replace the battery, you first need to unsolder the red and black wires coming from it from the motherboard and carefully remove it, overcoming the adhesion force of the double-sided tape.

To release the touchscreen cable, you need to use a screwdriver blade to move the clamps a couple of millimeters in the direction indicated by the red arrows in the photo. After this, the cable can be removed from the connector without effort.
How to check the touchscreen before installing it in a tablet
After removing the back cover from the tablet, it became possible to test the new touchscreen for functionality. To do this, without removing the protective film, you need to place a new touch screen on the broken one, carefully turn the tablet over, and observing the numbering of the cable, insert it into the connector on the motherboard and return the latches to their place. Then turn the tablet over with the display facing up and turn it on using the power button.
After downloading the software, you need to tap on any icon or just work a little on the tablet. If there is a reaction on the display when touching and scrolling through pages, then everything is in order and you can start replacing the broken glass. Before starting the repair, you must turn off the tablet with the power button and disconnect the cable of the new touchscreen from the connector.
How to remove a cracked touchscreen
To remove a cracked touchscreen, use the end of a knife to pry it at any of the corners and try to lift it up.

In the MonsterPad tablet, the glass was glued weakly; there was no need to even heat the glued area with a hairdryer. The force of the fingers was enough to peel it off. The main thing is not to rush and perform this operation very slowly and smoothly.
Preparing the tablet frame and installing the touchscreen
After removing the cracked touchscreen, use a rag soaked in alcohol to degrease and remove any remaining adhesive from the frame.

Fortunately, the cracked glass did not crumble into pieces and there was no need to use a vacuum cleaner or hair dryer to blow off the small fragments. For the same reason, it is not recommended to scrape off glue residue with a tool.

To ensure that the cable did not interfere with the positioning of the touchscreen when gluing, a piece of polyvinyl chloride tube was inserted next to its release hole, as in the photo.

In the next step, the protective film was removed from the touchscreen from the applied adhesive layer to the edges.


All that remains is to tuck the cable into the hole in the tablet frame, rest the corner of the touchscreen near the cable into the notch of the frame and slowly attach it to the frame, controlling the accuracy of the placement in the opposite corner diagonally.

The touchscreen fit into the recess of the frame exactly, without gaps or displacement on the first try. There is no need to press the glass tightly at this stage of repair. It is advisable to do this after fully assembling and checking the operation of the tablet.


The cable is long enough, which is convenient for installation. However, to prevent the cable from breaking if it gets caught between the covers when they are closed, it must be folded in half and pressed a little, avoiding sharp bends.
All that remains is to install the pushers of the buttons for turning on the tablet and adjusting the sound volume and snap the back cover to the base of the tablet. Screw in the four self-tapping screws and install the removed plugs on them.

The independent repair of the tablet was successfully completed, it began to work and look like new, and the child can play his favorite games again. Now, I believe, he will be more careful with his tablet and other gadgets. I did not remove the protective outer film from the touch screen; let the owner of the tablet remove it and be the first to tap (touch) the surface of the screen.
I hope that the step-by-step instructions provided will help any home craftsman, even those who do not have experience in repairing such devices, cope with the repair of a tablet or smartphone.
The cost of replacing the tablet's touch glass with your own hands was less than 10% of the original cost of the tablet.
Recently, in many Hollywood science fiction films, bizarre devices have begun to appear that the characters in the film control with their own hands. For example:
Fragment from the movie "Six Day"


Fragment from the film "The Stepford Wives"
Abroad, touch technologies are already widely used in various products, for example, information touch kiosks, point-of-sale terminals, car multimedia systems, tablet PCs, PDAs and other devices.
This technology is also widespread in Russia; I do not mean handheld computers that are sold in our country. The speed of its spread is apparently limited by the high retail cost of finished products.
Currently, there are about a dozen companies working in this area, and I managed to get a “sensory kit” from one of them for a test. Is it possible to make a touch monitor with your own hands, which would also have a low cost? After reading this review you will confidently say “Yes”.
Touchpad and controller
The touch panel that was provided for testing is manufactured by the Taiwanese company Apex Material Technology Corporation (AMT), one of the largest Asian manufacturers of touch components. AMT's head office and production facilities are located in Taipei, Taiwan.

There are several types of touch panels - resistive, capacitive, infrared and surface acoustic wave screens. AMT9102 belongs to the class of analog resistive touch screens. But there are also resistive panels, multilayer and 4/5/8 wire, this model is a two-layer four-wire.
AMT9102 Specifications:
- Panel dimensions: 332.6 x 257.5 mm;
- Panel thickness: 3.3 mm;
- Active area: 304.1 x 228.1 mm;
- Thickness of the sensitive layer: 0.188 mm;
Electrical Specification:
- Resistance of the circuit section (pressed): 10 MOhm;
- Resistance of the circuit section (pressed): 2 KOhm;
Press response time:
- 10 ms;
Layer resistance:
- Analogue: 200~800 Ohm/m2;
- Operating voltage: 5V;
- Operating temperature: -10°C to 60°C;
- Storage temperature: -20°C to 80°C;
- Humidity: no more than 90%;
- Pressure force with a stylus or finger: from 10 to 80 grams;
- Surface density: 3H;
- Durability: 10 million point pressure;
- Transparency: 80%.
Resistive technology is based on the method of measuring the electrical resistance of a part of a system at the moment of touch. To determine the X and Y coordinates, special sensitive layers are used, between which there is another, “neutral” one.
When the top layer comes into contact with the bottom layer, the electrical circuit is completed and the controller receives X and Y coordinate information from the top and bottom layers, respectively. In order for the controller to distinguish between signals, the currents of the upper layer flow in a direction perpendicular to the lower one. Compared to other types of "dot-screens", resistive has a high resolution (300 dpi), a long service life (10 million touches), a short response time (about 10 ms) and low cost. But in addition to the advantages, there are also disadvantages, such as a 20% loss of luminous flux.

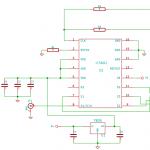
The controller was taken from the same manufacturer - PenMount 9026. Model 9026 is compatible with four and eight wire designs. The controller is designed for installation inside the monitor case and has an RS-232 connection interface.

Technical characteristics of PenMount 9026:
- Connection interface: RS-232;
- Plug & Play: Full support;
- Maximum resolution: 1024 x 1024 pixels;
- Signal transmission speed to port: 19,200 baud;
- Power consumption: from 5V to 12V;
- Indicators: LED built into the controller;
- Overall dimensions: length 65 mm x width 25 mm x thickness 2.5 mm.
Scope of delivery
The touch panel is covered with a protective film and packed in a bag in which you can also find eight self-adhesive strips of different lengths. This is where we can finish talking about the AMT9102 delivery kit.

The PenMount 9026 controller is also packaged in cellophane and comes with interface cables and a CD with drivers and software.
Selecting a Monitor to Upgrade
We have a 15" touch panel, the next step is to choose a suitable monitor. It is not possible to install a touch screen in every display; if everything is more or less clear with a CRT monitor, then you will have to look for a suitable LCD, and we will implant a “point screen” specifically in the LCD monitor.

Initially, it was planned to use one of two 15" models - Philips 150B2B or EIZO FlexScan L355. The fact is that these monitors have a built-in power supply and very limited free space, which is typical for many branded displays. Therefore, installing a controller and panel, in this case, almost impossible.
As practice has shown, to install AMT9102 you need about 5 mm of distance between the front panel and the LCD matrix of the monitor. Why 5 mm if the thickness of the touch screen is 3.3 mm, you ask. To connect the “dot screen” to the LCD matrix, special damper self-adhesive pads are used, the thickness of which is 0.85 mm. From all this we get an additional 5 mm.

After an unsuccessful attempt to integrate a touch screen into the Philips 150B2B and EIZO FlexScan L355, it was decided to look for a monitor with an external power supply. It didn’t take long to look for such a display, as the computer market is full of models from “noname” manufacturers.
The choice fell on a 15" LCD from an unknown manufacturer, which is sold under the name "SoCool", which literally means "So Cool". Let's see if it's really that good.
SoCool uses a 15.1" CHUNGHWA CLAA150XH01 LCD panel with a thickness of only 6 mm, and the boards are mounted on the back wall of the monitor, so there was plenty of space.