Suitable for broadcast digital television DVB-T2 standard. But you don’t have to buy them at all, especially since the cost of the device together with a digital receiver can amount to a decent amount. Moreover, such an antenna must be suitable for the parameters of the frequency range that is used in the area where you live. Otherwise, the multiplex used in the antenna will not receive all available TV channels.
We'll tell you how to find out frequency range your region and calculate the parameters of the required antenna. Also, our step by step instructions will help you quickly make a high-quality antenna from scrap materials for receiving over-the-air channels of the new digital standard DVB-T2.
For reference:
Multiplex(from English multiplex- mixture, mixed; also mux) - combining television channels into a single digital package for digital television broadcasting
What you need to assemble a digital antenna
How to make your own antenna for digital TV? The main condition for self-assembly A digital antenna is to use a wire or tube (copper or aluminum) with a diameter of 3 mm (sectional area slightly less than 6 mm2). It is not always possible to find such material even in specialized hardware and electrical stores. Therefore, from a huge variety of types of homemade antennas, we chose the most optimal and least expensive - using the antenna wire itself as the main material.
When choosing such a cable in a store, you must proceed from the parameters that it must have a characteristic impedance of 75 Ohms, and its cross-section (including the sheath) must be at least 6 mm. It is highly desirable that the central core and shielding braid be copper. Antenna cables with a copper-plated steel center wire are commercially available. This budget option and it is not very desirable to use.
The antenna itself will require a cable length of about 2 m in total, and to connect to your TV you need to determine the required distance yourself.
In addition to the antenna cable itself, you will need:
- soldering iron with solder and rosin;
- sharp knife with short blade
- pliers with wire cutter function and electrical tape
- sealant or glue gun with the appropriate consumable plastic rods (if you are going to place the antenna outside).
Antenna design features
Most antennas offered on the Internet have an angular design made of copper or aluminum tubes (or thick wires), which works great in open areas with direct visibility of the translator. Another type is based on a circle of antenna cable.
 Both designs do not provide very good reception in dense urban areas or in places closed from the line of sight of the translator.
Our version of the antenna (seen on a popular video hosting site) is focused on both the direct signal and the one reflected from buildings in the city. That is why the design consists of two concentric rings made of antenna cable, which greatly simplifies its manufacture.
 This might be interesting:
How to make an antenna for digital television with your own hands: step-by-step instructions
Before we start cutting and stripping the wire, we need to determine the correct length of cable sections for the components of our antenna. To do this, you need to find out the digital television broadcast frequency in your area. But how to calculate an antenna for digital TV? Go to the official website map.rtrs.rf and find your area of residence. In the left menu, select the “Frequency zones” checkbox. Now, in addition to frequency ranges, the map will display multiplex packages and indicate the number of channels included in them. For example, throughout almost the entire Moscow region, the I-multiplex (RTRS-1) includes 10 channels (they are broadcast on channel 30) and can be caught at a frequency of 546 MHz; the II-multiplex (RTRS-2) also includes 10 channels and is broadcast they are on channel 24 at 498 MHz.
 To calculate the length of cable sections for an antenna based on frequency maps, you need to use the formula for determining the wavelength:
λ=300/F, Where F- frequency of the transmitted signal in MHz.
For example, for a frequency of 546 MHz the wavelength is about 550 mm. It is this length of cable that should be used to obtain the first circle of the antenna.
To receive the second multiplex with a frequency of 498 MHz, the length of the antenna cable must be approx. 600 mm.
 First step- cut the cable into the required lengths. In our case it is 550 and 600 mm. After this, each end of the cable is freed by 15 mm from the outer braid, and the shielding is twisted into a tight pigtail and tinned with a soldering iron. Leave the central part of the wire untouched in the braid. She won't be needed.
Second step- solder the right end of the tinned pigtail of the screen of one wire to the other, then do the same with the left ends of the cable. Do not touch the central wires of the antenna cable. You can even wrap them with electrical tape to prevent the ends from touching each other. 
Thus, the base of our concentric antenna is made.
Third step- roll both segments into rings and place them concentrically, i.e. one ring inside the other, for example, on a cardboard from under shoes and secure closer to the ends with packing wires.  The only thing left to do is connect the antenna cable leading to your TV and insulate the exposed contacts.
Fourth step- take your antenna cable of the required length, strip both ends of it from the outer braid by about 15 mm. Clean the end of the cable leading to the antenna in a special way: twist the shielding cable braid into a tight braid and tin it. 
And strip the central wire of the remaining braid by 10 mm, leaving about 5 mm of braid to protect it from a short circuit with the screen wire. 
Fifth step- bring the antenna cable with prepared ends to the previously obtained antenna from concentric rings and twist the end of the braid from it with the end from the left side of the antenna, solder the resulting connection.
Sixth step- insulation of exposed wires. For these purposes, you can use electrical tape or a glue gun (if you have one). Twist the second wire - the central core of the cable - with the end of the braid on the right side of the antenna and solder the connection. This way you will have the shield braid soldered to the left side of the ring and the center core to the right side of the circuit.
Seventh step- connecting the cable to the antenna plug. To do this, cut the outer plastic sheath of the cable by approximately 15 mm and turn the shielding wire inside out, pulling it over the sheath. Carefully strip the central core by 10 mm. Insert it into the central part of the plug (if the design allows), and then screw the outer shielding nut so that it tightly covers the shielding part of the wire. The remaining screen can be carefully cut off.
Thus, our universal dual-band antenna is ready for indoor use. The antenna does not require amplification or additional power supplies. But in dense urban areas, the question still remains of how to properly install an antenna for digital television. To do this, try to experimentally determine the location of the best reception.
 If your TV is not equipped with a modern receiver for receiving terrestrial digital television of the DVB-T2 standard, you will need to purchase this unit. You can read which one works best in.

High-quality antennas have always been difficult to obtain - the Soviet industry practically did not produce them, so people made them themselves from improvised materials. Today the situation has not changed much - in stores you can only find lightweight aluminum Chinese crafts, which do not show good results and rarely last more than a year. What to do if you like to watch TV, but there is no quality reception? The answer is simple -Given free time and a pair of skillful hands, anyone can handle this.
Quite recently in Russia there was analog television, but now almost the entire country has switched to digital broadcasting. Its main difference is that it operates in the decimeter range.
You can create a homemade antenna for the digital range at home
This was done for reasons of economy and safety - maintenance of transmitting antenna-feeder stations is virtually not required, their maintenance is reduced to a minimum, harm from contact with powerful transmitters for masters is minimal. But such stations have one serious drawback - low power. And if in a big city the signal can often be caught even on a piece of copper wire, then far from the transmitter, reception may be difficult. If you live outside the city, in remote areas or villages, you will have to assemble your own antenna and take it outside to catch the desired signal.
Attention:Signal problems can occur even in the city center. Decimeter waves are practically not dampened by other sources, but are reflected from thick reinforced concrete walls. In modern high-rise buildings there are many places where they are completely attenuated before reaching the TV receiver.
It is also worth noting that DVB-T2 ( new standard television) offers a fairly constant, but weak signal. When the noise level is one and a half to two units higher than normal, the TV reproduces the broadcast quite clearly, but as soon as the noise exceeds 2 dB, the signal disappears completely. Digital television is not sensitive to electromagnetic interference - it is not knocked down by a running refrigerator or microwave. But if a mismatch occurs anywhere in the system, the picture stops or falls apart. High qualitywill solve this problem, but in some cases it will have to be taken outside or onto the roof.
Basic requirements for antennas
The current television standards in the USSR do not fit modern realities - the protective and directional coefficients today have practically no effect on the signals. The airwaves in cities are clogged and contain a lot of dirt, so you shouldn’t pay attention to these coefficients. You are guaranteed to get interference on any antennas, so there is no need to reduce the efficiency factor and efficiency factor. It is better to improve the antenna gain so that it receives a wide range of airwaves and selects the desired stream, rather than focusing on a specific signal. The processor of the set-top box or TV itself will isolate the necessary signals and create a normal picture.
 Classic Polish antenna with amplifier
 So, Experienced engineers recommend building band antennas. They must be correctly calculated, receiving signals in a classical way, and not through engineering “optimizations” and traps. The ideal option is that the device fully complies with theoretical calculations and geometry. Also, the constructed antenna must be consistent with the cable at operating ranges without the use of matching devices. In this case, it is best to create a frequency response that is smooth and even, since when the amplitude-frequency response dips or jumps, phase distortions appear.
Attention: analog Antennas with ferrite USS, which provide full reception of the old signal, practically do not work with DVB. You need to build a “digital” antenna.
In the article we will analyze modern types of antennas that work with new digital broadcasting.
Antenna types
DIY antennas for digital TV Can you assemble it at home? There are three most common options:
- All-wave, or as radio amateurs call it, frequency-independent. It is assembled very quickly and does not require high knowledge or specialized tools. Well suited for the private sector, villages, dacha cooperatives - where the airwaves are not clogged with garbage, but not too far from the transmitter.
- Log-periodic range. It has a simple design and receives the signal well at close and medium distances from the transmitter. Can be used as a remote antenna if the transmitter is located far away, or as a home wall antenna.
- Z-antenna and its variations. Many radio amateurs are familiar with meter-long “zeshki” - they are quite large and require a lot of effort to assemble. But in the decimeter range they are quite compact and do their job well.
Nuances of construction
If you want to build a quality antenna, you must master the art of soldering. You cannot twist the contacts and guides - during operation they oxidize, the signal is lost, and the picture quality deteriorates. Therefore, all connections are soldered.
 Such connections are unacceptable - be sure to solder them
 You also need to deal with points of zero potential, where currents arise even in the absence of voltage. Experts recommend making them from a single piece of metal, without using welding at all. Even well-welded pieces can make noise at the boundary values, while a solid strip will “pull out” the signal.
Also when creating homemade antenna for digital TV you need to figure out how to solder cables. Today, copper is practically not used for braiding, since it is expensive and quickly oxidizes. Modern braiding is made of steel, which is not afraid of corrosion, but it is very difficult to solder. It should not be overheated or squeezed. For connections, use 36-40 watt soldering irons, flux and light solders. Dip the winding well into the flux and apply solder - it takes up perfectly with this method of application.
All-wave antenna
The all-wave antenna has quite simple design. It consists of triangles, copper wire and wooden slats. You can study the design in more detail in the picture - it does not represent anything supernatural.
The thickness of the wire can be any, the distance between adjacent wires is 25-30 mm, the distance between the plates is no more than 10 mm. The design can be improved by eliminating plates and using PCB. It needs to be given the appropriate shape or simply remove the copper foil in the shape of a triangle.
The remaining proportions are standard - the height of the device must match the width, the plates diverge at right angles. Zero potential is on the extreme line home antenna for tv , just at the intersection of the cable with the vertical guide. To avoid loss of quality, the cable must be tied to it with a tie - this is enough for coordination. Such an antenna, hung outside or directed at a window, receives virtually the entire frequency range, but has a slight dip, so you need to set the correct angle when fixing the antenna.
By the way, this design can be modernized using ordinary aluminum beer and cola cans. The principle of its operation is as follows: as the shoulder span increases, the working band expands, although other indicators remain within the original limits. The Nadenenko dipole, often used in military developments, works on the same principle. Aluminum cans are ideal in shape and size, creating vibrator arms in the decimeter range.
 Two-can antenna for TV
 You can create a simple can antenna by simply soldering two cans to a cable. This DIY indoor TV antenna Suitable for viewing channels at a short to medium distance from transmitters. There is no need to coordinate anything in this scheme, especially if the cable length is less than 2 meters.
You can complicate the design by assembling a full-fledged array from eight cans and using an amplifier from a regular Polish antenna. This design is perfect for hanging outdoors in areas remote from the transmitter. To enhance the signal, you can place a metal mesh.
Z antenna
Complex Z-antenna designs with multiple loops exist, but in most cases they are not needed. You can easily assemble a structure from ordinary copper wire 3 mm thick. If you don’t have one, then just buy a 3 mm single-core copper wire 120 mm long - this will be enough for your work. This design consists of two segments. We bend the wire according to this pattern:
- The starting section is 14 centimeters long. Its edge is bent into a loop to connect with the last one (the loop is 1 cm, the total length of the first piece is 13 cm).
- The second piece is bent at 90 degrees (it is better to bend it with pliers to maintain the angles). Its length is 14 cm.
- The third piece is bent at 90 degrees parallel to the first, length 14 cm.
- The fourth and fifth pieces are 13 cm each, the bend does not reach the loop by 2 cm.
- The sixth and seventh pieces are 14 cm each, bent at 90 degrees.
- Eighth - returns to the loop, length 14, 1 cm goes to a new loop.
Next, you need to thoroughly strip the two loops and solder them. The opposite corner is also cleaned. The cable contacts are soldered to them - one is central, the other is braided. There is no difference which contact to solder to.. It is advisable to insulate the soldered areas; for this you can use sealants or hot-melt adhesive. The ends of the cable are soldered to the plug and also insulated with cambric.
 You can assemble such an antenna in half an hour.
 To avoid displacement of segments, the edges can be strengthened. To do this, take a regular plastic cap from a five-liter bottle, cut 4 slits in it so that the wire is recessed to the base. Cut the fifth hole for the cable. Then place the antenna in the cover (after checking the quality and reliability of the soldering), and fill it with hot-melt adhesive. The resulting design will be practically eternal - it is capable of receiving a stable signal at a distance of up to 10 km from the source.
So you already know What can be used instead of an antenna for a TV. In fact, the structures are much larger than those we described, but even these will be quite enough for you. If you live far from the signal source, then you will need amplifying antennas - you can get by with a classic “polka” with amplification. Well, if everything is bad with the airwaves, then use satellites.
Once upon a time, good television antennas were in short supply, and most of those on sale were, to put it mildly, no different in quality and durability. At that time, any craftsman who could make a TV antenna with his own hands was in great demand. But interest in homemade antennas does not fade away even today. There is nothing strange here: the conditions for TV reception have changed dramatically, and manufacturers, believing that there is and will not be anything significantly new in the theory of antennas, most often adapt electronics to long-known designs, without thinking about the fact that the main thing for any antenna is its interaction with a signal on the air.
This is the most popular antenna for a TV - almost anyone can make one with their own hands. The secret of its popularity is the simplicity and availability of materials. You can even make something from tin cans at the dacha or on a picnic. Experienced craftsmen claim that it will take only 10 minutes to make such an antenna for a TV with your own hands, and it receives many more channels than a stationary one.
To make a TV antenna from empty tin cans, you will need:
- antenna cable;
- a couple of tin cans for beer or other low-alcohol drinks;
- self-tapping screws;
- plug;
- insulating or adhesive tape;
- screwdriver;
- stick.
Antenna assembly instructions:
- Tape the cans to the stick with insulating tape at a distance of about 7 cm from each other (although you can select the distance using an empirical method).
- Screw self-tapping screws into the beer container and attach the antenna cable, stripped at both ends, to them. If the can still has opening rings, the cable can be attached to them with self-tapping screws.
- Tie the cable to the stick with tape (this is necessary for the stability of the receiver). Instead of a wooden stick, you can use a hanger - then it will be more convenient to hang the antenna for tuning.
- To prevent the antenna from losing its working properties due to the influence of bad weather, the jars must be closed with a 2-3 liter plastic bottle, having previously cut off the bottom and neck. In the center of the bottle you need to drill a hole through which the cable will be pulled. After connecting, this place must be scalded with boiling water - then the plastic will deform from the high temperature and make the hole hermetically sealed.
The antenna made from empty beer cans is ready, all that remains is to connect it to the TV and configure it. You can improve the design by making the antenna from several sections.
This TV antenna can be used as an indoor antenna.
Simple TV antenna
If you don’t fancy yourself a great master, but still want to try making an antenna for a TV with your own hands, you can make the simplest version of it.

To do this you need to do the following:
- Connect the antenna input to any pre-insulated metal circuit.
- Place the circuit on a stand made of plastic or wood and place it on the TV itself or on the balcony.
- Since you need to connect the antenna to the TV using a plug and cable, you need to cut off about 5 cm of insulation on the cable.
- Divide in half and bend the opened winding.
- Carefully cut off the inner winding and expose the cable core.
- Secure the core with winding in the plug using screws. If your plug does not have room to attach the winding, then you need to cut it off.
- Strip the other edge of the cable, make a ring from the core and secure it to the circuit.
- Wrap the joints with insulation for structural reliability.
To improve the signal on your home antenna, you need to use electronic signal amplifiers.
Powerful homemade antenna
In order for the antenna to work as well as the purchased one, or even better, you need to improve its receiving circuit.
- The first step is to buy a signal amplifier for a television antenna, which connects directly to the antenna, and be sure to wrap the cable at both ends with electrical tape so that there is no interference in the signal.
- In order for the reception to be of high quality, you need to make a screen - this is a metal mesh that is isolated from the TV and placed behind the receiver. You can use a metal mesh from a fence as a screen.
- The reception area should be increased if possible - to do this, you can attach metal rods to the screen, paying attention to the fact that the entire structure is made of the same metal, so that oxidation does not occur over time. The rods must be connected to the screen symmetrically to create the largest possible area.
- In the center of the structure you need to place another amplifier, soldering the contacts to the receiver.
Antennas for this type of TV are not installed in the house; they are usually placed on the roof, turning towards the nearest TV tower.
Antenna made from a minimum of materials
Since making an antenna for a TV at home does not always allow available tools, two completely elementary methods have become widespread:

- For the first option you will need the simplest wire. But not aluminum - it is subject to very rapid oxidation. Copper or brass wire works great. Strip the wire from both ends of the insulating material, then attach one end to the battery or pipe, and insert the opposite end into the television connector. You will notice that a signal immediately appears, since the pipe, passing through most of the house and exiting upward, is an amplifier of the desired frequencies. In this way you can “catch” about 5 channels.
- The second option will be available only to those who have a balcony. You need to take the same wire as in the first option, only longer, so that it connects the TV and the balcony area. Strip the wire on both sides, connect one end to the TV, and wind the other to the stretched strings on which the laundry is hung. Such an improvised antenna will not only help increase the number of received channels, but will also improve the image quality by an order of magnitude.
You can make not only simple, but also satellite antennas for your TV with your own hands. This is especially true for those who live far from big cities and cannot buy a parabolic receiver in a store. It is good if the TV tower is located no more than 35 km from the house so that the signal is strong enough. And if there is a tall building nearby, the task will become even easier.

To do satellite dish for TV, you will need:
- unnecessary umbrella;
- foil;
- antenna cable (preferably made of copper);
- beer can;
- signal amplifier with power supply.
Antenna assembly instructions:
- Measure the antenna array (umbrella): measure the length between the spokes, take into account the height of the desired segment and the angle at which the spokes are attached.
- Transfer all the calculations to the foil and cut out the parts so that they fit the triangular sector of the umbrella.
- Sew the foil parts to the fabric of the umbrella with nylon threads - as a result, its entire internal part should be covered with foil.
- Install the signal receiver at the focus of the antenna array. You can either buy an amplifier in a store or make it yourself. In the latter case, it is enough to remove 4 cm of the outer winding from the cable, trim the screen that protects against interference and leave the core (it will transmit the signal).
- Cut an oval out of a beer can, make a hole in the center of the oval, thread a wire into it and solder a contact.
- Cover the joint with plasticine - this way the metal will not rust or oxidize.
- Attach the receiver to the handle of the umbrella using tape, tie the cables with an allowance of 10 cm - this way you can adjust the structure. It is very important to ensure that the receiver does not come into contact with the metal on the umbrella handle, otherwise interference may occur. At the point of contact, you need to stick plasticine or other insulating material.
- Attach the antenna, pointing it at the television tower, and adjust the channels by turning the umbrella in different directions. Place the power supply next to the TV, because the amplifier is powered via a cable.
We hope that experienced craftsmen will also gain some useful information from this article. And for beginners who have not yet felt the air, it is best to start with a “beer” antenna.
DIY home TV antenna was last modified: May 11th, 2016 by MaximB
Digital technologies are already sweeping the country, and many are trying to buy TVs that support this format. But if this is not possible, there is another way out - making the antenna yourself. With a little theoretical and practical training, almost anyone can do this.
How to make it yourself dvb - antenna
Digital technologies involve the transmission of images and sound through digital video encodings. It differs from analog equipment in that interference practically does not interfere with the signal, so it arrives at the receiver device with minimal losses.
Today there are already 20 channels of this type. To be able to connect to it, it is not necessary to have special equipment. In this case we're talking about about signal reception high quality, for which it will be enough to have a television cable. It is also called coaxial. 
For acceptance digital signal You need a decimeter antenna. It’s very easy to do it yourself – you only need an antenna cable. But the main thing is not to make mistakes in the calculations. The procedure is as follows:
- Take a 30 cm antenna cable and connectors (male/female and F-connector).
- Prepare wire cutters, a tape measure (at worst, a ruler), a knife and a calculator.
- Next you will need a computer with an Internet connection. On the digital television website, find a coverage map of dvb channels, determine which one is closest to your city. There is a search form there.
- Find a station, find out the detailed frequencies on which it operates.
- Several channels and frequencies for them may be indicated there. The antenna length is calculated by dividing 7500 by the frequency. For example, if the channel frequency is 754 MHz, the result is 7500:754=9.94. Thus, it turns out that homemade dvb antenna should be about 10 cm long. If there are several stations, the average length is determined.

- You need to attach the F-connector to the end of the antenna wire yourself. It's easy - the cable is stripped and the connector is screwed on top. It is necessary that there is a central wire in the middle, and the foil with the wires is at the attachment point.

- Then move a few centimeters away from the connector, then measure another 10 and cut off what is unnecessary.


- The plastic insulation and “screen” (wires with foil) are removed from the remaining cable, and the antenna is ready. Now the question is connecting it.

There is another manufacturing method, which is also simple and requires a minimum of available materials: a board approximately 550x70 mm, self-tapping screws, copper wire (40 cm in length, central core 4 mm in diameter). A blank is made from wood. 8 wires, each 375 mm long, stripped in the middle by approximately 30 mm, thus ensuring good conditions for signal reception. Then you need to cut two wires 220 mm long, and clean the joints according to the size of the board. The remaining wires are bent in a “V” shape.
A special plug connects the antenna and cable (the plug can be purchased separately). The wire is secured to the plug with a tabletop soldering iron. The homemade antenna is ready.
The third method will require:

A small cut is made in the cable sheath, 10 cm from the edge, twist the covering “foil”, cutting off the middle layer by 10 mm. 
At the opposite end, install a plug to connect to the TV. A cable is attached to one of the cans, the middle of the wire is screwed to the second, and the best method is soldering; tape is unreliable.

Fix the cans in a straight line on the trempel at a distance of approximately 7-8 cm. Now the device needs to be fixed in the place where the television signal is most clearly received. True, such a device will not be able to pick up many channels, maximum 10.
Feature and dvb connections -antennas
The difficulty may be to find a point in the apartment where the digital television signal would be best received.  Then sometimes problems arise with inserting the antenna into the set-top box or TV. Options - for example, first insert an extension cord into the console, and then insert the cable into it. At the same time, it should not disturb anyone; ideally, it is generally better to hide it somehow.
Homemade structures of this kind, apparently, do not take much time. So for about 100-400 rubles you can build a digital television device of the dvb standard with your own hands. According to reviews, it works even better than various expensive telescopic devices. True, only for digital TV of one frequency. Not suitable for analog. A high-quality image can be obtained provided that a powerful transmitting station is located no further than 30 km. True, sometimes the distance is reduced even to the range of 5-10 km.
Features of dvb reception

There are more homemade methods strengthen the signal, especially if the terrain or a large distance from the transmitter (50-100 km) does not allow good digital TV reception. For high altitude external antenna You will need to install a board, and any two-transistor board with a low or medium gain will do. Powerful amplifiers in this case are not required, since the signal is quite distorted. 
In our age, digital television has a large coverage area and is actively developing, while analog television will soon simply disappear as a species. Based on this, I suggest you make the simplest antenna for receiving digital television which will receive a signal no worse than factory models, and sometimes even better.
We will make an antenna using the example of the so-called “eight”; it can be used both without a reflector and with it. If the signal source is far from you, then it is better to add a reflector; using it, signal reception will be better and more stable, the main thing is to know where the tower is installed and point it at it.
For the manufacture of the antenna, you can use any conductive material with a suitable cross-section (aluminum wire, pipe, profile, angle, bus, etc.), but as practice has shown, it is best to use copper wire with a cross-section of at least 6 mm2 (the thicker the better the reception ), and it is also easy to bend, solder or align if necessary.
Antenna manufacturing
To make the antenna, take a piece of wire 112 mm long and bend it in this order: make the first section 13 cm + 1 cm for the loop (for connection strength). We make the second and third 14 cm each, the fourth and fifth will be 13 cm each, the sixth and seventh will be 14 cm each, and the last eighth will be 13 cm + 1 cm stiffening loop.

The ends of the wire must be twisted into loops and soldered well, this place will be the contact for connecting the cable, where to solder the central core of the cable does not matter.

Don’t be afraid to make a mistake or get shortchanged, we don’t make an antenna that meets all standards, we need a simple and working one, so to speak, a surrogate, but reliable. I personally couldn’t stand the size, without a reflector, I used a 50 Ohm cable, not 75 Ohm, but with a thick braid. Nevertheless, the antenna works quite well. Below I will write what length of the sides of the square should be exactly for your signal transmitting tower (at what frequency it transmits) and how to calculate it.
To make this design rigid, you can use a regular cap from a twenty-liter bottle and fill the soldering areas with plastic glue from a gun, this will better contact and it will not be possible to accidentally tear off the cable.

The result is this design and, as you can see, it can be installed anywhere, cornice, curtain, window frame, etc.
P.s. In order to find out at what frequency the television tower closest to you is transmitting and in which direction to point the antenna you made, just go to the office. website of the Russian television and radio broadcasting networks and follow the instructions, everything is simple there.
Once you know the transmitter frequency, use online calculator(finding on the Internet is not a problem) to calculate the length of the sides of a square, everything is also simple there, you insert the received data and get the result.
The simplest antenna for digital television. Do it yourself.
Already a fait accompli - analog terrestrial television ends its glorious history in Russia. It was replaced by digital TV broadcasting. This is generally good, the quality of the TV picture is significantly higher. Today I will tell you how to make a simple one yourself, with good characteristics antenna.
A few memories. At school I took part in a radio club, it was led by specialists from SONIIR, the guys were very professional, and passed on their knowledge to young people. And at that time, the first television channel alternative to state broadcasting appeared in our city. They played all sorts of films there that were shown in video stores at that time. Well, of course, we’ll teach you, tell us how to make an antenna, so that it’s simple and really good. Well, without thinking twice, the antenna was designed, manufactured and tested, showing excellent results. And actually, when the question arose about an antenna for digital TV, I had no doubts about the design of the antenna.

To make the antenna, ordinary copper wire is used; the thicker the diameter, the stronger the product. The design is shown above. I think there shouldn't be any manufacturing issues. An additional advantage is that the characteristic impedance of the antenna matches the characteristic impedance of the cable and no additional matching elements are required.
A simple modification to your home indoor antenna!

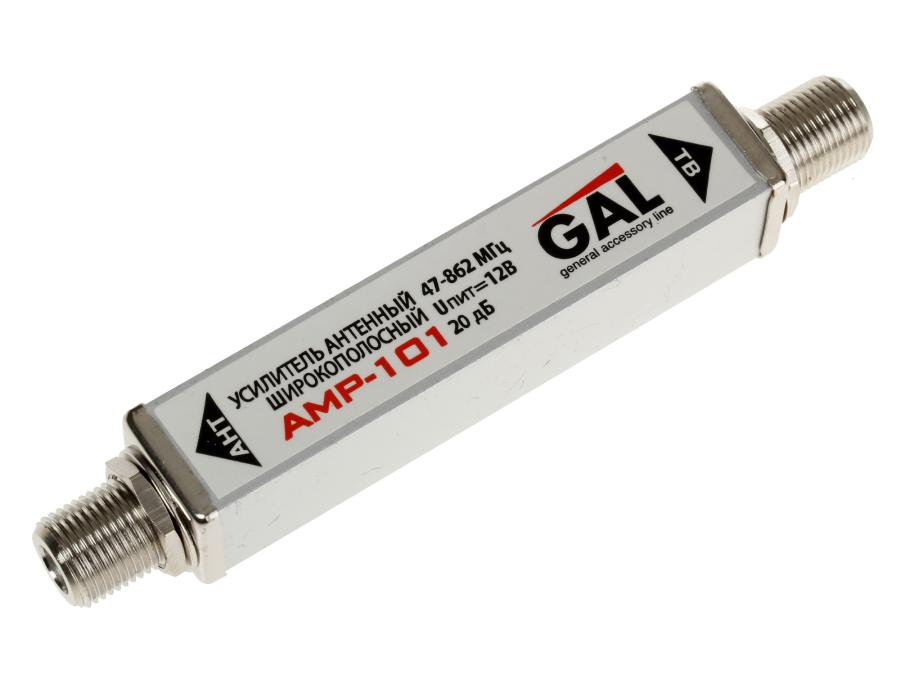
So you have purchased digital set-top box for TV. It's time to start using it - but what if you don't have the right one at your disposal? outdoor antenna ? No problem - take it simple room and add to it... amplifier! How to connect them correctly - read on!
Why does this work?

The effect of noise on the image in analog and digital signal versions
With an old analog signal, connecting an amplifier to a simple antenna didn't give any results– along with the useful signal, the noise increased and the picture was still snowy And intermittent. But digital channels- at all another matter! In order to extract a useful signal, a small difference with noise is enough for the receiver. If you amplify even a noisy indoor antenna signal, it will the level is enough so that digital channels are extracted And deciphered.
How to do this?

You will need a simple signal booster(adapter with antenna plug) and itself indoor antenna. Connect the antenna plug to the amplifier input. The output of the amplifier is accordingly connected to the TV.
Experiment with antenna position- and everything will work. Turn on the set-top box, insert the amplifier adapter into the socket and turn on the setting - after a while the set-top box will find up to 30 channels with clear images– and all this without an outdoor antenna! Agree, very convenient!
Happy editing and interesting TV shows!
Digital TV antenna in 15 minutes
Many of us have at least once in our lives encountered a situation where, despite having a TV, we have a complete lack of antenna or cable television. And the most annoying thing is that there is a TV tower over there, and the TV shows weather phenomena in the form of snow. And the radio waves themselves do not want to fly into the antenna socket and move electrons.
Part of the population, brought up under the vigilant gaze of the all-seeing eye of the party, will undoubtedly rush headlong to fulfill their civic duty as a consumer to the nearest supermarket of household appliances, where the cunning gaze of a consultant will immediately single you out as the object of a 100% scam. - Why? - you doubt, going through files in your head in search of knowledge about antennas...
So for those who didn’t find anything, I’ll explain. They will forcefully sell you an antenna “specially designed for digital television broadcasting” and without it your TV will not be able to give high-quality image. Some particularly zealous consultants will argue that she even takes a companion. (A consultant, like a traffic cop, has the skills of psychological influence and from the first words recognizes the level of your competence.) The price of such a “cool” antenna can be above 1,500 rubles. It looks something like this:

Let's take a closer look at what's what here. Two telescopic active elements of a symmetrical vibrator for receiving meter waves (very few channels work in this range, and digital ones do not work at all). By extending or retracting these tubes, you tune the antenna into resonance with the carrier frequency of a particular TV channel, and both elements must be the same length. The black “donut” is a UHF antenna (there is just a broken wire ring inside). This antenna is not precisely tuned to any UHF channel, but has average characteristics, that is, it does not catch well, but on all channels. Inside the stand there are matching transformers and, if there is a power cord, then an amplifier, the gain of which is changed by the regulator. This amplifier is the most useless thing in this entire structure. Let me explain. When the TV tower is within visibility (10 - 15 km), the power of the useful signal will already be enough for reliable reception, and if further, such a broadband antenna will also receive interference, which will also be amplified by the amplifier. In such remote places it is necessary to take care of an external antenna.
As for receiving a digital signal, the antenna doesn’t care what signal it receives: digital, analog, or all frequency-modulated. All necessary transformations take place on the TV.
And here a self-respecting citizen will certainly have seditious thoughts:
– the Chinese, under the guise of high technology, are selling us two tubes and one wire (the rest is non-functional) – they are lying;
– sellers who sell a penny item at exorbitant prices also lie, assigning non-existent functions to it;
– the authorities, which allow them to openly deceive their citizens, also apparently have their noses in the dust.
Therefore, I urge you to hit the world bourgeois consumer goods with high-quality homemade products.
If you have a TV cable with a plug, as well as a piece of wire 125 cm long and with a diameter of at least 1 mm, you can build a high-quality UHF antenna in about 15 minutes. Unless, of course, you add designer delights.
So, armed with pliers, if possible a soldering iron and a tricky Russian word, we bend a wire like this (see Fig. 3-4), with sides 13-15 cm. The ends of the wire can be soldered, or you can simply twist it at the upper or lower corner. The figure shows where the central core and cable braid are soldered. Make sure that the thin braid wires do not come into contact with the central core. The distance between points “a” and “b” should be 1.2 -1.5 cm, the angles should preferably be straight and everything should be in the same plane. By the way, the structure can be made from metal tape. The wider the tape, the wider the frequency range, but the lower the gain, which in the wire version will be approximately 8.5 decibels (for a Chinese trinket, about 4). Connect the antenna to the TV, install it vertically and perpendicular to its plane to the direction of the repeater.

If everything is done correctly, then everything will work right away and you can think about the design. For it is said: functionality is the forerunner of design.
Having done such a thing, you will suddenly feel how your self-esteem has risen and this will not go unnoticed by your spouse or girlfriend. And the saved money can be spent on a family romantic dinner, because in the eyes of your spouse (friend) you will become a genius, at least until the first scattered socks.
I will be glad if my writings give rise to wise thoughts that will move me towards the path of technical assault.


