" announced the release on December 21, 2010 of the new edition 1.1 of 1C: Library of Standard Subsystems 8.2 (BSP). Edition 1.1 is the next stage in the development of tools for the developer of application solutions on the 1C: Enterprise 8.2 platform.
Edition 1.1 of the BSP provides a set of universal functional subsystems, ready-made sections for user documentation and technology for developing application solutions on the 1C:Enterprise 8.2 platform. With the use of BSP, it becomes possible to quickly develop new configurations with ready-made basic functionality, as well as the inclusion of ready-made functional blocks in existing configurations. The use of BSP when developing application solutions on the 1C:Enterprise 8.2 platform will also make it possible to achieve greater standardization of configurations, which will reduce the time for studying and implementing application solutions due to their unification according to the set of standard subsystems used.
New in version 1.1 BSP
Edition 1.1 includes a number of new subsystems, some of the previously created functionality is separated into separate subsystems, significant changes have been made to some existing subsystems, and the BSP “Implementation Assistant” has been implemented.
The "Web services for working with files" subsystem provides work with attached files that are physically located in another information base (file library). Any configuration with the “Working with Files” subsystem, which is published as a web service, can act as a file library. The subsystem provides the user basic set operations with files: viewing the list of attached files, adding new files, deleting files and opening files for viewing.
Using the new "Interactions" subsystem in the configuration, planning, registration and ordering of interactions can be organized: correspondence by email, calls and meetings. All interactions, as well as information about interaction contacts, are stored centrally in the information base. For example, this subsystem is actively used in edition 11 of the “Trade Management” configuration.
The "Change prohibition dates" subsystem allows you to block changes to any data (documents, register entries, directory elements, etc.) before a certain date. It is possible to configure both one common date for the entire information base as a whole, and several dates for sections and/or individual objects of accounting sections.
The "Attached Files" subsystem allows you to store (attach) files to arbitrary configuration objects. Unlike the "Working with Files" subsystem, this subsystem is focused on an arbitrarily large number of different types file owners without loss of speed when user access is limited at the record level. According to the composition of functions and appearance the subsystem is close to the "Working with Files" subsystem: collective editing of files, support for full-text search in attached files, electronic digital signature, encryption.
In the "IB Backup" subsystem for file infobases, the ability to perform backup on-demand and scheduled settings. Built-in assistant for restoring an infobase from a copy. For the client-server mode of operation, a notification is provided about the need to configure backup using standard DBMS tools.
The "Electronic Digital Signature" subsystem provides the application developer with a software and user interface for working with cryptography tools: electronic digital signature and signature verification.
The following subsystem is highlighted as an independent one: "Group modification of objects", which provides a universal service for group modification of properties and details of objects of arbitrary reference type (directories, documents, etc.), as well as the subsystem " File functions". The "File Functions" subsystem is a technological subsystem that can only be used in conjunction with the "Working with Files" and/or "Attached Files" subsystems. It implements functions common to both subsystems and basic user interfaces working with files, storing files in disk volumes, functions for supporting RIB and creating an initial image of the information base.
The "Basic functionality" subsystem has a new software interface to batch write events from client code to the log, and also to check whether certain types of events are enabled in the log. Added functions for checking the correctness of regulated data (TIN, checkpoint, etc.).
New functions have appeared in the “Business Processes and Tasks” subsystem that significantly expand the scenarios for using business processes in configurations: stopping business processes, hierarchy of subordination of business processes and accepting tasks for execution.
For configurations with a small number of users, the "Users" subsystem provides a functional option that disables the configuration of user groups and external users in the configuration.
The Data Exchange subsystem provides data exchange developers with new mode unloading objects "Unload if necessary", as well as the ability to switch modes of unloading objects in the "1C:Enterprise" mode. Additionally, the data exchange administrator can now configure all object mapping relationships that migrate between information bases, including those that were created by the administrator himself or were created automatically.
The "Working with Files" subsystem uses the standard capabilities of the "Electronic Digital Signature" subsystem. In addition, when scanning documents, it is now possible to adjust the compression level (for TIF), quality (for JPG) and the method of saving to PDF (using an external program).
In the "Access Control" subsystem, a mode for using a simplified interface for setting access rights has been added. This mode is intended for application solutions with a small number of users, each of whom has a unique set of rights and access restrictions. In addition, setting the access rights of users, user groups, external users or external user groups is now possible directly from the element forms of these objects. Available from the user rights setup form full list allowed actions (roles), calculated based on the user’s membership in certain access groups. To obtain a complete picture of the rights of a user, user group, external user or group of external users, a detailed report has been developed. As additional opportunity the list of access group members now also displays its “implicit” members: members of user groups (external user groups), as well as user managers.
In the "Individuals" subsystem, checks for filling out the series and document number are implemented individual(military ID, military ID of a reserve officer, diplomatic passport of a citizen of the Russian Federation, etc.).
Along with subsystems, BSP also offers separate methods for developing application solutions. In edition 1.1, the developer is provided with ready-made sections of documentation for inclusion in the description of the configuration developed on the basis of the BSP.
For initial implementation and subsequent updating of BSP versions in application solutions Edition 1.1 includes a special tool - "Implementation Assistant". This assistant provides decision-making support for the implementation of the BSP in the configuration, as well as automatic control of the actual result of the implementation of the BSP. Since making decisions on the implementation of BSP and monitoring their implementation no longer requires “immersion” in the technical details of the implementation, design, implementation and control can be performed by different specialists and at different points in time.
How to upgrade from a previous version
Edition 1.1 is provided to registered users of the 1C:Enterprise 8 system who have a valid subscription to information technology support (ITS).
To update the BSP to version 1.1, version 1.1.1 was released, compatible with platform version 8.2.13 and higher.
Version 1.1.1 of the BSP is published as part of the February 2011 release of the ITS, on the user support website http://users.v8.1c.ru/ and on the ITS website http://its.1c.ru/ (access to these sites only ITS subscribers have).
The general procedure for updating the configuration of an already used BSP to version 1.1.1 is given in the documentation included in the delivery of this version. Features of updating from previous versions 1.0.7, 1.0.6, beta version 1.0.5 and trial version 1.0.4 are described in the update.htm file, also included in the delivery of version 1.1.1.
To update BSP versions in application solutions, it is recommended to use the "Implementation Assistant", which is included in the distribution kit in the form of external processing.
Library of standard subsystems (LSL) - a set of subsystems for configurations on the 1C:Enterprise platform, implementing basic functionality and individual function blocks. Let's try to understand in more detail what it is.
Why was BSP created?
The first version of the BSP was released by 1C back in 2010 for the 1C:Enterprise 8.2 platform. 1C suggests using this library (or its individual subsystems) as a basis for creating your own application solutions. Also, all standard products produced by 1C itself are based on BSP.
The use of uniform modules made it possible to achieve greater standardization of application solutions, and this in turn made it possible to reduce the time spent on studying them (by programmers, administrators, and end users).
For programmers developing application solutions from scratch, BSP allowed them to save a lot of time, because There is no need to independently develop the basic functional blocks included in the BSP. The development and testing was carried out by 1C for the programmer. The programmer now only needs to understand the already developed functionality and learn how to implement the BSP.
How is BSP distributed?
BSP is a configuration for the 1C:Enterprise platform. Moreover, the configuration is not an independent application solution, it is just a toolkit for the developer. The entire configuration or part of the subsystems can be used when developing application solutions.
The BSP delivery includes a demo base with an example of implementation. This demo database is available for review on the 1C website. You can read how you can access it in the article.
BSP is not for sale. The BSP distribution kit can be obtained free of charge if you have a subscription to information technology support (ITS). To use an application solution developed on the basis of the BSP, a subscription to the ITS is not required. Partners of 1C can also receive BSP for free.
The official documentation on the BSP is located at https://its.1c.ru/db/bspdoc and is available if you have a subscription to the ITS.
BSP composition
The BSP consists of many subsystems, which are divided into:
- independent. To implement it, it is enough to transfer all objects to the target configuration and display the objects in the interface. Examples of such subsystems: “Log Analysis”, “Currencies”, “Completing User Operations”.
- integrable. Designed for tight integration with other configuration objects. To implement such subsystems it is necessary to perform additional settings. Examples of such subsystems: “Object versioning”, “Filling objects”, “Prohibition of editing object details”.
Currently (July 2017), BSP version 2.4.2 is available, which supports the following functionality:
| Administration and Maintenance Tools | Log analysis Additional reports and processing Program settings Configuration update Performance Evaluation Finding and removing duplicates Security Profiles Scheduled tasks Information security backup Removing marked objects Managing totals and aggregates |
| Administration of users and access rights | Shutting down users Users Access Control |
| Integration with other programs and systems | External Components Loading data from a file Integration with 1C-Bukhfon (1C-Connect) Data exchange Sending SMS Receiving files from the Internet Working with email messages Distribution of reports |
| Technological mechanisms and software interfaces | Basic functionality Filling Objects Prohibition of editing object details Updating the information security version Plug-in commands Prefixing objects Working in a service model Monitoring Center |
| Application subsystems and user workstations | Questionnaire Business processes and tasks Report options Interactions Working with files Current affairs Message templates |
| Regulatory reference information and classifiers | Banks Currencies Opening hours Calendar schedules |
| Service subsystems | Versioning objects Group modification of objects Dates prohibited from changing User Notes Personal data protection Startup information Contact information User Reminders Setting the order of elements Seal Full text search Checking the legality of receiving updates Properties Declension of object representations Reporting structure Electronic signature |
Specific subsystems will be described in more detail in separate articles.
Implementation of BSP
Before implementing a library of standard subsystems into your configuration, you need to determine the list of subsystems to be implemented. In the simplest case, all subsystems are implemented. Regardless of what functionality is needed, there are mandatory subsystems that are always implemented:
- Basic functionality;
- Updating the information security version;
- Users.
The general implementation scheme consists of the following stages:
- Transfer of necessary metadata objects to the target configuration;
- Setting up transferred objects;
- Using BSP objects when developing new functionality.
To assist in the implementation of BSP, the library includes processing First Implementation of BSP.epf . It is located in the configuration template directory. In processing brief description of all subsystems and the interdependence of the subsystems on each other is determined.
To check the correctness of the BSP implementation, a report is located in the configuration template directory Checking the implementation of BSP.erf.
How to find out the version of the BSP application solution
There are several ways to find out which version of the BSP is used in a specific application solution:
- Programmatically: call a function StandardSubsystemsServer. Library version() ;
- Interactive: in the “Subsystem Versions” information register, look at the version value for the “StandardSubsystems” subsystem.
Print (Ctrl+P)
Instructions for implementing a library of standard subsystems
The library includes a set of universal functional subsystems,
intended for use in application solutions on the “1C: Enterprise 8.3” platform
Delivery files contains
1. 1Cv8.cf – library delivery file. Not intended to be created
information databases based on a template.
2. 1Cv8_demo.dt – demonstration base.
3. 1Cv8_demo.cf – demonstration database delivery file.
The first implementation of library subsystems in the configuration and updating the version of an already implemented library are noticeably different. After loading the 1Cv8.cf file into an empty configuration, you need to configure the library objects as described in section 2.2, otherwise a message will be displayed when running in enterprise mode
When I first implemented BSP, I used the 1Cv8_demo.cf file, where everything was already configured and loaded it into an empty configuration, and then enabled the ability to change the configuration and methodically deleted the added objects that I did not need in the 1Cv8_demo.cf configuration file and prepared myself another cf file that can be loaded into an empty one configuration without setting up migrated library objects.
In general, the implementation process consists of the following stages:
Stage 1. Transferring metadata objects from the library delivery file to the configuration.
Stage 2. Configuring migrated library objects.
Stage 3. Using library objects when developing a configuration.
All functional subsystems included in the library belong to the parent subsystem “Standard subsystems” in the tree of metadata objects of the configurator. Subsystems designed for configurations designed to work in the service model are subordinate to the “Work in the service model” subsystem.
For the task of initial implementation and subsequent updates of library versions in application solutions, the distribution kit includes a special tool - an implementation assistant ( external processing First Implementation of BSP.epf).

Its functions include support for decision-making on the implementation of the library in the configuration, as well as automatic control of the actual result of the implementation. Since making implementation decisions and monitoring their implementation does not require immersion in the technical details of the implementation, design, implementation and control can be performed by different specialists and at different points in time
Step 1 Transfer metadata objects from file
delivery of the library to the configuration.
First implementation
Step 1. To transfer library objects to your configuration during the first implementation, you need to select the menu command Configuration – Compare, merge with configuration from file in Configurator mode. In the dialog box, specify the library delivery file and confirm the request for support.

Step 2. In the window that opens for comparing and merging configurations, uncheck all the boxes, check the box “include the area of subordinate subsystems” and mark the transferred objects using the command Actions – Mark by supplier configuration subsystems.

From the Standard subsystems group of subsystems, select:
- mandatory subsystems: Basic functionality, Updating the information security version, Users, Contact information. Note that when implementing the “Users” subsystem for use in the service model
subsystem "Contact information" - subsystems that need to be implemented in your configuration, for example, service subsystems, regulatory information and
classifiers - if the configuration is supposed to work in the service model, then you need to include additional subsystems that must be transferred to the configuration to work in the service model
Step 3. Additionally, you need to check or uncheck the boxes for individual library objects and their properties and select the merging mode Take from file (Actions – Set mode for all...) and click the Run button. In the window with a list of dependent objects, click Continue.
Step 4. After completing the comparison and merging, proceed to the second stage - setting up library objects. Depending on the number of subsystems being implemented, this step may take from one to several hours.
Updating the library version
This section describes general scheme updates on new version libraries. Separate features of updating each specific version of the library are given in accompanying document updateSSL.htm included in the library delivery. As a rule, when moving between editions, sub-editions and releases of a library (first,
second and third digits in the version number) additional update steps are required, and when moving between patch releases of the library (fourth digit
in the version number), as a rule, no additional actions are required. In rare cases, when additional steps are still necessary when updating to a patched library release, the corresponding instructions are contained not only in updateSSL.htm, but also in the readme.txt file in the Important section. To update the library version, select the menu command Configuration – Support – Update configuration. In the dialog box, select the Select update file option, set the path to the library delivery file, and confirm the request for
updating the vendor configuration version.
Step 1. You must first prepare obsolete library metadata objects for removal from the configuration. To do this, in the window that opens for comparing and merging configurations, uncheck all the boxes next to metadata objects, then set the comparison and merging filter to the value Show those present only in the old supplier configuration in the New supplier configuration group<- Старая конфигурация поставщика, как указано на рисунке.
Next, mark all metadata objects with checkboxes, select the merging mode Take from new provider configuration (Actions – Set mode for all...) and click the Run button.
If there are references to obsolete library objects from other configuration objects or from other objects in the library itself, the Continue button is not available. You must manually clear all references from other configuration objects and proceed to step 2 (but references from library objects will be removed automatically in step 3).
If no references to outdated library objects were found and the Continue button was able to put the configuration into support, then you should cancel the support by returning to the original database configuration (menu Configuration – Database Configuration – Return to Database Configuration).
Step 2. Repeat the command Configuration – Support – Update configuration, specifying the path to the library delivery file in the Select update file option. In the window that opens for comparing and merging configurations, clear all the checkboxes and mark the transferred objects using the command Actions – Mark by subsystems of the new supplier configuration. From the “Standard subsystems” group of subsystems, select:
● mandatory subsystems;
● additional subsystems that must be transferred to the configuration to work in the service model;
● all previously implemented subsystems, as well as subsystems that additionally need to be implemented in your configuration;
● subsystems on which the above-mentioned subsystems depend,
Then check the boxes for transferring the same set of subsystems (metadata object “subsystem”), as well as the Administration subsystem (if it was implemented previously or is planned to be implemented) in the window for comparing and merging configurations.
Select the merging mode Take from the new supplier configuration (Actions – Set mode for all...).
Then you need to mark all obsolete library metadata objects for removal from the configuration. To do this, set the comparison and merging filter to the value Show those present only in the old supplier configuration in the New supplier configuration group<- Старая конфигурация поставщика, как указано на рисунке.
Next, check all metadata objects and click Run. In the window with a list of dependent objects, click the Continue button.
Step 3. After completing the comparison and merging, proceed to the second stage - setting up library objects.
As a rule, configurations in 1C are written for users. All configurations are different, but quite often different configurations use the same objects that differ slightly from each other. It is really difficult to imagine a configuration where such entities as items, counterparties, users, and currency would not appear. And some tasks are typical: the possibility of basic differentiation of rights, working with email, tasks for users, etc. But there is a configuration that makes the programmer’s work easier; it contains and structures the standard tasks that employers set for programmers.
If you have worked with different standard configurations from 1c, you will have noticed that they are basically quite similar, many basic functions are the same for all standard configurations. Also from the BSP you can add to your own configuration such standard directories as organizations, banks, a currency classifier and much more.
We will try to figure out which subsystems are responsible for what and how they are interconnected.
If you decide to use a BSP, this does not mean that you need to use all the subsystems that are included in it. The BSP includes a special implementation assistant, which helps to significantly save time when developing a new configuration. The assistant is designed as a step-by-step wizard, using which the developer specifies the subsystems he needs, and the wizard will create a template that can be worked with in the future. In essence, we receive a template for a future configuration.
If we launch the BSP in thin client mode, we will see such a window
At the initial stage, we are interested in the “Developer Tools” tab, with which we will launch the “BSP Implementation Assistant”

The skua itself looks like a step-by-step assistant.
At the first stage, we select the subsystems that we will need in the configuration being developed.
For example, like this 
After this, you need to specify the file in which we will save the settings. XML file format.
Then we move on to the second stage.
At the second stage, specify additional parameters for each of the selected subsystems.
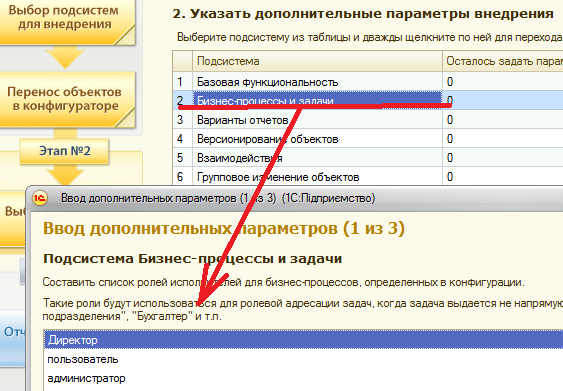
After you have selected all the parameters, the system will check whether everything was selected correctly and offer different options for tracking errors

Or in this form:

In the following articles we will continue to study working with the library of standard subsystems.


