Anything can happen in life, for example, you suddenly inherited a MacBook or iMac from your great-grandmother. Well, or another computer made by Apple. Everything is fine, you are glad of the happiness that has fallen, the euphoria is gradually replaced by the realization that the password for the computer is unknown, and, in general, there is no one to ask it from. What to do in this case - read on.
Of course, you will do everything described here at your own risk and there is nothing to complain about later. And of course, it is understood that such procedures will only be carried out if you actually do not know the password to your great-grandmother’s MacBook.
You can describe the process from the point of view of a command line guru, but this is inappropriate, since your great-grandmother’s MacBook is apparently your first MacBook, so it’s as simple and clear as possible about the main thing. How to get the most important and important password - the Administrator password!
To get started:
- Command+S, copy-paste doesn't work here!
- Wait until the lines of code run through, then carefully enter the command. This spell will make the filesystem readable and writable:
- Look for your great-grandmother's short system nickname:
- Kill your great-grandmother's Keychain. Please note: instead of “nickname” you substitute the one you found with the previous command, this is important!
- Restart your Mac:
As a result, the next time you boot, OS X will create a new Keychain, and great-grandmother will have nothing to do with it.
Now let's get down to the most important and interesting thing - we take control of the Mac into our own hands, resetting the most important and important Administrator password. There are a couple of options for how to do this, you can choose any one. And, if you’re not tired yet, let’s continue.
1. Use a bunch of commands:
- Boot into Single-User mode: when loading, immediately hold down Command+S, copy-paste doesn't work here!
- Wait until the lines of code run through, then carefully enter, the spell will make the file system readable and writable:
- Manually open the Open Directory - the thing that manages all the accounts on the computer (on Mac OS 10.6 and earlier this thing will not work - it’s simply not there):
- Again, you are looking for the short system nickname of your great-grandmother, or the account whose password you need to reset. Remember:
- Here you replace the “nickname” with the name obtained by the previous command:
If something like this suddenly pops up, don’t be alarmed, just ignore it:
Launchctl: Couldn’t stat (“/System/Library/LaunchDaemons/com.apple.DirectoryServicesLocal.plist”): No such file or directory nothing found to load
- Enter a new password!
- Restart your Mac:
2. Use three times fewer commands:
OS X is very easy to cheat. For example, make the system think that they haven’t thought about installing it yet. To do this, you just need to delete one file, it says that the installation of OS X is complete, let him “think differently,” as Jobs bequeathed!
- Again, boot into “Single-user mode”: when loading, immediately hold down Command+S, copy-paste doesn't work here!
- Wait until the lines of code run through, then carefully enter the command, the spell will make the file system readable and writable:
- Delete the same file:
Restart your Mac:
As a result, you get a brand new Mac that looks like it came straight from the store. Set up your account again, just like after installing the system. Moreover, the data of other accounts (and great-grandmother’s too) will remain untouched. Unless you enter a username that is already in the system.
3. Use “Recovery Mode”
- Boot into “Recovery Mode”: when loading, immediately press and hold Alt (Option), here we need a disk called “Recovery”
- Through the “Utilities” menu, select the “Terminal” program
- Enter the command, it will bring up a dialog box to reset the necessary and important Administrator password:
- In the dialog box that appears, select the boot disk, account, enter a new password with confirmation and select a question to recover it
- Click “Save” and reboot using the corresponding “Apple” menu item. Great-grandmother would be proud of you!
In fact, it is not clear: impenetrable OS X and such “failures” in security! Such things can easily help attackers take over the contents of any Mac. Although, on the other hand, if it were not possible to access the Mac bypassing the Administrator account, then, say, having lost or forgotten the password, without an installation disk at hand, you can say goodbye to all information forever. But this is only if the great-grandmother did not enable FileVault disk encryption - none of the above methods will work then.
After purchasing a new Mac and launching it for the first time or a clean installation of macOS, the operating system will ask you to register by specifying your username and password. After each reboot, you will be required to enter the password for the administrator account.
From a security perspective, it keeps your Mac safe from third parties, but if you only use your computer at home or don't store sensitive information, then this feature can only be annoying. In this article we will tell you how to disable entering a password every time you start your Mac.
The vast majority of Mac owners use automatic sign-in in macOS, and enabling this feature is easy.
How to enable automatic login on macOS?
1 . Open menu → System Settings…

2 . Go to control panel " Users and groups».

3 . At the bottom of the left side menu, select " Login Options».

4 . Click on the lock to make changes, and then enter the password for the administrator account.

5 . In paragraph " Automatic login" instead of " Off» select a user account and enter the password for the selected account.

What to do if automatic login is disabled (grayed out or unavailable)
If there are no options to choose from, then there is no need to worry, because there are two reasons for this:
- The FileVault function is activated - disk encryption. It can be disabled, but in this case the level of Mac security is reduced by an order of magnitude (a Mac password can be reset in a couple of minutes by an ordinary user who has read manuals from the Internet);
- you use the same password to sign in as your iCloud account, change password ().


In general, if with stationary Macs (iMac, Mac mini, Mac Pro) that do not leave the house, this procedure can really be simplified, then with the MacBook with which you walk through life, it is better to be careful at any time and anywhere. You never know - what if it gets lost or someone steals it? In such a case, the data will be protected and your nerves will be calm. Although... what kind of peace can we talk about when the car is missing? Well, it’s definitely worth worrying about data confidentiality.
A few years ago we gave a Mac Mini to our parents. A reliable workhorse for the home. Then I created an administrator account, installed all possible programs, and configured it. Then I created three standard accounts for relatives, so that they wouldn’t mess with the system. Everyone used their account and everyone was happy.
But recently I needed to update the system, add applications, change some settings. Surprisingly, the administrator password was not saved anywhere and was conveniently forgotten. The funny thing is that the vaunted Mac OS allows you to easily reset a forgotten administrator password...
It’s one thing to read the instructions, another thing to put it all into practice. After searching on Google, I was convinced that most of the instructions boil down to one operation, which I will describe in detail. The rest of the tips are either too primitive or outdated... I carried out all the steps on the latest Mac OS 10.11.6.
Methods that do not need detailed description:
- remember by hint, if it is installed.
- reset the administrator password from another administrator account. This rarely happens, because it is not at all safe to have two administrators on a computer. System Settings->Users and Groups. Well, there you can do whatever you want under the admin account.
And now the general method, if you forgot your password, the hint doesn’t help and you have one administrator account:
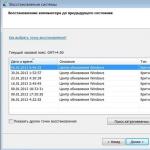
Step 1. Reboot the computer. When turning it on, press the CMD (command) + R keys. Hold until the special mode loads.
Step 2. A window will appear with a choice of 4 options. But you don't need this window! Open Utilities->Terminal in the top menu.
Step 3. In the terminal, type resetpassword! And a window will open on the right in which you need to select an account and enter a new password twice, as well as a hint (optional).

Step 4. Reboot the computer.
Resetting your keychain
After resetting my password, I kept getting a message related to “keychain”. Allegedly, this password is needed for 4-5 services. Messages about this could not be closed and they opened in a circle.
Not only did I not know the password, but also what Apple ID was used during registration. This is the situation. Therefore, I had to create a new keychain.

In a new window I saw an offer to enter. Now you just need to enter the password for the Apple ID specified in the window to log into Mac OS.

Note that even this password can be recovered by clicking the “Forgot” button. And you can restore it by email. If the mail worked on a Mac, then the letter arrives there.
Password reset protection
This way you can reset the administrator password, keychain, account, with a minimum of information. What to do to prevent this from happening? The only solution I found was to enable the built-in FileVault encryption.
System Settings->Protection and Security->Enable FileVault

Well, in the next window you need to select one of two items:
- Allowing my iCloud account to remove protection from my drive is less secure, but it will be easier for you to recover the password yourself, even if you suddenly forget it.
- Creating a recovery key and not using my iCloud account is the safest way, but in this case you need to store the recovery key somewhere safe. If you lose that too, the data on your Mac will be lost.

This is what the recovery key looks like:

These are the pies! :) Good luck everyone. Don't forget your administrator password.
All Macs are initially configured in such a way that there is at least one administrator user in the OS. But it happens that when there are global system changes (installing updates, changing access rights) or computer configuration, a user with administrative privileges “disappears” from Mac OS. That is, the account, for the most part, remains in the system (without any changes in the file hierarchy), but it is deprived of the ability to administer. This problem is not at all common, but in our practice it happens with enviable regularity.
We will consider two options for possible restoration of a user with administrative privileges. The first is used by the author of the English-language article, Topher Kessler, the second is used by us. Until now. The third part of this article will be a list of tips on what to do if enabling the administration feature does not help. So,
Method one. Usage Single-user mode(Single User Mode) and System Setup Assistant
Initially, the new Mac ships without created user. When you turn on your computer for the first time, it automatically starts System Setup Assistant, running with superuser (root) access rights. This program offers create administrator and configure the system. After its completion, Mac OS marks the successful setup of the system and launches it again System Setup Assistant(present in Mac OS always and stored in the root folder System -> Libraries -> CoreServices) becomes impossible. The trick to the method proposed by Kessler is that you need to remove this mark and again run the setup program, create a new administrator and use it to change the access rights of previously created users.
The hidden mark indicating successful system setup is stored at /var/db and is named “.AppleSetupDone”. At everyone When the computer starts, the operating system checks for its presence and if it does not find this file, it launches the setup assistant automatically. Let's get started.
- We start the computer in Single-user mode(Single User Mode)
To do this, restart the computer and, when turning it on, press and hold down two keys: ⌘(Command) + S. The usual graphical shell there won't be loaded, don’t be alarmed, you will be taken to the command line interface with superuser (root) access rights. This is a very powerful mode that gives complete unrestricted access to all aspects of the system using terminal commands; it must be used with understanding and a certain amount of caution. With the right skill, many of your Mac's problems can be resolved with its help. - Enable write access in the file system
By default when loading into Single-user mode you only get access to read information from the hard drive, without the ability to change it. This doesn’t suit us, so we enter the command:
mount -uw / - Removing the hidden mark about successfully completed system setup
We enter a single command line to delete the file we need, exactly as it is presented below. Be careful, the only space present in the code is after the “rm” command, there should be no others.
rm /var/db/.AppleSetupDone - Reboot the computer
All necessary actions required by us to be carried out in Single-user mode produced. Reboot the computer by entering the command:
reboot
All commands have already been entered
The result of all operations performed will be the launch System Setup Assistant when you turn on the computer. Following his prompts, we create a new administrator, different from existing users (that is, the name of the user being created must be unique and different from the names of users already present in the system). We load into it and work in it.

This administrator user is temporary and will be deleted in the future, we only need it to enable administration for other accounts
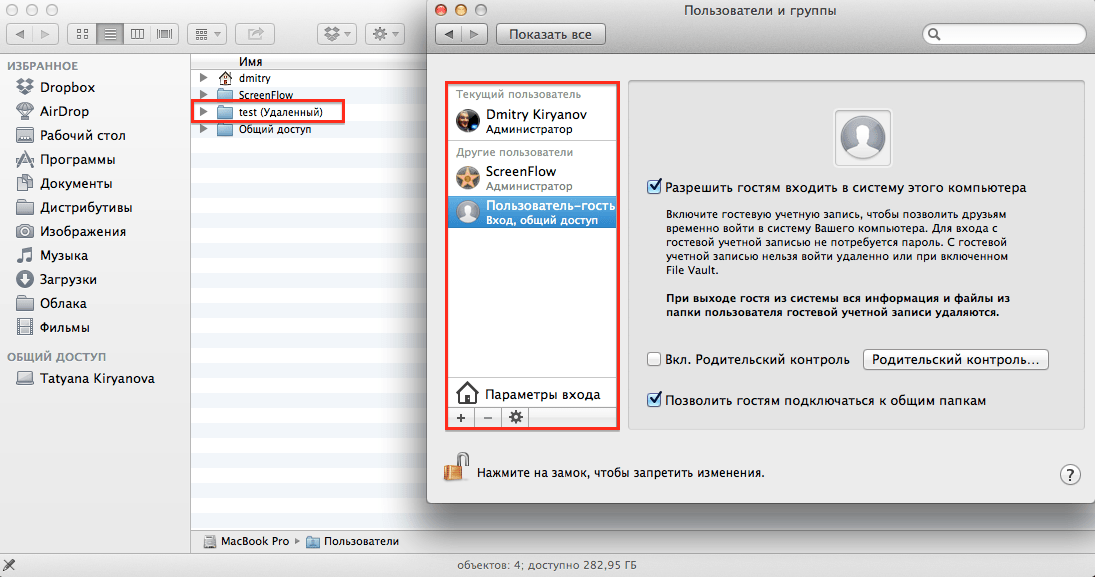
Now opening -> System Preferences -> everyone accounts present on your Mac. All you need to do is find the required user and in its properties tick the “Allow this user to administer the computer” checkbox. Which is exactly what we needed from the start!

The required checkbox is highlighted in red
Method two. Enabling the super-user root and working in it
This method is “more transparent” for fans of the graphical interface, so many will be more comfortable using it. The logic of the argument is similar to that presented above: to enable the administrator on a Mac (provided there is no at least one administrative account), you need to work with super-user rights, root. But this time we won't run System Setup Assistant, but elementary let's turn it on this account.
The super user root is always present on a Mac, but initially the ability to log into this account is limited. To enable it use Password reset utility.
- Start the computer from the recovery partition
To do this, restart the computer and, when turning it on, press and hold down two keys: ⌘ (Command) + R. After the recovery system has loaded, the desktop will appear with the operating system menu bar and the program window Mac OS X Utilities.
- Start the computer from the recovery partition

- Let's launch Password reset utility
From the menu bar, select Utilities -> Terminal. In the window that opens terminal enter the command exactly as shown below:
- Let's launch Password reset utility


Exactly as in the instructions, enter the “resetpassword” command
- Enable super user root
In the opened Password reset utility select the root user and set a password for the account. This must be done; the root user cannot be without a password. At Apple, when creating images of diagnostic systems, the default root password is configured, which is equivalent to its short name - “root”. Click the “Save” button, a message indicating the success of the procedure will appear.
- Enable super user root

By the way, using the recovery partition and Password reset utilities You can reset the password not only for the root user, but also for any other user represented in the system. If security is a major concern, Apple recommends enabling FileVault 2 data encryption, which makes this operation impossible.
Close all windows, including the window Mac OS X utilities. In the dialog box we will be asked to “Restart the computer”, to which we helpfully agree. When the system starts, a new entry, “Other,” will appear in the account login window. This is what you need. We select it, enter “root” in the username, “root” in the password field (if in the third step of these instructions you entered your own password, enter it). Now by opening -> System Preferences -> Users and Groups, you can manage everyone accounts present on your Mac. All you need to do is find the required user and in its properties check the “Allow this user to administer the computer” checkbox.
But that's not all. We solved the original problem, but at the same time made the operating system less secure by enabling the root super-user. It should be turned off.
- Disable root superuser
While in the same “Users and Groups” settings System Settings Click on the “Login Options” tab and on the right side of the window we find the “Connect” button opposite the “Network Account Server” entry. Click it and then, in the window that opens, click the “Open Directory Service” button. A separate program is launched Directory service, in the menu bar of which select Edit -> Disable root user.
Part three. When enabling administrator is not enough
Yes, that happens sometimes too. You check the “Allow this user to administer this computer” checkbox. System settings, but this does not lead to the desired effect. In this case, there is only one way out - deleting the user.
Very important. Make sure you have a backup everyone the data you need (if you make a small mistake in further steps, you can part with all the information)!
- We delete the user while saving all data and settings
Open -> System settings -> Users and groups, select the “unwanted” user and delete him by clicking on the minus “-” button. The system will ask you what to do with the user's home folder. Important! Select “Do not change user folder”.
- We delete the user while saving all data and settings


- Checking the safety of the user folder
Open the "Users" folder on your Mac and make sure that it contains the folder of the user you deleted one step earlier (the "Users" folder is stored in the root of the hard drive, for quick access to it in the menu bar Finder select Go -> Computer and open your hard drive, which by default is named “Macintosh HD”). Remember the name of this folder, it is equivalent to the name of the “account” (in the English interface the more understandable term “short name” is used) of the remote user. In the latest versions of the operating system, the “Remote” label is added to the name of the remote user. The folder name can be edited and this label can be erased.
- Checking the safety of the user folder
The same mark
- Creating a new user
In the same “Users and Groups” settings of the program System Settings Create a new user by clicking on the plus “+” button. It is very important at the creation stage to indicate the same “account” name (short name) that the user had previously, we remembered it in the paragraph earlier, it is the same as the folder of the remote user. And of course, change the type of new account you are creating from “Standard” to “Administrator”. If everything is done correctly, the operating system will report that it has detected another user folder and will offer to use it for the new administrator. Agree, this is what we started this whole thing about. A new account with administrative privileges will be created, saving all your data and settings.
- Creating a new user
It is important to understand that anyone with physical access to your computer (be it Mac, Windows or Linux) will sooner or later be able to find a way to log into it. If a person is sitting right in front of your computer, then there is no such thing as absolute security.
Therefore, if you really care about protecting your files, then you should consider using the FileVault utility to encrypt them.
Resetting your password using Lion Recovery
If you bought yourself a brand new Mac with the Lion operating system pre-installed, then you have a recovery partition on your hard drive that offers you access to a number of different tools.
Here's how to use them to reset your Mac password:
- Turn off your Mac and then turn it on by holding down the Command and R keys until the Lion recovery screen appears;
- Select Russian language in the first window;
- From the top menu, select Utilities > Terminal;
- In a terminal window, enter resetpassword and press Enter;
- In the password reset utility, select your hard drive, select your account, and enter a new password.
Resetting Lion passwords in single-user mode
Mac OS X Lion users can also use the following method to reset their password.
Turn off your Mac and then turn it on by holding down the Command and S keys until a black screen with white text appears. This mode is known as single-user
After checking the disk and returning to the command prompt, type mount -uw / and press Enter.
Now dial ls /Users and press Enter. You'll see a list of everyone on your computer, which is useful if you don't know or remember the name.
Dial dscl. passwd /Users/username password by replacing the username parameter with one of the names from the list presented to you, and the password parameter with a new password of your choice.
Press Enter. Most likely, you will see a message about the file or directory not being found - you can simply ignore it.
All that remains is to type reboot and press Enter.