After purchasing acoustics with support for 5.1-channel sound mode, I encountered a number of problems. Simply put, 5.1 mode did not work in Windows 10; out of five columns, only 2 worked, and even then in compatibility mode. At first I thought that it was all Google Chrome (which itself controls the sound), but no, I needed to know one feature when setting it up. We continue with detailed instructions for setting up 5.1 sound on Windows 10.
First you need to check which sound card is installed on your PC. To do this, you need to go to the “Device Manager” and find the item “Sound, game and video devices” (this can be done by right-clicking on the “Start” button, “manager” will be the fifth from the top). If the sound card is from any other manufacturer other than VIA Audio, skip the next step.

If the sound card is made by VIA Audio, then before setting it up you need to install the driver version: “VIA HD Audio v 11.11.00” (you can download it from the link). However, the VIA programmers made a mistake and assigned the wrong one to the built-in mixer, so after downloading the archive with the drivers we simply unpack it into any folder. Then you need to go to the “Device Manager”, then in the “Properties” of the built-in sound card, find the “Driver” tab and click on the “update driver” button. Next, “search for drivers on this computer.” Then select the folder with the unpacked drivers from VIA. Upon completion of successful installation, reboot the PC.

To configure 5.1 sound on Windows, you need to go to the “Playback Devices” tab (right click on the volume icon in the Windows tray). Next, select the speakers we need and click on the “Settings” button in the lower left corner. Next, and this is very important, you need to select the 7.1 sound mode!, then click “next” and uncheck the “side pair” of speakers. Then we simply click “next-next” and exit the settings window. 5.1 sound activated, congratulations.


You also need to configure the virtual surround sound mode so that when playing files with stereo sound, not 2 speakers work, but all 5. To do this, you need to go to the “Properties” section (the button in the lower right corner). There is a tab “Enhancements”, where there is a list of different modes, we are interested in the “Enable Speaker Fill” mode - check the box next to it. This completes the sound setup.
Instructions on how to deal with a bunch of wires from a 5.1 audio system and correctly connect it to your computer.
What you will need:
- Actually, the audio system is 5.1
- sound card supporting 5.1
- 3 cables “red-white tulips - jack 3.5mm”
Step #1:
As you know, 5 and 1 are the number of audio channels through which the sound signal travels. That is why we have, roughly speaking, 6 speakers at our disposal: subwoofer ( SubWoofer– designated SW) – the main giant of our system, a low-frequency speaker for creating bass; two front speakers (they are called FrontLeft (left) and FrontRight (right), and are designated FL and FR (see photo)); two rear ones (called either RearLeft (left) and RearRight (right), or SurroundLeft/SurroundRight (RL/RR or SL/SR, respectively) and another central column (Center - designated CEN).
Knowing all this, you can begin the connection process itself...

Step #2:
Now your task is to connect all these 6 channels (2 front, 2 rear and subwoofer + center) to the connectors of your sound card. It’s easy to guess that by connecting 6 pairwise combined channels at the output, we should get only 3. And these same 3 outputs should look like this, as shown in the photo...

Step #3:
That is, the connection process is as follows:
— two “tulips” connected to the front speakers must go into the green sound card socket
— two “tulips” connected to the rear speakers should go (as a rule) into the black sound card socket
- two “tulips” connected to the subwoofer and the center should go (as a rule) to the orange socket
ATTENTION! Paired tulips must be inserted specifically into the “Audio Input 5.1” section, because single tulips coming from the speakers themselves are inserted into the “Audio Output” section (sometimes this section is not named at all)! This is the only way you can achieve true 5.1 surround sound.

Step #4:
Now that all the wires are connected to the required connectors, all you have to do is go to Control Panel, select the Sound section (or first Hardware and Sound), then Speakers and click the “Configure” button. Here we select the “5.1 surround sound” item, click Next and – voila!

Tips and warnings:
- Remember: any multi-channel audio (sound in a movie or multi-channel music) will be spread over 6 of your speakers ONLY PROVIDED that the recording is designed specifically for such sound! The rest of the sound on your speakers will sound like simple stereo.
- All the necessary cables should already be included in the speaker set, but if, for example, there are no “tulip-jack” cables, you will have to buy them in the store
Call or directly on the website! Our specialists will be happy to help you
First of all, after connecting a multi-component speaker system, you need to set the correct settings in the computer operating system. As you know, this speaker system has three output connectors that connect to the microphone input, line input and linear output of the system unit. Thus, it is necessary to convert the input jacks to the output signal. Moreover, the change in the functioning of the connectors must be made in such a way that they produce the correct signal for the speaker system, because in the case of using a 5.1 system, the overall sound signal is divided into components associated with one or another part of the speaker system.
Open your computer's control panel. Go to the Hardware and Sound section. Next, click on the “Manage audio devices” button. In the window that opens you will see the device. Select this device and click on the “Configure” button. Select 5.1 Surround Sound. Now the audio signals will be distributed correctly between the audio ports.
Software settings
Audio settings provided by the speaker manufacturer's software include volume controls for each speaker, tone controls, equalizer, and surround sound settings. In the program, you can also select the type of speaker system, which implies a particular number of speakers. In this section, select “5.1 Sound”. The main window of the program displays the location of the speakers in the area of the sound receiver, that is, the listener. Each of the speakers can be placed as it stands in real life. By clicking on the icon of a particular speaker, a volume control appears. Thus, it is possible to adjust the overall sound of the system so that the sound seems evenly distributed in space.
Please note that any specific system speaker volume setting can be saved. This is convenient if you often rearrange the room by swapping speakers. After adjusting the volume, check the surround sound quality. For this purpose, there is a button, when pressed, some standard stereo sound is heard. You can also check that all speakers in the system are connected correctly to a common node by double-clicking on each of them in the sound settings program. You will hear the sound from this speaker and can check the match.
Surely, almost every user wants the sound reproduced by his computer to be of the highest quality. If you are one of them, then most likely you have thought about how it can be improved. The most effective solution, of course, would be to buy better equipment, such as a good audio system, an additional sound card, and things like that.
However, you can do without this, because there are many programs designed to customize and improve the sound quality of your computer. This material will present the most effective of them.
The most popular driver package for configuring built-in Realtek sound cards. Provides basic audio customization options.

Unlike competitors, it ensures the correct operation of the sound card and has only the most necessary functions.
Volume2
A small program that is a replacement for the standard Windows volume control. In addition to standard features, it has several additional functions.

Having the least functionality among other programs, Volume2 aims only to increase the convenience of volume adjustment and does an excellent job of it.
FxSound Enhancer
FxSound Enhancer contains a small set of simple but effective tools for improving sound. They allow you to improve sound quality in real time.

This program allows you to adjust individual sound parameters, such as, for example, increasing clarity and enhancing low-frequency sounds. However, its free version has somewhat reduced capabilities.
ViPER4Windows
This program has enormous capabilities for customizing sound. With the right skill, you can achieve almost professional sound quality.
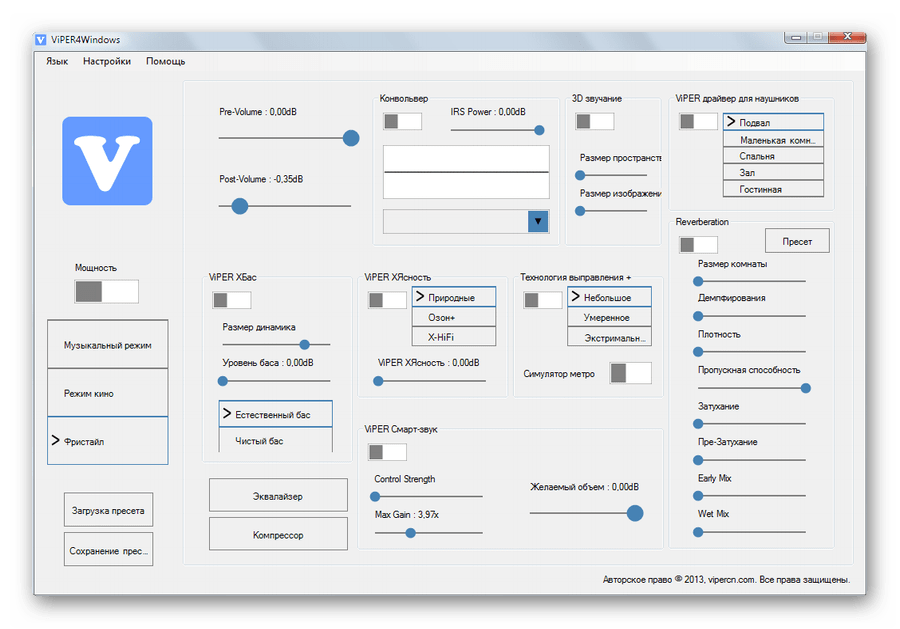
ViPER4Windows includes all the same features as FxSound Enhancer and, in general, has the largest set of tools for changing sound parameters among its competitors, but also requires some knowledge to get quality results.
All of the programs presented above for changing sound parameters have the necessary functions to improve the sound. All you have to do is choose the most suitable one for yourself.