Technical progress moves forward with a huge speed. Sources of light are becoming more economical and miniature. An intermediate link between LED lamps and incandescent steel fluorescent light bulbs. Energy-saving were economical and durable, but they were not immediately lit and demanded time for heating.
In my country in the hallway there was a thin flat luminiscent lamp with a thickness of 3 cm. He lit up very dimly, already have time to undress, and he just begins to flare up, in general dot beds alone. Since the ceiling was low and trimmed with ceiling tiles, the thick it was impossible to put it, his head will quickly demolish it. Throwing sorry too, it looks pretty.
And now diode lamps appeared on sale (8 years ago), but the thickness of 30mm did not allow the LED to stuff. Therefore, it was disassembled and the filling is integrated into a new body.

- 1. Donor characteristics
- 2. Donor disassembly
- 3. How to do lED lamp do it yourself?
- 4. Checking the heating
- 5. The result of modernization
- 6. Repair of LED lamps do it yourself
Donor characteristics

5 months ago for the sake of LED modules and drivers in the local store, ASD LEDs were purchased for 11W for 103r. thing. Real power from them turned out to be only 8.5W. At the same time, they had a number of significant flaws:
- the body terribly stuck with plastic when heated;
- too small radiator inside;
- lEDs without matte flasks warm to 95 °, and even more with it;
- there were no holes for ventilation in the housing.
The filling was good for a low price, but on the radiator and plastic heavily saved. The part was disassembled on the components, part are upgraded and put in the storage room and on the staircase. I also want to put them in the entrance after I put a video surveillance system. And then Swan all the same dragged one corn, which covered the intercom.
Disassembly of donor

We repeat the above process of upgrading with a conventional round matte lamp. Many of the readers do not understand the LEDs at all and do not know the principle of operation. And the soldering iron in the hands once kept and really want to get rid of energy saving.
Make a LED lamp do it yourself very simple. No need to bother with search for plates with LEDs and selection of driver to it. Just buy a diode lamp for 220V, there are already everything, sold everywhere.
First dismantle the flask, it happens from plastic and glass. I could not remove the glass, it was increasing strong and always cracked. Plastic is usually durable polycarbonate, it is difficult to break. To determine the material, try scratching, the glass does not scratch.


Then get the module with 20 SMD 5730 LEDs and a power driver from a 220V network. We definitely save a white thermal path, it is not necessary to wipe, it will be used further.


How to make a LED lamp do it yourself?

Before installing the module into the luminaire case, it is necessary to remove the paint layer for direct contact with the metal. We supply the aluminum plate and whining this square.


Drilling 2 holes for fastening the plate, we select a couple of bolts with nuts.


Overre the feed wires, transfer from the back to the front so that they do not interfere tightly press.

The driver's board is insulating in order to prevent closures and compliance with safety, because it is 220 volts. We will protect yourself from electric shock with direct touch, and so that there is no phase on the housing if the body is metallic.

Lubricate additionally thermocons. I have contact with a sandy place turned out bad, iron is not very thick and deformed. Especially when Kernil and drilled. The contact stain is checked by the prints of the paste, the more, the better. I got contact about 30%, maybe it will be enough. It turned out to be a spouse during the tidy a small bag with white plasticine (thermalcaste) threw and smeared turned out to be nothing. It may be enough of what remains when disassembling.
Checking the heating

The LED is a luminaire turn on for 30 minutes in open form without a lid. It is desirable that the heating does not exceed 80 °, in the LED lamp for the home the module was grain to 95 °. Since the product is budget, then the high-quality ice they definitely not put it there, which can work for a long time with such a heating.
If it is even above 80 °, then it is not so scary, because it stands in the storage room, I work for a maximum of 30 minutes a day. Thus, it will work not 100, but only 30-50 years old, which is also very bad.
Of course, there would be a regular lamp radiator, which initially stands in it in absolutely closed conditions without air circulation. In the open air, it would cool much better, and it could well provide an acceptable temperature of about 80-85 °.
The aluminum radiator could be put on a ceramic cartridge with an E27 base. You can straighten from cylindrical shape to flat. But at the extension of aluminum, it does not withstand the deformation and begins to break, respectively, thermal conductivity in such a narrow place becomes even worse.

Measures showed an average of 79.5 °, this is a good indicator. For data objectivity, there were 10 more measurements at different intervals. Everything is okay.
The result of modernization

After assembling the case, the product gets a finished look and ready for the wall mounting, false way.
Repair of LED lamps do it yourself

To make it easier for you to figure out the design of the LED lamp, consider that it is structurally similar to a diode lamp. As a rule, there are the same disadvantages:
- overheating LED;
- bad contact plate with diodes and radiator;
- bad assembly;
- power supply with poor current stabilization;
- too small cooling system;
- the flask is made of matte plastic with low light transmitness.
To determine the faulty item with your own hands, you will need to measure the voltage on the wires going to the diode module:
- if the voltage is, it means that one of the diodes in the serial chain is defective;
- no voltage, then the problem is in the driver, the current source.
If you have experience, you can turn on your own. If there is no experience, you can contact your neighbor or master.
Is it possible with your own hands from beginning to end to make a LED lamp (LED), running 220 volts voltage? It turns out, it is possible. In this exciting lesson, our tips and instructions will help you.
Advantages of LED Lamps
LED lighting in the house is not just modern, but also stylish, and bright. Conservative fans of incandescent lamps remain weak "Ilyich's light bulbs" - the Federal Law "On Energy Saving", adopted in 2009, from January 1, 2011 prohibits production, import and selling incandescent lamps of more than 100 W. Advanced users have long switched to compact fluorescent lamps (CLF). But LEDs bypass all their predecessors:
- energy consumption of the LED lamp is less than 10 times than the corresponding incandescent lamp, and almost 35% less than that of CLL;
- lED LED light lamps are more respectively 8 and 36%;
- achieving the full power of the light flux occurs instantly, unlike the CVL, which requires about 2 minutes for this;
- cost - subject to the manufacture of the lamp independently - tends to zero;
- lED lamps are environmentally friendly, because they do not contain mercury;
- the life of the LED is measured with tens of thousands of hours. Therefore, LED lamps are almost eternal.
Dry figures confirm: for LED - the future.
Construction of modern factory LED lamp
The LED here is initially assembled from a variety of crystals. Therefore, in order to assemble such a lamp, you do not need to solder numerous contacts, you need to attach only one pair.

LED lamp consists of base, driver, radiator, LED itself and diffuser
Types of LEDs
The LED is a semiconductor multilayer crystal with an electron-hole transition. Moving through it a constant current, we get light emission. From the usual diode, the LED is different and the fact that when it is incorrectly connected, it burns immediately, as it has a small value of the punch voltage (somewhat volt). If the LED burns out, it must be completely changed, the repair is impossible.
There are four main types of LEDs:

The homemade and correctly assembled LED lamp will serve for many years, while it can be repaired.
Before proceeding with self-assemblyYou need to choose a power supply method for our future lamp. Many options: from battery to network alternating current By 220 volts - through a transformer or directly.
It is easiest to collect LED by 12 volts from the distorted "halogenki". But it will require a rather massive external power supply. The lamp with a conventional base, designed to voltage 220 volts, is suitable for any cartridge in the house.
Therefore, in our manual, we will not consider the creation of a 12-volt LED source of light, and show a pair of lamp layout options for 220 volts.
Since we do not know the level of your electrical training, we cannot give warranty that you have a properly working device at the exit. In addition, you will work with a life-threatening stress, and if something is done inaccurately and incorrectly, damage and damage are possible, for which we will not be responsible. Therefore, be careful and attentive. And you will succeed.
Drivers for LED Lamps
The brightness of the luminosity of the LEDs directly depends on the strength of the current passing through them. For sustainable work, they need a source of constant voltage and stabilized current not exceeding the maximum permissible value for them.
Resistors - current limiters - you can do only for low-power LEDs. You can simplify the simple calculation of the number and characteristics of the resistors, finding a LED calculator in which the data is not only issued, but also a ready-made electrical design scheme is created.
To power the lamp from the network, you must use a special driver that converts the input alternating voltage into working for LEDs. The simplest drivers consist of a minimum number of details: an input capacitor, several resistors and a diode bridge.

In the simplest driver diagram through a restrictive capacitor, the supply voltage is supplied to the rectifier bridge, and then on the lamp
Connecting powerful LEDs through electronic drivers controlling and stabilizing currents and having high efficiency (90-95%). They provide a stable current even with sharp changes in the supply voltage in the network. The resistors do not know this.
Consider the simplest and most common drivers used for LED lamps:
- the linear driver is completely simple and used for small (up to 100 mA) operating currents or in cases where the source voltage is equal to the voltage drop on the LED;
- the pulse downright driver is more complicated. It permits powering powerful LEDs with a source of much higher voltage than necessary for their work. Disadvantages: large size and electromagnetic interference generated by choke;
- the pulse boost driver is used when the operating voltage of the LED is greater than the voltage obtained from the power supply. Disadvantages are the same as the previous driver.
In any LED 220 volts lamp to ensure optimal operation mode, an electronic driver is always embedded.
Most often, a few faulty LED lamps are disassembled, deleted turbid LEDs and drivers radio components, and from integers one new design.
But you can make a LED lamp and from ordinary thr. This is quite an attractive idea. We are confident that many lattice owners in boxes with details and spare parts are kept faulty "Energy Saving". Roll out a pity, apply nowhere. Now we will tell, as from the energy-saving lamp (E27, 220 c base), create a LED lamp literally in a couple of hours.
Faulty CLL always gives us a high-quality base and a case for LEDs. In addition, it is usually a gas-discharge tube, but not an electronic device for its ignition. Acting electronics We again postpone the honeycomb: it can be disassembled, and in the skillful hands these details will still serve something good.
Types of Contemporary Lamps
The base is a threaded system for a quick connection and fixation of the light source and cartridge, power supply to the source from the power supply and ensuring the tightness of the vacuum flask. The interface is deciphered as follows:
- The first label letter indicates the type of base:
- B - with a pin;
- E - with carvings (developed in 1909 by Edison);
- F - with one pin;
- G - with two pins;
- H - for xenon;
- K and r - respectively with cable and recessed contact;
- P is the focusing base (for spotlights and lanterns);
- S - sofit;
- T - telephone;
- W - with contact inputs in glass of flasks.
- The second letter U, a or v shows in which lamps the base is used: in energy-saving, automotive or with a conical end.
- The numbers following the letters are denoted by the diameter of the base in millimeters.
The most common base from Soviet times is the E27 - a threaded base of a diameter of 27 mm to voltage 220 V.
Creating an E27 LED lamp from energy-saving using a finished driver
For independent manufacture of LED lamp we will need:
- Fabinating Lamp Cl.
- Passatia.
- Soldering iron.
- Solder.
- Cardboard.
- Head on shoulders.
- Skillful hands.
We will redo the LED defective CLM brand "Cosmos".

"Cosmos" is one of the most popular brands of contemporary energy-saving lamps, so many maiden owners will definitely find several of its faulty specimens.
Step-by-step instructions for the manufacture of LED lamp
- We find a faulty energy-saving lamp, which has long been with us "just in case." Our lamp has a power of 20 W. So far the main component of us is the base.
- Gently disassemble the old lamp and remove everything from it, except for the base and the wires from it, with which we will then connect the soldering driver. Lamp is assembled using protruding over the housing of the latch. You need to see them and pry them. Sometimes the base is attached to the body more complicated - the core of point recesses around the circle. Here you have to drill a dock of a cerination or gently cut them with hacksaw. One feed wire is soldered to the central contact of the base, the second to the thread. Both are very short. Tubes with these manipulations can burst, so you need to act carefully.
- We clean the base and degrease it with acetone or alcohol. Increased attention is worth paying the hole, which is also thoroughly cleaning from excess solder. It is necessary for further soldering in the basement.

Pad for a gas-discharge tube built into a luminescent lamp to create lED device We will not suit us
- The cover of the base has six holes - gas-discharge tubes were mounted in them. We use these holes for our LEDs. We will lay the circle of the same diameter from the suitable piece of plastic cut off by manicure scissors. A tight cardboard is fit. He will fix the contacts of LEDs.

From the reverse side, the base has six round holes in which we will install LEDs
- We have multicultural HK6 LEDs (voltage 3.3 V, power 0.33 W, current 100-120 mA). Each diode is assembled from six crystals (connected parallel), so shining brightly, although powerful and not called. Given the power of these LEDs, we connect them three pieces in parallel.

Each LED shines quite brightly in itself, so six pieces in the lamp will ensure good light power
- Both chains connect sequentially.

Two chains of three parallel LEDs each connected sequentially
- A simple ready-made driver can be taken from a broken LED lamp. Now, to connect six white monovate LEDs, we use such a driver by 220 volts, for example, RLD2-1.

The driver connects to the LEDs on the parallel scheme.
- Insert the driver into the base. Another carved plastic circle or cardboard place between the board and driver to avoid closures between the LED contacts and the driver parts. The lamp does not heat up, so any one is suitable.

The positive difference between Chinese sockets from the Russian: they are sold much better
- We collect our lamp and check whether it works.

Collecting the lamp, you need to connect it to the voltage source and make sure it burns
As a result, we get a pretty beautiful design.

Six LEDs inserted into the slope form a powerful and uniform light source
We created a source with the power of light about 150-200 lm and a capacity of about 3 W, a similar 30-watt incandescent lamp. But due to the fact that our lamp has a white color of the glow, it visually looks brighter. Lighting the section of the room can be increased by filling the LED conclusions. In addition, we got a wonderful bonus: a trigger lamp can not even turn off - the counter practically does not "see it."
Creating a LED lamp using self-made driver
It is much more interesting not to apply a ready driver, but to make it yourself. Of course, if you are well posted a soldering iron and have basic reading skills of electrical circuits.
We will consider etching the board after drawing on it the schemes manually. And, of course, everything will be interested in messing with chemical reactions, using affordable chemicals. As in childhood.
We will need:
- A piece of foil with copper from two sides of the glassstolite.
- Elements of our future lamp according to the generated scheme: resistors, condenser, LEDs.
- Drill or mini drill to drill a fiberglass.
- Passatia.
- Soldering iron.
- Solder and rosin.
- Nail polish or stationery corrective pencil.
- Salt salt, copper vigorous or iron chloride solution.
- Head on shoulders.
- Skillful hands.
- Accuracy and attentiveness.
Textolite is used in cases where electrical insulating properties are needed. This is a multilayer plastic, the layers of which consist of tissue (depending on the type of tissue layer fibers there are basalttextolites, carbon-texts and other) and binder (polyester resin, bakelite, etc.):
- the fiberglass is fiberglass, impregnated with epoxy resin. It features high resistivity and heat resistance - from 140 to 1800 o C;
- fungalized fiberglass is a material covered with a layer of galvanic copper foil with a thickness of 35-50 microns. It is used to make printed circuit boards. Composite thickness - from 0.5 to 3 mm, leaf area - up to 1 m 2.

For the manufacture of printed circuit boards uses foil fiberglass
Driver Scheme for LED Lamp
The driver for LED lamps can be done independently, for example, leaning on the simplest scheme that we considered at the beginning of the article. There you only need to add a few details:
- R3 resistor to discharge the capacitor when the power is turned off.
- A pair of vd2 and VD3 stabilions and VD3 to shunt the capacitor if the LED chain struck or breaks.
If we correctly select the stabilization tension, we can restrict ourselves to one stabitron. If we laid the voltage more than 220 V, and we will choose a condenser under it, then we will do without additional details at all. But the driver will be in size more, and the fee may not fit into the base.

This scheme allows you to make a driver for a lamp of 20 LEDs.
We created this scheme to make a lamp of 20 LEDs. If they are greater or less, you need to pick up another capacitor capacitor C1 so that 20 mA current passed through the LEDs.
The driver will lower the network voltage and try to smooth out the voltage jumps. Through the resistor and the current-limiting capacitor, the network voltage is supplied to the pavement rectifier on diodes. Through another resistor, a constant voltage on the LED block is supplied, and they start shining. The pulsations of this straightened voltage are smoothed by a capacitor, and when the lamp is turned off, the first capacitor is discharged by another resistor.
It will be more convenient if the driver design is mounted using a printed circuit board, and does not constitute some com in the air from the wires and parts. The board can be done yourself.
Step-by-step instructions for the manufacture of LED lamps with a homemade driver
- We generate using a computer program your own drawing to etch the board according to the planned driver design. Very convenient and popular among radio amateurs free computer program Sprint Layout, which allows you to independently design the printed circuit boards of low difficulty and receive an image of their wiring. There is another beautiful domestic program - DipTrace, drawing not only fees, but also concept schemes.

Free computer program Sprint Layout generates detailed schema etching board for driver
- Cut the circle with a glass diameter of 3 cm from a fiberglass. This will be our fee.
- Select the way to transfer the circuit on the fee. All methods are terribly interesting. Can:
- draw a scheme directly on a glass of fiberglass, a stationery corrective pencil or a special marker for printed circuit boards, which is sold at the Radioetting Store. There is a subtlety: only this marker allows you to draw tracks less than or equal to 1 mm. In other cases, the width of the track, no matter how old, will not be less than 2 mm. Yes, and copper stacks for soldering will come out inaccurate. Therefore, it is necessary after applying the drawing to correct it with a razor or scalpel;
- print the circuit on the inkjet printer on the photo paper and get a printout with iron to a fiberglass. The elements of the scheme will cover paint;
- draw a lacquer scheme for nail, which is exactly in any house where a woman lives. This is the easiest way, they use it. Diligently and neatly tassel from the bottle are drawing tracks on the board. We are waiting for the lacquer dry well.
- We divorce the solution: 1 tablespoon of copper sulfate and 2 tablespoons of the cook salt are stirred in boiling water. Copper vigor is used in agriculture, so you can buy it in horticultural and building stores.
- I lower the fee into the solution for half an hour. As a result, only the copper tracks will remain, which we protected varnish, the remaining copper will disappear during the reaction.
- Acetone remove the remaining varnish with a fiberglass. Immediately you need to regain (cover by the solder) edges of the board and the locations of the contacts so that copper is rapidly oxidized.

Contact locations are disappeared by a solder layer mixed with rosinel to protect the copper tracks from oxidation
- According to the scheme we make a drill hole.
- We disappear on the board LEDs and all the details of the homemade driver from the side of the printed tracks.
- Install the fee into the lamp housing.

After all operations carried out, the LED lamp is equivalent to a 100-watt incandescent lamp
Safety comments
- Although the independent assembly of the LED lamp is not a very difficult process, it is not necessary to even begin if you do not have at least initial electrical knowledge. Otherwise, the lamp assembled with the internal short circuit can harm all electrical network Your home, including expensive electrical appliances. The specificity of the LED technology is that if some elements of its scheme are incorrectly, even an explosion is possible. So you need to be extremely neat.
- Typically, the lamps are used at a voltage of 220 V AC. But the designs designed for voltage at 12 V, connect to the usual network in no case, and you should always remember about it.
- In the process of making a homemade LED lamp, the lamp components often cannot be completely completely isolated from the 220 V. power supply network so you can seriously hit the current. Even if the design is connected to the network through the power supply, it is quite possible that it has simple schema without transformer I. galvanic junction. Therefore, it is impossible to touch the design by hand until the capacitors are discharged.
- If the lamp has not earned, then in most cases a poor-quality spike of parts is to blame. You were inattentive or hastily acted with a soldering iron. But do not despair. Take on!
Video: Learning to solder
A strange thing: in our age, when there are absolutely everything in stores, as a rule, inexpensive and very diverse, after the twenty-year-old euphoria, people are increasingly returning to doing her homework. Neten blossomed needlework, joinery and plumbing skill. And in this row confidently returns simple applied electrical engineering.
LED lighting is distributed in private. and in public premises.
However, buying and installing equipment for it is quite expensive.
Therefore, we consider how to make a lamp from LEDs and girlfriends with your own hands, which devices, consumables, tools will be required for this, and which options can be obtained.
When creating LED luminaires, two types of LED light bulbs are used:
- Before halfvatt. Their main features are minimal heating and the ability to set the lighting device any shape, thanks to a large number of points. The disadvantage is their installation of very laborious, if you consider to solder and connect with your own hands.
- From 1 to 5 watts. The high power of diodes allows to significantly reduce their number in the device, which reduces labor costs. However, the effective operation of the lighting device on them is impossible without the proper selection of the radiator and the light diffuser.
The manufacture of LED lamps is also based on LED tapes. The lighting capacity, the color selection and the location density of the light bulbs are determined by the operating conditions and personal preferences of the one who will collect them with their own hands. In the width of the standard, they reach 8-10 mm, and in length - up to 5 meters (this is exactly such a length in the coils sold). Power is powered by a DC source with a voltage of about 12 volts and above. To connect them from the household network, you will need an appropriate power supply. Also, they can be collected on batteries.
Calculation and principle of operation of the driver with a quenching capacitor
To equip already existing chandeliers and other lamps in the apartment, a cheap LED light source, you can apply the driver with a crash capacitor.
His main feature is low energy consumption. Collecting the block with your own hands, everyone will make sure that it is quite simple and there is nothing superfluous in it, including the stabilizer. The diodes used do not distinguish many heat, so the device also does not have a radiator.
The only minus of such a scheme is a direct connection to the 220V network. This means that if there are constant stress interruptions, the lamp will be constantly flashing. To assemble a similar driver, you will need to prepare raw materials:
- Bread board.
- One-two-speech resistors.
- Circuit breakers.
- Capacitors 47 MF per 500 V.
- Diode bridges type KC405A.
- Capacitors film by 600 volts (you can take more).
If the LED lamp is made for the ceiling chandelier under standard cartridge, as a base, you can take the base from the distorted economical luminescent lamp. To do this, you need with your own hands, better outdoors, carefully disconnect the lamp.
Scheme
The operation of the condenser scheme made by their own hands is subordinate to the following algorithm:
- The resistor (indicated on the R1 scheme) reduces the rinks on the network until the scheme stabilization. It takes about one second. Its parameters - resistance of 50-150 ohms, power - 2 W.
- The resistor (on the illustration R2) supports the operation of the capacitor-ballast - discharges it when the power is turned off. In practice, this is useful in order to repair with their own hands if necessary, the master has not been exposed to electricity. In addition, it prevents the formation of a current throw with non-combination of the first half-wave of an alternating network current with the polarity of the condenser.
- C1 directly quenching capacitor. it main element LED lamp diagrams based on ribbon or lamps. Its function - current filtering. With it (Variating power parameter), you can specify any value of the current strength in the chain. So, for diodes given as the basis (see above) its value is not long to exceed 20 mA with peak voltage.
- Then the diagram includes a diode bridge.
- C2 (electrolytic type condenser) prevents lamp flicker. In addition, due to the slow discharge of the electrolyte, the lamp does not fit immediately, and gradually.
Important! LED elements of the LED tape do not have an inertness effect. Therefore, when the person's eye is turned on and off, it may notice a change in the illumination stability only at a frequency of 50 Hz. However, if you look at the lamp through the smartphone camera, you can immediately detect its quality. As a rule, cheap Chinese diodes immediately give themselves flickering, an imperceptible naked eye.
Basics of calculation
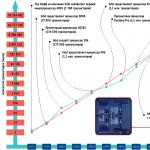
To correctly calculate the condenser, it is necessary to use the following formula: i \u003d 200 * C * (1.41 * U sketch - u LED): I - circuit current (A); The digit "200" is the constant obtained by multiplying the frequency of the current 50 Hz to "4"; The value "1.41" is another permanent; C - the container of the quenching capacitor, expressed in the Farads; U sings - voltage in the network used, usually 220V; U LED - a general drop voltage on the LED strip or individual diodes, for example, if each element has 3,3V, then this value must be multiplied by their total number and the value of U LED will be obtained.
Read also Types, features and scheme IR illumination

The chain selection rule (i) is simple enough. It is necessary to choose the capacity of the quenching capacitor and the number of diodes with a given voltage so that the desired value of the circuit current is not exceeded in the LED elements parameters. By setting the value of I, you can set the brightness of the glow. The time period of the diode service is from it in the opposite addiction.
The image shows a typical driver circuit illustration with a quenching capacitor.
Interesting! As an option, a battery can be used as a power source. The lamp on batteries can be connected without a driver. At the same time, when calculating its power, it is necessary to take into account the total drop in the voltage of all LED elements.
What materials can be used
During the manufacture of homemade luminaires, any materials combined with LED ribbons and light bulbs are suitable. The case can be made both with your own hands and take the previously used device as the basis. At the same time, it is necessary to take into account the heat transfer of LED elements. Without a properly selected radiator, they will quickly ruin.
For high power diodes, heat-conducting material will be required. For example, it can be an aluminum profile, pipe, cone and other metal objects. For such elements like LEDs 5 mm "Straw Hat" with an angle of distribution of the light flux in a hundred twenty degrees, you can use any material - plastic, paper, wood, cardboard - as they do not heated.
How to make a lamp do it yourself: detailed instructions
Now consider the most popular options for manufacturing lamps based on LED elements. We will analyze in detail how to make their body with your own hands, and what materials it is better to use for desktop and wall lamps, as well as decorative lighting devices and some other models.
Desktop
For making with your own hands, the desktop lamp will first need to be upgraded by a lighting device already. For this you need:
- Extract native cartridge.
- As a base, take the base from the above-described economical light bulb and put in it, connecting according to the diagram, the driver with a quenching capacitor.
- As a housing for LED elements, you can use, for example, a cap from a deodorant suitable size.
- Over all its area, the holes of a suitable diameter are drilled under 5 millimeter diodes (about 50-60).
- To the residue of the base from the economical light bulb, the housing is attached to small screws to a circular plastic base with a diameter like a cap. At the same time, the basis itself is attached to small corners and podiums also on fastening elements.
- After fixing and collection, the lamp is simply screwed up instead of a conventional incandescent lamp in the bench for the tablet.
Tip! Using the above technology, you can make lamps for conventional pendant chandeliers with your own hands, as well as plafoons hanging for lighting the utility rooms, garages, bathrooms. Instead of ordinary incandescent lamps or "housekeeping", LED homemade will be applied.
Wall
The wall LED lamp can be used in various premises - bathroom and bathroom, in the kitchen and in the children's, living room and hallway, corridor. The procedure for making it in the form of a round slap with their own hands as follows:
- First of all, it is necessary to choose the basis for the installation of diodes. It must be proportioned to the scatterer. For example, you can cut the bottom from the plastic construction bucket.
- Having calculated the required number of diodes (on average 100-120), it is necessary to evenly do the holes in the markup evenly.
- A driver is fixed on the reverse side of the base, if necessary, several pieces.
- The base with diodes and drivers is necessarily fixed to the base of the flame on the tapping screw. To do this, in the middle it is necessary to install a plastic or metal podium.
- The assembled device is fixed on the wall and closes the scatterer.
With the rise in the cost of electricity, many think about buying LED light sources that bring tangible savings and are excellent substitutes. natural lighting. However, today, not many can afford the LED lamp, because their cost is still quite high. Therefore, thanks to the people's craftsmen, in this article we will consider how you can make a lightweight device from the LEDs with your own hands.
What is a LED lamp?
LEDs - semiconductor electronic devices emitting light as a result of electric current. Having appeared 15 years ago, domestic appliances literally conquered the market of light sources. Today you can buy LED lamps of any shape, size, power and colors. But you can also make them yourself that, that's not even an inexperienced radio amateur. The simplest devices on LEDs can operate at a voltage of 3-5 V, i.e. from the usual battery. However, its power is enough only to illuminate the flashlight, so below we will look at how to make more serious designs, allowing room lighting.
Lighting
The composition and principle of operation of the lamp
Before proceeding to the manufacture of the LED lamp with their own hands, consider its design and the principle of operation.
Diode is a semiconductor device transmitting a current through p-N Transition Only in one direction. As a result of the excretion of energy during electron recombination and holes, photons are emitted with the release of light and thermal energy.
The heat dissipation in the LED device is an important task when assembling the lamp, because the high temperature leads to degradation and failure of the LED. Therefore, the presence of a radiator is a prerequisite when assembling any LED lamp.
The simplest radiator is an aluminum substrate on which LEDs are located, however, such heat dissipation will not be enough if the device is collected on 3 and more semiconductors. Special metal radiators are installed in such lamps. In room devices, it replaces the bulb case.
In addition to the radiator, the LED product has a reflector and diffuser, which can replace the metallized reflector, and lens.
Typically, the LEDs are produced by the finished assembly, but in order for the bright light of the device to not irritate the eyes, use the matte flask, which is covered with the luminaire case.

Light bulb device
Assembling lamp
The diagram of the simplest lamp operating from the network 220 V consists of two resistors with a resistance of 12 com and two LEDs installed in parallel. The scheme is relevant for the even number of LED devices.
For odd - the diagram must be present a driver, stabilizing output current and voltage. It is best to purchase a ready-made driver that is selected for the LED device. In addition, the driver can also be made with your own hands using a rectifier bridge, capacitors and conventional diodes, which in the assembly convert the network voltage into the voltage of the specified frequency and the value. Resistors in such a diagram perform the role of the current limiter.
As can be seen from the above, the LED device can collect any person who at least once in his life kept a soldering iron and knows how to use the Internet, where many examples of standard and non-standard schemes and solutions for assembling the LED lamp are presented.

Scheme of the lamp
Lamps in the housing

LED Strip Light
The simplest lamp can be made with their own hands using lED ribbon.which is enough to fix on any flat surface With the help of bilateral scotch. For greater reliability and expansion functionality The device LED ribbon is conveniently placed in the case from a non-working fluorescent lamp, the length of which does not exceed 30 cm.
Such a lamp adapts at a height of no more than 80 cm above the desk, kitchen surface, aquarium or use it for decorative illumination. The light of the lamp is perfectly dispersed and does not tire of vision.

Application of the lamp
The following types of ribbons will be suitable for the manufacture of LED lamps:
- SMD 3528 (60 (4.8 W); 120 (7.2 watts); 240 (16 W) LEDs on the pursuit of 1 meter);
- SMD 5050 (30 (7.2 W); 60 (14 W); 120 (25 W).

LED density
Density and location of LEDs on ribbons type SMD 3528 and SMD 5050
The optimal choice will be the LED-tape SMD 5050, the parameters of which correspond to the following values:
- the radiation angle is 120 degrees;
- supply voltage - 12 V;
- current - 1.2 A / m
LED tape with a tape must be glued to the inside of the case. You can buy a power supply unit or collect your own hands using the diagram below. The advantage of the self-assembled power supply is that it is possible to hide it in the luminaire case. Purchased - you have to "attach" next to the device. In any case, the assembled design will look carefully and work economically, perfectly lighting the desktop.

Electrical power supply circuit
An important point during installation is the high-quality isolation of all conductive parts.
The lamp do it yourself on the basis of the LED tape in its parameters does not differ from the purchase option. In this case, its value is significantly lower than the cost of the finished product.
LED lamps on a different basis

Light LED
The economical version of the LED lamp can be made with their own hands on the basis of the burnt lamp. To do this, it is necessary to carefully disassemble the blur lamp, without damaging the base and carry out its cleaning and degreasing.
In the basement, we place a protective resistor per 100 ohms and two capacitors of 220 NF, the operating voltage of which is 400 V, the condenser is 10 μF, responsible for the lack of flicker, rectifier (diode bridge) and LEDs in a ratio of 1 (red luminescence) to 3 (white ). Composite parts of the circuit connect soldering and insulating the mounting glue, filling the entire space of the base between the parts of the circuit and fixing them.
In addition to the ordinary lamp to create a LED lamp, a halogen lamp is used with their own hands.
Halogen lamp

Halogen lamp
For the assembly of the lamp on a halogen lamp requires the following components:
- the assembly scheme that can be written independently or take from the Internet;
- lEDs;
- non-working halogen lamp;
- quick-drying glue;
- copper wire;
- soldering iron and solder;
- aluminum substrate with a thickness of 0.2 mm, which will replace the radiator;
- resistors;
- hole puncher.
Assembly
The assembly process occurs in the following sequence:
- Clean the halogen lamp from all components and smelting.
- We take it out of the reflector.
- We prepare the disk reflector on which the LEDs will be located. The disc stick on an aluminum substrate (the disc template can be taken on the Internet) and do holes in it.
- According to the scheme, we have LEDs on the disk with legs up, taking into account their polarity. Between them ride some glue, avoiding contacting contacts.
- We sold the contacts of the LEDs so that the chain began with positive polarity ("+") and ends with negative ("-").
- Positive contacts combine soldering.
- For negative contacts with soldering, we connect resistors and combine their contacts with each other, receiving negatively charged resistors.
- Contacts of resistors also connect with each other and solder copper wires to them. To avoid short circuit The space between contacts and wires fuel glue.
- We glue a disk and a reflector of halogenki.
- After the glue polymerization, the power supply can be connected to 12 V.
Energy saving lamp
After energy saving lamp It served his time and burned, the hand-made wizard recommend not to throw it out, and use the instrument to create a LED lighting device. It is possible to carry out if there is a serviceable electronic ballast in the lamp in the lamp and the whole body with the basement, which will become the basis of the new product.
To complete the complete set, it is necessary to purchase the LEDs of the size of 5 mm and 4 uf4007 super-fast diodes.
The essence of the creation of an LED lamp based on an energy-saving lies in the installation of a rectifying bridge at the EB outlet, which will allow to obtain a constant voltage of 100 V at a current of 130 mA.
To reduce the frequency of alternating voltage at the EB output, the rectifier bridge will collect from the diodes of UF4007, to the output of which we solder the capacitor by 0.1 μF, operating at a voltage of 400 V. Diode bridge to install the C3 capacitor (see the Basic Lamp Scheme) connecting the thread incandescent lamp, which is then closed with each other.

Electrical circuit EB lamp
Separately, we collect a sequential chain of 30 LED devices, the consumption current is 20 mA, and check its operation.
For constant voltage 100 V and current 130 mA can be collected 5 chains of LED diodes of 30 pieces and get a lamp, the power of which will be 15 watts.
As we can see from the above, the LED lamp can be made with your own hands, not only bypacing the scheme, but also using various devices - LED tape and lamps of different types.
 Secrets of the choice of halogen chandeliers with the control panel
According to statistical data, it was revealed that the cost of LED lamps has decreased significantly. Such indicators led to an increase in the acquisition of highly economical means of lighting in private houses and apartments. Those who are perfectly controlled with the soldering iron, will not need to go to the store in order to equip their housing, as you can create a lamp with your own hands, without referring to factory products. Thus, you can save a large amount of money and pick up the design of the device that will be suitable for the interior of the apartment.
Scheme of the LED lamp.
LEDs have its own feature consisting in DC mode and low voltage. Therefore, devices such as power supplies are predominantly used to implement the lighting process. Some sold out electrical circuits On boards, which is not so easy, especially for those who are not familiar with this area of \u200b\u200bactivity.
By creating a lamp with your own hands, a lamp or any other lighting device, you need to take into account the fact that one third of such a unit, as the rated power, will go to the transformation of the light stream, the remaining parts are needed for heat losses.
It is important to remember that when overheating LEDs may have a reduction in operation. Collecting independently any design from LEDs should be provided for heat dissipation from the entire structure during power supply.
What LEDs should be used?

Table of varieties of LEDs.
It is initially desirable to choose a certain type of LED, which will be required. If we consider powerful and low-power, then the first view is much more profitable, due to the fact that the complexity is higher. The attitude of low-power to powerful is 20: 1. According to such indicators, it can be concluded that with low-power LEDs there is much more soldering. Among the powerful LEDs, you can select a pair of varieties, some of which are intended for outputting installation works, while others - for superficial. In most cases, derivatives are used, since with them, installation works are carried out much faster.
Power sources
For the durability of LEDs, you need an excellent driver, and it can be called a power source in a different way. The driver can be cabinet and inapproprous, with the presence of galvanic junction and without it. If we consider the reworking of the lamps, it is desirable to apply the form of a unborn driver in which a galvanic isolation is coming.
The view without the housing is very useful in that it is compact in size, and also has a smaller degree of heating. But there are also their definite disadvantages that are manifested in difficulties when attaching.
The use of galvanic isolation is usually required to ensure safety, as in this case, you can avoid shock. In the absence of such technology, some receive minimal electrical discharge strikes.

Electrical diagram of the LED lamp.
When choosing drivers, it is advisable to pay attention to the minimum and maximum number LEDs that can be connected to connectivity. If there are no such data, it is worth viewing the output of the power supply voltage.
The power supply may be two species, one of which consists of a filter of electromagnetic interference, and the second, respectively, does not have it. Devices that do not have filters have a greater extent with interference electromagnetic waves and conduct frequencies to receiver.
Using a radiator for LEDs
In order to use the LED successfully and for a long time, it is worth applying radiators, since they are the same important components of the process, as well as power sources. The radiator must be made exclusively from aluminum. It is very simple to find such a material, as each person has old aluminum dishes. In order to be able to dispel the heat from the LED, it is necessary to take into account the size of the area, and not the thickness. It is worth noting that fans are installed on computer coolers, since without such a device, heat from the LED will be discharged at a minimum speed.
The process of manufacturing the lamp with your own hands
Before starting the development of the lamp independently, it is desirable to prepare all the necessary tools. In particular, it is advisable to acquire:

Scheme of the lamp housing.
- basic and spare LEDs;
- microtransformer;
- multimeter;
- red LED bulbs;
- 100 ohm resistor;
- capacitor for 400 μF and 10 μF;
- patron;
- degreaser;
- soldering iron;
- mounting glue;
- board;
- abazhur.
It is initially desirable to check each LED, which will be included in the chain, and the quality of the supply voltage in the network cable. To implement such a process, it is worth using a microtransformer. Thus, when setting up and with a test check of the future lighting device, the adjustment will be carried out much smoking.
In order to measure, voltage drops with constant current and exposure to the resistor or not, and the multimeter is used to accurately calculate the current of the diodes. As a rule, at an independent assembly, they are trying to use hymestroll luminaires, but they often need those that are calculated by 12 volts.
The diodes themselves should be high quality so that it is possible to avoid an unpleasant bluish glow, which will not just spoil appearance Luminaire, but also hurt the eyes.

Connection diagram of LED parts on the luminaire case.
The assembly scheme can be called very simple and without loss for the driver. The only defects consists in the absence of insulation at the wires, that is, the luminaire itself can be subject to current shocks. Focusing on the latest data, it is worth considering that it is desirable to protect the lamp from falling, but later the scheme can be upgraded.
- Resistors are needed to protect the board when connecting to the network to avoid the voltage jump. In the case of its lack, it is desirable to use a tiny straightening bridge.
- The use of a 400 μF capacitor is required in order to set the energy at the desired level, which is required for transmission and additional addition of lamps, with free bandwidth. Before work, it is advisable to make sure that it is the type of rated voltage, which is usually half a normal current in the network.
- The use of a condenser 10 of the ICF is needed to create an ideal light source, as well as to eliminate such consequences like glare and flashing. The height of the rated voltage in this case should exceed the indicators of the previous condenser twice.
If there is no possibility to purchase a new cartridge, it can be removed from the old lamp. To do this, it is necessary to carefully smash the light bulb, and so that the nesting part of the cartridge is not damaged. After such a procedure, the patron itself is to protect and process with a degreaser. It is important that before installing the hole in the cartridge is checked again for the presence of lamp residues that can harm the future lighting system, and it is desirable to carry out additional processing with acetone or alcohol.
Mounting cartridge to resistor and transistor
Next, it goes for soldering works. Through the soldering iron, the installation of a tiny rectifier is carried out, and the materials must be prepared in advance and are at hand. The surface is processed at mandatory mode, and the actions themselves should be as accurate as possible and neat, in order to eliminate damage to the parts already installed.
In order to carry out a heat shrinkage, any type of mounting glue is used, since the material must be intended for such actions, and in no case of the stationery.
The installation of LED lamps is considered the most important and interesting point in the entire assembly of the lamp. The basis will serve in advance purchased or the board cooked from old devices. If it belonged to old structures, then, respectively, the board must be cleaned from parts and various burrs.
Conducting and connecting each contact, they should be checked and cleaned if the signal does not arrive. It remains quite a bit - and the lamp will be able to delight its creator. In order to complete the work, you need to simply collect all the details that are available. To be more accurate, each detail is soldered to the tablet and to the resistor device. Next, everything is insulated with glue, connections between diodes are checked for proper light propagation.