Good afternoon dear blog readers. We continue the topic of feedback forms on WordPress. And since we are talking about them, I propose today to talk about the WP Contact Form 7 plugin. Next, I will tell you the step-by-step plugin setup, and also briefly describe the add-ons for this plugin.
Page navigation:
Description of WordPress Contact Form 7
2) Activate the Contact Form 7 plugin in the WordPress admin.
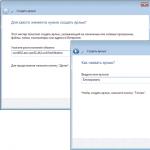
3) Go to the newly created tab as shown in the picture:
 4) Click the "Add New" tab and specify the default form language, or select the desired one
 5) Specify the name of the contact form and click save.

6) Now we have a shortcode that can already be copied and pasted into a post or sidebar in order to display the form - contact-form-7 id="1252" title="(!LANG:Form number 1" (надо взять в квадратные скобки как на рисунке).!}

7) This is how our form looks like:
 Of course, it’s not very beautiful, but no one bothers to create your own styles or make your own form and insert inserts there.
How to display Contact Form 7 in an arbitrary place in the template
In paragraph 6 step by step setup I showed you how you can take the CF7 code shortcode and further described that this code can be displayed in a widget or in a post, page. In addition, I want to say that you can display Contact form 7 anywhere in the template. To do this, insert the following simple code:
That's all, if you did everything right, you will get the output of Contact Form 7 in an arbitrary place in the WordPress template.
Customizing Contact Form 7 Input Fields
Thanks to him, you will additionally have such boxes as:

Configuring reply-to response for contact form 7
AT new version plugin CF7 4.4 and higher, the developer recommends entering in the from field (here it is on the skin below)
 the correct address that matches your domain. Seen from the skin, and this recommendation creates a problem:
How to make a response to the user from the mailer?
If you just click answer, then we will answer our own mail, in fact, we will answer ourselves. This is very inconvenient, because we need to manually copy the user's address into the mailer and only then respond.
The solution to this problem is, and as always, simple. you need in the field Additional headers add code:
Reply To:
Of course, your-email-sh needs to be replaced with your mail shortcode. See skin below:

Now, when you receive a WordPress feedback letter, you can click in the mailer to answer and your answer will be sent to the correct e-mail.
If after these steps you encounter a problem, you should read the post by clicking on the link. There are described the main problems and causes of troubles in the Contact Form 7 plugin.
That's all. I hope you understand how the plugin and its layouts are configured.
Hi all. Somehow, I have too much energy and I decided today to write another article that will be devoted to one of WordPress plugins. Quite an interesting and functional plugin, it copes with its duties 100% and I haven’t found better so far what to issue feedback.
I don’t want to torment you for a long time, I think you already understood about what will be discussed in the article. And so, today we will understand and configure Plugin Contact Form 7 for WordPress, namely to create a feedback form.
I sat for a long time and thought about what are the disadvantages of the plugin and nothing came to my mind, but this creation has a lot of pluses.
Pros of Contact Form 7 Plugin.
- Clarity and ease of setup. A person who encounters this plugin for the first time will be able to figure it out without any problems.
- Creation of a large number of different forms and their integration into the site.
- The form is inserted using a shortcode on the page and anywhere on the site. It is very comfortable.
- Support for Russian and other languages.
- Support for Ajax requests.
- Spam protection with a text question or captcha. For captcha, you will additionally need to install Really Simple CAPTCHA.
- Setting appearance forms with css styles.
- Integration with the Akismet service to protect against spam.
On our site you can see and use such a form if you click on the menu item “Contact us”, a window will pop up where you can see a good example.
Let's start!
First we need to download this plugin. You can from our server here is the link -\u003e or from the official site here is the link -\u003e Download from the official site .
After downloading, you need to install it on . How to install, I will not describe, I think you should know this process from A to Z. Downloaded, installed, now we go directly to ourselves in order to understand and configure it.
Setting up the Contact Form 7 plugin and creating a feedback form.
Now that you have downloaded and installed everything as needed, go to the WordPress admin panel and find the item Contact Form 7, click on it and we get to the page for adding a new form.

Form creation.
In order to create a new form, you must click on “ Add new”, then select the language (Russian by default) and click “Add new”. After all the steps taken, you should have this picture:

The form has been created, now we will customize it, according to your needs, and for starters, give it a name. In my case, I'll call " Test form”, you name it whatever you want and then click “Save”. Now you can see the shortcode that will need to be inserted into the code of the site where this form will be displayed.

We'll need the code a bit later as we need to set up the form first. Go to the form template and customize it.
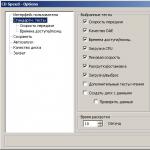
Drop down list on the right Generate tag”, if you open it, you can see many fields that are added to the form.
 Generate Tag field
 On the left you can see the fields that have already been added to the form.
Let's for example, let's make a simple form in which there will be a name, mail, phone, text question for spam protection, message and send button.
Starts.
Making a text field for the name. In the "Generate tag" drop-down list, select " Text field". We tick the required field, give it a name in my case “NAME” and assign an id so that the field can be formatted using css styles. I got id=”name”. Below you can see the text " Copy this code and paste it into the form template on the left". We take this code and copy it into the form template, as in the picture:

For mail (e-mail), we do the same, for the phone, select “Generate tag” from the list, the field “ Phone number” and also by analogy we do.
To customize the message, select " Text field” and we do the same by analogy with everything described above.

Now add the field Question". To do this, select " Question”, give it a name. In the Question|Answer field, you can ask different questions and answers, under the field there is an example of a logical question, you can set a text one, for example, “3rd month of the year?| March”, etc. Paste the code as before.
 field "Question"
 And the last thing we need is the button “ Send”, you can leave the one that is in the template or in the “Generate tag” list, select “Submit button”. The template is ready, press the button “ Save”.
Let's check what we got, copy the shortcode and paste it on the page or in any part of the code where necessary. I'll paste into a test page.
Here's what I got:

You must have something similar.
Customizing the Form and Message Destination
We go down a little below the form template and see the addressee settings.
- Destination field. Enter the mail from which letters will be sent to visitors who fill out the form.
- Sender field. Instead of<>, we substitute our shortcodes (the names that were given to the fields). You can see them above. In my case it will be<>.
- Subject field. I always write a feedback form and indicate the site.
- Letter template field. Here you can display whatever your heart desires. For our example, I make the From field:<>and details Phone: , Message ..
- The rest of the fields are empty.

Don't forget to save at the end.
If you go even lower, you can see the message settings. Everything here is in Russian, so you can edit to suit your needs as you wish. Here I think you will understand
The form is ready, you can proceed to test and see if the message arrives at the mail you specified.
Everything works fine for me, after clicking the “Submit” button, I see the message “ The message was sent successfully. Thanks. ” You can test and see what errors the form will give if you do not enter the data correctly.
As for css styles, they can be added to the main css style.css file. With the help of firebag, you can look at the id and classes of the fields and assign them the appropriate styles.
Plugin Contact Form 7 for WordPress very functional, you can make a form of any complexity, I'm sure you are convinced of this. On this I will end, if some points are not completely clear, write in the comments and I will try to help figure it out. Thank you.
A contact form is an essential attribute of most sites. This is why there are so many contact form plugins in the WordPress directory. One of the most popular is Contact Form 7. The plugin allows you to create forms of any kind; very flexible and easy to set up; has been developing for many years and contains many developments.
Creating and displaying contact forms
Creating forms in the admin
After installing the plugin, the menu item "Contact Form 7" will appear, through which you can create and delete forms.
The form in the picture was created automatically when the plugin was activated.
We use the default form, for this we will create a "Contact me" page and insert the shortcode of the form there.

Front of the site
Now let's save the article and see what our form looks like (using the Twenty Sixteen theme):

The picture shows the form after the sent letter (this is indicated by the notice at the bottom of the form).
Form customization (creating complex forms)
The example above shows how to insert a ready-made and very simple contact form. And now let's look at how to create a form more difficult. To do this, we will return to the admin panel, to the form manager and go to editing the default form.

In the upper field - the name of the form (it is visible only in the admin panel), indicate a name that is clear to you, for example: "Feedback about the site", "Job application form", "Feedback form", etc.
Below the title is a shortcode. We use it in records, to display the form.
And below are four tabs:
- Form Template
- Letter
- Additional settings
Let's consider each tab separately.
Form Template

In this tab, you can customize the fields and appearance of the form. The workspace is the WP HTML editor. Only instead of the usual buttons, we see buttons for inserting different form fields.
Form layout
For layout, you can use html tags and plugin shortcodes. Shortcodes add form fields, and html tags allow you to create an arbitrary HTML structure. For example, our default form looks like this:
And when displayed in a post, it will turn into this HTML:
Shortcode syntax
Let's click on the "Text" button. A window opens where we can specify attributes for the text field. Specify and click "Insert tag".

The tag will later be converted into a text field with html code:
Shortcodes can be conveniently created using the shortcode constructor.
But the constructor does not allow you to change the shortcode (you can only create a shortcode there). There are two ways to change the shortcode:
- delete and create a new one using the constructor.
- study the syntax and fix the field shortcode manually.
With the designer, you will figure it out yourself.
And here we will analyze the syntax of the shortcode.

For example, consider a text field tag with additional options:
Text (mandatory) Field type: text, select, password, number, etc. (in this case, a text field). Determines which form element our tag will be converted to, which means what kind of data it will accept. * An asterisk makes the field mandatory (the form will not be submitted and a notification will be displayed that the field must be completed). client-name (mandatory) The name of the field is used as the name attribute in the input, and is also used when forming the template of the sent letter. id:my-id The id attribute on input with the value my-id. Used for decoration. class:my-class The class attribute on input with the value my-class. Used for decoration. placeholder "(!LANG:Enter a name" Использовать текст "Введите имя" как placeholder. !}
Follow the order of the tag attributes: first comes the field type, then its name, and only then additional options.
Field types
- Text fields: text , email , tel , url , textarea
- Numeric fields: number , range
- Date fields: date
- Checkboxes, radios, lists: checkbox , radio , select
- File upload field: file
- CAPTCHA: captchac and captchar
- Polls: quiz
- "Accept" field: acceptance
- Submit button: submit
- Custom field type
Letter Template

In the second tab, you can fine-tune the template (layout) and properties of the sent letter. In the fields of this tab, you can use special form field tags - this makes it possible to send the data specified in the form in the letter.
The tags consist of field names from the form template. For example, we have created a text field named: . Now you can use the tag in your email template. In the letter, instead of this tag, the value of the field entered by the user (full name) will be substituted.
Email headers:
- Additional headers - Reply-To: is written here by default. The Reply-To header tells us that this email can be answered by clicking the "Reply" button in mail program, and the form tag is the name of the field from the template. The user-specified email will be inserted instead of this tag. You get something like Reply-To: [email protected].
To whom - email box where the email will be sent. You can specify as many boxes as you like separated by commas.
From - name and e-mail, from whom the letter came. Usually the server mail is indicated here (for example [email protected]).
You can specify any mail, but if the mail domain differs from the site domain, the form will not will be tested and will “swear” at this parameter, although letters will still be sent.
Subject - The title of the email. It will be clear from which form the data was sent. For example, the subject of the letter is "Error on the site", "Order callback" and so on. Choose a title to make it easier to work with received letters.
Letter body
This is the next important part of this tab. Here is the text of the letter. In the text, we use all the same form tags (field names from the form template).
Let's analyze the default letter:
From:<>Subject: Message: -- Sent from the site Exploring the Contact Form 7 Plugin (http://test-wp.ru)
We had 4 fields that the user filled out. After sending the email, the tags will turn into values and we will receive an email like this:
From: Dmitry
Optional fields in the body of the email
If the user does not fill in the field, but it is used in the body of the letter, then the body of the letter will be incomplete. For example, the body says Man from the city, but the user did not fill in the field, which means that in the letter we will receive Man from the city ... Such a line in the letter is superfluous. To remove this line from the email, check the box "Exclude output of lines with empty message tags". Note that this will only work when the field text and shortcode are on the same line.
Option "Use HTML-format of the letter". Allows you to use HTML tags in the body of the email. In this case, you can use a limited list of HTML tags, because not all mail clients or services can properly handle complex HTML markup. You can use: tables, bulleted lists, boldness, paragraphs, and so on. Search the web for more details.
Contact Form 7 allows you to send a letter to two addresses, and the settings for each letter are different. This can be useful when you need to send an email to the site administrator with complete information and a duplicate for the manager, which contains only order data.
Form submission notifications

In this tab, you can edit the messages that the form displays in a given situation: when sending a letter successfully or unsuccessfully, or when errors occur.
Letter template tags do not work in these fields.
Additional settings

This tab is intended for advanced users and allows using JS code to expand the possibilities of the form. For example, hang events for analytics.
I will talk about the use of this functionality in a separate article.
The Contact Form 7 plugin will help organize feedback on your site.
You can download the Contact Form 7 plugin on the official WordPress website
You can download the Really Simple CAPTCHA plugin on the official WordPress website
We covered how to install and connect this plugin in the lesson "", now we will deal with additional features Plugin Contact Form 7. The form works correctly on monitors, tablets, phones and laptops. By the way, if your laptop is broken, then there is a service where HP laptops are repaired.
After you have downloaded and activated the plugin, go to the plugin settings by going to new section control panel "Contacts".
Hover your mouse over the name of the form and select "Edit"
A window for changing the form parameters will open.

Since the site can use not one, but several forms (a form for sending a message, a form for ordering a call, a form with personal data), so that there is no confusion about which form is responsible for what, you need to change the name of the form. To do this, click on the name of the form 1 .
Block No. 2 displays what will be displayed on the page in the form. First comes the text, the name of the field, after the code of this field. You can change the text to whatever you want.
To add new fields to the form, click on the drop-down list No. 3 - "Generate tag" and select the required element from the drop-down list.
- Text field
- Phone number
- Number (spinbox)
- Number (slider)
- Text field
- Drop-down menu
- Checkboxes
- radio buttons
- Acceptance
- Question
- CAPTCHA
- Sending a file
- submit button
Tips and form fields by default are arranged like this: at the top is a hint, at the bottom is an element. If you want to place the description and the element on one line, remove the tag after the text
. The entire block with descriptions and elements must be on one line and be inside the tag
Text field
From the drop-down list, select the element "Text field"

If any feature that you add is required, check the box 1 and do not forget to write it in the description.
You can add additional information to the input field to make filling out the form more understandable. Check box 2 "Use as placeholder?" and enter a hint in the field next to it. When you fill out this field in the form, the tooltip text will disappear. Then follow the plugin prompts. The result is a field like this in the finished form:
Be sure to insert the code into the letter template, otherwise the data from this field will not be sent to the mail! This applies not only to text fields but also to any other elements.
Used to pass the sender's mailbox address to the form
URL
Allows you to add a website address to the form.
Phone number
Only numbers can be entered in this field.
Number (spinbox)
A field where you can set the quantity of something, such as a product. The quantity is set with the up/down arrows.
the date

Inserts a calendar into the form with the option to select a date. For example, it is used to reserve rooms in a hotel. Arrival date, departure date.
Text field

Yes, don't be surprised 🙂 Another text field. This time, this field is large and allows you to write a lot of text in it. For example reviews, comments.
Drop-down menu

When there are many options for something and you need to select some item from a large list, for example, a list of cities, streets, goods.

The list must be placed in the Choice field, each item on a new line.
Checkboxes
A checkbox, or checkbox in developer jargon, is an element that creates a checkbox. This field has two states - checked or not. Multiple selection is possible. They are located only in a row, if you check the box "Make checkboxes mutually exclusive?" then only one option can be selected.
radio buttons
Switches (slang. radio buttons) are used when you need to select one single option from several proposed ones. By checking the box "Place label first, and then check-box?" the location of the label and the selection field changes, by default, first the selection, then the label.
Acceptance
confirmation of something. Assume an agreement to accept the conditions described above.
Question
 This is the first line of defense against spam, the most elementary. In the setting, write some kind of question, you can use numbers, you can use letters or both, and indicate the correct answer. If the answer when filling out the form is correct, then the form will be submitted. Green indicates which part of this formula will be displayed on the site in front of the answer input field, red indicates the answer. The correct answer in the formula is written after the sign | (vertical bar)
Adds spam protection to the form.
Another plugin is required for this feature to work. Download, install, activate the plugin.

You can not change the settings, copy and paste 2 lines before the send button.
Sending a file

You can attach a file to the form for sending a message. In the settings you can specify maximum size in bytes, and allowed formats for uploading, e.g. .jpg .tiff .doc
submit button
Submitting the form. In the settings in the "Shortcut" section - you can give the name of the button (Send, reply, send 🙂)
Customizing the Appearance of Contact Form 7
Since plugins have update properties, we will make changes to the appearance of the form in the site theme style file style.css
The code is responsible for displaying the form, its fields and other elements:
Wpcf7 ( background-color:#ddd; ) /*form background color */ .wpcf7 input, .wpcf7 textarea( padding:5px; color:#1D1D1D; font-family:Arial, Helvetica, sans-serif; font-size: 16px; line-height: 20px; border: 1px solid #C7C7C7; box-shadow: inset 2px 2px 8px #F9F9F9; -webkit-transition: all 0.2s ease; -moz-transition: all 0.2s ease; -o-transition : all 0.2s ease; transition: all 0.2s ease; ) .wpcf7 .wpcf7-list-item( padding-left: 0; margin-left: 0; margin-right: 25px; ) .wpcf7 .wpcf7-list-item input( border: none; padding-left: 0; margin-left: 0; ) .wpcf7 select( outline: none; font-size:16px; font-family:Arial, Helvetica, sans-serif; ) .wpcf7 input: hover, .wpcf7 input:focus, .wpcf7 input:active, .wpcf7 textarea:hover, .wpcf7 textarea:focus, .wpcf7 textarea:active ( background: #FDFDFD; outline: none; )
What is here what.
.wpcf7 input, .wpcf7 textarea - input field style (text field)
- padding- sets the indent from the content to the border of the element. Here - the indent from the text entered in the field to the border of the field. The value is set in pixels to Xpx, where X is the number of pixels. Example: padding: 5px 3px 6px 8px;
- color- text color.
- font-family- input fields font.
- font-size- font size
- line-height- line height
- border- frame around input field
- box shadow block shadow. inset indicates that the shadow is internal. If you want an outer shadow, omit this value. The second and third values of 2px 2px indicate the horizontal and vertical blending of the shadow, respectively. The fourth value, 8px, specifies the blur radius for the shadow. Fifth - #F9F9F9 - the color of the shadow.
Customizing the Contact Form 7 Button
.buttons_form ( padding: 0px; height: 30px; width: 150px !important; border: none !important; cursor: pointer; color: #fff; -webkit-border-radius: .5em; -moz-border-radius: . 5em; border-radius: .5em; color: #faddde; border: solid 1px #980c10; background: #d81b21; background: -webkit-gradient(linear, left top, left bottom, from(#ed1c24), to(# aa1317)); background: -moz-linear-gradient(top, #ed1c24, #aa1317); filter: progid:DXImageTransform.Microsoft.gradient(startColorstr="#ed1c24", endColorstr="#aa1317"); )Contact Form 7 Notification Style
It is responsible for reporting errors or successful submissions.
Wpcf7 .wpcf7-validation-errors( border:none; background-color:#246416; color:#fff; margin:0; padding:20px; -webkit-border-radius: 10px; -moz-border-radius: 10px; border-radius: 10px; ) .wpcf7 .wpcf7-mail-sent-ok( -radius: 10px; border-radius: 10px; ) .wpcf7 .wpcf7-mail-sent-ng( border:none; background-color:#349622; margin:0; padding:20px; ; -moz-border-radius: 10px; border-radius: 10px; color: white; ) .wpcf7 span.wpcf7-not-valid-tip( border:none; background-color:#349622; padding:5px; padding- left: 5px; padding-right: 5px; border-radius:10px; width: 290px; color: white; /* Drop shadow */ -webkit-box-shadow: 3px 3px 3px rgba(0,0,0,0.3) ; -moz-box-shadow: 3px 3px 3px rgba(0,0,0,0.3); box-shadow: 3px 3px 3px rgba(0,0,0,0.3); )
And now, for convenience, the entire code with comments:
Wpcf7 ( background-color:#ddd; ) /* form background color */ .wpcf7 input, .wpcf7 textarea( /* This part code is responsible for style of input fields, text areas */ padding:5px; /* Sets the padding from the margins of the element to its content, you can set any value, for example 10px */ color:#1D1D1D; /* Text color in input fields */ font-family:Arial, Helvetica, sans-serif; /* Text font in input fields */ font-size:16px; /* Size of text in input fields */ line-height: 20px; /* The height of the line in the input fields */ border: 1px solid #C7C7C7; /* Border around fields. The first value is the width in pixels, the second is the style of the box, the third is its color */ box-shadow: inset 2px 2px 8px #F9F9F9; /* Shadow from input fields. 2px - x-shift, 2px - y-shift, 8px - shadow blur radius, #F9F9F9 - shadow color */ -webkit-transition: all 0.2s ease; -moz-transition: all 0.2s ease; -o-transition: all 0.2s ease; transition: all 0.2s ease; ) .wpcf7 .wpcf7-list-item( padding-left: 0; margin-left: 0; margin-right: 25px; ) .wpcf7 .wpcf7-list-item input( border: none; padding-left: 0; margin -left: 0; ) .wpcf7 select( outline: none; font-size:16px; font-family:Arial, Helvetica, sans-serif; ) .wpcf7 input:hover, .wpcf7 input:focus, .wpcf7 input:active , .wpcf7 textarea:hover, .wpcf7 textarea:focus, .wpcf7 textarea:active ( /* This part is responsible for the style of the input fields when hovering over them */ background: #FDFDFD; /* The background of the input field when hovering the mouse pointer on it */ outline: none; /* Outer border of the text input field */ ) transition: 0; -o-transition: 0; transition: 0; border: none; /* Border around the button */ position: relative; color: #fff; /* Text color */ text-transform: uppercase; /* Transform text (uppercase means that the text on the button will be displayed in uppercase) */ /* Rounding button corners. The values of the following three properties must be the same, as they are the same thing for different browsers */ -webkit-border-radius: 6px; /* Round corners for Chrome */ -moz-border-radius: 6px; /* Round corners for Mozilla FireFox */ border-radius: 6px; /* Round corners for all other browsers, including mobile */ font-size: 14px; /* Button text size */ font-weight: bold; /* Text style (bold means bold) */ padding-top: 11px; /* Top padding from the edge of the element to its content */ padding-bottom: 10px; /* Padding from the bottom of the element to its content */ padding-left: 35px; /* Padding to the left of the element's edge to its content */ padding-right: 35px; /* Indent to the right of the edge of the element to its content */ /* Gradient background - The gradient background of the button */ background-color: #000000; /* The background color of the button if the gradient is not supported by the browser */ /* In the following properties, the colors must be specified in the same way, as they are the same, only for different browsers. Let's take a look at the first property. The from(#676767), to(#3B3B3B) part means that we need to display a gradient, where from color #676767) there is a transition to color #3B3B3B */ background: -webkit-gradient(linear, left top, left bottom, from( #676767), to(#3B3B3B)); background: -moz-linear-gradient(top, #349622, #246416); filter: progid:DXImageTransform.Microsoft.gradient(startColorstr="#349622", endColorstr="#246416"); -ms-filter: "progid:DXImageTransform.Microsoft.gradient(startColorstr=#349622, endColorstr=#246416)"; /* Drop Shadow - The shadow of the button. Shadow color specified in RGBA */ -webkit-box-shadow: 0 2px 5px rgba(0,0,0,0.3); -moz-box-shadow: 0 2px 5px rgba(0,0,0,0.3); box-shadow: 0 2px 5px rgba(0,0,0,0.3); ) /* On hover - Style the button when hovering the mouse pointer. Everything is almost the same as in the previous block */ .wpcf7 input.wpcf7-submit:hover( cursor: pointer; text-decoration: none; background-color: #000000; background: -webkit-gradient(linear, left top, left bottom, from(#246416), to(#349622)); background: -moz-linear-gradient(top, #246416, #349622); filter: progid:DXImageTransform.Microsoft.gradient(startColorstr="# 246416", endColorstr="#349622"); -ms-filter: "progid:DXImageTransform.Microsoft.gradient(startColorstr=#246416, endColorstr=#349622)"; ) /* On click - button style when clicking on it almost the same as in the previous block */ .wpcf7 input.wpcf7-submit:active( top: 1px; color: #d8c6e2; /* Button text color when clicked */ background-color: #000000; background : -webkit-gradient(linear, left top, left bottom, from(#FF0000), to(#246416)); background: -moz-linear-gradient(top, #FF0000, #246416); filter: progid:DXImageTransform .Microsoft.gradient(startColorstr="#FF0000", endColorstr="#246416"); -ms-filter: "progid:DXImag eTransform.Microsoft.gradient(startColorstr=#FF0000, endColorstr=#246416)"; -webkit-box-shadow: none; -moz-box-shadow: none; box-shadow: none ) /* CF7 Messages - Style of messages about successful sending, errors, etc. */ .wpcf7 .wpcf7-validation-errors( /* Message style for validation errors */ border:none; /* Message block border */ background-color:#246416; /* Background */ color:#fff; /* Text color */ margin:0; /* Outer padding */ padding:20px; /* Inner padding */ /* Cross-browser corner rounding - the following 3 properties */ -webkit-border-radius: 10px; -moz-border -radius: 10px; border-radius: 10px; ) .wpcf7 .wpcf7-mail-sent-ok( /* Success message style */ border:none; /* Message block border */ background-color:#7ad33f; /* Background */ margin:0; /* Outer padding */ padding:20px; /* Inner padding */ /* Cross-browser corner rounding - the following 3 properties */ -webkit-border-radius: 10px; -moz- border-radius: 10px; border-radius: 10px; ).wpcf7 .wpcf7-mail-sent-ng( border:none; background-color:#349622; margin:0; padding:20px; -webkit-border-radius: 10px; -moz-border-radius: 10px; border-radius: 10px; color: white; ) .wpcf7 span.wpcf7-not-valid-tip( border:none; backgrou nd-color:#349622; padding:5px; padding-left: 5px padding-right: 5px; border-radius:10px; width: 290px color:white; /* Drop shadow */ -webkit-box-shadow: 3px 3px 3px rgba(0,0,0,0. 3); -moz-box-shadow: 3px 3px 3px rgba(0,0,0,0.3); box-shadow: 3px 3px 3px rgba(0,0,0,0.3); ) .wpcf7-form .fleft( float: left; ) .wpcf7-form .mright20( margin-right: 20px; ) .wpcf7-form .mright40( margin-right: 40px; ) .wpcf7-form .clear( clear: both; )
Contact Form 7 can manage numerous contact forms where you can flexibly customize the content of the forms and mail with fairly simple markup. Forms have built-in support for Ajax submission, CAPTCHA, Akismet's spam filter, and more.
Documentation and support
Screenshots
Installation
- Upload the entire contact-form-7 folder to the /wp-content/plugins/ directory.
- Activate the plugin from the Plugins page in your WordPress dashboard.
In the WordPress dashboard menu, you will find the ‘Feedback’ tab.
To learn how to properly use the plugin, you can visit its homepage.
Reviews
I see a lot of people hating on this plugin because they"re using some unsupported version that is bundled in a theme, - all I can say from my own experience is that after using it for several years on many sites is a big thank you to the devs that keep it up to date and free for everyone. It's extremely easy to set up and customize. Cheers!
Members and Developers
"Contact Form 7" - a project with an open source code. The following contributors contributed to the development of the plugin:
MembersChangelog
For getting additional information see Releases.
5.1.6
- CSS: removes a style rule from the stylesheet that was unnecessary and conflicting with Twenty Twenty's rules.
- REST API: retrieves the contact form ID explicitly from the route parameters.
5.1.5
- Config Validator: New test item for the unavailable_html_elements error.
- Config Validator: New test item for the attachments_overweight error.
5.1.4
- reCAPTCHA: Introducing the WPCF7_RECAPTCHA_SITEKEY and WPCF7_RECAPTCHA_SECRET constants.
- reCAPTCHA: Introducing the wpcf7_recaptcha_sitekey and wpcf7_recaptcha_secret filter hooks.
- Adding the $status parameter to the wpcf7_form_response_output filter.
- Generates a random code when the user is a registered user.
- Introducing WPCF7_ContactForm::unit_tag(), a public method that returns a unit tag.
- reCAPTCHA: Gives a different message to the spam log in cases where the response token is empty.
- Consent flag: support for the label_first option in the consent form tag.
5.1.3
- Fixed a bug that made it impossible to deselect an option in the Mail tab.
5.1.2
- Permanent contact: Introduced contact list selector.
- Permanent Contact: Introduced additional setting constant_contact.
- reCAPTCHA: Introduced wpcf7_recaptcha_actions and wpcf7_recaptcha_threshold filter hooks.
5.1.1
- reCAPTCHA: Changes the response to empty response tokens.
5.1
- The Permanent Contact integration module has been introduced.
- Updated reCAPTCHA module to support reCAPTCHA v3.
- Adds Dark Mode style rules.
5.0.5
- Fixed mismatch issue between get_data_option() and get_default_option() in WPCF7_FormTag class.
- Silences PHP errors that occur on unlink() calls.
- Introduced wpcf7_is_file_path_in_content_dir() to support the UPLOADS constant.
5.0.4
- Explicitly sets the power_type argument in the register_post_type() call to fix the problem of unauthorized privilege escalation.
- The attachment local file- it is forbidden to specify absolute paths to files located outside the wp-content directory.
- Configuration Validator - Adds a test element to detect incorrect attachment file settings.
- Fixed a bug in the JavaScript backwards compatibility feature for outdated browsers, which do not support the HTML5 placeholder attribute.
- Consent checkbox - disables the do-not-store function of the form tag.
5.0.3
- CSS: Apply cursor style "not allowed" when hovering over submit buttons in disabled state.
- Consent checkbox: revision user interface tag generator, to encourage the use best options protection of personal data.
- Implementation of the wpcf7_anonymize_ip_addr() function.
- Introduced consent_for:storage option for all form tag types.
5.0.2
- Added "Privacy Notices" section to readme.txt file.
- Updated content in the Information meta-block.
- Use get_user_locale() instead of get_locale() where more appropriate.
- Consent checkbox: Reset the status of disabled submit buttons after successful application.
5.0.1
- Fixed incorrect usage of _n().
- Configuration Check: Fixed incorrect number of warnings in Advanced Options tab.
- Configuration Check: Fixed incorrect handling of the [_site_admin_email] special email tag in the "From" header field.
- Acceptance flag: The specified class and id attributes were applied to the wrong HTML element.
- Configuration check: if for mailboxes, such as Cc or Reply-To, there is an additional mail header, but a possible empty value, "Invalid mailbox syntax" error will be returned.
- Explicitly specify the fourth parameter to add_action() to avoid passing unintended parameter values.
- Check if the target directory is empty before deleting it.
5.0
- Additional settings: on_sent_ok and on_submit have been removed.
- New additional setting: skip_mail.
- Flamingo Header incoming channel changes along with the change in the title of the corresponding contact form.
- DOM events. The entire API response object is available through the event.detail.apiResponse property.
- HTML Mail: Adds language-related attributes to the HTML header.
- File Upload: Sets the accept attribute in the upload field.
- New WPCF7_MailTag class introduced.
- Allows you to abort an attempt to send mail using the wpcf7_before_send_mail action hook. Also, you can set custom status and message via action interceptor.
- Acceptance checkbox: allows you to specify conditions in the content part of the form tag.
- Acceptance checkbox: Supports the optionality parameter.
- New custom mail tags: [_site_title], [_site_description], [_site_url], [_site_admin_email], [_invalid_fields], [_user_login], [_user_email], [_user_url], [_user_first_name], [_user_last_name], [_user_nickname], and [_user_display_name].
- New filter hooks: wpcf7_upload_file_name, wpcf7_autop_or_not, wpcf7_posted_data_($type), and wpcf7_mail_tag_replaced_($type)
- New form-tag features: zero-controls-container and not-for-mail