Program morphvox pro is today one of the most popular utilities that allows you to modulate sound from external sources. To put it simply, with the help morphvox pro you can change your voice when talking on Skype and others common means of IP-telephony, as well as create a capellas for subsequent mixing work in a virtual studio. Of course there are possibilities morphvox pro very far from professional programs However, for home use they are quite sufficient.
How to use morphvox pro?
After downloading and installing the utility on your computer, an interface with settings opens in front of us. As a rule, before starting the program, the user needs to make sure that the microphone is connected to the PC and is working properly.

So it opens morphvox pro and a window appears in front of us Voice Doctor in which the user needs to enter his data to fill out a profile.

Also here you can assign a microphone that will be used during recording and conduct tests, for which we press the button Record. After filling out all necessary information click Next and the window closes. Now you can work directly with the program itself.
Setting up the morphvox pro utility
A rather colorful utility interface appears before us with many additional functions and effects. It is worth noting that the program is not Russified, so it will be somewhat difficult for users who do not speak English to understand all its intricacies.

We will focus only on the most important points that will allow you to work correctly with the program:
1. Icon with which the current voice pattern is associated.
2. Button Morph Voice patterns are turned on/off. Listen V active mode allows you to hear your own voice in speakers or headphones with some delay. When integrating the program into Skype, this function can be disabled to avoid confusion during communication.
4. In the menu Tweak Voice There are three scales that change the pitch of the voice, its timbre and the strength of the timbre, respectively.
5. By adjusting the graphic equalizer you can achieve optimal value voice settings in environmental conditions. You can save changes using the button + , when clicked, the user will be prompted to add the current preset to the settings. Managing presets, deleting them, as well as resetting the equalizer to its original settings is carried out here using the keys Preset, — And Reset respectively.
6. In the menu Sound the user can control various environmental effects (noise on the street, shopping center, etc.) by turning them off and on during recording using the keys located nearby.
7. Voice Effect allows you to add the necessary voice effects directly when using templates. To activate them, you just need to click on the indicator located next to the inscription.

To do this you need to go to Record your voice, which is located in the menu MorphVOX and select a directory to save the file. After this button Record will become active and you can start directly recording your voice.

If you want to change the microphone or change the current profile, you can do this by calling the menu Voice Doctor by clicking to the one indicated on photo icon
In general, the MorphVOX Pro program interface is quite simple and understandable for the average user. However, people who have difficulty understanding English language may encounter some uncertainties. This article is intended for all those who cannot figure out how to use the program.
When you first launch the program, you will be greeted by Voice Doctor, which is designed to automatic settings programs for your voice and your microphone. Click next and check the box "Echo Cancellation"(echo elimination) if you use speakers as a sound-reproducing device.
If you have headphones, you can uncheck the box, because with them there is no echo. From the following list, select the microphone and headphones/speakers you are using. Make your choice carefully if you have programs installed on your computer that emulate these devices, since if you choose incorrectly, the program will not work.
At the next stage, you will be asked to enter a name for your profile (to save the settings under the name) and a description for it. Here you can enter whatever you want. Next, the final stage is checking the microphone. By pressing the Record button, read the words from the screen or simply speak something into the microphone.
If the volume is normal, the text will be highlighted in green; otherwise, you will be prompted to change the microphone volume in the settings Windows systems. Next, the program will automatically adjust the effects of voice changes and background noise according to the received data and will be ready to work.
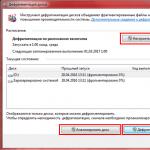
Here is an image of the standard MorphVOX Pro window - as it appears after Voice Doctor has completed its work. Each mark corresponds to a different element, each of which is described in detail below.
By clicking on it, you can listen to a sample of this voice.
If the button is green, it means voice change is enabled.
If the button is green, it means you can hear your voice through the speakers with a slight delay. This is useful for testing and setting up voice changes, but confusing when speaking.
If the button is available, it means that changes have been made to the template. To save them as a template, click on this button.
Allows you to select a voice change pattern from the list.
It contains all the information associated with each of the voice patterns, which are divided into groups. If the indicator to the left of the template name is green, it means it is coordinated with information received from Voice Doctor; otherwise it is grayed out. To listen to a voice sample of a particular template, click on the small loudspeaker located to the right of the name.
The higher the indicator, the higher your voice sounds; The smaller it is, the correspondingly lower the voice.
Allows you to adjust the timbre of your voice.
Sets how strongly the tone value will be applied to the voice.
Resets voice pitch and tone settings.
Shows how loud you are speaking.
Enable/disable sound effect playback. Plays the selected sound effect in the speakers and sends it “down the line” so that it can be heard by your interlocutor.
Here you can select the sound effect that is played by the button above.
Sets the volume of the sound effect.
Opens a window with additional settings sound effects.
Turn on/off playback of one of the background sounds. Plays the selected background sound in the speakers and sends it “on the line” so that it can be heard by your interlocutor.
Allows you to select one of the background sounds to play from the list.
Sets the volume of the background sound.
Opens a window with additional settings for background sounds.
A 10-control graphical equalizer that allows you to make very subtle adjustments to your voice.
Reset the eucalizer settings to default.
Allows you to set eucalizer settings using pre-saved standard or custom presets.
Allows you to create your own custom template with eucalizer settings.
Deleting a once created template with eucalizer settings.
Allows you to add additional sound effects to already applied templates.
Gives access to even more advanced sound effect settings.
Allows you to select one of several profiles created in Voice Doctor.
Well, now let’s look at the main menu items of the program. Let's start with File:
Opens a window with many different settings.
Opens a dialog box in which you can apply a voice change effect to the contents of the file.
Almost all points Settings menu are present in the working window of the program and are described above, so there is no point in describing them. But in the Tools section there are several interesting moments. For example, Run a Voice Doctor - launches a “voice doctor” in case your microphone has changed or for some other reason you need to perform automatic reconfiguration. The remaining items are intended for working with voice profiles and other minor parts of the program.
In general, we can sum it up. To enable voice change in the MorphVOX Pro program, you need to click on the corresponding button in the upper left corner.
In the list on the left you can select one of the voice change patterns. This list, by the way, can be expanded with the help of add-ons that are present in the archive with the program installer. To turn on background noise or a sound effect, you need to click on the corresponding button on the Sounds panel, and to install additional sound effects there is a panel in the lower right corner of the program’s working window.
To fully use MorphVox Pro, you will need a microphone and the main program with which you communicate (for example, Skype) or record video.
Step 1: Install the program
The installation procedure for MorphVox Pro on your computer is not very difficult. You need to buy or download trial version program on the official website, run the executable file and then simply follow the instructions of the step-by-step Installation Wizard. Read more in a separate article on our website.

More details:
Step 2: Setup
Choose options for your new voice, customize the background and sound effects. Optimize voice reproduction so that there is as little interference as possible. Select one of the templates for changing your voice or download a suitable one from the Internet. More details about all this can be found in the material provided at the link below.

Step 3: Voice Recording

In the window that opens, click "Set" and select the location where the file will be saved. Then click the button "Record", after which recording will begin. Don't forget to turn on your microphone.

Many users, when using applications for voice or video communication online, sometimes want to change their voice in order to remain unrecognized by the interlocutor or simply turn the conversation into a joke. To do this, you can use programs for so-called voice morphing, one of which is the popular MorphVOX Pro utility. How to use this application will be shown below. You can use Skype or any other voice client as a companion program.
Why do you need MorphVOX Pro?
First, a few words about what this utility is for and how it works. Actually, the very concept of morphing, from which the name of the application comes, in its simplest interpretation means “changing your voice in real time.”
For this purpose, the program has several ready-made templates, the list of which can be significantly expanded if desired. In addition, here you can make fine tuning your modified voice with the addition of various effects or sounds played in the background (this is called Background). Further, to work with the application, it is suggested detailed instructions(MorphVOX Pro must initially be configured to enable its audio components.) There are not many parameters, but you should pay close attention to each section so that the utility works as expected.
How to use MorphVOX Pro: Presets
So, we assume that the application is installed (usually there are no problems with this). Initial setup for Skype or any other similar application is not that difficult to produce.

How to use MorphVOX Pro? Nothing could be simpler. We launch the utility and click on the section of the same name located in the top panel, and then select the settings menu (Preferences). On the left side of the menu, select the parameters of the device you are using (Device Settings), and then use the Volume button.

Next, you are redirected to standard settings Windows sound, where from the list presented on the recording tab you need to select a device called Screaming Bee Audio, then turn on this microphone via RMB and set it to use by default as a means of communication. For the main microphone (for example, Realtek High Definition Audio) only sets the default use option.

Basic setup is complete. Now let's see how to use MorphVOX Pro in Skype. We launch Skype, use the call menu and select the sound setting, and then in the right side of the main window from the drop-down list, select the same Screaming Bee Audio microphone. Now, during a conversation, the interlocutor will hear not your original voice, but a modified one based on one of the selected templates.
Morphing and listening sector
Speaking of how to use MorphVOX Pro, you immediately need to understand the interface. There are few parameters. Pay attention to the first voice selection sector on the left. There are only two main buttons available here - Morph and Listen.

In default settings they will be lit green, which corresponds to listening only to the modified voice. Pressing the first button causes you to hear your voice in the headphones without changes, the second means that the clear voice in the headphones is turned off.
Voice settings sector
In the question of how to use MorphVOX Pro, you need to carefully look at the section for selecting a template that will act as a substitute for your voice (you can select them from a list).
If you click the Get More Voices button, you can download additional voices from the Internet, which are independently integrated into the program, after which they become available for use.
Voice change sector
The next section is for manual change vote. Here three faders (sliders) are used for adjustment:
- Pitch Shift - change the pitch;
- Timbre Shift - timbre control;
- Timbre Strength - changing the strength of the voice.
By changing the positions of the sliders, you can change the original voice even without selecting a template, or customize the preset voices at your discretion.
Microphone parameters sector
This sector serves to display an indication of the microphone’s operation, and the Mute button allows you to temporarily turn it off or turn it on again. Nothing complicated, but this function can be very useful if you need to make sure that the interlocutor does not hear you for some time.
Effects and equalizer
Finally, three more sections. One of them contains an equalizer that allows you to make adjustments frequency characteristics or own voice, or the template that is selected for replacement.
In the next sector, the user is offered several basic effects that can add color: phase change, choral or monotonous sound, echo (reverb and delay), etc. Each effect can be used separately or combined with each other, creating unique combinations .
The third section has a set of sound inserts to create a background that will be heard during a conversation (the sound of an alarm clock, the surroundings of a highway or a supermarket, the mooing of a cow, belching, and much more).
Conclusion
As you can see, the issue of using this utility is not so complicated. True, in order to try out all possible variations of voice changes, you will have to use what is called the scientific “poke” method (especially since the settings allow you to do this).
However, the most important problem, which is why the program may sometimes not work, is that when initial setup It is imperative to make the correct selection of recording and communication devices (microphones). Otherwise, in theory, there shouldn’t be any special difficulties. Yes, and activating the application in relation to the same Skype program looks very simple and consists, again, only in selecting required device, not to mention those used in at the moment templates in the MorphVOX Pro application.
MorphVox Pro - special application, allowing you to change your voice when communicating or recording. The utility is not a professional modulator, but is quite suitable for home use. MorphVox Pro is suitable for Skype, WhatsApp, Telegram and other popular services for IP telephony. So what can the program do and how to use it?
Installing the utility
First, the user needs to find an installer and install the application. It is recommended to download the program from the official website. Applications downloaded from unfamiliar resources may contain unpleasant surprises like viruses, spyware, etc.
To install you need:
After the installation is complete, the user needs to run the utility and enter personal information. In the window you need to fill in the field with email address, full name, indicate age and enter the key, if available.
Setting up the program
Before you start using MorphVox Pro, you must complete the setup. The software has ready-made presets. The user can choose the voice of a woman, a child, an old man, a robot, etc.
Customization Features:

Before talking through MorphVox Pro, it is recommended to adjust the volume and quality of speech, remove echo and unnecessary background sounds. To do this, you need to enter the program, click on MorphVOX and select "Settings…".
Note: The speech change will remain in effect as long as the modulator is running.
Using a modulator
A simple and fun program will help you make fun of your friend and diversify the conversation. The user only needs to install the application, select or configure suitable option voices and call a friend.

The further procedure depends on which version of Skype you are using. In the case of the classic one, the instructions are as follows:

And for the updated Skype it’s even simpler:

The program operates in passive mode. As long as the user does not stop the application, the speech will change.