In some cases, when a user tries to format their flash drives, the system displays the error “Windows cannot complete formatting.”
Sometimes this happens when working with HDDs, DVD RWs and other drives, but most often Micro SDs are affected by this problem.
Why does Windows write this text?
This happens because the OS for some reason cannot perform formatting on its own, or the reason is a malfunction of the SD card or hard drive itself.
It is also possible that the memory card was previously used on a different operating system (Linux, Mac OS, etc.) and the file system is incomprehensible to Windows.
The inability to work with the file system is the most common cause of this error.
This error looks like the one shown in the figure.
But what to do when the system produces such an error? There are several ways.
The simplest of them is performed using standard Windows tools and is available for both Windows 7 and Windows 10, and even for the good old Windows XP.
Solving the problem using the system
Step-by-step instructions on how to remove this error when formatting a removable drive are as follows:
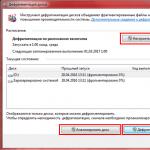
- Press the combination of Win + R buttons on the keyboard. This opens the Run dialog box. The image shows which keys need to be pressed on the keyboard and the window that should appear after this (circled in green).

- In this window you need to enter the following: diskmgmt.msc and press Enter on the keyboard. Thus, we opened the Disk Management program.
- In the window that appears, you need to find the designation of the memory card. You can recognize removable media by the corresponding “Removable device” inscription at the bottom of the program and by the image of a memory card, which differs from other media at the top.

- In one of the places indicated by green frames in the photo above, you need to click the right mouse button. As a result, you can see the drop-down menu shown in the figure.

- In this menu you need to click on the inscription “Format...”. Then the flash drive will be formatted using a slightly different algorithm than in other cases.
Clarification! Perhaps the problem is that the media is simply not allocated. Then the inscription “Delete volume” (highlighted with a yellow frame in Figure No. 4) will be active, not dim, that is, you can click on it. Try this. After this, you will need to create a new volume.
Creating a new volume
To create a new volume on unallocated media, you need to right-click on it and select “Create a simple volume...” from the drop-down menu.

After this, the “Simple Volume Creation Wizard” will open, in which you should not change any parameters - we leave everything as standard and just click the “Next” button several times.
After this, in the Disk Management program, “Fixed” will be written opposite the flash drive, as shown in Figure 6.

After this, you can again try to format the flash drive using standard means - through “My Computer” by right-clicking on the desired media and selecting “Format...”.

Disabling a foreign process in the system
It is possible that some extraneous process in the system is preventing the formatting of the flash drive.
To exclude this option, you must do the following:
- Restart the computer in safe mode. To do this, open the “Start” menu, then click on the button circled in green in the image and select “Restart” (this is for Windows 7).
The computer will turn off and immediately turn on again. So, immediately after shutting down, you should press the F8 button and wait for it to load.

- After this, you should run the command prompt as an administrator. There are many different ways to perform this action.
The simplest of them is to hold down the Shift key on the keyboard and right-click on any free space on the desktop. In the menu that appears, select “Open command window”.

- In the window that appears, you need to write the following: format [drive letter]:. To find out the drive letter, you need to go into my computer and look at what is written next to the drive, as shown in the picture (indicated by arrows).
In our case, this is the letter “e”, so in the command menu we write “format e:”, as shown in the photo below (circled in blue) and press the Enter key.

If this does not help, you will have to use outside help, that is, third-party recovery programs.
Disk recovery programs
One such program is D-Soft Flash Doctor. It is very easy to download it on the Internet. The program window looks as shown in the figure.

In this window you need to select our media. You can recognize it by its letter (in our case it is “e”).
To do this, you just need to click on the symbol of the flash drive at the top of the program (highlighted in orange in the photo above).
After this, you can select “Recover media” (indicated by a red frame). Recovery will occur, after which you can try to format the disk again.
You can also select the “Scan for errors” option.
Then the scanning will begin and the user will have the opportunity to find out what is wrong with his media.
If the flash drive not only does not format, but also shows that the volume is 0 MB, EzRecover helps a lot. By the way, you can also find out the size of the flash drive in “My Computer”.
In the figure, red lines highlight the places where the storage capacity is shown.

In our case, it shows 5.18 GB, but if it shows 0 MB, feel free to download EzRecover.

EzRecover automatically finds removable media; you don’t even have to specify anything here.
After opening the program, the user only has to press the “RECOVER” button and wait a little.
There are many more programs on the Internet for recovering flash drives, you can try others. If none of these options produces results, the only thing left to do is throw away the flash drive.
The video below clearly shows how to format a disk using standard Windows tools.
Flash drive cannot be formatted, repair using Windows
Solving the problem - Windows cannot complete formatting
 Formatting a hard drive is the process of creating a file system on its partition, accompanied by deleting data and creating a new file system structure. Functionality for formatting hard drives and solid-state drives is contained in almost all modern operating systems, but the standard mechanism is not always optimal and applicable. This material will tell you in more detail how to format a hard drive in several ways.
It is very easy to format a HDD using standard tools. To do this, you need to select the desired partition in Explorer, right-click and select “Format” from the pop-up menu.
 In the menu that opens, select formatting options. It is recommended to use NTFS as the file system, and leave the cluster size as standard. Checking the box next to “Quick formatting” significantly speeds up the process, but only the FS table is created anew. The data itself physically remains on the disk, although it becomes inaccessible. If you do not check the box, all data will be physically erased (filling each memory cell with zeros), but the process will take a long time. A hard drive with a capacity of several terabytes will take hours to format. But such formatting allows you to permanently destroy data, for example, when transferring the drive to a new owner.

An alternative way to format the HDD using standard means is through the “Control Panel”. To do this, you need to find the “Administration” menu, select “Computer Management” in it and in the left column find “Disk Management.” The menu that opens will display all drives in the form of a structure. The advantage of this method is that this way you can format disks that do not have a partition and therefore are not displayed in Explorer.

How to format a hard drive via the command line
To format a disk via the command line, there is a utility command called format. To use it, you need to run the command line as an administrator and enter the format command. It should look like this:
format [drive letter]:- formatting will take place without any questions, into the same FS that is on the disk, in a slow way (with complete erasing).

format [drive letter]: /q — the “/q” flag triggers a quick format, without physically clearing the contents of its memory. The flag can be placed in combination with any other keys.
format [drive letter]: fs:[file system]— formatting the selected partition into one of the supported file systems: NTFS, FAT, FAT32.
format [drive letter]: fs:[file system] /q- the same thing, but with quick formatting.
How to format your hard drive before installing Windows
To format your hard drive before installing Windows, you need to select a full installation, wait until the partition selection menu for installation appears, click on the desired drive and press the “Format” button at the bottom. The system will independently determine the optimal formatting method, file system type and cluster size. The whole process takes less than a minute.
Before you format your hard drive, installing Windows may require creating additional system partitions to load the OS. The screenshot below shows that such a partition takes up 100 MB. It stores part of the system bootloader.

The disadvantage of formatting this way is that you can't manually manipulate the parameters. Ordinary users do not need this, but sometimes they need FAT32 instead of the standard NTFS system. For example, such a need arises on tablets with Intel processors and two installed operating systems (Windows + Android), like the ten-inch Chuwi Hi10. In order for the Windows partition to be visible from Android, it must be formatted in a compatible file system. The “green robot” cannot work with NTFS without special plugins and third-party programs.
The correct answer to this question is “not at all.” The computer's BIOS is intended for slightly different purposes and does not have functionality for working with the HDD. Usually, “formatting from Bios” is popularly known as formatting via the command line in a text-based operating system (for example, MS-DOS). The advantage of this solution is that you can even work with a system partition that is not in use.
To format a hard drive using a boot disk with DOS, you need to create an image of such an OS, write it to a flash drive and copy the formatting utility there. Instead of DOS, you can also use a special program for working with HDDs, for example, GParted. This option is preferable as it is more functional.
To format a HDD from BIOS using a bootable USB flash drive, you need to download. This is an automatic installer that will download and write the latest version of Gparted to a flash drive.

After creating the flash drive, you need to restart the PC, go to Bios (usually by pressing DEl or F2) and find the Boot menu. In it you should select the item containing the words “Boot device priority” or something similar in meaning. Among them, you should put your flash drive first. Then you need to press F10, agree to save the settings and wait for loading from the flash drive.

In the loaded menu of the GParted program, you need to select the language, select the disk and find the item responsible for formatting. You can select the file system, cluster size, format type, and other options.
In this article, you will learn how to format a CD/DVD-RW disc that has problems playing or loading information. Please note that a recorded (full) CD/DVD-R disc cannot be formatted. Formatting a disk will erase all data stored on it.
Steps
1 On Windows
- 2 Open the Start menu. To do this, click on the Windows logo in the lower left corner of the screen.
- 3 Open File Explorer. To do this, click the folder icon at the bottom left of the Start window.
- 4 Click This PC. This tab with a computer icon is located on the left side of the Explorer window.
- 5 Click the optical drive icon. It looks like a gray disk and is located in the "Devices and Drives" section in the middle of the page.
- 6 Click Manage. You'll find this tab at the top left of the Explorer window. A toolbar will open under the Manage tab.
- 7 Click Format. The icon for this option is on the left side of the toolbar and looks like a gray disk with a red circular arrow. The Format window will open.
- 8
Select a file system. Open the File System menu and choose one of the following options:
- UDF 1.50
- UDF 2.00- to use the disk in XP and older versions.
- UDF 2.01 (default)- to use the disk in modern operating systems.
- UDF 2.50
- UDF 2.60- to use the disk in modern operating systems. Supports Blu-ray.
- 9 Click Launch and then click OK. The process of formatting the disk in the selected file system will begin.
- 10 Click OK when prompted. The formatting process will be completed.
2 On Mac OS X
- 1
Insert the CD-RW disc or DVD-RW disc into your computer. Hold the disc with the label facing up and insert it into the optical drive.
- If your computer doesn't have an optical drive, buy an external drive.
- In Mac OS X, you can't format a drive the way you can in Windows, but you can erase it and reformat it to fix errors.
- 2
Click Go. This menu is located on the left side of the menu bar, which is located at the top of the screen. A drop-down menu will open.
- If the menu bar doesn't appear, click on the desktop or open Finder.
- 3 Click Utilities. This option is at the bottom of the Go drop-down menu.
- 4 Double-click the Disk Utility icon. You'll find this icon in your Utilities folder - it looks like a stethoscope disk.
- 5 Select a drive. Click the drive name in the External section, which is located on the left side of the Disk Utility window.
- 6 Click the Erase tab. It's at the top of the Disk Utility window. A window with disk properties will open.
- 7
Click Complete. This option will completely erase and reformat the drive.
- Or select "Quick" to quickly erase the drive, but this will not erase any errors that may be on the drive.
- 8 Click Erase. This will erase and reformat the drive. When the process is complete, you can burn music or video to the disc.
- Using a third-party program such as Roxio CD Creator or Nero can simplify the process of formatting the drive.
- A CD-RW disc can be formatted many times because it is a rewritable disc.
Warnings
- A CD/DVD-R disc can only be formatted once. Files from this disk cannot be erased.
CD-RW is a digital rewritable storage medium used for recording and storing various data. Once the appropriate hardware, software, and drivers are installed, formatting and burning a CD-RW is accomplished through a few basic steps. Difficulties with formatting or burning CD-RWs can arise for a variety of reasons. The most common are the obsolescence of the optical drive, incompatibility of the drive and disks, problems with the firmware or drivers. To write data to CD-RW in Windows XP, you will need additional software. This article will tell you how to troubleshoot problems when trying to write data to a CD-RW.
Steps
Method 1 of 4: Windows Vista / Windows 7
Click "Show Formatting Options" and select the "Live File System" option or the "Master" option.


Insert the CD-RW into the optical drive. The Burn Disc window will open.

Enter the disk name in the appropriate field. Formatting options will appear in a pop-up window.

Select a formatting option and click Prepare. The disk will be formatted and you can drag files/folders onto it (to burn them).
Method 3 of 4: Update the optical drive driver from the manufacturer's websiteDownload and install the latest optical drive driver.
- Go to the drive manufacturer's website. Find your drive model on it. Device drivers can be downloaded from the Downloads and Support section.


Use the special Windows feature to update drivers. This may resolve disk formatting issues.
- Click “Start” - “Control Panel” - “Device Manager”.


- Windows XP does not have a feature for formatting CD-RWs, so additional software will be required. Very often, such programs are pre-installed on the computer or they can be purchased/downloaded on the Internet (to do this, enter “CD/DVD burning program” in a search engine).
- CDs manufactured before 1997 may not be compatible with modern optical drives. Modern drives are marked with the word “multi-recorder” on their front panel.
Attention, TODAY only!
Everything interesting
Typically, ISO images of DVDs are used for convenient storage of information or for subsequent recording on similar media. To write ISO files, as well as to read them, you need to use special utilities. You will need-…
Almost every modern computer has an optical DVD drive, which can be used to burn data to DVDs. From time to time, you need to dump the most necessary information onto the disks, since no one is immune from failure...
Any electronic information carrier requires formatting - preparation for recording certain data. Both hard drives and flash drives, as well as CDs, require formatting. Before you burn any information to a DVD, it...
On the Internet you can now find various options for OS Windows installation disks, including programs, drivers, and various useful utilities. You can also create an installation disk yourself, including everything you need. You will need-…
Windows Vista 64-bit operating system is designed for installation on computers with a 64-bit processor, such as Athlon 64, Core i3, Core i5. This OS is not suitable for 32-bit processors. How to install it? To you…
Updating all computer drivers is possible in two ways: using standard Windows tools or third-party programs that determine the hardware configuration and scan their servers for updates. Instructions 1If you want...
CD-RW is a type of disc that can be rewritten many times. It is very convenient to store temporary information on it. For example, you can burn a movie to cd-rw in order to transfer it from computer to computer. You will need a computer with OS...
Sometimes a situation may arise when you need to create a copy of a DVD. For example, if important information is stored on it, then for reliability it is better to overwrite this disk and store it in several copies. All you need is a writer...
Modern disc burning programs allow you to copy information from one disc to another without wasting time transferring information to a computer. However, for this you will need two DVD drives. You will need a computer with...
To play videos on home DVD players, you must use a special disc-burning technique rather than simply burning the files as regular data. How to do this? You will need - a computer; - Ashampoo Burning program...
DVD - RW discs
Format DVD disk – this option is available only in Windows 7. In Windows XP you will be prompted to “erase CD-RW”, which is similar in principle, but not the same thing. Just keep in mind that format You can only use DVD-RW discs; attempting to format a DVD-R disc will damage the disc.
When formatting a DVD disc, the disc is divided into sectors for ease of writing and reading the disc, which is unacceptable for DVD-R discs. Writing to 1 bit will ruin the entire disc and it will be perceived as written. It is not possible to delete information from DVD-R discs.
You need to know that the DVD-R disc is already formatted initially.
The easiest way to format a DVD disc. To do this, insert the disc into the drive and wait for it to load. Open My Computer. Right-click on the DVD disc, 
Select “Format” from the menu that appears. Next will be the formatting settings 
warning about deleting all data 

Another way to erase a DVD is to use some program, such as Nero, Image Burn, etc.
When erasing a DVD disc using Nero, you need to select “DVD” from the drop-down list in the running program window. A little lower, among the icons, select the window with a plus - “Add-ons”, then select “Clean DVD”. The “Erase rewritable disk” window will open and there are two actions to choose from: “Quickly erase RW disk” and “Completely erasing rewritable disk”. It is better to choose full erase. Click “Erase”. The sedum lasts about a minute.