How to install 1C Enterprise 8.3? This question plagues many beginners; in fact, it is much simpler than you might think! You don't have to be at all to do this. In this step-by-step instructions, I will tell you the process of installing the 1C 8.3 program and how to install the 1C configuration using the example of “1C Enterprise Accounting 8” with the Windows operating system. The procedure is absolutely similar for other applications, such as 1C Trade Management.
By the way, if you have not yet purchased 1C, you can order any 1C program and configuration services from. Delivery and installation of 1C PROF in Moscow and the regions for free!
The installation can be roughly divided into 2 small steps:
- First of all, install the 1C 8 platform itself and
- Installing the configuration: there are a lot of 1C configurations, and it is not possible to consider installing all of them. For example, I take the most popular configuration - 1C Enterprise Accounting.
Get 267 video lessons on 1C for free:
As a rule, configuration files are packaged in an archive containing installation files. It looks something like this:

In the archive you need to find and run the “setup.exe” file.
The following window will appear:

Here you need to set the option “This component will be installed on the hard drive” for the first three points, as in the picture. You can also specify the one you need in the interface language menu (the default is Russian/English).
In this article I will describe in detail the process of organizing web access to 1C:Enterprise databases8.3 on the IIS (Internet Information Server) web server included with Microsoft Windows Server. For older versions of 1C:Enterprise (8.1 And 8.2 ) the algorithm for publishing databases is generally similar. The algorithm for setting up IIS for 1C:Enterprise will be discussed, and the process of publishing databases on a web server will also be described for both32-bit, and for 64-bitweb server extension module.
- What you will need
- Installing IIS Web Server
- Installing 1C:Enterprise components
- Setting up the operating system
- Publishing a database to a web server
- Configuring IIS to use the 32-bit Web Server Extension Plug-in
- Configuring IIS to use the 64-bit Web Server Extension Plug-in
- Connecting to a published infobase via a web browser
- Connecting to a published infobase via the 1C:Enterprise client
- Virtual Directory Configuration Files
- File default.vrd
- web.config file
1. What you will need
- A computer that meets the minimum system requirements for running a web server running one of the operating systems:
- Microsoft Windows Server 2012 (R2)
- Microsoft Windows Server 2008 (R2)
- Local administrator rights on this computer.
- Distribution kit for installing 1C:Enterprise components. To configure a 64-bit web server extension module, a distribution kit for installing a 64-bit 1C:Enterprise server. This example uses the version 8.3.4.389 . For older versions of 1C:Enterprise ( 8.1 And 8.2 ) the algorithm for publishing databases is generally similar.
2. Installing the IIS web server
We install the Internet Information Server web server, which is included by default with Microsoft Windows Server. When installing, be sure to select the components:
- Common HTTP Features
- Static Content
- Default Document
- Directory Browsing
- HTTP Errors
- Application Development
- ASP.NET 3.5
- .NET Extensibility 3.5
- ISAPI Extensions
- ISAPI Filters
- Health and Diagnostics
- HTTP Logging
- Request Monitor
- Management Tools
- IIS Management Console
I wrote in detail about the process of deploying an IIS web server:
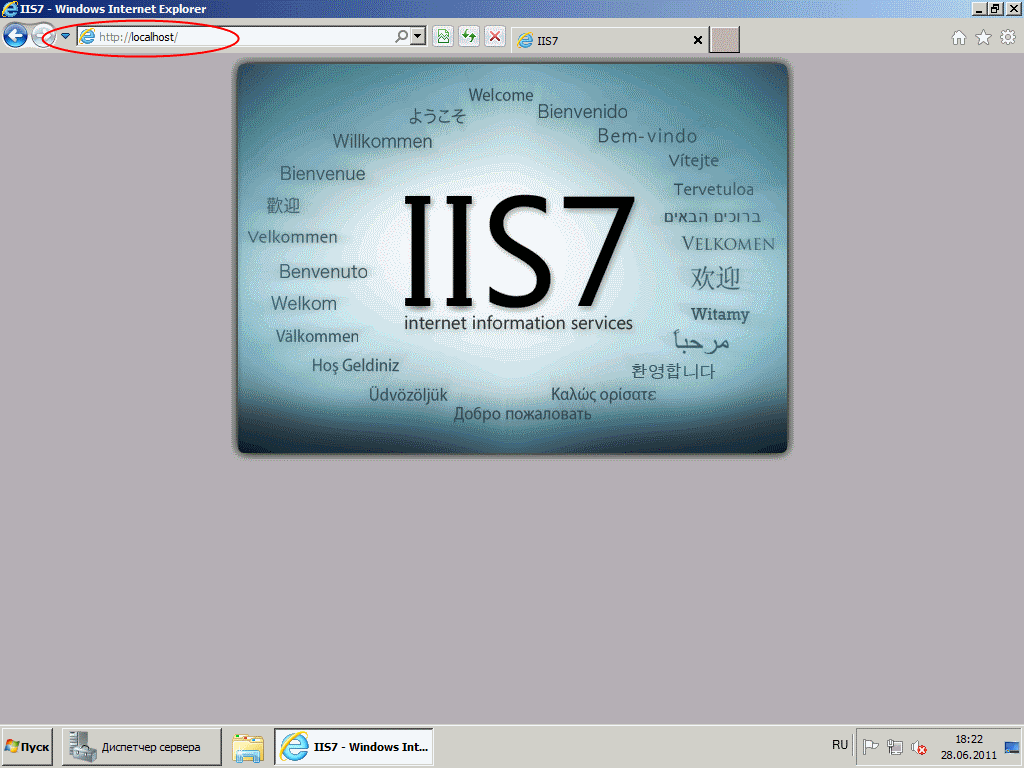
- In Microsoft Windows Server 2012 (R2) - here. IIS version 8, after installation you should see a Default Web Site page like:

- In Microsoft Windows Server 2008 (R2) - here. IIS version 7, after installation you should see a Default Web Site page like:
3. Installation of 1C:Enterprise components
On the same server where the IIS web server is deployed, we install 1C:Enterprise (32-bit components), making sure to select the following components during installation:
- 1C:Enterprise
- Web server extension modules

If you plan to configure a 64-bit web server extension module, you must additionally run the 64-bit server installation program from the corresponding 1C:Enterprise package and install the component:
- Web server extension module

4. Setting up the operating system
Now you need to set the necessary rights to the key folders used when using web access to 1C:Enterprise databases. For the storage directory for website files published on the web server (default C:inetpubwwwroot) you need to give full rights to the group " Users"(Users). In principle, you can skip this step, but then to publish or change the publication of the database you will need to run 1C:Enterprise as an administrator. To configure the security of this directory, right-click on it and select “ Properties"(Properties).

In the properties window that opens, go to the “ Safety" (Security) and press the button " Change» (Edit...), to change existing permissions. The permissions window for this directory will appear. In the list of Groups or user names, select the group “ Users" (Users) and in the list of permissions for the selected group set the flag " Full access"(Full control). Then click " Apply" (Apply) to record changes and close all windows using the button " OK».

Next, you need to give full rights to the directory with installed 1C:Enterprise files (by default C:Program Files (x86)1cv8 for 32-bit expansion module and C:Program Files1cv8 for 64-bit) group IIS_IUSRS. To do this, we perform actions similar to those described above, with the only difference that in order for the required group to appear in the list “ Groups or users" (Groups or user names) you must click the button located under the list " Add"(Add..), and in the window for selecting groups or users, click " Additionally"(Advanced...).

Then click the button on the right “ Search"(Find Now), then select the required group IIS_IUSRS in the search results table and click “ OK».

Group IIS_IUSRS appears in the list of groups or users. We give it full rights to the selected directory and click “ Apply» (Apply) to save changes.

And finally, if publishing is performed for a file database, you must also give the group IIS_IUSRS full rights to the directory containing the files of this infobase.

5. Publishing the database on a web server
Let's move on to directly publishing the database on the web server. To do this, launch 1C:Enterprise in Configurator mode for the database that you want to publish. Then select “ Administration» - « Publishing to a web server...»

The window for setting up publishing properties on the web server will open. The main fields required for publication are already filled in by default:
- Virtual directory name - the name by which the database on the web server will be accessed. Can only consist of characters of the Latin alphabet.
- Web server - selected from the list of web servers found on the current computer. In our case, this is Internet Information Services.
- Directory - the physical location of the directory in which the virtual application files will be located.
- Using the corresponding flags, you can specify the types of clients to publish, as well as indicate the possibility of publishing Web services. In the table below you can edit the list of Web services that will be published, as well as in the column “ Address» change the synonym by which this Web service will be accessed.
- It is also possible for the IIS web server to indicate the need to perform authentication on the web server using OS means by setting the appropriate flag.
Having selected the necessary publishing settings, click “ Publish».

If the publication went through without errors, we will see a corresponding message.

Publishing to the IIS web server is always done for the default website and the default application pool. It is worth keeping in mind that when publishing from the configurator, the 32-bit web server extension module will be registered, and the default application pool will be DefaultAppPool- Without configuration, it only works with 64-bit applications. Accordingly, further actions depend on the bitness of the web server extension module that you plan to use. For a 32-bit web server extension, you must enable the application pool to use 32-bit applications, or register a 64-bit web server extension. This will be discussed below
6. Configure IIS to use the 32-bit Web Server Extension Plug-in
Means" (Tools) - " Internet Information Services Manager

Default Web Site- a virtual directory transformed into an application appeared with the name that we specified when publishing the database. The only thing left to complete publishing is to enable 32-bit applications for the default application pool. To do this, go to the “ tab in the connection tree Application Pools"(Application Pools).

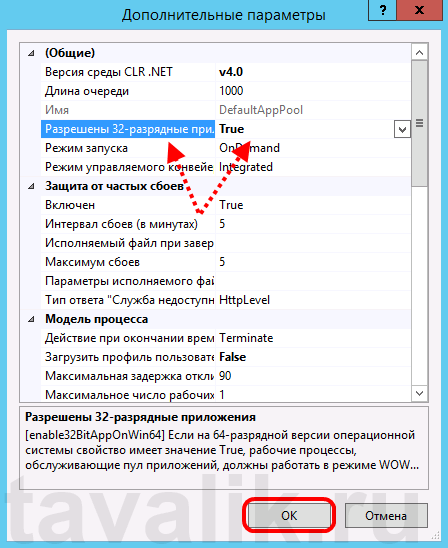
In the list of application pools we find a pool with the name DefaultAppPool. Right-click on it and select “ Additional options"(Advanced Settings).

In the application pool settings window that opens, in the group “ General"(General) find the item " 32-bit applications allowed» (Enable 32-Bit Applications) and set the parameter value to True. Then save the changes by clicking " OK».
7. Configure IIS to use the 64-bit Web Server Extension Plug-in
You can register the 64-bit web server extension module using the utility webinst.exe the corresponding version located in the directory bin, directory with the 1C:Enterprise program installed, or use the method below.
Let's launch Internet Information Services (IIS) Manager. This can be done from the Server Manager by selecting the “ Means" (Tools) - " Internet Information Services Manager» (Internet Information Services (IIS) Manager).
Here, expanding the tree in the connections window, we will see that for the default website - Default Web Site- a virtual directory converted into an application appeared with the name we specified when publishing the database. To complete publishing, all that remains is to tell the application to use a 64-bit request processor. To do this, open the handler mapping settings page for this virtual directory by selecting “ Handler Mapping» (Handler Mappings) on the application home page.

In the table of handler comparisons we find the handler "1C Web-service Extension". Let's open this handler by double-clicking on the corresponding row in the table.

Let's edit the handler by replacing the path to the executable dll of the 32-bit web server extension module that is currently selected with the path to the 64-bit version of the library. In this example, we change the path from " C:Program Files (x86)1cv88.3.4.389binwsisapi.dll" to " C:Program Files1cv88.3.4.389binwsisapi.dll» using the selection button. After changing the path, click " OK» to save changes.

8. Connect to a published infobase via a web browser
Well, that seems to be all. To connect to a newly published database, launch Internet Explorer and enter a path like this in the address bar http://localhost/<Имя публикации информационной базы> . In this example it is http://localhost/DemoAccounting/.

You can also connect to this information base from any computer on the network by accessing the web server via its internal one (or if the port is forwarded 80 , by external) IP address.
In this case, for 1C:Enterprise to work correctly, the domain name being accessed (or IP address) must be added to trusted Internet Explorer sites, and pop-up windows must be allowed for it. Read more about setting up Internet Explorer for the 1C:Enterprise web client here.

9. Connecting to a published information base through the 1C:Enterprise client
You can also connect to an information base published on a web server using the 1C:Enterprise thin client. To connect, open the “1C:Enterprise” launch window and click the “ Add» to add an information base.

In the window for adding an infobase/group, set the switch to “ Adding an existing infobase to the list" and click " Next».

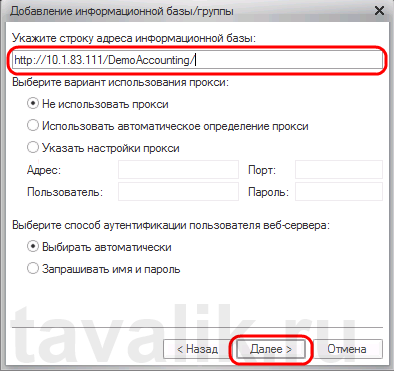
Enter the name of the database as it will be displayed in the list of infobases (must be unique for this list), select the location type " On the web server" and click " Next».

Enter the address line to connect to the infobase (without the /ru_RU/ prefix). Here you can also specify the proxy server parameters (if any) and the authentication method on the web server. Having specified the necessary settings, click “ Next».
Specify the launch parameters for the infobase and click “ Ready» to complete the wizard.

After which this information base will appear in the list of databases in the 1C:Enterprise launch window. Please note that the Configurator launch mode is not available for this type of connection. Click " 1C:Enterprise» to connect to the information base.


10. Virtual directory configuration files
Let's take a closer look at the structure of the files that were created during the publishing process. If web access to a published infobase does not work for some reason, the configuration files can be edited manually to achieve the desired result (the configuration files from this article for the 64-bit web server extension module can be downloaded here).
Let's go to the directory that we specified when publishing the database. We will see two files in it:
- default.vrd
- web.config

Both files can be viewed and edited using any text editor, such as Notepad. Let's take a closer look at the structure of these files.
10.1. File default.vrd
In file default.vrd describes published Web services (element
Ib="File="C:1C_BASEDemoAccounting";"
As you can see from the example, if the connection string contains characters that are illegal according to the XML standard (http://www.w3.org/TR/xml11/), they must be replaced accordingly.

In the connection line you can specify the user's login and password. In this case, the connection to the infobase will be performed on behalf of the specified user. For example, to connect as the user Seller, the connection string will be as follows:
Ib="File="C:1C_BASEDemoAccounting";Usr=Seller;Pwd=123;"
For a server infobase, the connection string will look like:
Ib="Srvr="WIN2012;Ref=Accounting;"
Where WIN2012- name of the 1C:Enterprise server cluster, and Accounting- name of the database in the cluster.

You can read more about the structure of this file in the book “Administrator's Guide” 2nd edition, Appendix 2, chapter 3.12.
10.2. web.config file
File web.config is a file that defines parameters for an ASP.NET web application. Every web application must have a file web.config, located in its root directory. Our virtual directory is no exception. The current file contains data about the 1C Web-service Extension handler that processes requests to this application. The handler is configured in such a way that all requests are passed to the library wsisapi.dll located in the directory bin, directory with 1C:Enterprise files. In the case of using server information bases, the version of the library must correspond to the version of the 1C:Enterprise server cluster.

This handler can be found (or added if it does not exist) in IIS Manager. To do this, select the tab with the current application and in the properties window select “ Handler mappings» (Handler Mappings).
In the table of handler comparisons we will see our handler "1C Web-service Extension". If such a handler is not in the list, you should add it by selecting it in the “ Actions" (Actions) item " Adding a script match with wildcards» (Add Wildcard Script Map…).

When adding, enter the name of the handler and indicate the path to the file wsisapi.dll. These parameters can also be changed for the current handler by selecting “ Change…"(Edit...) in the action list window.

You must also make sure that the flag " is set for the handler Execution» (Execute) in the function permission changes window. You can call this window by selecting “ Changing function permissions..." (Edit Feature Permissions...) in the window " Actions"(Actions).

This article will discuss in detail the algorithm for installing the client part of the 1C:Enterprise system. 8.3 (for versions 8.2 , 8.1 And 8.0 The installation algorithm is similar to the one about installing the 1C:Enterprise system 7.7 I wrote) in operating systems of the . Typical options for working with 1C:Enterprise are considered, and a brief description of all components of the system will be provided.
0. Basic information about the 1C:Enterprise system
The 1C:Enterprise system is a set of software modules designed for the development and use of application solutions ( configurations) - on accounting and automation of economic activities of enterprises. The software modules of the 1C:Enterprise system are universal and can work with any configuration. R Working with information bases is possible as in file, and in client-server option.
In the case of working with a file information base, the database files are located either directly on the computer of the user working in the program “1C:Enterprise”, or on a network resource to which “1C:Enterprise” is connected to work with the information base. The figures below show the most common scenarios for the 1C:Enterprise system working with file databases.

This mode of operation is only suitable for information bases with which a small number of users work simultaneously.
If it is expected that a large number of users will simultaneously work with the information base, or a significant load on the information base is expected, you should use server cluster "1C:Enterprise". In this case, the database files will be located in a separately installed DBMS (database management system), and the server cluster will interact with this DBMS for the end user. In general, the operation scheme of the 1C:Enterprise system will then be as follows:

I wrote in detail about installing a 1C:Enterprise server cluster in the article. Next we will talk only about installation client application the 1C:Enterprise system, i.e., system modules necessary to work with file information databases or to connect to an existing 1C:Enterprise server cluster. For this we need:
- A computer capable of installing a client application of the 1C:Enterprise system running Windows OS.
- Local administrator rights on this computer.
- Distribution kit for installing modules of the 1C:Enterprise system. This example uses the version 8.3.4.389 . Installation of modules of the 1C:Enterprise system of earlier versions is similar.
- or , suitable for the required 1C:Enterprise operating mode.
1. Installation of 1C:Enterprise system components
Open the directory with the 1C:Enterprise installation files and run the filesetup.exe.

The 1C:Enterprise 8 installation assistant will start, click “ Next"on the first page.

On the next page you can change the folder for installing 1C:Enterprise modules by clicking the button Change"and specifying a new path for installation, and you also need to select the components that will be installed. The list of components depends on what needs to be installed. Depending on the distribution type, not all components may be available for installation. If you need to install a component (or cancel the installation), you need to mark it by clicking the icon to the left of the component name (or the Space), in the menu that appears, select one of the options:
- This component will be installed on your local hard drive.
- This component will not be available.
Here is a brief description of the installed components:
- 1C:Enterprise— the main components of 1C:Enterprise, including components for administration, configuration, thick and thin clients.
- 1C:Enterprise - thin client— thin client components only for working in client-server mode.
- 1C:Enterprise - thin client, file version— thin client components, including components for working with the file version of the infobase.
- Server 1C:Enterprise— components of the 1C:Enterprise server (read more about installing the 1C:Enterprise server).
- Web server extension modules— web server extension modules required for the operation of the web client and Web services (read more about setting up web access to 1C:Enterprise databases).
- Administration of the 1C:Enterprise server— additional components for administering a cluster of 1C:Enterprise servers.
- Interfaces in different languages— user interfaces in various languages.
- 1C:Enterprise configuration storage server— components of the 1C:Enterprise configuration storage server.
- Converter IB 1C:Enterprise 7.7— information base converter.
Having selected the necessary components for installation, click “ Next».

At the next step, you need to select the interface language to be used in the future (the operating system language is the default). Having specified the interface language, click “ Next».

Click " Install" to start the installation of the 1C:Enterprise system.

Upon completion of the installation process, the assistant will offer to install the protection driver - HASP Device Driver. It is necessary to install the protection driver only if the USB port given a HASP4 NET hardware protection key will be installed on the computer (the driver installation can be performed later using the menu item " Start» — « Programs» — « 1C Enterprise 8» — « Installing HASP Device Driver"). Leave or remove the flag "Install protection driver" and click " Next».

If the installation is successful, the final page of the installation assistant appears. If you leave the flag " Open Readme file", then a file will be opened with information that seems to be recommended to be read before using this version of the system. Click " Ready» to complete the wizard.

2. Adding an infobase to the list of infobases
During installation, a shortcut to launch 1C:Enterprise will be created on the desktop. If you launch it, the 1C:Enterprise launcher will open with an empty list of infobases and a proposal to add a new infobase to the list.

The next steps depend on the specific situation:
- If you need to create a new database to start accounting, click " No"And first of all, we install a standard configuration template, and only then, based on the template, we create a new information base. Read more about this in the article
- If you need to connect to an existing information base, click “ Yes"and add this database to the list of information bases. Read the article on how to do this.
3. Installing a 1C:Enterprise license
Software products "1C:Enterprise" version 8can be protected from copying by hardware LPT or USB keys such as HASP4 Net from the company Aladdin , or using a software licensing system. It is also possible to use both types of protection simultaneously. After installing the system "1C:Enterprise" and creating information databases, all that remains is to install a license to operate "1C:Enterprise".
- I wrote about installing and configuring HASP protection keys in the article “”
- I wrote about the software licensing system in the article “”, as well as about the case of initially obtaining a license in the article “”.
Did this article help you?
06.04.2014
Available:
Windows 8.1 Professional.
1C enterprise, version 8.3.4.465.
ZUP database 3.0.
It is necessary to establish access to the specified ZUP database via an Internet browser or thin client.
For ease of understanding, all actions will be described from the control panel.


- The configurator will configure IIS itself.
2. Publication of a database from 1C enterprise.
After installing IIS, you need to run the configurator as a local administrator and publish the database.


We agree to restart the IIS server after publishing the new database.


7. Open a port in the firewall.
Control Panel - Windows Firewall - Advanced Settings.
Create a rule for incoming connections for the selected port.

8. Organization of work via the Internet.
In order to be able to access the database from the “open Internet”, you must purchase a “white IP address” from your provider. Figuratively speaking, this will be your digital identifier by which all computers on the Internet will recognize you. If your web server has this address, then you don’t need to do anything else. If the Internet will be distributed by a router, or another computer with a proxy server (i.e., a gateway), then on this gateway you need to open one of the ports and redirect it to the working IIS port on the web server. In the gateway settings, you must specify the incoming port and where the traffic is redirected - the IP address and port of the web server.
9. Launch the browser.
In my case, the browser launch line will look like this:
http - protocol indication.
i7 - dns computer name or web server IP address.
180 - IIS port (can be omitted if the port is the default)
hrm30 - publication directory (c:\inetpub\wwwroot\HRM30)

For a thin client, the string is specified in the connection settings.
That's it, you can work!
In the future, you must remember to update the publication after updating the enterprise 1C platform.
The profit growth of any organization directly depends on the success of planning business activities and the effective work of its employees. At the same time, a good financial result depends not only on reducing time and effort to produce a quality product, but also on proper documentation. Thus, if an enterprise expects efficient and well-organized activities, then its management should think about using software that will structure and minimize routine paperwork.
Just For such tasks the 1C: Enterprise program was developed, the capabilities of which allow you to fully keep records of the economic activities of any full-fledged enterprise.
Note: You can download 1C: Enterprise for free from our resource or the official website of the developer. To do this, use the direct links at the bottom of this material. This is a free educational version of the program that can be used, however, with some restrictions.
Thus, having a full-fledged set of accounting programs, you can easily automate many processes occurring within the company, and do this most efficiently and in the shortest possible time. The 1C:Enterprise program platform is as universal as possible, which allows you to use products created on its basis in a wide variety of areas.

Description and capabilities of the software
The latest version of 1C:Enterprise software 8.3 was created taking into account all the previously accumulated experience, which the developers managed to systematize and analyze after the release of version 7.7 (more than six years ago). This confirms the fact that 1C’s products have not ceased to be recognizable, understandable and user-friendly with any level of computer literacy - it just now contains an updated set of functions for various tasks, based on recent innovations in legislation and the changing needs of the business sphere. After all, it has long been no secret that some methods of accounting and generation of reporting documents have undergone a qualitative and semantic transformation, which were necessarily taken into account in the latest version 8.3.When composing their new product, the authors of the project relied on numerous wishes of interested users in order to make the functions of all programs as efficient and optimal in operation as possible. And to evaluate its capabilities in practice, it is proposed to download 1c Enterprise 8.3 for free in Russian from the official website of the developer.

Scope of application
This program can be used to perform a wide variety of tasks in most commercial enterprises and almost any budgetary organization. In any case, the software will be equally productive and useful for automating routine accounting processes.Configuration "Trade Management", which is part of 1C: Enterprise, will help to easily automate many financial processes occurring within an organization, for example, greatly facilitate the planning and analysis of trading operations, and simplify the maintenance of management and operational accounting.
In such a case, you may also find the extensive capabilities of “1C: Enterprise Management” useful, which facilitates the process of implementing end-to-end management accounting either for all companies that are part of a large company, or for each of them separately.

With it, your employees will be able to easily organize the process of filling out primary template forms related to business documentation: warehouse, trade and purchasing, productive, financial and other types of necessary documents. And also speed up the registration of business transactions.
Especially among domestic commercial structures, an updated version of the software is in demand, which is distinguished by a well-thought-out mechanism of operation and the versatility of its use within a wide variety of organizational forms. With its help, you can almost completely automate not only tax accounting, but also accounting, as well as the natural generation of regulated reporting.

It doesn’t matter what exactly your organization specializes in: building its own production, trading at the wholesale level or engaged in retail sales, providing any services, conducting commission or sub-commission trading - in any case, there is already a competent solution for you to automate reporting , which is called 1C: Enterprise, which can be downloaded for free in Russian.
Additional program features
You can independently regulate the accounting methodology, based on the existing accounting policy framework, and generate the necessary reports in the required sections. In the new version of the program, the process of registering business transactions occurs simultaneously in the required sections of quantitative, analytical and currency types of accounting, as well as in the area of accounting accounts. Tax and accounting, even in the free educational version of 1C:Enterprise, fully comply with all currently relevant laws.
Conclusions: Thanks to its versatility and flexibility, the proposed software will be most effective in a wide variety of applications. It will help you: easily automate the process of carrying out economic and organizational activities, correctly fill out regulated reporting forms, quickly calculate salaries, control the progress of accounting with the presence of several charts of accounts at once, conduct arbitrary accounting measurements, simplify the efficiency of managing an organization, perform financial analysis processes, overall planning and budgeting of the company more effective.
The last one The Russian version of 1C:Enterprise 8.3 can be downloaded for free with support for all current reporting documents, and its educational version will clearly demonstrate the entire range of capabilities of the basic version of the software, and will also allow you to learn programming for 1C platforms.


