It is quite difficult to imagine a modern person without a digital storage device. A flash drive is currently a successful portable object on which a lot of useful information is stored.
The advantage of a flash drive is that it does not take up much space and is accompanied by increased practicality. Even when dropped, it is not always damaged, as was previously the case with disks.
Another advantage is that recording the desired content on it is not only faster, but also much easier.
Unfortunately, despite its unique practicality, it may happen that the flash drive stops functioning at some certain point.
Of course, you can peacefully “say goodbye” to the dead flash drive and go to the store where you can purchase a new digital drive.
If it’s difficult for you to get rid of your usual storage media so easily, then we recommend that you study the recommendations on how to restore a “dead” Transcend flash drive.
Recovery process
Before making minor repairs to a damaged Transcend flash drive, it is important to determine the reason why it failed.
Such a diagnosis can be compared with the treatment of a patient. The doctor also initially examines the patient, establishes a diagnosis, identifies the cause of the pathology, and only after that prescribes treatment.
We also recommend that you “treat” your affected digital media. The Transcend flash drive recovery program will help with this quite effectively, which can be easily downloaded using offers on the network.
However, it is still initially useful to establish the cause of the failure, due to which you have to “draw” advisory information.
Reasons for failure
In most cases, you have to consider restoring a Transcend flash drive due to a banal software failure that users have to deal with quite often.
To confirm that, indeed, a software glitch presented such a unpleasant surprise, allow some tricks.
Insert your drive into the USB connector and watch what happens next. If all your attempts to open the media are in vain, but the computer still sees the Transend flash drive, then it is likely that it has suffered a software failure.

You can suspect the same if, when you connect the media via a USB connector, you hear a characteristic beep, but no visible changes will appear on the screen, including not detecting your media when you launch the Computer window.
Also, a software failure is indicated by the factor when the PC sees the flash drive, but not all of it, but only part of it disk space.
Of course, if you find confirming “symptoms” of a software failure that requires recovery of the Transend flash drive, you don’t need to fall into despair and feverishly remember what could have caused such trouble.
You, of course, could have caused the digital storage device to fail if you neglected the recommendations on how to properly remove the drive from the USB connector.
The reason for the failure may be a fall of the device or strong mechanical compression. There may also be reasons that are completely independent of the user’s actions.
Troubleshooting
Those who are convinced that the drive has stopped responding to any actions want to find a program for flash drive recovery.
Indeed, a utility for restoring a Transcend flash drive exists; it is not so difficult to find, download and install on a computer.

One of the programs for flash drive recovery
However, it is initially important to make sure that the digital drive is still “dead”. Sometimes it happens that it does not respond on one PC, but functions perfectly on another computer.
Often a software failure is detected on the PC itself, when, for example, the drivers have crashed.
You can also try disconnecting all peripheral devices from the USB connectors and connecting only the flash drive. Even such a simple move can sometimes easily fix the problem.
If all attempts are in vain, we recommend that you inspect your digital drive from all sides. It is useful to pay attention to all chips and cracks that you find on the body.
It wouldn’t hurt to look inside the part that connects to the USB connector. Sometimes such a visual inspection is enough to identify poor internal contact.
Don’t be afraid to carefully open the media case and inspect it for integrity inside. It is useful to carry out a thorough visual inspection of its internal contents.
You can also try to fix a bad contact yourself, but only if you have special tools for this. If there are none, you are unlikely to be able to eliminate even the identified problems.
Only after you are convinced that mechanical damage is excluded, you can move on to the next stage, which will allow the digital media to be restored.
Of course, in this case you will definitely need a Transend flash drive recovery program.
To correctly restore a flash drive, it is important to first clarify the type of memory installed on the media, its ID, firmware version, controller ID and other technical details.
Without help special utility In this case, you won't be able to get by with Chip Genius. With such a utility, you will not only receive information quickly, but it will be accurately presented without errors.

Based on the information received, you can begin a search, the goal of which is a program to recover your flash drive.
The ideal solution to the problem you identified is not even a recovery utility, but service program JetFlash Online Recovery.
This option is suitable for those users whose computer is provided with constant and reliable access to the Internet.
Don’t even get yourself ready for a labor-intensive process; your expectations will be in vain. Immediately after launching such a service program, as well as connecting the digital “dead” drive to the USB connector, the “reanimation” process will start automatically.

You just have to wait patiently for the process to complete. The only thing you have to do is click on the “Yes” button, confirming your willingness to grant the rights to work with the flash drive to the program itself.
Once the work is completed, the program will notify you about this. Now unplug the flash drive and then plug it in again. If the resuscitation process was effective, you will instantly find that your digital drive has come to life. You can again perform copying, recording and other functional user manipulations on it.
If the flash drive still doesn’t come to life, you’ll have to say goodbye to it and buy yourself a new digital “assistant.”
So, you were able to see that the process of recovering digital media is not complicated. However, such a process requires increased attention and responsibility for every step taken.
Transcend removable storage devices are widely used a large number users all over the world. It’s not surprising, because these flash drives are very inexpensive and last quite a long time. But sometimes some kind of misfortune happens to them - information is lost due to damage to the drive.
This can happen for various reasons. Some flash drives fail because someone dropped them, others simply because they are old. In any case, every user who has removable media company Transcend, should know how to recover data on it if it has been lost.
There are proprietary utilities that allow you to very quickly recover data from Transcend USB drives. But there are also programs that are designed for all flash drives, but they work especially well with Transcend products. In addition, the standard Windows data recovery method often helps when working with flash drives from this company.
Method 1: RecoverRx
This utility allows you to recover data from flash drives and protect them with a password. It also allows you to format drives from Transcend. Suitable for absolutely all removable media from Transcend and is proprietary software for this product. To use RecoveRx for data recovery, follow these steps:


Method 2: JetFlash Online Recovery
This is another one proprietary utility from Transcend. Its use looks extremely simple.

Method 3: JetDrive Toolbox
It's interesting what the developers are positioning this tool like software for Apple computers, but it also works very well on Windows. To perform a restore using JetDrive Toolbox, follow these steps:

JetDrive Toolbox actually works exactly the same as RecoveRx. The difference is that there are many more tools.
Method 4: Transcend Autoformat
If not one of the above standard utilities for recovery it does not help, you can use Transcend Autoformat. True, in this case the flash drive will be immediately formatted, that is, there will be no chance of extracting any data from it. But it will be restored and ready for work.
Using Transcend Autoformat is extremely easy.
- and run it.
- At the top, select the letter of your storage medium. Below, indicate its type - SD, MMC or CF (just check the box next to the desired type).
- Click on the button Format" to begin the formatting process.
![]()
Method 5: D-Soft Flash Doctor
This program is famous for running at a low level. Judging by user reviews, for Transcend flash drives it is very effective. Repairing removable media using D-Soft Flash Doctor is done as follows:

If repair using all the above methods does not help restore the media, you can use standard means Windows recovery.
Method 6: Windows Recovery Tool

Judging by the reviews, these 6 methods are the most optimal in the case of a damaged Transcend flash drive. Less efficient in this case is the EzRecover program. How to use it, read the review on our website. You can also use D-Soft Flash Doctor and JetFlash Recovery Tool. If none of these methods help, your best bet is to simply buy a new removable storage device and use it.
Portable USB-Flash drives have become an integral part of our lives. They help us in work, study and relaxation. But, probably, everyone has encountered the fact that one fine day a flash drive stops working as it should or is not detected by the computer at all. Many people in this situation will prefer to throw the broken flash drive in the trash and buy a new one as a replacement. Fortunately, prices for flash drives are now quite low. But you shouldn’t rush to do this rash act, as you can try to bring the flash drive back to life.
Today we will look at the issue of restoring the functionality of a flash drive using the example of a Transcend JetFlash 300 8Gb, which froze while writing data and was not recognized as a drive after removal.
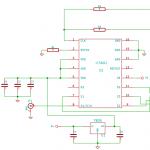
When connecting the flash drive to the PC, it blinked a diode with a smooth attenuation, as if telling us: “Ooops! there is a problem." The following picture was observed in the device manager:

In the device properties it was clear that the flash drive was detected, the VID and PID corresponded to the model, but it was not displayed as a disk and was not available in the disk manager.
![]()
Any flash drive has a controller (control chip) and one or more memory chips inside. Due to failures, power problems or other reasons, the controller may be blocked, and in memory, like hard drives, “bad” sectors may appear.
In the event of a software failure, which occurs in our case, the algorithm for resuscitating the flash drive is as follows:
- Determine the controller manufacturer.
- We find service utility manufacturer.
- We put the controller into test mode, if necessary.
- We restore.
Considering the fact that the warranty on our Transcend JetFlash 300 8Gb has long expired, we will not be shy and will analyze it:


Carefully use a knife to pry the edge of the sticker from the side of the lid and lift it up. Under the sticker we see the latch tooth:

We press something thin onto the latch tooth and pull the connector forward. You can use a thin screwdriver inserted between the housing and the colored plug:

The body can be separated quite easily:

And here we have in our hands a completely disassembled Transcend JetFlash 300 8 Gb flash drive:

Let's see, what kind of controller chip is it? - SM3255Q AB.

On the reverse side we find the memory chip - Samsung K9BCG08U1A-MCB0

We have decided on the initial data. Now we start searching for the utility from the wonderful site flashboot.ru
We have a chip from SMI, which means we are looking for a service utility that can work with the SM3255AB controller. Through trial and error, the utility was found - SMI MPTool V2.03.20 v2 J0324. Please note that there are a great many versions of this utility, but only this version (v2 with J0324 at the end) saw our flash drive.
At first, not a single utility wanted to detect the flash drive. On specialized forums, in such cases it is recommended to switch the controller to test mode, in which the memory chip is not polled during flash drive initialization (details at flashboot.ru). Then install the factory driver (included with the utility).
To put the controller into test mode, you need to short-circuit its two legs. But not just any, but special ones! But, unfortunately, it is not always possible to find a datasheet (documentation) for the controller, and there is a high probability of shorting the wrong legs and completely burning the control chip. Therefore, they usually go the other way, namely, they look for a datasheet for the memory chip, and short-circuit the legs on it. The data bus of the memory chip and the controller is usually directly connected.
If we have a datasheet for our microcircuit, then in the circuit we look for pins labeled F0D0, F0D1, etc., this is the data bus. We close them in pairs using a thin screwdriver or tweezers before connecting the USB flash drive (it’s convenient to use USB extension cable), and we try to determine it in the utility (F5). For microcircuit Samsung memory K9BCG08U1A-MCB0 the required legs turned out to be 19-20. The legs are counted from the key (the point in the corner of the microcircuit) in the direction of the legs counterclockwise/clockwise, depending on the case. In our case, the pins are located clockwise.

In our case, the flash drive was detected by the system, so the factory driver was installed without the need to put the controller into test mode. The driver is located in the folder with the utility, along the path ..\UFD_MP\FactoryDriver\WinXP\SMIInfUpdate.exe
Although the driver itself is intended for XP, it was successfully installed on 7.

Here we enter the VID and PID of our flash drive and press the SMI Factory Driver button, after which the driver installation will be completed. Reconnect the flash drive to the PC. Now in Device Manager it should look like this:

Various problems with USB drives or flash drives are something that probably every owner faces. The computer does not see the flash drive, files are not deleted or written, Windows writes that the disk is write-protected, the amount of memory is displayed incorrectly - this is not a complete list of such problems. Perhaps, if the computer simply does not detect the drive, this guide will also help you: (3 ways to solve the problem). If the flash drive is detected and works, but you need to restore files from it, first I recommend reading the material.
If various ways to correct USB errors drive by manipulating drivers, actions in Windows Disk Management, or using command line(diskpart, format, etc.) did not lead to a positive result, you can try utilities and programs for repairing flash drives provided by both manufacturers, for example, Kingston, Silicon Power and Transcend, as well as third-party developers.
On the official website of Silicon Power in the “Support” section there is a program for repairing flash drives from this manufacturer - USB Flash Drive Recovery. To download you will need to enter an address email(not checked), then the UFD_Recover_Tool ZIP archive is downloaded, which contains the SP Recovery Utility (requires .NET Framework 3.5 components for operation, will be downloaded automatically if necessary).

Similar to the previous program, SP Flash Drive Recovery requires an Internet connection to work and restoration of work occurs in several stages - determining the parameters of the USB drive, downloading and unpacking a suitable utility for it, then - automatic execution necessary actions.
You can download the program for repairing flash drives Silicon Power SP Flash Drive Recovery Software for free from the official website http://www.silicon-power.com/web/download-USBrecovery
If you are the owner Kingston drive DataTraveler HyperX 3.0, then on the official Kingston website you can find a utility for repairing this line of flash drives, which will help format the drive and bring it to the condition it had when purchased.

You can download Kingston Format Utility for free from https://www.kingston.com/ru/support/technical/downloads/111247
ADATA USB Flash Drive Online Recovery
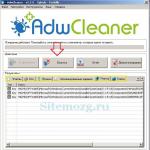
The manufacturer Adata also has its own utility that will help fix flash drive errors if you cannot read the contents of the flash drive, Windows reports that the disk is not formatted, or you see other errors related to the drive. To download the program you will need to enter serial number flash drives (so that exactly what is required is loaded) as in the screenshot below.

After downloading, run the downloaded utility and perform several simple steps on restoration USB operation devices.
Official page where you can download ADATA USB Flash Drive Online Recovery and read about using the program - http://www.adata.com/ru/ss/usbdiy/
Apacer Repair Utility, Apacer Flash Drive Repair Tool
Several programs are available for Apacer flash drives - different versions Apacer Repair Utility (which, however, cannot be found on the official website), as well as Apacer Flash Drive Repair Tool, available for download at official pages some of the Apacer flash drives (search the official website specifically for your USB drive model and look at the downloads section at the bottom of the page).

Apparently, the program performs one of two actions - simple formatting of the drive (Format item) or low-level formatting (Restore item).
Formatter Silicon Power
Formatter Silicon Power - free utility low level formatting flash drive, which, according to reviews (including in the comments to the current article), works for many other drives (but use it at your own peril and risk), allowing you to restore their functionality when no other methods help.

The utility is no longer available on the official SP website, so you will have to use Google to download it (I do not provide links to unofficial locations within this site) and do not forget to check the downloaded file, for example, on VirusTotal before launching it.
SD Memory Card Formatter for repairing and formatting SD, SDHC and SDXC memory cards (including Micro SD)
The SD Memory Card Manufacturers Association offers its own universal utility for formatting the corresponding memory cards if problems arise with them. Moreover, judging by the available information, it is compatible with almost all such drives.

The program itself is available in versions for Windows (Windows 10 is also supported) and MacOS and is quite easy to use (but you will need a card reader).
You can download SD Memory Card Formatter from the official website https://www.sdcard.org/downloads/formatter/
D-Soft Flash Doctor program
Free D-Soft program Flash Doctor is not tied to any specific manufacturer and, judging by reviews, can help fix problems with a flash drive through low-level formatting.

In addition, the program allows you to create an image of a flash drive for subsequent work not on a physical drive (to avoid further malfunctions) - this can be useful if you need to obtain data from a Flash drive. Unfortunately, the official website of the utility could not be found, but it is available on many resources with free programs.
How to find a program to repair a flash drive
Actually this kind free utilities for repairing flash drives there is much more than what is listed here: I tried to take into account only relatively “universal” tools for USB drives different manufacturers.
It is quite possible that none of the above utilities are suitable for restoring the functionality of your USB drive. In this case, you can use the following steps to find the program you need.

Additionally: if all the described methods are repaired USB drive didn't help, try.
Today it is impossible to imagine a more convenient tool for quickly storing information than a flash drive. For many reasons, the main one of which is still the technical imperfection of Flash drives, a storage device in the form of a key fob, which is convenient in all respects, can still fail. Restoring a Transcend flash drive will be the topic of our story. However, the electronic “reincarnation” algorithm given below is also effective for miniature “storages” of other brands.
Introduction: interesting theory
Before restoring a Transcend flash drive, we need to understand what we will have to deal with. Knowledge of the technical part of the device will greatly facilitate the overall process of troubleshooting. However, we will not delve into the technical details and fill our heads with various technological terms. We just need to understand the main thing - what the miniature drive consists of.
How a flash drive works: a look from the inside
- As a rule, the NAND FLASH chip takes up the most space on the board. Depending on the manufacturability of the finished product and its storage capacity (nominal amount of stored data), a specific Flash Drive may have one or more such elements. If you restore a Transcend 16 gb flash drive, know that most likely there are two such NAND chips. It is worth noting that there are three main types of negotiated memory: SLC, MLC and TLC.
- The second most important part is the controller. From different manufacturers, such a component may differ from similar ones in both standard and software characteristics. This microcircuit performs several functions: converts supply voltage, controls LED indicator(if any) and carries out the process of exchanging information with the computer host. The controller also contains a special memory area in which the firmware is located - this is the microprogram through which general interaction with all internal components of the Flash media occurs.
- The board also contains SMD elements and a quartz resonator.

After a while, you will understand how much easier the above information will make restoring a Transcend flash drive.
Determining the cause of the malfunction
As practice shows, the main source causing the inoperability of a Flash-Drive device is a banal software failure, the main “symptoms” of which are:
- The storage device is not visible to the computer at all when inserted into a USB connector, but responds to insertion with a sound signal.
- The operating system determines only part of the disk space of removable media.
- The flash drive is recognized by the computer OS, but does not “want” to work with it.
Even if you did not violate the operating rules, and some of us (users) unknowingly abuse the method of “quickly” removing a flash drive from a PC, there are still frequent cases when a miniature memory device partially or completely fails due to reasons beyond our control. reasons for us. And yet, it would be somewhat rash on our part to discount the possibility of mechanical damage, but more on that later...

Step One: Comprehensive Action Analysis
Don’t rush to look for utilities for restoring Transcend flash drives. Perhaps your computer is faulty, or the reason for the removable media’s inoperability lies in one of the “whims” of the PC:
- Check if the “problematic” drive works on another computer.
- Disconnect all peripheral devices from your PC.
- Connect the Flash Drive to one of the main system USB connectors ( rear end block).
- Go to the system event log and make sure that there have been no recent conflicts with drivers. Otherwise, the “dead” software should be reinstalled.
- Clear the system of traces of previously connected Flash devices (the USBOblivion utility will help you).
If the above did not help, and the carrier still “does not want” to work fully, proceed to the next part of the article.
Step two: check the physical integrity of the Flash-Drive device
Hardware recovery of a Transcend flash drive is not always a complicated process (in terms of its implementation):
- Inspect the “non-working” flash drive from all sides.
- Chips, deep scratches should alert you.
- Look inside the USB connector - perhaps one of the contacts is bent or even dangling, shorting the connector located next to it.
In the event that you hear that something has fallen off inside the case, or a visual inspection requires a more in-depth analysis, carefully remove the Flash drive casing. Inspect the integrity of internal soldering, especially where the metal part of the USB connector touches the main electronic board.

Step three: diagnostics of the memory device and collection of data about the removable drive
Correct recovery of a Transcend 8gb flash drive (including other capacity denominations) is only possible when the user knows the exact information about his model.
Namely:
- What type of memory is installed on the Flash Drive device (its unique ID).
- What kind of controller is equipped with the removable media (its manufacturer, model identifier and firmware version).
You can find out all this data by running the ChipGenius utility on your PC, which you can easily find on the Internet, after which all you have to do is download the recovery tool you need and return the flash drive to “digital life.”
Step four: the immediate process of restoring the Flash Drive device
In most cases, the JetFlash Online Recovery utility helps. Download it latest version and run it on your computer. By the way, in the process of using this software you need a constant Internet connection.

So, as soon as the Transcend flash drive recovery utility is launched and your faulty removable drive is inserted into the USB port, click the rightmost “Yes” button and wait until the program performs all the “resuscitation” actions.
At the end of the repair process, remove the drive from the connector and reconnect the flash drive.
With a high degree of probability, your Flash-Drive will become operational again.
In conclusion
As you can see, nothing is impossible! Everything is not as difficult as you may have thought before. The only thing you should beware of is haste and rash actions. Do not doubt your own abilities, be confident - and you will succeed!