How to Recolor Anything and Everything in Photoshop
Sofia Skrylina, teacher information technology, St. Petersburg
Photoshop graphics editor has huge amount tools that can be used to repaint various objects. Some of them require preliminary selection of fragments, others do not require the use of selection tools, affecting only certain colors of the image. In this article, we will only work with the background or regular layer, without using any fill layers or layer blend modes.
Color Replacement Tool
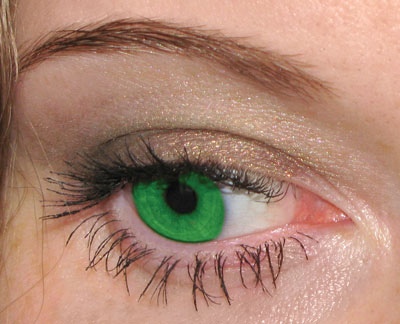
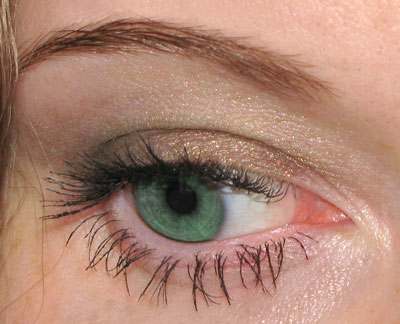
Tool Color replacement(Color Replacement) is in the same group as tools Brush(Brush) Pencil(Pencil) and Mix brush(Mixer Brush) and is intended for repainting image fragments. This tool has only four blending modes: Color tone(Hue) Saturation(Saturation), Chroma(Color) and Brightness(Luminosity). Modes are used to repaint fragments Chroma(Color) and Color tone(Hue). The first mode provides a brighter shade, so when using it you should choose shades of the color applied to the object that are much darker than in the second mode. So, in Fig. 1 shows an example of repainting the iris of the eye in green one shade: R=7, G=95, B=17. The first result was obtained in blend mode Chroma(Color), the second is in mode Color tone(Hue).
 a
a
 b
b
 c
c
Rice. 1. Results of repainting the iris with the Color Replacement tool: a - original image; b — Color mode; c — Color tone mode

The tool properties panel has a number of other parameters (Fig. 2):
- All pixels(Discontiguous) - the color is replaced wherever it occurs on the path of the pointer,
- Adjacent. pix(Contiguous) - colors that are similar in color to the one under the mouse pointer are replaced.
- Edge highlighting(Find Edges) - when replacing colors, clear edges of objects are preserved at the same time;
- parameter Tolerance(Tolerance) sets the sensitivity of the instrument;
- checkbox Smoothing(Anti-alias) sets smooth borders when replacing colors, set by default.
In the example considered, the object was not pre-selected, but if you are working with a more complex object that requires brush processing in several stages using several blending modes, then, of course, you must first select the object.
Note. Basically, instead of a tool Color replacement (Color Replacement) can be used Brush (Brush), which has the same blending modes: Chroma (Color) and Color tone (Hue).
Beyond the Tools Color replacement(Color Replacement) and Brush(Brush) tools are used to repaint fragments color correction. To call them use the menu Image(Image) -> Correction(Adjustments). Let's take a closer look at these tools.
Dialog box « Hue/Saturation »
For changing the color of an object in a dialog box Hue/Saturation(Hue/Saturation) is answered by the slider Color tone(Hue). When selecting an item All(Master) replaces all colors in the selected area. At the same time, you can specify one of the base colors of the RGB and CMYK models, which will be affected by the tool (Fig. 3). In this case, if the object is the only one in the image consisting of one group of colors, there is no need to first select it.

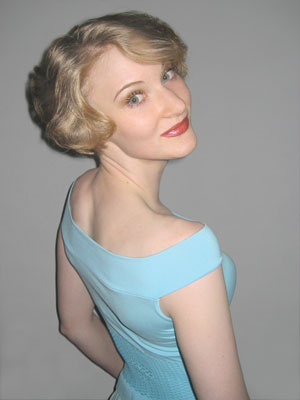
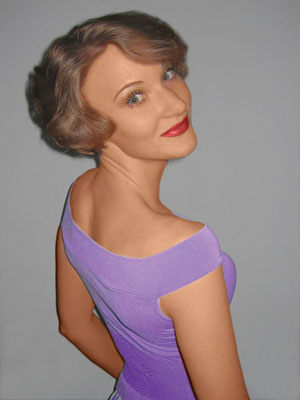
Rice. 4. The original image of the girl (a) and the result of repainting and tanning (b)
So, in Fig. 4, to change the color of a sweater from blue to lilac, there was no need to select it; it was enough to select the blue color to be replaced (see Fig. 3). But to color the remaining objects, they were pre-selected.
Note. In the above example, a tool was used to dye the hair and jacket Hue/Saturation (Hue/Saturation), and for applying tan - tools Replace color (Replace Color) to darken the skin tone a little, and Color replacement (Color Replacement) to repaint the leather brown.
Don't forget to use the remaining two sliders when replacing colors: Saturation(Saturation), which allows you to increase or decrease the saturation of the selected color, and Brightness(Lightness), darkens or brightens the selected color.
Replace Color Dialog Box
Team Replace color(Replace Color) replaces the color in the image that is selected using the eyedroppers. The first click with the eyedropper selects the color to be replaced, subsequent clicks with the “+” or “-” sign specify the range of colors (Fig. 5). Parts of the image corresponding to the selected colors in the area preview are indicated in white. In addition to the eyedroppers, a slider is used to expand or narrow the selected shades Scatter(Fuzziness).

Using sliders Color tone(Hue) Saturation(Saturation) and Brightness(Lightness) determines the color of the replacement. In addition, the replacement and replacement colors can be selected from the color picker, which is called up by clicking on the color swatch. In most cases, preliminary selection of fragments is not required.
Note. Please note that the dialog box Replacecolor (Replace Color) is very similar to the selection tool Color range (Color Range), which selects a fragment by group of colors. It turns out that the dialog box Replace color (Replace Color) combines the functions of two tools: the selection tool Color range (Color Range) and color replacement tool Hue/Saturation (Hue/Saturation).
Best results when using a dialog box Replace color(Replace Color) is achieved if the replaced color is close to uniform. Otherwise, noise appears in the image, which you have to get rid of using additional tools. Usage example of this instrument for repainting tulip petals is shown in Fig. 6.
 a
a
 b
b
Rice. 6. The original image of a tulip (a) and the result of its recoloring in the Replace Color dialog box (b)
Selective color adjustment
Selective color adjustments are made in the dialog box Selective correction colors(Selective Color) (Fig. 7), which allows you to selectively change the volume of a composite color in any of the primary colors without changing the other primary colors.

This tool can be used to recolor parts of an image while maintaining the base color. For example, red color can be changed to any other color that contains red: from yellow (a mixture of red and green) to lilac (a mixture of red and blue). But, for example, turning red into blue will not work. This tool is also indispensable in situations where you need to remove a color cast created by a light source, such as a regular table lamp (Fig. 8).
 a
a
 b
b
Using Lab Mode
The Lab color model is based on three parameters: L— brightness (Lightness) and two chromatic components — a And b. Parameter a varies from dark green through gray to purple. Parameter b contains colors from blue through gray to yellow. This circumstance can be used to quickly recolor image fragments by inverting the straight line in each channel (provided that this object is easy to select or all other colors in the image are close to neutral). To invert a straight line, simply drag the top right point of the straight line down and the bottom left point up.
a you can get the following results:
- red and burgundy colors are repainted green;
- green becomes light brown.
When inverting the straight line in the channel b You can get other results:
- red becomes purple or lilac depending on the original hue, and purple and lilac become red;
- yellow turns to blue.
When inverting the straight line in both channels simultaneously, the following results are obtained:
- red is repainted into blue, the shade of which depends on the original shade of red;
- blue and magenta become green.
Note. Because the Lab color model can display more colors than the RGB model, converting an image from Lab to RGB and back does not affect its quality. Therefore, the transfer can be carried out as many times as you need.
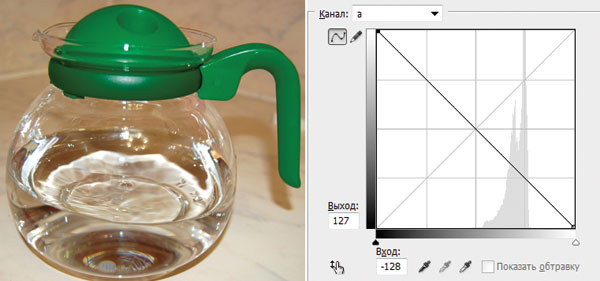
Now let's look at a few examples. In Fig. Figure 9 shows the original image of a jug with a lid and a red handle.
First you need to switch the image to Lab mode by running the command Image(Image) -> Mode(Mode) -> Lab. In this case, a tool is quite suitable for highlighting the lid and handle Quick selection(Quick Selection).

 a
a
 b
b
 c
c
Rice. 10. Result of repainting fragments: a — green by inverting the straight line in channel a; b — to lilac color by inverting the straight line in channel b; c — to blue by inverting the straight line in channels a and b
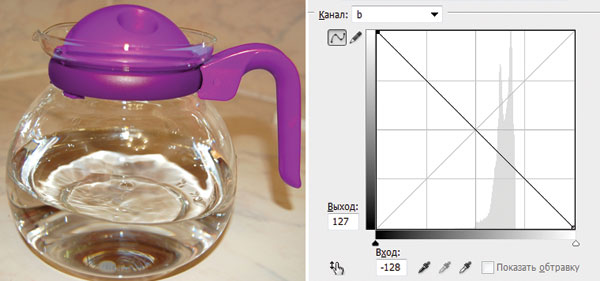
In the dialog box Curves(Curves) (it is called by the key combination Ctrl+M) from the list Channel(Channel) select the channel a and invert the straight line (Fig. 10 A).
If you invert the straight line in the channel b without changing the position of the straight line in the channel a, we get a lilac color (Fig. 10 b). Inversion of the straight line in both channels will give a blue color (Fig. 10 V).
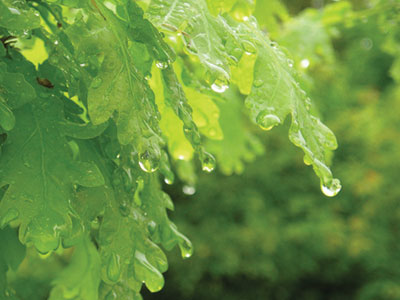
Image colors may fade during repainting. You can also increase their saturation in Lab mode, without resorting to dialog box Hue/Saturation(Hue/Saturation). To do this, it is necessary to increase the angle of inclination of the straight line in both color channels. In Fig. Figure 11 shows the original image of green leaves. When inverting the straight line in the channel a we get a faded brown color (Fig. 12).

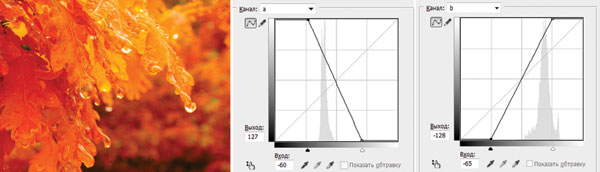
To increase the saturation of colors and transform the summer landscape into autumn, let’s change the channels a And b angle of inclination of the straight line (Fig. 13).
As you can see, graphic editor Photoshop offers a truly huge selection of tools for recoloring parts of an image. Which of the available tools to use is up to you.
Changing colors in Photoshop is a simple but fun process. In this lesson we will learn how to change the color of various objects in pictures.
We will change the colors of objects in three ways: in different ways. In the first two we use special functions program, and in the third we will paint the required areas manually.
Method 1: Simple replacement
The first way to replace color is to use a ready-made function in Photoshop "Replace color" or "Replace Color" in English. It shows the best results on monochromatic objects. For example, let's take an icon and open it in Photoshop. Next, we will replace the color with any other one that interests us.


So we changed one color to another.
Method 2: Color Range
The second method, according to the scheme of work, can be said to be identical to the first. But we will look at it in a more difficult image. For example, we chose a photo with a car.

As in the first case, we need to indicate what color we will replace. To do this, you can create a selection using the color range function. In other words, highlight an image by color.

The result has been achieved. If there are areas of the original color left in the image, the procedure can be repeated.
Hello again, my dear readers. Today I would like to tell you how to replace a color in Photoshop with another in a separate area and even in the entire picture. After all, you probably have often had the desire to repaint something just to see how it would look. But in order not to make a mistake, it is better to first do this on some kind of layout or photograph. Then you will already know how and what it looks like. Let's see how to change the color of an object to a specific one using the example of repainting the car in the picture.
First way. Color replacement
Let's look at the simplest case, when our background is completely different from the object itself, i.e. cars.
- So, upload a photo, picture or drawing into our editor and now go to the familiar “Image” menu. Next, select “Correction”, and then “Replace Color”.

- A color replacement window opened in front of us. What are we doing here? First, let's make sure that the active tool in this window is a regular eyedropper (without signs). Now just left-click somewhere on the hood of the car.

- As you can see, we have a small drawing in the window. What is colored light shows us which area will undergo a color change. Now start dragging the Hue slider. Do you see? Some of the color starts to change as you move that tone. Don't be upset that not the whole car is painted over. We'll fix it.

- To begin, hold down the left mouse button on the “Scatter” slider and drag it towards the larger side. Just try to make sure that the car is painted over as much as possible, while the background remains untouched. In this case, there are no yellow tints in the background, which allows me to set the maximum spread to 200.
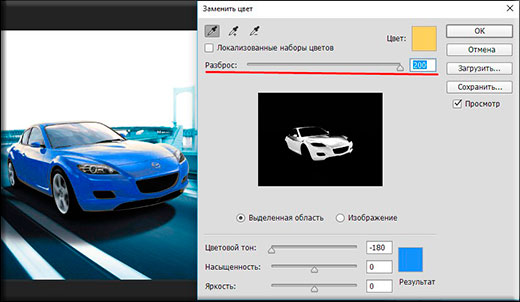
- Has the desired object changed almost all its color, but not completely? Again, no problem. Activate the internal tool “Pipette+” and left-click on those areas of the car where there are unpainted areas in the drawing.

- Voila!) As you can see, everything worked out and even our background was not damaged. And by the way, you can also move the “Hue”, “Saturation”, “Brightness” sliders to achieve the desired shade.

Look. It looks like it should be. And this function can be used in different areas, for example, to replace the color of clothes, or to give an unusual but specific shade to vegetables or fruits. In! Try making a blue watermelon. I assure you. It's easy, very interesting and useful for consolidation.

Correcting Misunderstandings
Let's look at a slightly more complicated case. Let’s say I again want to change the color of the car, but this time it’s different. As you can see, the color of the car is the same as in the background. Well then? Let's do everything the same as above and see what we get.

But we’re doing a bad job, the background is so similar to the color of the car that neither the “Pipette-” nor reducing the spread helps. If we want ours to be purple, then our mountains will also be similar. What to do?

In such difficult situations, you will have to do a little manual work. There's really nothing wrong with this. You'll just have to use the one you know. Yes, yes. We erase unsuccessfully painted objects or backgrounds with pens, thereby leaving only the object itself with a certain color, i.e. in our case a car.

Even better, before you start changing the color, duplicate the layer and perform all the actions on the created copy. And unnecessary details can be erased with regular . This will be better if you suddenly want to change the color later.
Second way. Blend Mode
Well, since we’re talking about repainting a car in Photoshop, I can’t help but mention another good way to carry out this action. True, here you will also have to work with your hands, since you will have to change and paint over everything. But we can easily replace the color in Photoshop with any other.
Let me load the same car as above.
- Let's take and how we would like to paint this car. Well, let’s say I want to see it green, then I’ll choose this specific color.
- Now create new layer by pressing the key combination SHIFT+CTRL+N. And then take a look at the Layers panel. Do you see any blending modes there? The default is normal, but open the drop-down list and select “Color” (By the way, the “Color Tone” mode is also suitable, so you can select that too). Great. Well done.

- Now choose the size, shape and hardness of the brush, and go ahead! We paint the car. Just be careful not to touch too much. Well, if you hit it, then use an eraser to correct it, no big deal.

- And now, if you want to change the color that you sculpted, you need to go to our again familiar “Image” menu and select “Correction” there - "Hue/Saturation". But I advise you to immediately use a simple key combination CTRL+U.

- Well, in the newly opened window, you can also move the hue, saturation and brightness sliders to change the hue. It's simple.

Well, how do you like the lesson? Was everything clear and interesting? I hope so. Personally, when I learned about changing the color of an item in Adobe Photoshop, was simply delighted. If, of course, something is unclear, you can always clarify or ask. I will be glad to help as much as possible.
I would also advise you to look cool video course on photoshop. The video lessons are simply awesome, the course goes from easy to complex, everything is told in human language, nothing is missed and at the same time there is no unnecessary “water”. Everything is spot on. So be sure to check it out.
Well, I say goodbye to you today. I will be glad to see you in my other articles. Well, in order not to get lost, be sure to subscribe to my blog updates. I won’t spam - everything is just to the point, honestly. Well, you practice. See you in other lessons. Bye bye!
Best regards, Dmitry Kostin.
Welcome! In this article we will show you how to change the color of a selected object in photos in Photoshop. You've probably visited the websites of car dealerships, where all the color options of cars are presented, and by clicking, you can see them all, or clothing stores, where you can also see all the color options presented. Naturally, you can photograph the product in all colors, but this is not always possible, and you need to show the entire assortment. It will not be possible to repaint complex objects with a brush, since this method does not allow you to convey, for example, the texture of clothing or all the glare on a car body. Well, stop pouring water, let's get started!
Changing colors on contrasting objects

- First, we need to copy the image layer just in case, so as not to spoil it and accidentally save it. To do this, click on the photo layer and press the keyboard shortcut ctrl+
j.
This is the layer we will work with:

- Now we need to create an adjustment layer. To do this, click on the “Create a new adjustment layer” button, which you will find at the bottom of the layers panel, and in the list that appears, select “Hue/Saturation...”.

- This is the layer with the mask that should appear:

- Now we need to change the color in the properties of the created adjustment layer:
 Please note that we are editing the red color in the photo, and select it accordingly. If you have a different color, then you need to choose that one. If the color you need is not on the list, then you should look for a solution in the following methods.
 - Activate the Eyedropper tool in the properties of the adjustment layer and use it to take a color sample from the area of the photo that you are editing:
- The next step is to select the required color using the “Color Tone” slider in the properties of the adjustment layer. You can also edit the saturation and brightness to give the desired result:
 Don't be alarmed if the entire photo begins to change color - this is normal. Then we will do everything right!
 - Once you have found the desired shade, you need to fill the adjustment layer mask with black. To do this, press the key combination Ctrl+
i,
but before that, be sure to activate the layer mask by clicking on it:
 After you fill the mask with black, the photo will return to its original form. By the way, if you want to know what masks are and how to use them, then read the article Working with masks in Photoshop.
 - Now select the area to which we are changing the color. Selections can be made with a pen P or a magic wand W, if the edges are clear. If the edges are not quite clear, then it will be easier and faster to use a quick selection:
 This is how we selected the editable area:
- Now take the brush B, select white and paint the mask in the editable area with white. The required color will appear:

- Deselecting Ctrl+
D and look at the result. If you see that there are areas of the photo that could not be properly selected and could not be changed, then do not be upset, since we worked with a mask and everything is easy to edit. To do this you need to take the brush without selection. B with white color and carefully work on them, changing the size of the brush and its hardness. In the end, the result should please you:
 Tip: After you have changed the color, you can change the adjustment color settings in order to change the color to the desired one, without having to do all the manipulations again.
Change the colors of the object to any others

11.02.2015 27.01.2018
In this lesson I will tell you in detail about ways to change colors in Photoshop. I will describe all the steps in detail, accompany them with pictures to make it clear and clearly explain where and what function can be used.
1 way
The first way to replace a color is to use the ready-made function in Photoshop “Replace Color” or Replace Color in English.
I will show you with a simple example, a simple picture. Let's take the icon and open it in Photoshop.
Trowel on a yellow icon. We will replace yellow with any other color that interests us. To do this, go to the menu Image – Correction – Replace Color (Image – Adjustments – Replace Color)
.png)
The Color Replacement Function dialog box appears. Now we must indicate what color we will change; to do this, activate the Eyedropper tool (see arrow) and click on the trowel with it. You'll see this color appear in the dialog box at the top, which is labeled Highlight.
.png)
At the bottom is the Replacement heading - there you can change the selected color. But first, you can set the Scatter in the selection parameter. The larger the parameter, the more colors it will capture. In this case, you can set it to maximum. It will capture all the yellow in the image.
Configure the Color Replacement settings - with the color you want to see instead of the one being replaced. I made it green by setting the Hue, Saturation and Brightness parameters.
.png)
When you're ready to change the color, click OK.
So we changed one color to another.
Method 2
The second method in terms of operation can be said to be identical to the first. But we will look at it in a more difficult image.
For example, I chose a photo with a car. Now I will show you how to replace the color of a car in Photoshop.
.jpg)
As always, we need to indicate what color we will replace. To do this, you can create a selection using the color range function. In other words, select an image by color.
To do this, go to the menu Selection – Color Range (Select – Color Range)
.jpg)
Next, all you have to do is click on the red color of the car and we will see the function that defined it - coloring it white in the preview window. The white color shows which part of the image is highlighted. The spread in this case can be adjusted to the maximum value. Click OK.
.jpg)
After you click OK, you will see how the selection has been created:
.jpg)
Now you can change the color of the selected image. To do this, use the function – Image – Correction – Hue/Saturation (Image – Adjustments – Hue/Saturation)
.jpg)
A dialog box will appear.
Immediately check the Toning option (bottom right). Now using the Hue, Saturation and Brightness parameters you can adjust the color. I adjusted the color blue.
.jpg)
All. The color has changed.
.jpg)
It was - it became:
.jpg)


