Illustrator provides several options for adjusting transparency for both vector and bitmap objects. The simplest of them is to select an object and set the desired opacity for it using the slider Opacity(Opacity) custom palette Transparency(Transparency). This palette, which can be open or closed, is called from the list of palettes that opens when the command is activated Window(Window). If, when choosing a command Window => Transparency the palette opens incompletely, then you must sequentially use the commands Show Thumbnails(Expand from pictogram) and Show options(Show Options) from the palette menu.
In addition, the visibility of individual areas of the image can be controlled using layer masks (clipping masks - clipping mask) and translucency masks ( opacity mask). Stencil-like masks determine how individual layers are superimposed on each other, can make individual parts of an image completely or partially visible or completely invisible, and allow complex transparency settings for any object. And since transparency in this case is implemented as a mask over the object, the user can edit the object at any stage of the work without affecting the mask. You can also adjust the transparency for groups of objects, although if you need to edit individual objects from the group, the last of them will have to be ungrouped, and all the transparency settings for the group will be destroyed.
Adjusting opacity without masking
Palette Transparency(Transparency) allows you to easily change the transparency of any objects - both raster and vector (formed in a variety of ways: using contours of different types, symbols from the palette Symbols(Symbols) or as text) and make the underlying objects show through effectively. Pay attention, for example, to fig. 1, which is taken as a source image. Then a series of paths were added to it: the upper path was created with the tool Pen(Pen) and filled with a linear gradient, and a series of water droplets obtained using the palette Symbols... For all involved contours, their own transparency levels are set (Fig. 2, 3).


Rice. 3. The final appearance of the photo after adjusting the transparency of individual objects
Setting a specific transparency option is not an obstacle for the subsequent editing of objects, for which, if necessary, you can always change the fill or stroke option, size and position, transparency level, etc.
Also in the palette Transparency(Transparency) it is possible to select color mixing modes ( Blending mode): Normal(Normal) (this is the default mode), Multiply(Multiplication), Screen(Lightening), etc., which can be applied not only to an individual object, but also to a group or a layer, and in combination with the transparency level can achieve the desired effect of the object's visibility.
Setting opacity for vector objects
Let's consider the option of setting opacity for individual objects. To do this, draw some simple intersecting objects. Such objects are preferable because they can be used to familiarize yourself with the different opacity options. In this example, the objects will be three overlapping flowers on a black background (Fig. 4). Select two objects, for example the two top flowers, and change their opacity values in the palette Transparency, for example, as shown in fig. 5, - for this you just need to drag the engine Opacity(Opacity). Notice that the flowers are now transparent both relative to each other and to the background (Fig. 6).


In the second option, you need to restore the transparency value to 100%. To do this, first group both selected flowers with the command Object => Group(Object => Grouping) which will automatically cause the checkbox to be checked Knockout Group Transparency... Then change the opacity again by setting the parameter value Opacity(Opacity) equal to 70%. As a result, the objects will become transparent in relation to the background, but not relative to each other (Fig. 7). The point is that enabling the checkbox Knockout Group(Group with background removed) in the palette Transparency allows you to remove (albeit only visually) the translucency of translucent group objects that overlap each other in this group.

Additionally, draw a series of several small elements of the same type, such as stars (fig. 8). Combine them into a group using the command Object => Group(Object => Group) and set them to blend mode Screen(Dodge) with opacity (fig. 9). As a result, the stars will change their color and will look something like the one shown in Fig. 10.


Rice. 9. Setting opacity and blending mode for the new group

Rice. 10. The appearance of the entire image after adjusting the opacity settings
Select both groups of objects, then group them again and check the box Isolate Blending(Isolate Blend Mode) in the palette Transparency- this will allow you to isolate objects when setting their blending mode for them. As a result, the color blending mode will be applied to the objects included in the group, and all other objects (in this case, one single asterisk on a green flower) will be ignored (Fig. 11). Note that the checkbox Isolate Blending(Isolate Blending Mode) only makes sense when it comes to color blending modes other than Normal(Normal).

Rice. 11. Changing the appearance of the image as a result of the isolation of objects
Adjusting the Opacity of a Bitmap
Now let's try to experiment with the bitmap (Fig. 12). Form a vector outline around the image in the form of a rectangle filled with white (Fig. 13). Change the opacity in the palette Transparency, for example, as shown in fig. 14. The image will begin to resemble Fig. 15. The result can be much more interesting if the rectangle is filled with a radial gradient (fig. 16, 17). It is also worth experimenting with opacity modes, for example changing the default mode Normal on the regime Screen(fig. 18).


Rice. 15. Appearance of the image after changing the opacity of the rectangle

Rice. 16. Setting the opacity of the rectangle in the Transparency palette after filling with a radial gradient

Rice. 17. The appearance of the image after filling the rectangle with a gradient and changing the opacity in the Normal mode

Rice. 18. The appearance of the image after filling the rectangle with a gradient and changing the opacity in the Screen mode
Opacity control via layer mask
Layer mask, or clipping mask ( clipping mask), allows you to remove, or, as they say, mask unnecessary areas of the image (Fig. 19, 20), without destroying the contents of the layer.


Rice. 20. Visibility of the image after creating a layer mask in the form of an oval
The creation of a layer mask is carried out in several stages. First, a contour is formed above the image layer, which is supposed to be used later as a mask. Then you need to select the image and the outline. It is often more convenient to do this in the palette. Layers by sequentially clicking on the round buttons corresponding to the objects while holding down the key Shift- the appearance of the circle button for each selected element will change. After that, you need to press the button Make / Release Clipping Mask on the palette Layers or use the command Object => Clipping Mask => Make... As a result, everything that falls inside the path will remain visible, and the area outside the path will be hidden. If mask cutting was done unsuccessfully, then you can refuse it at any time by calling the command Object => Clipping Mask => Release or by clicking on the button Make / Release Clipping Mask on the palette Layers.
Note that the button Make / Release Clipping Mask on the palette Layers is usually unavailable and becomes active only if in the palette Layers activated area Group(fig. 21). In addition, it should be borne in mind that any objects that are subsequently added to the group of a layer with a layer mask are also cut off by the mask (Fig. 22) and become invisible. At the same time, objects embedded in the layer above the group will be visible (Fig. 23).


Rice. 22. The result of cutting off the added stars by the layer mask - some of the stars have become invisible

Rice. 23. The appearance of the image with the Layers palette open - an asterisk added above the group with a layer mask is visible
Texture text
Very often, layer masks are used when creating textured text, that is, text cut from some kind of texture or just from a photograph. As an example, we will use a photograph (Fig. 24) and print some arbitrary text over it (Fig. 25). Select the text along with the outline of the photo and apply the command Object => Clipping Mask => Make... As a result, the image will begin to resemble Fig. 26, and the palette Layers will take the form corresponding to Fig. 27. The resulting image, if desired, can be subjected to further editing, for example, make a stroke (Fig. 28), apply a suitable filter (Fig. 29), etc.


Texture Fill Freehand Vector Paths
Open a suitable texture (Fig. 30), which you plan to use to fill some contour (Fig. 31) - in this example, we used a fragment of a lizard contour that we created in one of the previous lessons - and copy the contour onto the texture via the clipboard (Fig. 32), if necessary, editing its size and position. To hide the space outside the path, which is visually equivalent to filling the path with a texture, select the path along with the texture and use the command Object => Clipping Mask => Make... As a result, the image will begin to resemble Fig. 33, and the palette Layers will take the form corresponding to Fig. 34.
To make the image finished, make a copy of the path through the clipboard, right-click on the copy and to mirror it, select the command Transform => Reflect with parameters as in Fig. 35. Place the copy properly (fig. 36) and give the lizard a slightly curved shape using the filter Twist(Bend) - command Effect => Distort & Transform => Twist(Effect => Distortion and Transformation => Bend) with approximately the same parameters as in Fig. 37. The result obtained may resemble fig. 38.


Rice. 36. The appearance of the image obtained on the basis of two aligned contours, previously filled with texture


Simulate the effect of intersecting objects
Now let's look at a more complex option for creating a clipping mask - we need it to simulate the effect of intersecting objects. First, form three circles (in this example, Latin letters will play their role. " o”) So that each next circle partially overlaps the previous one (fig. 39). Select all three circles and make a copy of them to the clipboard with the command Edit => Copy(Editing => Copy). Then paste a copy from the clipboard using the command Edit => Paste in Front(Editing => Paste in Front) so that the original image and its copy are superimposed on each other. After that, use the Restangle tool to form a rectangle with no fill and no borders at the intersection of the first and second circles (Fig. 40). Please note that the rectangle must appear on the same layer. Layer 1, but above all other objects (Fig. 41).


Rice. 40. The appearance of a rectangle at the intersection of the first two circles

To create a layer mask, select the formed rectangle and the first circle and apply the command Object => Clipping Mask => Make(fig. 42). Then, in the same way, create a rectangle at the intersection of the second and third circles and select this rectangle along with the second circle (Fig. 43). If it is not possible to do this in the usual way, then select the necessary objects through the palette Layers: to do this with the key pressed Shift click on the circle buttons available for each element of the layer (Fig. 44), and in this case the appearance of the circle button for each selected element will change. Create a clipping mask with the command Object => Clipping Mask => Make- the resulting image will resemble Fig. 45.


Rice. 44. Window of the Layers palette with the second circle and the second rectangle selected

Finally, to make the image more effective, select on the palette Layers the bottom three circles and shadow them with the command Effect => Stylize => Drop Shadow(Effect => Stylize => Drop Shadow) and then fill the background under the circles with a gradient, for which you need to create a new layer Layer 2... To this end, activate the layer Layer 1, open the palette menu Layers and select the command New layer(New Layer) - resulting above the layer Layer 1 layer will appear Layer 2... Draw a rectangle on it (this will cause the circles to appear under the rectangle and be invisible), which will act as a background, fill it with a suitable gradient and apply a shadow with the command Effect => Stylize => Drop Shadow(Effect => Stylize => Shadow). To make the circles sit on top of the background rectangle, change the L layers ayer 1 and Layer 2 places by dragging one on top of the other in the palette Layers(fig. 46). It is possible that the image will take on something like the one shown in Fig. 47.


Rice. 47. The final appearance of the intersecting circles on a gradient background
Adjusting opacity by creating an opacity mask
Translucency mask ( Opacity mask) determines which parts of the image should be clearly visible, and which - only partially, that is, semi-transparent or not at all visible. In this case, any colors, as well as decorative and gradient fills located below and located inside the mask, can be visible through the specified semitransparent mask.
The process of forming a mask is quite simple and consists in layering two or more objects one on top of the other, and in setting the required transparency level for each of them and in defining the topmost one as a mask using the command Make opacity mask(Create Semi-Transparent Mask) from the palette menu Transparency... The creation of the opacity mask will be indicated by the appearance in the palette Transparency mask icons next to the icon of masked objects, separated by the "chain" icon, and changing the visibility of image fragments (Fig. 48, 49, 50). Palette appearance Layers will change depending on what is active at a given time - an image (Fig. 51) or a mask (Fig. 52).


Rice. 50. Transparency palette - on the left is an image icon, on the right is a mask icon

Rice. 51. Image and palettes Layers and Transparency - active image

Rice. 52. Image and palettes Layers and Transparency - active mask
An opacity mask is created according to the shape of the uppermost of the selected objects, and at least two upper objects must be selected - selecting only one of them will create an empty mask. Adding new objects to the image does not in any way affect the previously created translucency mask; all added objects will be visible by default, as they are created on top of the mask (Fig. 53), although they can be moved under the mask if desired.

Rice. 53. Result of adding a new object in the form of a frame over the masked image
As a result, the upper object will become a mask, and its filling in grayscale mode will affect the degree to which this or that area of the image lying under it will be visible. For example, full filling of the mask with white will result in the image fragments within the mask being completely visible, with a black mask, the masked objects will be invisible, and using a gradient black and white mask will cause the masked objects to appear where the white begins. area, and fade out where the gradient turns black. In addition, you can create a translucency mask using any gradient fills, gradient meshes, and even decorative fills.
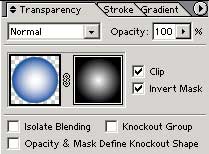
It is worth noting that the above rule regarding mask color and object visibility is ambiguous. So, turning on the checkbox Invert mask(Invert mask) in the palette Transparency will lead to the fact that the black and white effect is inverted and the black areas become transparent, and white, on the contrary, opaque (Fig. 54); enable / disable the same checkbox Clip(Cropping) allows you to swap masked and unmasked areas.

Rice. 54. Changing the appearance of the image as a result of inverting the mask
The translucency mask can be formed from any vector object and transformed using various distortion filters, which allows you to achieve very interesting effects. Text can also be saved as an opaque mask to quickly create custom text headings while keeping the text editable. The shape of the opacity mask can be adjusted by clicking on the mask icon in the palette Transparency with the key pressed Alt... As a result, the object on the basis of which the mask was created will be selected and become available for editing. After finishing editing, click on the image thumbnail.
To completely remove the opacity mask, select it and use the command Release opacity mask(Remove transparency mask), and to temporarily hide it - with the command Disable Opacity Mask(Remove the transparency mask). Both commands are selected from the palette menu Transparency.
Effects with photography
First, open some photo (fig. 55) and form a rectangle on top of it, fill it with a linear gradient and process with a filter. ZigZag (Effect => Distort & Transform => ZigZag- Effect => Distortion and Transformation => Zigzag) (fig. 56).


Rice. 56. Appearance of the object? on the basis of which a semi-transparent mask will be created
Create a mask using the command Make opacity mask Transparency... As a result, the image will resemble Fig. 57, and in the palette Transparency the icon of the created mask will appear (fig. 58). Now try editing the mask: select it by clicking on the thumbnail in the Transparency palette while holding down the key Alt, take advantage of the effect Inner glow (Effect => Stylize => Inner Glow- (Effect => Stylize => Inner Light) and add a suitable shadow ( Effect => Stylize => Drop Shadow- Effect => Stylization => Shadow). It is possible that the image will begin to resemble Fig. 59.

Rice. 57. The appearance of the photo after applying a translucent mask


Texture text
As mentioned above, texture text is quite often created using a layer mask, but no less ample opportunities for cutting text from a texture or any photograph open up even when using translucent masks.
Take, for example, fig. 60 and type black text on top of it (as with any textured text, the letters should be large and wide enough) (Figure 61). Select text and photo and use the command Make opacity mask(Create Semi-Transparent Mask) from the palette menu Transparency when checked Clip(Cropping). It is possible that the result will resemble Fig. 62, and in the palette Transparency the icon of the created mask will appear (Fig. 63). Please note that in case of an unsuccessful initial position of the text, it is easy to move it after creating a mask, having previously selected it with tools Selection(Emphasis) or Direct Selection(Partial selection).


Rice. 62. Appearance of textured text cut from a photo using a semitransparent mask

Finally, try to give the text a three-dimensional effect. To do this, select the text and make a copy of it to the clipboard with the command Edit => Copy(Editing => Copy). Then paste a copy from the clipboard using the command Edit => Paste in Front(Editing => Paste in Front) so that the original image and its copy are superimposed on each other. Then move the bottom copy of the text slightly to the right and down and on the palette Transparency reduce its opacity from 100% to about 50-40%. The resulting texture text will be similar to the one shown in Fig. 64.

An equally interesting result can be obtained with a gradient fill of the text (Fig. 65). At the same time, to form an effective shadow at the very end, before creating a mask, copy the created text to the clipboard, and then create a mask in the usual way - in this case, after creating a mask, the palette Transparency will have the same form as shown in Fig. 66, and the text will resemble Fig. 67.


Rice. 67. Appearance of textured text based on a gradient semi-transparent mask
Next, paste a copy of the text from the clipboard with the command Edit => Paste in Back(Edit => Paste in Back) so that the copy is below the original text. Finally, move the lower copy of the text 2-3 pixels to the right and down (fig. 68).

Semi-transparent colored text
Open the photo, on the basis of which the translucent text will be created (fig. 69). Print text over the loaded photo in any bright color, for example orange (fig. 70) - the layers palette will look like in fig. 71 (note that the text layer is on top of the background layer). Swap the layers with normal drag and drop, then select both layers in the palette Layers and create a mask with the command Make opacity mask(Create a semi-transparent mask) (Fig. 72). The resulting text will retain its original color (that is, orange), but the background will show through very effectively (Fig. 73). When finished, apply a shadow over the text with the command Effect => Stylize => Drop Shadow(Effect => Stylization => Shadow) with suitable parameters (fig. 74).


Semi-transparent button
Create a circle and fill it with a radial black and white gradient (fig. 75). Then make two copies of the circle and place each copy with the command Edit => Paste(Editing => Paste) on a separate layer, then in the palette Layers three layers will appear: Layer 1, Layer 2 and Layer 3 with the same circle on each. Temporarily lock and make layers invisible Layer 2 and Layer 3. Go to Layer 1, activate the palette Gradient and change the gradient fill settings to something like the one shown in Fig. 76. As a result, the circle on the first layer will take the form in accordance with fig. 77, and the appearance of the palette Layers will resemble fig. 78.


Unlock the layer Layer 2, select with tool Selection both layers below and create a mask using the command Make opacity mask(Create Semi-Transparent Mask) from the palette menu Transparency when checkboxes are on Clip(Cropping) and Invert mask(Invert mask). To test the mask, temporarily turn on the mode Transparency Grid(Transparency grid) with the command View => Show Transparency Grid(View => Show Transparency Grid), and you will see that the circle shines through in its central part (Fig. 79, 80).

Rice. 80. The appearance of a circle after creating a mask with the Transparency Grid mode on
Unlock the layer Layer 3, select the circle, fill it with white and use the tool Select Direction(Direct Selection) Change the outline of the circle so that it resembles the shape shown in Fig. 81. Form a rectangle over the modified white circle so that it completely covers the future mask. Then fill it with a linear black to white gradient (fig. 82). Select both objects with the tool Selection(Selection), create a mask with the command Make opacity mask(Create a semi-transparent mask) and adjust the transparency parameters in accordance with Fig. 83. The resulting button will resemble the one shown in fig. 84.
The final touch can be adding a black shadow to the right and bottom of the button. To create it on top of the layer Layer 3 create a new layer Layer 4, copy the circle from the layer Layer 1 to the clipboard and paste it on the layer Layer 4 team Edit => Paste(Editing => Paste). Then delete the fill of the circle, make a black border 4 pixels thick around it, blur it in Gaussian with the blur parameters of 5 pixels (command Effect> = Blur> = Gaussian Blur- Effect> = Blur> = Gaussian Blur) and move it with a slight shift to the right and down in relation to the created button (Fig. 85).


Rice. 82. Forming a rectangle over the contour of the white modified circle


How to make PNG with transparency in Adobe Illustrator? Very simple. Open the required file and go to the File> Save for Web & Devices(Alt + Ctrl + Shift + S). In the opened window in the list Optimized file format select PNG and check the box Transparency(Transparency).
Then we define which colors will be transparent. All colors present in the image are contained in the tab Color Table(Color Table) and are displayed as colored squares. Select the tool in the toolbar on the left side of the window Eyedropper(pipette).

There are two ways to define colors. The easiest way is to specify a color with an eyedropper directly on the image - after that, the color will be highlighted in the color table with a dark stroke. If you know exactly what color should be transparent, you can select it directly on the color table by clicking the corresponding colored square. And in the first and second cases, if you need to select several colors, you need to work with the Shift (or Ctrl) key pressed. Now let's make the selected colors transparent. To do this, click the icon Maps selected colors to Transparent(Make selected colors transparent). In the upper image, this icon is outlined with a circle and the red color is selected as transparent. A transparent area will appear on the image, and the square on the color table will change its appearance - part of it will become a white triangle. Pressing the Maps selected colors to Transparent icon again will cancel the transparency of the selected color.
A few words about the way of setting transparency. The drop-down menu is responsible for it. Specify Transparency Dither Algorithm, in Russian - Algorithm for simulating transparency (Fig. below). Four choices can be made: No Transparency Dither, no algorithm, Diffusion Transparency Dither, diffuse algorithm, Pattern Transparency Dither, pattern based algorithm, and Noise Transparency Dither, noise based algorithm. In diffuse mode, the Amount slider becomes active, allowing you to change the diffusion value. What to put into practice? Depending on the purpose and image. I always leave the default - No Transparency Dither.

Click Save - the transparent PNG is ready. The work was done in Adobe Illustrator version CS4, but all actions and keyboard shortcuts are relevant for earlier versions.
If the image had clear boundaries, then no further processing is required. In the case of using shadows or if the borders of transparency are not quite clear, sometimes you have to tinker, reopening the created transparent PNG in Photoshop and erasing the borders of the image with an eraser one pixel at a time. If the transparent PNG is made by someone else, and you need to use it and the background color of the image is significantly different from the background color of the web page, then such edge processing is simply necessary. We'll have to use the Pencil tool to align to the edges of the colors, picking up pages close to the background. In this case, it is necessary to convert the image to RGB before processing, and at the end of it - back to indexed colors. The pictures show how this is done. The first drawing is a transparent PNG, prepared for a red background (a rough red border is visible on a white background), the second is an enlarged border, completely removing which we get "teeth".
Illustrator provides several options for adjusting transparency for both vector and bitmap objects. The simplest of them is to select an object and set the desired opacity for it using the slider Opacity(Opacity) custom palette Transparency(Transparency). This palette, which can be open or closed, is called from the list of palettes that opens when the command is activated Window(Window). If, when choosing a command Window => Transparency the palette opens incompletely, then you must sequentially use the commands Show Thumbnails(Expand from pictogram) and Show options(Show Options) from the palette menu.
In addition, the visibility of individual areas of the image can be controlled using layer masks (clipping masks - clipping mask) and translucency masks ( opacity mask). Stencil-like masks determine how individual layers are superimposed on each other, can make individual parts of an image completely or partially visible or completely invisible, and allow complex transparency settings for any object. And since transparency in this case is implemented as a mask over the object, the user can edit the object at any stage of the work without affecting the mask. You can also adjust the transparency for groups of objects, although if you need to edit individual objects from the group, the last of them will have to be ungrouped, and all the transparency settings for the group will be destroyed.
Adjusting opacity without masking
Palette Transparency(Transparency) allows you to easily change the transparency of any objects - both raster and vector (formed in a variety of ways: using contours of different types, symbols from the palette Symbols(Symbols) or as text) and make the underlying objects show through effectively. Pay attention, for example, to fig. 1, which is taken as a source image. Then a series of paths were added to it: the upper path was created with the tool Pen(Pen) and filled with a linear gradient, and a series of water droplets obtained using the palette Symbols... For all involved contours, their own transparency levels are set (Fig. 2, 3).
Rice. 3. The final appearance of the photo after adjusting the transparency of individual objects
Setting a specific transparency option is not an obstacle for the subsequent editing of objects, for which, if necessary, you can always change the fill or stroke option, size and position, transparency level, etc.
Also in the palette Transparency(Transparency) it is possible to select color mixing modes ( Blending mode): Normal(Normal) (this is the default mode), Multiply(Multiplication), Screen(Lightening), etc., which can be applied not only to an individual object, but also to a group or a layer, and in combination with the transparency level can achieve the desired effect of the object's visibility.
Setting opacity for vector objects
Let's consider the option of setting opacity for individual objects. To do this, draw some simple intersecting objects. Such objects are preferable because they can be used to familiarize yourself with the different opacity options. In this example, the objects will be three overlapping flowers on a black background (Fig. 4). Select two objects, for example the two top flowers, and change their opacity values in the palette Transparency, for example, as shown in fig. 5, - for this you just need to drag the engine Opacity(Opacity). Notice that the flowers are now transparent both relative to each other and to the background (Fig. 6).
In the second option, you need to restore the transparency value to 100%. To do this, first group both selected flowers with the command Object => Group(Object => Grouping) which will automatically cause the checkbox to be checked Knockout Group Transparency... Then change the opacity again by setting the parameter value Opacity(Opacity) equal to 70%. As a result, the objects will become transparent in relation to the background, but not relative to each other (Fig. 7). The point is that enabling the checkbox Knockout Group(Group with background removed) in the palette Transparency allows you to remove (albeit only visually) the translucency of translucent group objects that overlap each other in this group.
Additionally, draw a series of several small elements of the same type, such as stars (fig. 8). Combine them into a group using the command Object => Group(Object => Group) and set them to blend mode Screen(Dodge) with opacity (fig. 9). As a result, the stars will change their color and will look something like the one shown in Fig. 10.
Rice. 9. Setting opacity and blending mode for the new group
Rice. 10. The appearance of the entire image after adjusting the opacity settings
Select both groups of objects, then group them again and check the box Isolate Blending(Isolate Blend Mode) in the palette Transparency- this will allow you to isolate objects when setting their blending mode for them. As a result, the color blending mode will be applied to the objects included in the group, and all other objects (in this case, one single asterisk on a green flower) will be ignored (Fig. 11). Note that the checkbox Isolate Blending(Isolate Blending Mode) only makes sense when it comes to color blending modes other than Normal(Normal).
Rice. 11. Changing the appearance of the image as a result of the isolation of objects
Adjusting the Opacity of a Bitmap
Now let's try to experiment with the bitmap (Fig. 12). Form a vector outline around the image in the form of a rectangle filled with white (Fig. 13). Change the opacity in the palette Transparency, for example, as shown in fig. 14. The image will begin to resemble Fig. 15. The result can be much more interesting if the rectangle is filled with a radial gradient (fig. 16, 17). It is also worth experimenting with opacity modes, for example changing the default mode Normal on the regime Screen(fig. 18).
Rice. 15. Appearance of the image after changing the opacity of the rectangle
Rice. 16. Setting the opacity of the rectangle in the Transparency palette after filling with a radial gradient
Rice. 17. The appearance of the image after filling the rectangle with a gradient and changing the opacity in the Normal mode
Rice. 18. The appearance of the image after filling the rectangle with a gradient and changing the opacity in the Screen mode
Opacity control via layer mask
Layer mask, or clipping mask ( clipping mask), allows you to remove, or, as they say, mask unnecessary areas of the image (Fig. 19, 20), without destroying the contents of the layer.
Rice. 20. Visibility of the image after creating a layer mask in the form of an oval
The creation of a layer mask is carried out in several stages. First, a contour is formed above the image layer, which is supposed to be used later as a mask. Then you need to select the image and the outline. It is often more convenient to do this in the palette. Layers by sequentially clicking on the round buttons corresponding to the objects while holding down the key Shift- the appearance of the circle button for each selected element will change. After that, you need to press the button Make / Release Clipping Mask on the palette Layers or use the command Object => Clipping Mask => Make... As a result, everything that falls inside the path will remain visible, and the area outside the path will be hidden. If mask cutting was done unsuccessfully, then you can refuse it at any time by calling the command Object => Clipping Mask => Release or by clicking on the button Make / Release Clipping Mask on the palette Layers.
Note that the button Make / Release Clipping Mask on the palette Layers is usually unavailable and becomes active only if in the palette Layers activated area Group(fig. 21). In addition, it should be borne in mind that any objects that are subsequently added to the group of a layer with a layer mask are also cut off by the mask (Fig. 22) and become invisible. At the same time, objects embedded in the layer above the group will be visible (Fig. 23).
Rice. 22. The result of cutting off the added stars by the layer mask - some of the stars have become invisible
Rice. 23. The appearance of the image with the Layers palette open - an asterisk added above the group with a layer mask is visible
Texture text
Very often, layer masks are used when creating textured text, that is, text cut from some kind of texture or just from a photograph. As an example, we will use a photograph (Fig. 24) and print some arbitrary text over it (Fig. 25). Select the text along with the outline of the photo and apply the command Object => Clipping Mask => Make... As a result, the image will begin to resemble Fig. 26, and the palette Layers will take the form corresponding to Fig. 27. The resulting image, if desired, can be subjected to further editing, for example, make a stroke (Fig. 28), apply a suitable filter (Fig. 29), etc.
Texture Fill Freehand Vector Paths
Open a suitable texture (Fig. 30), which you plan to use to fill some contour (Fig. 31) - in this example, we used a fragment of a lizard contour that we created in one of the previous lessons - and copy the contour onto the texture via the clipboard (Fig. 32), if necessary, editing its size and position. To hide the space outside the path, which is visually equivalent to filling the path with a texture, select the path along with the texture and use the command Object => Clipping Mask => Make... As a result, the image will begin to resemble Fig. 33, and the palette Layers will take the form corresponding to Fig. 34.
To make the image finished, make a copy of the path through the clipboard, right-click on the copy and to mirror it, select the command Transform => Reflect with parameters as in Fig. 35. Place the copy properly (fig. 36) and give the lizard a slightly curved shape using the filter Twist(Bend) - command Effect => Distort & Transform => Twist(Effect => Distortion and Transformation => Bend) with approximately the same parameters as in Fig. 37. The result obtained may resemble fig. 38.
Rice. 36. The appearance of the image obtained on the basis of two aligned contours, previously filled with texture
Simulate the effect of intersecting objects
Now let's look at a more complex option for creating a clipping mask - we need it to simulate the effect of intersecting objects. First, form three circles (in this example, Latin letters will play their role. " o”) So that each next circle partially overlaps the previous one (fig. 39). Select all three circles and make a copy of them to the clipboard with the command Edit => Copy(Editing => Copy). Then paste a copy from the clipboard using the command Edit => Paste in Front(Editing => Paste in Front) so that the original image and its copy are superimposed on each other. After that, use the Restangle tool to form a rectangle with no fill and no borders at the intersection of the first and second circles (Fig. 40). Please note that the rectangle must appear on the same layer. Layer 1, but above all other objects (Fig. 41).
Rice. 40. The appearance of a rectangle at the intersection of the first two circles
To create a layer mask, select the formed rectangle and the first circle and apply the command Object => Clipping Mask => Make(fig. 42). Then, in the same way, create a rectangle at the intersection of the second and third circles and select this rectangle along with the second circle (Fig. 43). If it is not possible to do this in the usual way, then select the necessary objects through the palette Layers: to do this with the key pressed Shift click on the circle buttons available for each element of the layer (Fig. 44), and in this case the appearance of the circle button for each selected element will change. Create a clipping mask with the command Object => Clipping Mask => Make- the resulting image will resemble Fig. 45.
Rice. 44. Window of the Layers palette with the second circle and the second rectangle selected
Finally, to make the image more effective, select on the palette Layers the bottom three circles and shadow them with the command Effect => Stylize => Drop Shadow(Effect => Stylize => Drop Shadow) and then fill the background under the circles with a gradient, for which you need to create a new layer Layer 2... To this end, activate the layer Layer 1, open the palette menu Layers and select the command New layer(New Layer) - resulting above the layer Layer 1 layer will appear Layer 2... Draw a rectangle on it (this will cause the circles to appear under the rectangle and be invisible), which will act as a background, fill it with a suitable gradient and apply a shadow with the command Effect => Stylize => Drop Shadow(Effect => Stylize => Shadow). To make the circles sit on top of the background rectangle, change the L layers ayer 1 and Layer 2 places by dragging one on top of the other in the palette Layers(fig. 46). It is possible that the image will take on something like the one shown in Fig. 47.
Rice. 47. The final appearance of the intersecting circles on a gradient background
Adjusting opacity by creating an opacity mask
Translucency mask ( Opacity mask) determines which parts of the image should be clearly visible, and which - only partially, that is, semi-transparent or not at all visible. In this case, any colors, as well as decorative and gradient fills located below and located inside the mask, can be visible through the specified semitransparent mask.
The process of forming a mask is quite simple and consists in layering two or more objects one on top of the other, and in setting the required transparency level for each of them and in defining the topmost one as a mask using the command Make opacity mask(Create Semi-Transparent Mask) from the palette menu Transparency... The creation of the opacity mask will be indicated by the appearance in the palette Transparency mask icons next to the icon of masked objects, separated by the "chain" icon, and changing the visibility of image fragments (Fig. 48, 49, 50). Palette appearance Layers will change depending on what is active at a given time - an image (Fig. 51) or a mask (Fig. 52).
Rice. 50. Transparency palette - on the left is an image icon, on the right is a mask icon
Rice. 51. Image and palettes Layers and Transparency - active image
Rice. 52. Image and palettes Layers and Transparency - active mask
An opacity mask is created according to the shape of the uppermost of the selected objects, and at least two upper objects must be selected - selecting only one of them will create an empty mask. Adding new objects to the image does not in any way affect the previously created translucency mask; all added objects will be visible by default, as they are created on top of the mask (Fig. 53), although they can be moved under the mask if desired.
Rice. 53. Result of adding a new object in the form of a frame over the masked image
As a result, the upper object will become a mask, and its filling in grayscale mode will affect the degree to which this or that area of the image lying under it will be visible. For example, full filling of the mask with white will result in the image fragments within the mask being completely visible, with a black mask, the masked objects will be invisible, and using a gradient black and white mask will cause the masked objects to appear where the white begins. area, and fade out where the gradient turns black. In addition, you can create a translucency mask using any gradient fills, gradient meshes, and even decorative fills.
It is worth noting that the above rule regarding mask color and object visibility is ambiguous. So, turning on the checkbox Invert mask(Invert mask) in the palette Transparency will lead to the fact that the black and white effect is inverted and the black areas become transparent, and white, on the contrary, opaque (Fig. 54); enable / disable the same checkbox Clip(Cropping) allows you to swap masked and unmasked areas.
Rice. 54. Changing the appearance of the image as a result of inverting the mask
The translucency mask can be formed from any vector object and transformed using various distortion filters, which allows you to achieve very interesting effects. Text can also be saved as an opaque mask to quickly create custom text headings while keeping the text editable. The shape of the opacity mask can be adjusted by clicking on the mask icon in the palette Transparency with the key pressed Alt... As a result, the object on the basis of which the mask was created will be selected and become available for editing. After finishing editing, click on the image thumbnail.
To completely remove the opacity mask, select it and use the command Release opacity mask(Remove transparency mask), and to temporarily hide it - with the command Disable Opacity Mask(Remove the transparency mask). Both commands are selected from the palette menu Transparency.
Effects with photography
First, open some photo (fig. 55) and form a rectangle on top of it, fill it with a linear gradient and process with a filter. ZigZag (Effect => Distort & Transform => ZigZag- Effect => Distortion and Transformation => Zigzag) (fig. 56).
Rice. 56. Appearance of the object? on the basis of which a semi-transparent mask will be created
Create a mask using the command Make opacity mask Transparency... As a result, the image will resemble Fig. 57, and in the palette Transparency the icon of the created mask will appear (fig. 58). Now try editing the mask: select it by clicking on the thumbnail in the Transparency palette while holding down the key Alt, take advantage of the effect Inner glow (Effect => Stylize => Inner Glow- (Effect => Stylize => Inner Light) and add a suitable shadow ( Effect => Stylize => Drop Shadow- Effect => Stylization => Shadow). It is possible that the image will begin to resemble Fig. 59.
Rice. 57. The appearance of the photo after applying a translucent mask
Texture text
As mentioned above, texture text is quite often created using a layer mask, but no less ample opportunities for cutting text from a texture or any photograph open up even when using translucent masks.
Take, for example, fig. 60 and type black text on top of it (as with any textured text, the letters should be large and wide enough) (Figure 61). Select text and photo and use the command Make opacity mask(Create Semi-Transparent Mask) from the palette menu Transparency when checked Clip(Cropping). It is possible that the result will resemble Fig. 62, and in the palette Transparency the icon of the created mask will appear (Fig. 63). Please note that in case of an unsuccessful initial position of the text, it is easy to move it after creating a mask, having previously selected it with tools Selection(Emphasis) or Direct Selection(Partial selection).
Rice. 62. Appearance of textured text cut from a photo using a semitransparent mask
Finally, try to give the text a three-dimensional effect. To do this, select the text and make a copy of it to the clipboard with the command Edit => Copy(Editing => Copy). Then paste a copy from the clipboard using the command Edit => Paste in Front(Editing => Paste in Front) so that the original image and its copy are superimposed on each other. Then move the bottom copy of the text slightly to the right and down and on the palette Transparency reduce its opacity from 100% to about 50-40%. The resulting texture text will be similar to the one shown in Fig. 64.
An equally interesting result can be obtained with a gradient fill of the text (Fig. 65). At the same time, to form an effective shadow at the very end, before creating a mask, copy the created text to the clipboard, and then create a mask in the usual way - in this case, after creating a mask, the palette Transparency will have the same form as shown in Fig. 66, and the text will resemble Fig. 67.
Rice. 67. Appearance of textured text based on a gradient semi-transparent mask
Next, paste a copy of the text from the clipboard with the command Edit => Paste in Back(Edit => Paste in Back) so that the copy is below the original text. Finally, move the lower copy of the text 2-3 pixels to the right and down (fig. 68).
Semi-transparent colored text
Open the photo, on the basis of which the translucent text will be created (fig. 69). Print text over the loaded photo in any bright color, for example orange (fig. 70) - the layers palette will look like in fig. 71 (note that the text layer is on top of the background layer). Swap the layers with normal drag and drop, then select both layers in the palette Layers and create a mask with the command Make opacity mask(Create a semi-transparent mask) (Fig. 72). The resulting text will retain its original color (that is, orange), but the background will show through very effectively (Fig. 73). When finished, apply a shadow over the text with the command Effect => Stylize => Drop Shadow(Effect => Stylization => Shadow) with suitable parameters (fig. 74).
Semi-transparent button
Create a circle and fill it with a radial black and white gradient (fig. 75). Then make two copies of the circle and place each copy with the command Edit => Paste(Editing => Paste) on a separate layer, then in the palette Layers three layers will appear: Layer 1, Layer 2 and Layer 3 with the same circle on each. Temporarily lock and make layers invisible Layer 2 and Layer 3. Go to Layer 1, activate the palette Gradient and change the gradient fill settings to something like the one shown in Fig. 76. As a result, the circle on the first layer will take the form in accordance with fig. 77, and the appearance of the palette Layers will resemble fig. 78.
Unlock the layer Layer 2, select with tool Selection both layers below and create a mask using the command Make opacity mask(Create Semi-Transparent Mask) from the palette menu Transparency when checkboxes are on Clip(Cropping) and Invert mask(Invert mask). To test the mask, temporarily turn on the mode Transparency Grid(Transparency grid) with the command View => Show Transparency Grid(View => Show Transparency Grid), and you will see that the circle shines through in its central part (Fig. 79, 80).
Rice. 80. The appearance of a circle after creating a mask with the Transparency Grid mode on
Unlock the layer Layer 3, select the circle, fill it with white and use the tool Select Direction(Direct Selection) Change the outline of the circle so that it resembles the shape shown in Fig. 81. Form a rectangle over the modified white circle so that it completely covers the future mask. Then fill it with a linear black to white gradient (fig. 82). Select both objects with the tool Selection(Selection), create a mask with the command Make opacity mask(Create a semi-transparent mask) and adjust the transparency parameters in accordance with Fig. 83. The resulting button will resemble the one shown in fig. 84.
The final touch can be adding a black shadow to the right and bottom of the button. To create it on top of the layer Layer 3 create a new layer Layer 4, copy the circle from the layer Layer 1 to the clipboard and paste it on the layer Layer 4 team Edit => Paste(Editing => Paste). Then delete the fill of the circle, make a black border 4 pixels thick around it, blur it in Gaussian with the blur parameters of 5 pixels (command Effect> = Blur> = Gaussian Blur- Effect> = Blur> = Gaussian Blur) and move it with a slight shift to the right and down in relation to the created button (Fig. 85).
Rice. 82. Forming a rectangle over the contour of the white modified circle
About flattening transparency
If your document or graphic contains transparency, you usually need to follow a procedure called mixing... This procedure divides the transparent graphics into vector and rasterized regions. The more complex a graphic becomes (as a result of mixing images, vectors, fonts, spot colors, overprinting, etc.), the more complex the mixing procedure and its results.
Flattening may be required when printing, or when saving or exporting to other formats that do not support transparency. If you want to preserve transparency without flattening when creating a PDF file, save the file as Adobe PDF 1.4 (Acrobat 5.0) or later.
Note.
Transparency processing cannot be undone after the file is saved.
Flattening separates the superimposed images
Note.
For more information on output transparency issues, see the Print Service Provider Resources page on the Adobe Solutions Network (ASN) (English only) available on the Adobe website.
File formats with transparency support
When you save Illustrator files in some formats, the original transparency information is retained. For example, if you save a file in Illustrator CS (or later) EPS format, the file will contain both the original Illustrator data and the EPS data. When you reopen the file, Illustrator reads the original data (no information). EPS (flattened) data is used when the file is opened in another application.
Whenever possible, save files in a format that supports native transparency. If necessary, such files can be freely edited.
The original transparency data is saved in the following formats:
AI9 and later
AI9 EPS and later
PDF 1.4 and later (if the Keep Illustrator Editable check box is selected)
Illustrator flattens the artwork when you select any of the following operations.
Printing a file with transparency.
Save a file with transparency in legacy formats such as Illustrator 8 and earlier, Illustrator 8 EPS and earlier, or PDF 1.3 (for Illustrator and Illustrator EPS, you can choose to cancel transparency rather than flattening).
Exports a file with transparency to a vector format that does not support transparency (for example, EMF or WMF).
Copy and paste objects with transparency from Illustrator into another application with the AICB and Preserve Appearance check boxes selected (in the File Handling and Clipboard section of the Preferences dialog box).
Export to SWF (Flash) format or use the Handle Transparency command when the Maintain Alpha Transparency check box is selected. This command allows you to preview how the artwork will look after exporting to SWF format.
Note.
For more information on creating and printing files with transparency, see the Transparency document in the Technical Info / White Papers folder on the Illustrator CD. You can also find more information on printing and flattening transparency files in the Adobe Illustrator User Forum. It is an open forum with lots of tips and answers to your questions, located at www.adobe.com/support/forums.
Configuring Flattening Options for Printing
Choose File> Print.
On the left side of the Print dialog box, select Advanced.
Choose a processing style from the Style menu, or click Custom to set details for the rollout.
If your image contains overprinted objects that interact with transparent objects, select an option from the Overlays menu. Overlay colors can be saved, simulated, or deleted.
Note.
If the illustration does not contain transparency, the document is not flattened and the flattening options are not used. Use the palette to define areas of the artwork that contain transparency.
You can set the flattening options for transparent regions when creating, modifying, or viewing flattening styles in Illustrator, InDesign, or Acrobat.
Backlight options (preview)
No (view in color)
Cancels viewing.
Rasterize complex areas
Selects areas that will be rasterized for better performance (based on the position of the Raster / Vectors slider). Note that the edge of the light area is more likely to have unwanted seam effects (depending on the printer driver settings and screen resolution). To minimize seam issues, select Clipping Complex Areas.
Transparent objects
Selects objects that are sources of transparency, such as partially opaque objects (including images with alpha channels), objects with blending modes, and objects with opaque masks. Also, note that styles and effects can contain transparency, and overlapping objects can be considered sources of transparency if transparent areas are affecting them or the overlay needs to be flattened.
All Affected Objects
Selects all objects affected by transparency: the transparent objects themselves and the objects on which they are superimposed. Flattening of transparency affects selected objects - their strokes or patterns will be stretched, some of them may be rasterized, etc.
Affected linked EPS files (Illustrator only)
Selects all linked EPS files that are affected by transparency.
Processed images (InDesign only)
Selects all placed content that contains transparency or transparency effects. This option is useful for service providers who need to see images that require special attention to print correctly.
Disassembled patterns (Illustrator and Acrobat)
Selects all patterns to be expanded if they contain transparency.
Stroke in curves
Selects all strokes that will be converted to paths if they contain transparency or if Convert All Strokes To Paths is selected.
Text converted to curves (Illustrator and InDesign)
Selects all text to be outlined if it contains transparency or if Convert All Text To Outlines is selected.
Note... In the final version, the converted stroke and text may look slightly different from the original. This is especially true for very thin lines and very small text. However, when handling transparency, these appearance changes are not displayed.
Bitmap-filled text and paths (InDesign only)
Selects text and strokes that have been bitmap filled as a result of flattening.
All Rasterized Areas (Illustrator and InDesign)
Selects objects and object intersections that will be rasterized because there is no other way to represent them in PostScript or their complexity exceeds the threshold set by the Rasters / Vectors slider. For example, the intersection of two transparent gradients will always be rasterized, even if the Raster / Vectors value is 100. When the All Rasterized Areas option is selected, raster images (such as Photoshop files) that have transparency and rasterization effects are also displayed - shadows and shading. Note that this parameter takes longer to process than others.
Transparency handling style options
Name / Style
Specifies the name of the style. Depending on the dialog box, you can enter a name in the Name text box or accept the default name. To change an existing style, you can change its name. However, the default styles cannot be changed.
Raster / vector balance
Determines the amount of vector information stored. Higher values save more vector objects, while lower values will rasterize more vector objects. At intermediate values, simple areas will be preserved in vector form, and complex areas will be rasterized. To rasterize the entire image, select the lowest setting.
Note... The amount of rasterization depends on the complexity of the page and the types of superimposed objects.
Resolution for line and text objects
Rasterizes all objects, including images, vector graphics, text, and gradients, at the selected resolution. Acrobat and InDesign allow a maximum resolution of 9600 ppi for a vector object and 1200 ppi for a mesh gradient. Illustrator allows you to use a maximum resolution of 9600 ppi for both line art and gradient mesh. Resolution affects the precision of intersection areas when flattening. Vector objects and text should be between 600 and 1200 ppi for high quality rasterization, especially when using serif or small fonts.
Resolution for gradient and mesh
Determines the resolution of Illustrator gradients and meshes that are rasterized as a result of flattening. Values range from 72 to 2400 ppi. Resolution affects the precision of intersection areas when flattening. Gradient and mesh resolutions should be between 150 and 300 ppi, as gradients, shadows, and feathers will not improve at higher resolutions, but print time and file size will increase.
Convert all text to outlines
Converts all object types (point, line, and area) to paths and removes all glyph information on pages that contain transparent regions. This option ensures that the width of the text remains consistent when handling transparency. Note that selecting this option will slightly thicken small-sized fonts when viewed in an Acrobat window or when printing to low-resolution desktop printers. This setting does not affect print quality on high-resolution printers or photosetters.
Convert all strokes to paths
Converts all strokes to simple filled paths on pages that contain transparency. This option ensures that the width of strokes remains consistent during flattening. Note that setting this option will make thin strokes appear slightly thicker, and flattening performance may be degraded.
Cut out difficult areas
Ensures that the boundaries of vector and raster parcels follow the paths of objects. This option reduces the unwanted seam effects that occur when one part of an object is rasterized while the other remains vector. However, this option may produce outlines that are too complex for the printer.
Note... Some print drivers treat bitmap and vector areas differently, which can sometimes lead to color stitching effects. To minimize this problem, you must turn off some of the color management options in the print driver. These settings are different for each printer, see the documentation for your particular printer for more information.

(Illustrator only) Preserve Alpha Channels (Transparency Handler dialog box only)
Maintains the overall opacity of flattened objects. When this option is selected, blending modes are lost, but the appearance of rendered artwork and the level of alpha transparency (for example, when rasterizing artwork against a transparent background) is preserved. Preserving alpha channels may be necessary when exporting SWF or SVG files, as both formats support alpha transparency.
(Illustrator only) Maintain Spot Colors and Overprints (Only in the Transparency Handle dialog box)
Retains spot colors. In addition, this option preserves overprinting for objects that do not contain transparent areas. Select this option when printing separations and your document contains spot colors and overlaid objects. Uncheck this option when saving files used by applications to create page layouts. When selected, overprinting areas that interact with transparent areas are flattened, while overprinting in other areas is preserved. If you display this file in a page layout application, you may experience unpredictable results.
Keep Overlay (Acrobat only)
Blends the color of a transparent image with a background color to create a blending effect.
View areas of a artwork that are intended for rollup
You can select the areas that will be affected by flattening transparency using the preview options in the Transparency Processing Preview window. You can use this color coding information to customize the flattening options.
Note.
The Transparency Processing Preview window is not designed to accurately track spot colors, overprints, or blending modes. For these purposes, the mode is used View overlay colors.
In Illustrator, choose Window> View Rollup Results.
In Acrobat, choose Tools> Prepress> Flattening Transparency.
In InDesign, choose Window> Output> Flattener.
To display the Flatten Transparency palette (or dialog box):
From the Selection menu, choose the types of regions you want to select. The options available depend on the content of the graphic.
Select the information options you want: choose a style, or (if possible) specify specific options.
Note.
(Illustrator) If info options aren't available, choose Show Options from the panel menu to display them.
If your image contains overprinted objects that interact with transparent objects, set the Color Mapping menu in Illustrator to the appropriate option. Overlay colors can be saved, simulated, or deleted. In Acrobat, set the Preserve Overlay option to blend the color of the transparent artwork with the background color to create an overlay effect.
At any time, you can click the "Update" button to view the version with the current settings. Depending on the complexity of the image, it may be displayed in the preview window with a delay of a few seconds. In addition, in InDesign, you can select the Automatically Refresh Indication option.
Note.
To enlarge the image, in Illustrator and Acrobat, click the preview area. To zoom out on the output, Alt-click or Option-click the preview area. To pan the preview, press the Spacebar and drag in the preview area.
An overview of the View Rollup Results panel
Use the preview options in the Preview Rollup Results panel to highlight areas that are affected by the rollup. You can also use this information to customize flattening options and to save flattening styles. Choose Window> View Rollup Results to display the palette.

A. Palette menu B. Refresh button C. Selection menu D. Overlay menu E. Transparency processing options F. Preview area
The palette menu options let you control the speed and quality of the thumbnail. For the fastest view of the image, the "Quick view" command. To add an All Rasterized Regions option to the Selection drop-down menu, choose Detail Preview (this option is computationally intensive).
Note.
Note that the Rollup Results Preview palette is not designed to accurately display spot colors, overprints, blending modes, or image resolution. For a preview of how spot colors, overprints, and blend modes will appear in print, use the View overlay colors.
About Transparency Handling Styles
If you regularly print or export documents that contain transparency, you can automate the flattening of transparency. To do this, you need to save the corresponding parameters in transparency handling style... You can then use these options for printing, and for saving and exporting files in PDF 1.3 (Acrobat 4.0), EPS, and PostScript formats. They can also be applied in Illustrator when saving files for earlier versions of Illustrator or when copying them to the clipboard, and in Acrobat they can also be applied when optimizing PDFs.
In addition, these options control flattening when exporting to formats that do not support transparency.
You can choose a transparency handling style in the Advanced panel of the Print dialog box, or in the appropriate format dialog box that appears after the initial Export or Save As dialog box. You can create your own flattening styles or choose the default options supplied with the program. The default settings are designed to match the quality and speed of the downsample to the appropriate resolution of the rasterized transparent areas, depending on the intended use of the document.