is a program that allows you not only to view text files, but also create and edit them. Editing means changing the font, its size or style, dividing document information into sections, etc.
The most common editing is breaking information into sections, which is necessary for ease of use, since each section can be worked on separately, and this is much easier than with a large amount of information. Each part of the text can be formatted separately. This means that each part can have its own parameters.
After editing the text, they often proceed to setting the fields (if they have not been set previously). There are instructions for this, described below, which can make the work easier or help a novice user.
What is a field?
Margins in Word are the empty space left at the bottom, top, right, and left.
If there are no breaks (sections), then one field is set for the entire document.
There are several ways to set page margins in Word.
The first method is the simplest. To do this you will need a mouse and a ruler. All parameters are determined clearly. Typically the ruler is at the top of the page. If it is not shown, do the following:
- Page layout.
The ruler consists of a horizontal and vertical component, which is located along the left edge. This arrangement is optimal for regulating the field in Word from all sides. The ruler is painted in two colors - gray (inactive area) and white (active area).
The next way to set fields for Word is using the control panel. In this case, you can set the exact values of the parameters (width and length). This method is also used if there is no mouse to control. In order to install the field, you need to go through the following path:
- File.
- Page options.
- Fields.
- Data entry.
 Before you enter numbers into the form, it will show examples that you can use (called standard fields or most commonly used fields).
In addition to the above two, there is also a third method. It's called binding. From the name it becomes clear that it is used for those documents that will be bound after printing. This means that it is necessary to leave more space on the side from which binding is planned in the future (this depends on the orientation of the page and the material in the document, or the presence/absence of pictures).
It may be difficult to set the margin for two-sided documents. But this is only at first glance. For these purposes, the “Mirror Field” function was thought out. Some other difficulties may arise if the document is divided into sections. Then you need to select one of the options below by clicking in the “Apply” field:
- To the whole text. The selected values will appear throughout the document.
- To the current section. Possible only for one section.
- Until the end of the text. Only in the part of the text that will be marked.
What influences fields and their sizes in Word
The size of the margin is directly affected by the size of the page, as well as its orientation. For most documents, the standard format is 8.5 inches in width by 11 inches in document length. The text data is parallel to the short edge. In addition to the standard sheet, you can specify other data. In addition, it is possible. In this case, the standard parameters will change proportionally. Specify both page size and orientation as follows:
- File.
- Page options.
- Paper size.
- Selecting orientation.
- Apply (there are several options in this list: to a specific section, to the entire text, or to the end of the text).
- Click the “OK” confirmation button.
Knowing the basic ways to set a field for Word, you can easily edit a document without spending a lot of time on it, and setting fields will seem like the easiest operation to perform.
Installed on a computer text editor Word is initially configured for a certain font type and size, letter and line spacing, as well as standard document margin sizes (indents from the border of a sheet of paper to the document itself). Their default settings are quite suitable for normal documents, but in some cases they need to be adjusted.
Regular fields
When visually observing a document, its left, right, top and bottom margins are obvious. For greater clarity, it is recommended to enable the display of the document ruler. To do this, go to the “View” tab and in the “Show” section, check the box next to the “Ruler” tool. Visibility can be enhanced by also including the Grid tool.

How to customize fields in Word as you wish? The fields of the document can be changed “by eye” by using the mouse to grab the triangle icons on the top ruler, or the border lines on the left. But usually, not approximate, but strictly defined field values should be set.
Ample opportunities to change fields in Word open up on the “Page Layout” tab. In the drop-down list of the “Margins” tool, the user is offered predefined margin sizes in Word for page options - regular, narrow, medium, wide and mirrored. The pictures on the left explain the choices made.

As you can see, “according to GOST” in ordinary documents, the top and bottom margins are 2 cm, the left margin is 3 cm, and the right margin is 1.5 cm.
Mirrored margins are used in documents that are printed on both sides, such as books or magazines. In them, the fields of the left page are mirror image fields on the right.
If the fields required for the user's documents do not correspond to those specified by the standard, the user can precisely set the fields himself. To do this, he should click on the “Custom Fields” item.

In the “Margins” section of the window that appears, the user can make the page margins at his own discretion by adjusting the sizes of the top, bottom, left and right margins with an accuracy of 1 mm. You can remove fields altogether by setting the values to zero. In the same section, it is possible to provide a place for future binding (for example, for a diploma) so that it does not interfere with reading the pages. The following screenshot illustrates this case.
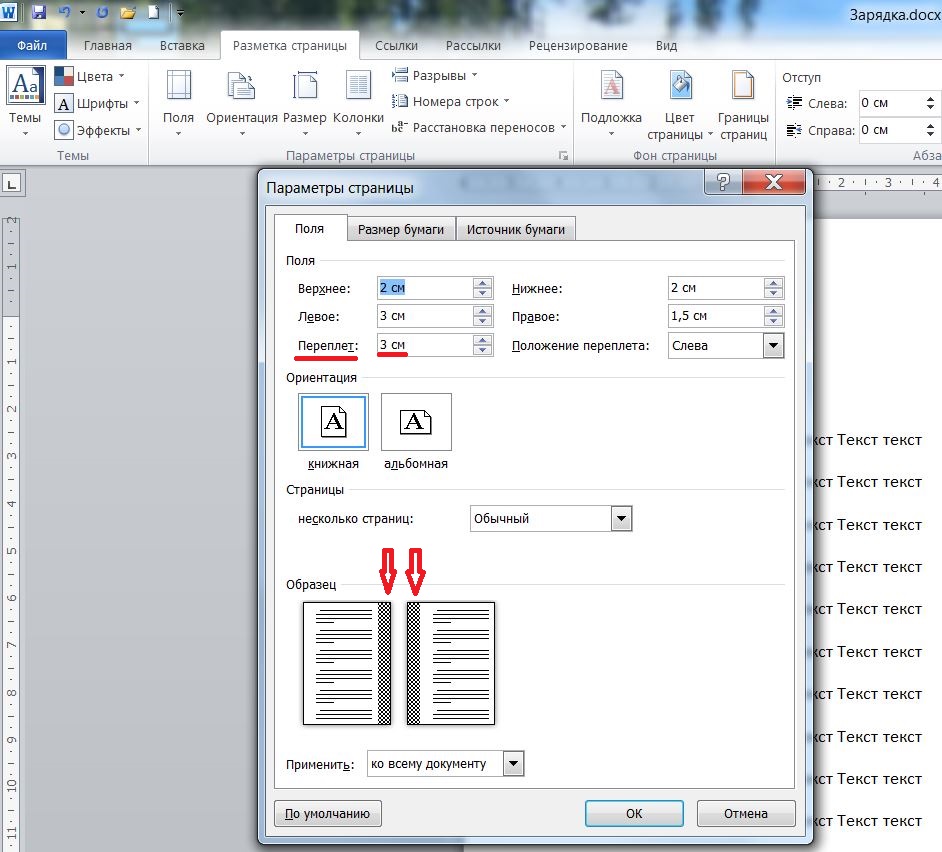
The binding position can be changed from left to top if necessary.
The correction of margins and/or setting of the binding location can be applied to the entire document or starting from current page. The last option is selected after opening the “Apply” list and selecting “To the end of the document.”

The configured document field parameters can be remembered for future use. To do this, click the last item in the window – “Default”. The selected setting, called "Last Custom Value", will appear in the "Fields" drop-down list (see second screenshot).
Text fields
A text field is an inscription that represents a quote or note to a document. It can be added anywhere in the document. To do this, go to the “Insert” tab, and in the “Text” group open the “Inscription” drop-down list.

In the window that appears, the user can select one of 9 proposed text field options. The form for typing the text field will be inserted according to the picture, and taking into account the location of the cursor. As an example, let's choose the seventh option (newsprint - catchy quote).

In the form that appears, you can enter any text, after which, using the mouse, grabbing the squares along the edges, adjust the size of the text field.

Simultaneously with the text field in Word appears new tab"Drawing Tools/Format" contains many tools for transforming the created text field. As an example, the following screenshot shows the result of editing a text field using the Text Effects/Transform tool.

In addition to the above option for inserting a text field from the nine offered, in the “Inscription” drop-down list of the “Insert” tab, you can also click the last line - “Draw inscription”. Then, using the mouse, draw the shape of a text field anywhere in the document.

Entering text, adjusting sizes, and possible further editing do not differ from those described above.
Versions
Regular and text fields were reviewed in Word 2010. How to make fields in Word of earlier and later versions? In Word 2007 and 2013 - also. In comparison with the considered actions, there is a difference at the very beginning in Word 2003. In this version, you can set fields by going to the “File” menu (as the tab was previously called) and clicking on the “Page Options” tool. Subsequent actions are no different.
Page margin is the distance from the edge of the sheet to text or other objects. To find out information about the margin parameters, you need to find the “Page Layout” tab and left-click on it. On the panel that opens there is a “Fields” button, which we need. After clicking, a list of templates will appear.
When you first open the program, the fields will be normal. There are 5 patterns with different meanings:
- If you select regular margins, the top and bottom margins will be 2 cm, the left margin will be 3 cm, and the right margin will be 1.5 cm.
- For narrow margins, all indents are 1.27 centimeters.
- In the middle margins, the bottom and top margins are 2.54 centimeters, and the left and right margins are 1.91.
- When choosing wide margins, the top and bottom margins are 2.54 cm, and the right and left margins are 5.08 cm.
- Mirror fields have an internal margin of 3.18 centimeters, all other margins are 2.54 centimeters.
How to set up fields in Word
Fields can be configured in several ways: find the desired command or use special markers.
How to set page margins
You can set any values for the fields. To set your value, you need:
- Select the “Page Layout” tab.
- In the “Page Options” block, click on the down arrow in the lower right corner.
- In the window that opens there is a “Fields” section, where you can find:
- top margin;
- bottom margin;
- left margin;
- right margin;
- binding;
- binding position.
Setting fields is very simple, just enter the required value in the field of interest.
For example, if you need to set the top margin to 2 cm, then in the top margin we set the value to 2 cm, and so on.
How to make margins in mm in Word
Fields can be not only in centimeters, but also in other units of measurement. You can change the settings using the following algorithm:
- Click the “File” tab and select “Options”.
- In the window that opens, go to “Advanced”.
- A long list appears that is difficult to navigate. You need to look at the section names in bold. Scroll down “Editing Options”, “Cut, Copy and Paste”, “Image Size and Quality”, “Show Document Contents”, the next section we need is “Screen”. The second one is “unit of measurement”. Left-click on the down arrow; the unit of measurement can be inches, centimeters, millimeters, points or picas.
Page fields according to GOST
What should be the fields for different types works? Let's consider what value needs to be used and whether templates can be used.
In the abstract, the left margin should be 30 mm, all other margins should be 20 mm.
For course work minimum indentation values are set. You need to leave at least 20 millimeters at the bottom and top, 10 millimeters to the right, and 30 millimeters to the left (for stitching). The “regular” template fits these requirements; all sizes correspond to the minimum, except for the “right” value. This value is 5 mm larger, which will not be considered an error. But it’s better to set all the sizes yourself.
For thesis The requirements set the same dimensions as for coursework.
Settings different sizes margins for even and odd pages
Sometimes you need to print two-sided documents, so the settings on even and odd pages must be different. For example, printing books or magazines. In this case, mirror fields are used.
Mirror page margins
You can select from templates.
- In the “Page Layout” tab, find the “Margins” button.
- A list of templates opens, which contains the “Mirror” command.
If you need to change the indents in mirrored fields, you need to go to “Page Settings”. Go down to the “Pages” section and in the “multiple pages” group select “mirror fields”.
The names in the “Margins” section will change and it will be possible to set values not only for the bottom and top margins, but also for the inner and outer ones.
How to remove page margins
Remove fields on a page Word document, is equivalent to changing the values for the top, bottom, right and left margins. In other words, to remove fields, you need to set the value to zero. There are two ways to do this.
Set zero values in the “Page Settings” window
- Go to the “Page Layout” tab.
- In the “Page Options” block, click on the down arrow in the lower right corner.
- In the Page Setup window that appears, set the top, bottom, left, and right margins to zero.
- Click OK to confirm your intentions.
After this, the page will lose margins and the text will be located on the entire sheet.
By the way, I do not recommend removing entire margins, because when printing, the printer has its own internal margins and it is quite possible that part of the text will be cut off.
Remove fields using markers
On the Word ruler, which is activated in the “View” → “Ruler” tab, there are markers that can also be used to delete fields.
Our task is to move the markers to the edge of the page so that there is no gray space left.
There are 4 markers available:
- top margin;
- bottom margin;
- left margin;
- right margin.
Move the marker to the edge of the page on the side where you want to remove the margin. If you need to remove all fields, then move each marker individually.
Inserting field templates
If you need to insert changing data or documents in the form of a form or sticker, Microsoft program Word provides for the use of special codes.
Data in the document changes automatically. That is, for example, if the date changes, you will not have to make changes; the date will become different without additional actions.
List of field codes in Word
There is a whole list of codes. Let's look at some of them:
DATE field
Used to automatically insert the date and time.
You need to click:
- Insert tab.
- Find the "Date and Time" button.
- Choose the format you like and change the language to Russian.
- Check the “update automatically” box.
- Next, on the same tab, select the “Express Blocks” group, and in it “Field”. In the list, select the field name “Date”. In the field parameters, put a checkmark in the box next to “Insert date in the last selected format.”
NUMWORDS field
Inserts the number of words in the document.
You need to place the cursor at the insertion location, find “Express Blocks” in the “Insert” tab and click on the “Field” button. In the field name, select NumWords.
PAGE field
Inserts the page number on which this command applies.
Place the cursor where you insert the page number. Select the “Insert” tab and find the “Field” button in the “Express Blocks” group. In the list of field names, go down and click on “Page”.
TOC field
Used to insert a table of contents.
In order for it to be correct, all headings and subheadings are necessary different levels were formatted using Word formatting. To insert, place the cursor in the desired place, in the “Insert” tab, select “Express blocks”. In the “Field” group we find the name of the TOC field.
UserName field
Used to insert the username.
First you need to enter this name. In the “File” tab, go down to the “Options” button. In the window that opens, find the “General” section and the “Personal” subsection Microsoft setup Office", change the username. To insert a field, on the Insert tab, in the Express Blocks group, select the Fields command. In the field name we look for “UserName”.
Formatting Format Keys
Fields can be changed. How to do this? Let's look at making changes using some keys as an example.
DATE field
For the date and time insertion field, you can change their format, as well as select one of the chronological calculations. To do this, select the field and click on right button mice. From the list, select “edit field”. Next, select your favorite date and time option.
NUMWORDS field
In this field you can change the format for writing the number of words in the text. To do this, select the field and press the right mouse button. Select “edit field” from the list. Select the desired format.
The correct indentation from the edge of the sheet is very important when formatting text. Incorrect placement can distort appearance document and interfere with its perception. The easiest way to make fields in Word is using the 2007 version as an example, since these methods can be applied to other releases Microsoft Word.
The methods listed below are the most popular and simplest, from which you will definitely choose the most convenient one!
Via the "Page Layout" menu
How to make margins using a ruler
Select all the text (Ctrl+A) and move the mouse pointer to the ruler. Place it at the inside end of the border (the pointer itself should take the form of a double-headed arrow). Drag the arrow to the required distance, and the text will automatically adjust to it. Be sure to follow the same procedure for the other sides of the page.
How to set margins for a specific piece of text
Select the text for which you want to apply the new settings, and drag the small triangle located on the ruler at the bottom to the required distance. If everything is done correctly, the distance to the edge of the page for the selected part will change, but for the main document it will remain the same.
You may find that the default page layout settings in Word are not sufficient for the document you want to create. In this case, you will want to change these settings. For example, if you are printing on a different size of paper, you will want to resize your document page to fit the paper. Additionally, you can change the page formatting depending on the type of document you are creating.
In this tutorial, you'll learn how to change page orientation, page size, and page margins.
Word offers various options page layout and parameters formatting, which affect how document content is displayed on the page. You can adjust the page orientation, page size, and margins depending on how you want your document to look.
To change the page orientation:
Landscape means the page will be oriented horizontally, while Portrait means the page will be oriented vertically.
To change the page size:

To format page margins:
- Select the Page Layout tab.
- Click on the Fields command and a drop-down menu will appear. The Normal option is selected by default.
- Click on the option with previously specified field sizes that suits you.

To use custom fields:
- On the Page Layout tab, select Margins.
- Select Custom Fields. The Page Setup dialog box appears.
- Enter margin sizes for each side of the page and click OK.

Page Setup Dialog Box
Just above, you learned how to open the Page Setup dialog box from the drop-down menu of the Fields command. As you become more familiar with Word, you may find that you may need to use the Page Setup dialog box much more often to adjust margins and other settings. In order to open the window faster, you can use the shortcut, which is conveniently located on the Page Layout tab.