Russia +7 Ukraine +380 Kazakhstan +7 Algeria +213 Andorra +376 Angola +244 Anguilla +1264 Antigua&Barbuda +1268 Argentina +549 Armenia +374 Aruba +297 Australia +61 Austria +43 Azerbaijan +994 Bahamas +1242 Bahrain +973 Bangladesh + 880 Barbados +1246 Belarus +375 Belgium +32 Belize +501 Benin +229 Bermuda +1441 Bhutan +975 Bolivia +591 Bosnia Herzegovina +387 Botswana +267 Brazil +55 Brunei +673 Bulgaria +359 Burkina Faso +226 Burundi +257 Cambodia + 855 Cameroon +237 Cape Verde Islands +238 Cayman Islands +1345 Central African Republic +236 Chile +56 China +86 Colombia +57 Mayotte +269 Congo +242 Cook Islands +682 Costa Rica +506 Croatia +385 Cuba +53 Cyprus North + 90392 Cyprus South +357 Czech Republic +42 Denmark +45 Diego Garcia +2463 Djibouti +253 Dominican Republic +1809 Dominican Republic +1829 Dominican Republic +1849 Ecuador +593 Egypt +20 Eire +353 El Salvador +503 Equatorial Guinea +240 Eritrea + 291 España +34 Estonia +372 Ethiopia +251 Falkland Islands +500 Faroe Islands +298 Fiji +679 Finland +358 France +33 French Guiana +594 French Polynesia +689 Gabon +241 Gambia +220 Georgia +7880 Germany +49 Ghana +233 Gibraltar +350 Greece +30 Greenland +299 Grenada +1473 Guadeloupe +590 Guam +671 Guatemala +502 Guinea +224 Guinea - Bissau +245 Guyana +592 Haiti +509 Honduras +504 Hong Kong+852 Hungary +36 Iceland +354 India +91 Indonesia +62 Iran +98 Iraq +964 Israel +972 Italy +39 Ivory Coast +225 Jamaica +1876 Japan +81 Jordan +962 Kazakhstan +7 Kenya +254 Kiribati +686 Korea North +850 Korea South +82 Kuwait +965 Kyrgyzstan +996 Laos +856 Latvia +371 Lebanon +961 Lesotho +266 Liberia +231 Libya +218 Liechtenstein +417 Lithuania +370 Luxembourg +352 Macao +853 Macedonia +389 Madagascar +261 Malawi + 265 Malaysia +60 Maldives +960 Mali +223 Malta +356 Marshall Islands +692 Martinique +596 Mauritania +222 Mexico +52 Micronesia +691 Moldova +373 Monaco +377 Mongolia +976 Montserrat +1664 Morocco +212 Mozambique +258 Myanmar +95 Namibia +264 Nauru +674 Nepal +977 Netherlands +31 New Caledonia +687 New Zealand +64 Nicaragua +505 Niger +227 Nigeria +234 Niue +683 Norfolk Islands +672 Northern Marianas +670 Norway +47 Oman +968 Palau +680 Panama +507 Papua New Guinea +675 Paraguay +595 Peru +51 Philippines +63 Poland +48 Portugal +351 Puerto Rico +1787 Qatar +974 Reunion +262 Romania +40 Russia +7 Rwanda +250 San Marino +378 Sao Tome & Principe + 239 Saudi Arabia +966 Senegal +221 Yugoslavia +381 Seychelles +248 Sierra Leone +232 Singapore +65 Slovak Republic +421 Slovenia +386 Solomon Islands +677 Somalia +252 South Africa +27 Sri Lanka +94 St. Helena +290 St. Kitts +1869 St. Lucia +1758 Sudan +249 Suriname +597 Swaziland +268 Sweden +46 Switzerland +41 Syria +963 Taiwan +886 Thailand +66 Togo +228 Tonga +676 Trinidad & Tobago +1868 Tunisia +216 Turkey +90 Turkmenistan +993 Turks & Caicos Islands +1649 Tuvalu +688 USA +1 Ukraine +380 Uzbekistan +998 Uganda +256 UK +44 United Arab Emirates +971 Uruguay +598 Vanuatu +678 Vatican City +379 Venezuela +58 Virgin Islands - US +1340 Wallis & Futuna +681 Yemen North +969 Yemen South +967 Zaire +243 Zambia +260 Zimbabwe +263
Current location
Hardware GSM module cell phone, like any other mobile device that supports SIM functions, is in continuous search mode for the most powerful and stable signal source. When a subscriber's location changes, his mobile device connects to the nearest tower cellular communication, which allows for the most stable and uninterrupted connection. The PLNET mobile device locator will determine the location of the phone on the map with an accuracy of several meters. To do this, you only need to indicate the subscriber number and activate the search.
CompatibilityiPhoneAndroidSpeedTo identify the location of a phone or any other mobile device with SIM support, it is enough to indicate the subscriber number in international format. PLNET will determine the location within a few minutes.
Autonomous from start to finishNow, to find a phone, you do not need preliminary installation and configuration additional applications on the device itself. Moreover, you can do this operation remotely, and without administrator rights.
Available to everyoneBy subscribing for one calendar month, you will be able to determine the location of one phone number no limit on the number of sessions. PLNET's simple interface is easy to understand for any user, regardless of computer skill level.
Anonymous and safeThe owner of the phone will never know that anyone is accessing his location data. The PLNET mobile device locator does not interact with the device software and does not in any way affect the stability of its operation.
24/7 global customer supportPlnet values each of its clients and places great emphasis on 24/7 customer service.
95% customer satisfactionCustomer satisfaction is the highest priority for mSpy. 95% of clients stated that they are satisfied and ready to reorder our services.
Phone location method- Compatibility - What makes PLNET so special is that it is universally compatible with all modern devices operating on various operating systems: iOS, Android, Windows Mobile, Symbian and Linux. Now you don't need to search new method obtaining geodata for each specific phone. The mobile device locator is equally successful in displaying geolocation data as the latest Iphone smartphones, and far from new push-button phones originally from the 90s. The PLNET mobile device locator interacts equally effectively with mobile operators in more than 100 countries.
- Lack of device owner consent - Today, almost every electronic device manufacturer offers a built-in geolocation feature. Apple calls it Find Iphone. U Android given the function is called Remote control Besides this mobile operators offer similar services MTS Locator, Radar Megafon, Beeline.Locator, Beacon from Kyivstar and so on. But all these services have a main drawback - you cannot activate them without access to the device. PLNET, in turn, does not require notification or consent from the device owner.
- Legal aspect - We are not interested in the purpose for which users subscribe to PLNET and, in turn, guarantee complete inviolability of confidential information. All received data undergoes a two-factor encryption process and cannot be transferred to third parties, regardless of the source of the request.
Still have questions? We will be happy to answer them: If you want to leave a review or make any suggestion, you can do so in the section
Geolocation
Geolocation allows you to determine the geographic location of website visitors. And this does not simply mean the country or even the city in which the visitor is located. Geolocation can narrow down a person's location to a city block or even determine his exact coordinates if he accessed the page from a smartphone.
All major browsers provide a good level of geolocation support:
Most of the new JavaScript features we covered earlier were part of the original HTML5 specification and were later separated when the specification was taken over by the W3C. But geolocation was never part of HTML5, it just came into full swing around the same time. But almost everyone sees this opportunity, along with the capabilities of HTML5, as part of one big wave of future technologies.
How geolocation worksThe possibility of geolocation raises quite a lot of questions among people who usually cannot be called paranoid. For example, how can some software to know that I’m not sick, as I told my boss, but I’m watching football in a cafe? Is there some kind of hidden code in it that tracks all my actions? I wonder what that van is there on the street and those people pretending to change a tire?
Fortunately, the ability to geolocate is not one of those horror stories about surveillance. This is because even if the browser can figure out your location, it won't share it with the website without your explicit permission:
A web page wants to obtain the visitor's location data. The visitor may choose to provide this information or not. This behavior Chrome browser is not the initiative of its developers, but an official rule of the geolocation standard, requiring that every website attempting to obtain a visitor's location must obtain the visitor's permission to do so.
To calculate the visitor's location, the browser enlists the help of a location provider, for example, for Chrome this is Google Location Services. Determining location is not an easy task, and the vendor uses several different approaches to solve it.
In the case of a desktop computer with a fixed (i.e. non-wireless) connection, the method is simple, but does not give very accurate results. When someone connects to the Internet, data from their computer or local network routed (via cable, leased line, or dial-up) to a powerful network hardware device, which, in turn, directs them to the Internet. This hardware device has a unique IP address, i.e. a numeric code that identifies this device to other network participants. This device also has a physical mailing address.
The location provider uses these two types of information to determine the geographic location of a web page visitor. First, the IP address of the device through which the connection is made is calculated, and then its physical address is determined. Naturally, such an indirect approach allows us to determine the exact location not of the user, but only of his Internet provider.
However, often even such inaccurate results are useful. For example, if you use a geolocation tool to find a store selling take-out pizza, you can quickly navigate to the area you're really interested in - near your home - even if you're not exactly nearby.
The IP address method is the most inaccurate method of geolocation. If available best source data, the location provider will use this source.
If a visitor accesses the page from a netbook or smartphone via wireless connection, the location provider uses the nearest points wireless access. Ideally, the location provider pulls data from a huge database to determine the exact location of these hotspots, and then uses the information to triangulate the visitor's location.
And in case of connection with mobile phone The location provider uses a similar triangulation method, but uses signals from different antennas mobile communications. This quick, relatively efficient procedure can usually determine a visitor's location to within 1 km.
Finally, many mobile devices equipped with special GPS hardware (Global Positioning Service - global system navigation and positioning), which makes it possible to determine the location of such devices with an accuracy of just a few meters. But this geolocation method has its drawback - it is slower and consumes more energy, which is important for battery-powered devices. In addition, it does not work particularly well in cities with large and tall buildings due to signal reflection from the buildings.
Of course, other methods of determining location are possible. There is nothing to prevent the location provider from using other sources of information for this purpose, such as data from RFID (Radio Frequency Identification) devices, data from Bluetooth devices, cookies with information from a mapping site like Google Maps etc.
From all this we can draw the following conclusion: regardless of the method of connecting to the Internet, even if a website visitor is sitting at a desktop computer, the ability to geolocation allows you to determine his location with more or less accuracy. And if he accesses the Internet from a mobile phone or a device equipped with GPS hardware, his location can be determined with greater rather than less accuracy.
In what areas can geolocation be used?Having answered the big question of how geolocation works, we need to figure out one more: how does it benefit us?
The key aspect to understand here is that geolocation functionality allows you to determine approximate geographical coordinates page visitor. And that's all. The web developer must combine this simple but important information with more detailed data about the visitor's location. This data can be obtained from a web server (usually from a huge server base data) or some geographic web service (say, Google Maps).
For example, a large business with branches in multiple locations may need to compare the location of a web page visitor to the locations of its various branches to determine which one is closest to the visitor.
And the developer of any tool social networks can create a diagram of the location of a group of users, showing them the distance between them. Or location data can be used to provide website visitors with a service, such as locating the nearest 24-hour store or cafe. In any case, information about the location of a web page visitor is only important in combination with other geographic data.
While the mapping and geography services provided by other companies are quite extensive, we'll look at one of them - Google Maps - a little later.
Determining visitor coordinatesThe geolocation feature is extremely simple. It consists of three methods on the navigator.geolocation object: getCurrentPosition(), watchPosition() and clearWatch().
The navigator object is a relatively minor part of JavaScript. Its several properties provide information about the current browser and its capabilities. The most useful of these is the navigator.userAgent property, which provides an information string containing details about the browser, its version, and operating system, in which it is executed.
To get the visitor's location, the method is called getCurrentPosition(). But it should be understood that the process of determining the location takes a certain time, during which no self-respecting browser will stop all activity on the page while it waits for this data. Therefore, the getCurrentPosition() method is executed asynchronously, i.e. after it is launched, the code that follows it continues to execute. When the location determination is complete, another piece of code is activated to process the results.
You can expect the completion of a location to be accompanied by a notification much like you would receive when an image has finished downloading or a reading has finished. text file. But JavaScript can be called anything but sequential. And when the getCurrentPosition() method is called, it is passed a completion function.
When executed, this code calls the getCurrentPosition() method and passes a function to it. When the browser completes the location detection process, it will activate this function, which will display a message box:

Don't forget: the use of geolocation is only permissible if the browser supports this feature and the visitor allows its use. It's also wise to test a page that uses this feature before you host it on your web server. practical application. Otherwise, problems may arise (for example, geolocation error handling will not function) and some browsers will not be able to determine the user's location at all.
Determining the accuracy of the provided locationIf the getCurrentPosition() method succeeds, the code receives a position object, which has two properties: timestamp(contains geolocation execution time) and coords(contains geographic coordinates).
But the coords property, in turn, is a subobject of the position object and, in addition to the properties latitude And longitude, defining the geographic coordinates of the visitor, has several other properties that provide additional information about the location. These are properties such as altitude(altitude), heading(direction of movement) and speed(speed). But on at the moment these properties are not supported by any browser.
More interesting is the property accuracy, which indicates the accuracy of a specific location in meters. (This means that as the accuracy of location data decreases, the value of the accuracy property increases, which can be somewhat confusing.) For example, an accuracy property value of 2135 meters means that the user's location was determined to be within that distance.
The accuracy property is useful for determining the quality of geolocation results. For example, if the value of the accuracy property is measured in tens of kilometers, the geolocation data is unlikely to have any practical value:
If (position.coords.accuracy > 10000) ( alert("The visitor could be anywhere on the map"); )
In such a case, it may be reasonable to notify the user of the uncertain location data and/or prompt the user to enter the correct information themselves.
Error HandlingGeolocation functionality does not work if the visitor refuses permission to use it. In this case, the completion function in our example is not called and the page will not know whether the browser is still trying to determine the location or there was an error in the execution of the code.
To solve this problem, when calling the getCurrentPosition() method, it needs to pass not one function, but two. The first function, as we have already discussed, is called if the geolocation process is successfully completed. Otherwise, the second function is called. The following is an example using these two functions:
// Save the element in which the page displays the result var result; window.onload = function() ( result = document.getElementById("result"); // If geolocation functionality is available, // try to determine the visitor's coordinates if (navigator.geolocation) ( // Pass two functions navigator.geolocation.getCurrentPosition( geolocationSuccess, geolocationFailure); // Display the result result.innerHTML = "The search has begun"; ) else ( // Display the result result.innerHTML = "Your browser does not support geolocation"; ) ) function geolocationSuccess(position) ( result.innerHTML = " You were last spotted here: " + position.coords.latitude + ", " + position.coords.longitude; ) function geolocationFailure(positionError) ( result.innerHTML = "Geolocation Error"; )
When a geolocation error function is called, the browser passes it an error object that has two properties: code(contains a numeric code indicating one of four error types) and message(contains a short notice about the problem). Typically the notification is for testing purposes and the error code is used by the function code to determine how to resolve the problem.
A modified error function that checks all possible error code values looks like this:
Function geolocationFailure(positionError) ( if(positionError == 1) ( result.innerHTML = "You have decided not to provide your location data, " + "but that's not a problem. We won't ask you for it anymore."; ) else if (positionError == 2) ( result.innerHTML = "There are network problems or the location service cannot be contacted for some other reason."; ) else if(positionError == 3) ( result.innerHTML = "He managed to determine the location of " + "within the specified time. "; ) else ( result.innerHTML = "Mysterious error."; ) )
Setting geolocation parametersSo far we've seen how to call the getCurrentPosition() method with two parameters: a function to handle the success of the geolocation and a function to handle the error when attempting to do so. But this method can be passed one more parameter, which is an object that sets certain geolocation parameters.
Currently, you can set three parameters, each corresponding to a different property of the geolocation parameters object. The following example sets one enableHighAccuracy parameter:
Navigator.geolocation.getCurrentPosition(geolocationSuccess, geolocationFailure, (enableHighAccuracy: true));
And in this example, all three parameters are set:
Navigator.geolocation.getCurrentPosition(geolocationSuccess, geolocationFailure, (enableHighAccuracy: true, timeout: 10000, maximumAge: 60000));
In both of these examples, geolocation parameters are set via JavaScript object literals.
What do these properties mean? The enableHighAccuracy property enables highly accurate location determination using GPS system(if the device supports this feature and the visitor has authorized its use). Do not set this option unless you need precise coordinates because its use greatly increases the battery consumption of the browser device. By default, the enableHighAccuracy property is set to false.
The timeout property specifies the period of time that the page will wait to receive geolocation data before considering the attempt as a failure.
Timeout values are set in milliseconds, i.e. 10,000ms means a maximum wait of 10s. The countdown begins after the user agrees to provide geolocation data. By default, the timeout property is set to 0, meaning the page will wait for geolocation results indefinitely without triggering a timeout error.
The maximumAge property enables caching of location data. For example, a maximumAge value of 60,000 ms allows you to use geolocation data received a minute ago. This saves time and computing resources, and also means that geolocation results will be less accurate if the visitor moves around. By default, the maximumAge property is set to 0, meaning that cached geolocation results are never used. The property can also be assigned special meaning infinity, in this case cached geolocation data of any date will be used.
Map displayDetermining the geographic coordinates of a website visitor's location is certainly an interesting trick. But it quickly loses its appeal if we do not find this information of any kind. useful application. This won't be the case, because... There is a wealth of geographic location data available on the Internet. (Often the problem is converting this information into a format useful for the web application.)
In addition, there are several mapping services, the undisputed leader of which is Google Maps. Reliable estimates of hits to this service suggest that Google Maps is the most used web application for any purpose.
Using Google Maps, you can create a map of any size of any part of the world. You can manage how visitors interact with this map, generate routes to get from one point to another, and, most usefully, overlay your information on this map.
Google Maps provides its services free of charge (even for commercial sites), subject to free access to the site. (For paid sites, Google provides a paid map service.) Google Maps currently does not insert its advertising on sites that use its services, but license terms explicitly stipulate the right to do so in the future.
The picture below shows modified version geolocation pages. Here the obtained geographic coordinates of the user are used to display his location on the map:

Creating such a page is not difficult at all. The first thing we need is a link to the Google Maps API scripts. This link is placed before all script blocks that use the mapping functionality:
Geolocation...
Where do you live?
The size of the map can be determined using a style sheet rule:
#mapSurface ( width: 600px; height: 400px; border: solid 1px black; )
Now you are ready to use the functionality provided by Google Maps. The first step is to create the map surface. In this example, a map is created on page load so that it can be used in geolocation success or error functions. (After all, a geolocation error just means that the page can't determine the user's current location. In that case, it still makes sense to display the map, but just center it around the default coordinates.)
Var results; var map; window.onload = function() ( result = document.getElementById("result"); // Set some map parameters. In in this example// the initial zoom level and map type are set. // For other options, see the Google Maps documentation. var myOptions = ( zoom: 13, mapTypeId: google.maps.MapTypeId.ROADMAP ); // Create a map using the parameters set above map = new google.maps.Map(document.getElementById("mapSurface"), myOptions); // Trying to determine the user's location if (navigator.geolocation) ( navigator.geolocation.getCurrentPosition(geolocationSuccess, geolocationFailure); result.innerHTML = "Search completed"; ) else ( result.innerHTML = "Your browser does not support geolocation"; goToDefaultLocation( ); ) )
But the map created by this code is not yet displayed on the page, because The geographical position has not yet been established. To do this you need to create a specific global point, using a LatLng object, which is then placed on the map using the method setCenter() cards. Below is the code that does all these things for the visitor's coordinates:
Function geolocationSuccess(position) ( // Convert the location to a LatLng object var location = new google.maps.LatLng(position.coords.latitude,position.coords.longitude); // Display this point on the map map.setCenter(location); )
This code will be enough to display a map like the one shown in the image above. But to this base map you can add various gadgets, for example, displaying other places in the sidebar or a pop-up information window. The latter is created using the infoWindow object. Following is the code to create and display a popup info window (like the image above):
Function geolocationSuccess(position) ( ... // Create a pop-up info window and set // its text and position on the map. var infowindow = new google.maps.InfoWindow(); infowindow.setContent("You are somewhere in this area."); infowindow.setPosition(location); // Display a pop-up window infowindow.open(map); results.innerHTML = "The location is marked on the map."; )
Finally, in the event of a geolocation error or lack of support in the visitor's browser, you can perform essentially the same actions, but using alternative preset coordinates instead of the visitor's coordinates:
Function geolocationFailure(positionError) ( ... goToDefaultLocation(); ) function goToDefaultLocation() ( // Approximate coordinates of the center of Moscow var moscow = new google.maps.LatLng(55.753878,37.649275); map.setCenter(moscow); )
Visitor movements trackingIn all the examples we've looked at so far, we've used the getCurrentPosition() method, which is a key geolocation functionality. But the geolocation object has two other methods that allow you to track the visitor's movements and notify the page about these movements.
The first of these methods is the watchPosition() method which is quite similar to the getCurrentPosition() method. Like the getCurrentPosition() method, the watchPosition() method takes parameters: a success function (the only required parameter) and an error function:
Navigator.geolocation.watchPosition(geolocationSuccess, geolocationFailure);
The difference between these two methods is that the watchPosition() method can fire the success function multiple times - to detect a location the first time, and then each time it detects a new location. For desktop computers, which never move, the getCurrentPosition() and watchPosition() methods have exactly the same effect.
But unlike the getCurrentPosition() method, the watchPosition() method returns a number. This number can be saved and passed to the clearWatch() method to stop tracking movements:
Var watch = navigator.geolocation.watchPosition(geolocationSuccess, geolocationFailure); ... navigator.geolocation.clearWatch(watch);
You can skip this step and continue to receive navigation messages until the visitor leaves the page.
Purchased new Android and want to use geolocation? We'll tell you how to turn it on.
Every modern smartphone is equipped with a GPS module. This makes it possible to use the gadget as a navigator. Moreover, you can use it to tag photos and take advantage of several other cool features. Therefore, beginners are interested in how to enable geolocation on Android.
Usually the function is activated immediately. But if you turned it off yourself, and now want it to work again, then you need Location settings.
Geolocation Android
At the top of this section there is a switch responsible for the operation of geolocation.

Setting up geolocation on Android
If its color is blue, then this indicates that GPS is activated. Moreover, you can immediately change the operating mode of the navigator. To do this, open “Mode. Based on device sensors."

How to set up geolocation on Android?
Geolocation operating modes:

How to enable geolocation on Android?
- High level of accuracy. This mode uses all possible information from the GPS sensor received via Wi-fi, as well as that received via the mobile network.
- Save charging. This mode allows you to save battery power, that is, the GPS module is not activated. Instead of a geolocator, Wi-fi and mobile Internet are used.
- By sensors. Here only the GPS module remains active.
By the way, in the location window you can activate or deactivate the transfer of data about your location to Google services. This option is found in Location Submission.

Sending geodata to Android
There are two more sections here - “Sending geodata” and “Location history”.
Go to each section and move the sliders to enable or disable.

How to send geodata on Android?
Video: Enable geolocation | Samsung GalaxyEvery smartphone, be it Android or iOS, has in its settings an option for recording location histories, which most users are not even aware of. If you regularly check your partner’s phone for suspicious correspondence and calls, but it’s “clean” - all correspondence is deleted, or simply what you need is not found, you can take advantage of this opportunity. In suspicious cases, when you don’t know where your significant other actually is, or you don’t believe the version voiced to you, you can easily find out where your passion actually was - at your mother’s or in an unknown residential building in Vostochny Biryulyovo, at work until late or in the sauna in Lyubertsy. You need to understand some subtleties before you can access the location history record of the owner of the mobile phone:
Many people use a browser on their computer Google Chrome, in which you enter your username and password to synchronize between your phone and computer. It's very convenient. Often on this google your account is set to auto-login or your password is saved, you don’t need to enter it, you can start tracking right away (see links at the bottom of the article)
- many people use this Google mail as their personal mail.
- if the options above do not apply, you need to find out the name of this google account(you can view it in many ways, for example by logging into the Gmail application from your phone - you are interested in the address mailbox), go to gmail.com from your computer and request a password reset when logging into your account, to do this, click the “Need help?” link.


Select the option "Difficult to answer"

Click "Send Alert"

After the message arrives, change the password, delete the SMS, delete the letter about changing the password on this mailbox.
Congratulations, now you know both the login and password for the account linked to the smartphone of the potential cheater(s)! Of course, all these actions must be done unnoticed by the owner of the phone: when he (she) is sleeping, in another room, etc., the main thing is that you have access to the phone itself, the SMS arrives silently, and is immediately received by you erased.
There are more complex cases when there is a password on the phone. In this case, you shouldn’t despair either. You can safely say that you want to check the phone, so as to be at peace with your “horns”, you can wait a moment and take the phone under the guise of “setting something up”, install a new toy, clear the phone’s memory, etc., and ask to unlock it telephone. The main thing is to come up with a reason that will give you at least a few minutes to have time to enable the options for recording location history and wait for an SMS from Google. If these methods are also difficult for you, try to sneak a peek at your phone password. It's not that difficult.
After all these “dancing with a tambourine”, you have finally come to your cherished goal - all the object’s movements for each day are drawn directly on the map! To see this very map, log in using the username and password you obtained on google.com and follow the link below. Goal achieved!
This instruction is suitable specifically for Android devices, however iPhone order The steps are exactly the same: go to settings, enable location recording, enable GPS, mobile internet, the only difference is that you need to gain access not to Google, but to an Apple ID, by logging into which you can also see a map of your movements. By iPhone detailed instructions I can’t write because... I don’t have such experience yet, I use Android.
So, due to the fact that your subject can turn off the GPS function in order to save battery power, this tracking method may be ineffective, although it will provide at least some data, perhaps the most important ones. In cases where this method did not help you in any way, I recommend resorting to much more simple way -
One of the main functions modern smartphone is geolocation. With its help you can use your smartphone as GPS navigator, leave your coordinates on photos, send data about your location, and much more. In this article you can learn how to enable geolocation on Android smartphone, as well as how to configure it correctly.
In most cases, geolocation is enabled and working on an Android smartphone. But, if you have previously disabled this function, and now you want to turn it on again, then you need to go to the settings of your Android smartphone and find there a section called “Location” (in latest versions This section is located at: Settings - Security and location - Location). It is in this section that all settings related to geolocation are concentrated.
In the “Location” section, at the very top of the screen, you will find a switch with which you can enable geolocation on Android.
Just below you will find the “Mode” section. In which you can choose how geolocation works.

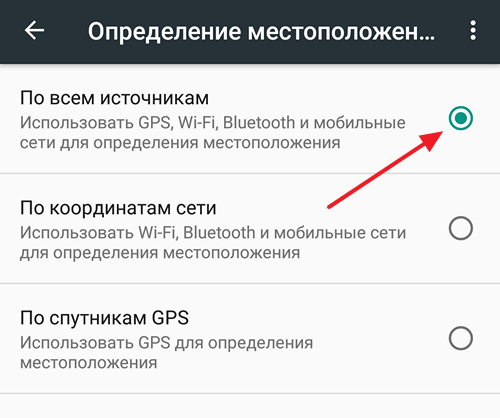
If you open the “Mode” section, you will see three possible modes of geolocation operation. Let's take a closer look at each of these modes.
- “Across all sources” mode (in older versions of Android this mode was called “High accuracy”). The most accurate geolocation operating mode. If you enable this mode, then everything will be used to determine your location. accessible to smartphone information. This is data from satellites, data from a mobile operator, as well as data received through Wi-Fi and wireless networks.
- Mode “By network coordinates” (in older versions – “Battery saving”). This mode uses data only from the mobile operator and wireless networks(Wi-Fi and Bluetooth). While the GPS module does not work and does not consume battery power. Enabling this geolocation operating mode allows you to save battery power and extend time battery life devices.
- By GPS satellites (in older versions - “By device sensors”). Geolocation operating mode in which data is used exclusively from GPS module. In this case, information from the mobile operator and wireless networks is not taken into account.
If you return to the “Location” settings section and scroll through the settings to the very end, then here you can find a couple more interesting features. These are “Location History” and “Transfer of Geodata”.
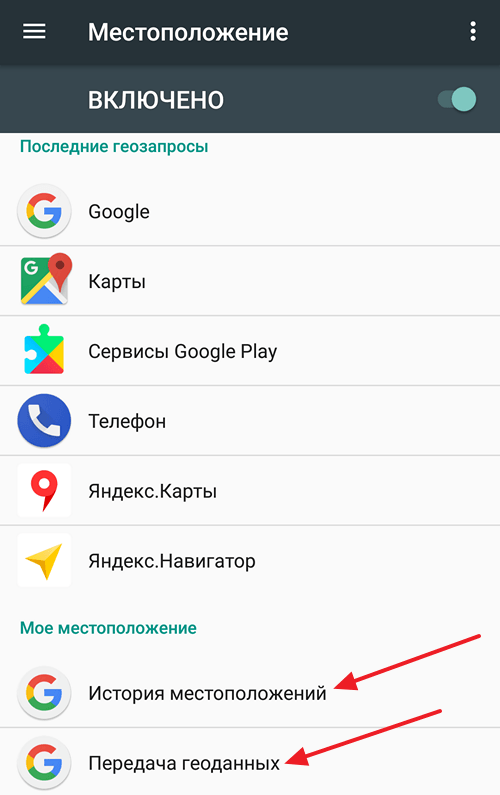
If you open the “Location History” section, you can enable or disable recording the history of your movements with your Android smartphone. This story is stored on Google servers and can be viewed on the website " Google Maps" in the "Chronology" section. You can get more information about this function.