The article reveals the main methods of how to determine the azimuth using a magnetic compass and the place of its possible application. The use of azimuth is common in satellite television.
V modern world, saturated with gadgets and technologies, only a few can independently find the direction of interest with the help of a compass and a map. The ability to find the azimuth can be useful and help out in any business.
True (geographic) azimuth is a dihedral angle counted clockwise (from 0 to 360 degrees) from the north geographic meridian to the direction line.
Magnetic azimuth is the angle formed by the magnetic meridian and the given direction of the landmark line. The countdown is clockwise (from 0 to 360 degrees). Angle search can be done using compasses, compasses. The magnetic azimuth is not accurate, as the compass needle points to a magnetic meridian that is subject to yearly changes.
Magnetic declination is the angle of difference between the true and magnetic meridian, which was mentioned earlier. It can be positive if the compass needle deviates from the true meridian to the right, or negative if it is to the left. On maps, magnetic declination is indicated relative to the year of printing. Each subsequent year of operation, the data provided are subject to adjustment.
Naturally, the magnetic declination for each region and area of \u200b\u200blocation varies.
A topographic map of an area is used for various purposes. It is a universal map, with the presence of the maximum amount of information about a particular region. The topographic map is divided by parallels (horizontal lines) and meridians (vertical lines). The map is useful for compass orientation. Geographic location data contains information about the terrain, soils, waters, roads, and other terrain features.
Finding values and working with acquired parameters
- Plan for determining the true azimuth (using a magnetic compass):
- The compass aligns horizontally to the ground, allowing the magnetic needle to point north;
- The desired object is determined, on which the reference point is taken;
- Without changing the position, the compass bulb is adjusted to the arrow, so that the letter N (C) is clearly opposite the magnetic indicator;
- The degree is counted according to the compass divisions, from zero to the given line of the direction of the object (clockwise);
- Result - obtained magnetic azimuth;
- The magnetic declination of the given region is added or subtracted to the found degree;
- And so, the true azimuth is found.
- Calculation of azimuth on the map:
- The desired landmark is selected and marked on the map with a dot;
- Further, from the intended landmark, a solid line is drawn from the starting point to the marked area;
- From the starting point, a parallel straight line is projected relative to the geographic meridian;
- Having two lines drawn, the protractor finds an angle that will be equal to the true azimuth.
Calculation by coordinates is similar to the process of finding the azimuth on the map. Instead of the marked landmark on the map, the coordinates of the point are taken, and the direction is built.
- Back azimuth.
The desired direction determined by the compass or map changes by one hundred and eighty degrees, receiving a reverse calculation.
Benefits of the acquired information:
- One way to get mirror data from the opposite direction point.
- The ability to make a precise turn and follow the return path.
Application of azimuth data in the field of satellite dishes
A correctly calculated azimuth, whether using a map or a compass, will not only tell you the way back home, but will also help with setting satellite dish.
The main guidance parameters will be the angular coordinates of the orientation of the antenna beam axis in elevation and, of course, azimuth. Before installing the antenna, you need to decide from which satellite the signal will be caught. The coordinates of various satellites can be found on thematic sites or in the antenna purchase store. Knowing the orbital position of the satellite, you can calculate the azimuth and elevation.
The elevation angle is a degree value in the vertical plane that characterizes the angle between the horizontal and the direction to the satellite.
The calculation of this value is carried out using a special protractor, or devices based on the work of the accelerometer. Also, if you have a modern smartphone, you can download from the Internet software performing data measurements. This will definitely help the user to adjust the antenna to the chosen angle.
The direction of the satellite dish in the vertical plane can be built thanks to the compass by calculating with the found angle and getting the true azimuth (the description of the process is described earlier). Or in a more accurate way - calculation on the map.
The theoretical part of finding the azimuth and elevation angle can be expressed in three formulas:
Az - azimuth in degrees;
El is the angle of inclination in degrees;
Lo ES - geographic longitude of the area (northern hemisphere sign - "+", southern - "-")
Lo SAT- geographical latitude terrain (eastern hemisphere - "+", western - "-")
La ES - longitude of the satellite position (eastern hemisphere - "+", western - "-")
After determining the correct position of the parabolic mirror of the dish, at the installation site you need to make sure that there are no direct obstacles that interrupt the reception of information (roofs, houses, trees). For example, if the elevation angle of a satellite dish is twenty degrees, obstacles are fifty degrees, we can conclude that such placement is unsuitable, since the receiving lines are blocked and the signal from the satellite will not pass. It is logical that during installation it is necessary to choose the right side of the house where the plate will be placed, because the “view” sector of the parabolic mirror mounted on the wall does not exceed one hundred and eighty degrees. And it is important that the azimuth and elevation of the satellite are included in this zone.
A common option for placing a satellite dish on the roof of a building. This a good choice terrain, as there is good review plates. The minus is the great windiness and the impossibility of quick adjustment of the antenna, in contrast to the wall dishes adjacent to the balconies.
By correctly installing the antenna and providing good guidance to the satellite, you can achieve high-definition broadcasting of your favorite TV channels.
When determining the azimuth, it is worth:
- You can only rely on high-quality and serviceable compasses, cheap Chinese counterparts can give an error of up to twenty degrees.
- Have a compass of two types:
- "Finger" magnetic compass.
Pros: ease of orientation in the area, resistance to shaking. Cons: not convenient when working on the map.
- Tablet magnetic compass.
Pros: accurate calculation of the direction on the map (due to the built-in ruler), the presence of a magnifying glass.
Cons: inconvenience of use on the ground.
- The article discusses antennas with azimuth-elevation suspension (receiving reception from one satellite) and their possible do-it-yourself localization. To adjust the polar suspension, it is necessary to invite classified specialists. Do not undertake the installation without prior experience.
- Do not overtighten the bolts when installing the antenna mirror to the grid. Distorting the shape of the parabolic mirror will disrupt the transmission signal, and calculating with a map with a compass will not be as effective.
- Satellites located on the same line near the dish being installed have a ready-made attitude. Having a compass, countable programs on your smartphone and special tools, you can measure the angle of inclination and azimuth of the dish (according to the converter holder bar) by copying it to your sample.
- Achieve maximum positioning effect satellite dish maybe a SAT Finder signal meter. It determines the most advantageous rotation of the antenna to millimeter accuracy.
Current version 3.5.0 - Date 10-Jan-2018 (Program is free for non-commercial use)
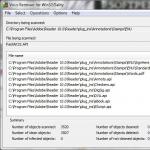
The program "Satellite Antenna Alignment" is designed to calculate the angles required when installing a satellite dish. The azimuth and elevation (elevation) for each satellite are calculated. The main difference from similar programs is the ability to calculate all satellites at once. This gives a clear picture of which satellites are physically visible from the spot. antenna installation and which ones are not. It should be remembered that in this program the calculation is purely theoretical, according to formulas, and in real conditions, when installing the antenna, many more factors must be taken into account, such as various obstacles (buildings, trees), terrain, altitude, transponder directivity, polarization etc. Nevertheless, this program will allow you to assess the situation quite accurately. The resulting calculation can be saved in text file, copy to the Windows clipboard, or output directly to the printer. Export to MS Excel, MS Word, HTML and CSV files. It is possible to remember the list of places for which the calculation was made. Subsequently, you will no longer need to enter the coordinates of these places again, just select them from the table. The program has a multilingual interface (English, Russian, Ukrainian, German, Lithuanian, Dutch, Romanian, Polish, French).
You can always download the latest version of the program from this link:
You need to start working with the program by entering the geographical coordinates of your satellite dish installation point. Enter your coordinates in the "Antenna location coordinates" section. North latitude is "N", south latitude is "S". Similarly, east longitude is "E", west longitude is "W". After the coordinates are entered, on the left side of the table you will receive the calculation of the angles for all satellites at once. The azimuth and elevation angle of the antenna (elevation angle) are calculated. The resulting azimuth is the direction to the satellite in degrees from north in a clockwise direction. The elevation angle is the angle (in degrees) between the direction of the satellite signal and the tangent plane to the ground at your point of reception. If the elevation angle is negative, then the satellite is hidden behind the horizon and reception of a signal from it is basically impossible. Thus, from your point of view, satellites are theoretically visible, for which the elevation angle is a positive value. Knowing the azimuth, you can quickly orient yourself and determine the direction to the satellite, determine the obstacles in the way of the antenna direction (neighboring houses, trees).
As mentioned above, the program operates with absolute values and calculates everything according to formulas. Thus, the resulting azimuth is the angle relative to the absolute north, and not from what your compass can show, because. a compass is a very unstable thing, especially in urban areas. It is better to navigate by the sun)
Additionally, the program implements the calculation of the azimuth to the sun, and now you can do without a compass! The calculation is made for the point whose geographic coordinates you specified to calculate the azimuth to the satellites. Altitude above sea level is considered to be 0 meters. You can specify a date (default is The current date) and calculate the motion of the sun with a resolution of one minute. The calculation results are displayed in the table on the left side. For the sun, both azimuth and elevation are calculated at the current time. Thus, this gives you the opportunity to do without a compass at all when installing an antenna. First, determine the azimuth to the satellite you need. Then calculate the azimuth to the sun on the day you plan to install the antenna. Find in the table the azimuth of the sun that is most equal to the azimuth to the satellite, and you will get the time (and date) when the sun will be in the same direction as the satellite. At the right time, we turn the antenna directly to the sun, the azimuth of the sun at this moment coincides with the azimuth of the satellite. Or just mark this position, turn the antenna later. When calculating, do not forget to indicate your time zone (Moscow +3 hours from Greenwich Mean Time). Additionally, the program calculates the azimuth of sunrise and sunset, as well as the time and elevation when the sun is due south.
The program does not take into account the transition to summer time! Therefore, for summer time, you need to add +1 hour to the results of calculating the azimuth to the sun.
The program draws a simple sketch showing the sides of the horizon. The yellow sector indicates daylight hours, the eastern part of it is sunrise, the western part is sunset. On the same diagram, you can schematically display the direction to the satellite you need. Select a satellite in the drop-down list, the direction to it (azimuth) is drawn with a red line. If the elevation angle to the satellite is negative, then the red line is not drawn (the satellite is not visible).

Currently, offset satellite dishes are widely used. Such an antenna, standing strictly vertically, already has a certain elevation angle (~ 20-25 degrees). You can enter the dimensions of your offset antenna (height and width) and the software will calculate the exact angle of elevation for that antenna. The calculation is made only for antennas with a height more width. Enter the dimensions of the antenna in millimeters. It will also show the angle of elevation to the satellite you have chosen, and the angle at which you really need to install the antenna (in degrees from the ground plane)

Version history of "Satellite Antenna Alignment":
January 10, 2018 version 3.5.0
The base of satellites has been updated, new satellites have been added. Some satellites have moved to a new position.
May 30, 2013 version 2.97.0
January 28, 2008 version 2.50.0
Compatibility with Windows Vista, fixed some minor UI bugs
Satellite database updated, new ones added recently launched satellites. Some satellites have moved to a new position.
January 07, 2008 version 2.38.0
The satellite database has been updated, new recently launched satellites have been added. Some satellites have moved to a new position.
October 15, 2006 version 2.36.8
Updated satellite database, fixed some bugs in the interface
Satellite database updated
08 April 2006 version 2.36.1
Some fixes in the Dutch language (Dutch), fixed some bugs in the program interface.
March 14, 2006 version 2.36
The satellite database has been updated, new recently launched satellites have been added, obsolete satellites have been removed.
The table of satellites is now stored in an external CSV file "satellites.txt", which is located in the directory with the program. The separator is the character ";" then. it is possible to update the satellite table without updating the program. Those who wish can leave in it only satellites that are relevant to them, deleting unnecessary lines.
Changes in the table of satellites: instead of the symbols "+" and "-", the symbols "E" and "W" are now used for east and west satellites, respectively.
The speed of calculating azimuths to the sun has been radically increased (there were slow places in the algorithm). In this regard, the button "Calculate azimuth to the sun" has been removed. the table of azimuths to the sun is now calculated automatically when the initial data changes, and always contains already calculated results.
Added Romanian and Polish languages to the interface (Romanian, Polish)
Added export to HTML files separately for the table of satellites and the table of azimuths to the sun
Added export to CSV files separately for the table of satellites and the table of azimuths to the sun. That. the results obtained can be subjected to additional processing if someone needs it.
Added the ability to save results as XLS file s (MS Excel), MS Excel is not required. The resulting XLS files can be used in OpenOffice. The ability to directly export to MS Excel via OLE linking has been retained, but this feature requires MS Office to be installed.
All basic actions can now be performed using hotkeys:
- switch to the tab with calculation of azimuths and elevation to satellites
- switch to the tab with the calculation of azimuths and elevation in the sun
- switch to the tab with the calculation of the elevation angle for the offset antenna
- switch to the tab with the calculation of the angle of elevation to obstacles in the path of the antenna
- switch to the tab with a text report (the report is automatically generated only for the first time)
- switch to the tab with a web browser to get information about transponders from sites Lyngsat.com and satcodx.com
- Export to MS excel spreadsheet satellites via OLE linking
- Export to MS Excel table of azimuths to the sun via OLE linking
- Export to MS Word satellite table via OLE linking
- Export to MS Word table of azimuths to the sun via OLE linking
- Save satellite table to *.HTML file
- Save to *.HTML file a table of azimuths to the sun
- Save the table of satellites in *.CSV file, the separator is the symbol ";"
- Save the table of azimuths to the sun in *.CSV file, the separator is the symbol ";"
- Save satellite table to *.XLS file, MS Excel is not required
- Save a table of azimuths to the sun in *.XLS file, MS Excel is not required
October 05, 2005 version 2.35
The satellite database has been updated, new recently launched satellites have been added. Some satellites have moved to a new position.
The principle of entering the geographical coordinates of the receiving place has changed. Enter "N" for north latitude, "S" for south latitude, "E" for east longitude, and "W" for west longitude (previously you had to put "+" or "-"). Thus, now the program can be used in close proximity to the zero meridian and to the equator (coordinates less than 1 degree). All previously saved positions are processed correctly.
Dutch language (Dutch) has been added to the interface.
Now it is possible for each satellite to get a list of transponders from the web sites Lyngsat.com and satcodx.com. By double-clicking on a satellite name, the program loads the corresponding page from Lyngsat.com. If you open the pop-up menu on the name of the satellite ( right button mouse), you will be able to choose where to download information about transponders: from Lyngsat.com or from satcodx.com. Those. now you can quickly get directly from the program detailed information from TV channels for the selected satellite. Internet connection required.
April 21, 2005 version 2.33
Fixed some bugs. Thanks to everyone who sends their feedback and bug reports.
March 21, 2005 version 2.31
The Ukrainian language has been added to the interface. 
March 12, 2005 version 2.3
The algorithm for calculating the azimuth and elevation in the sun has been corrected for the better, now it has a higher accuracy. Some changes in the formula for calculating the azimuth to satellites have also increased the accuracy of the calculations.
March 10, 2005 version 2.2
Fixed bug when calculating azimuth and elevation for geographic coordinates of the southern hemisphere (Australia, etc.)
March 6, 2005 version 2.1
Added export to MS Excel and MS Word. It is required that MS Excel and MS Word be installed on the computer, otherwise the export will not work. Export works on the principle of OLE linking: it is launched by an invisible Excel (Word), results are displayed in it, then Excel (Word) is displayed on the screen. There may be slight delays during export (from a few seconds to a minute), export progress is displayed in the status bar. The table of satellites and the table of azimuths are exported separately, for which four items have been added to the main menu: 
March 1, 2005 version 2.0
First public version. Before that, the program was developed only for personal use.
The program is free for non-commercial use.
If this program has been helpful to you,
you can thank the author with any amount to your wallet
Payment system WebMoney:
Z444815179910
R509750044656
Or Yandex.Money Payment System, wallet number: 4100122821278
or use online payment via paypro:
This program is my debut in the field of satellite reception, so if you notice inaccuracies or errors in it, then let me know about them. I'll try to fix them if possible. You can tell me your wishes for improving and finalizing the program. Contact form .


Independent calculation of the installation of a satellite dish Satellite Antenna Alignment.
Satellite dish, installation and calculation of direction angles to the satellite.
To make everything easier, we suggest you consider and use a good free program Satellite Antenna Alignment.
The angle of rotation of a satellite dish is, simply put, two angles. Horizontal angle (azimuth (bearing)), and vertical angle (elevation). Azimuth is the angle measured from north in a clockwise direction. Due to the peculiarities of the satellite antenna fasteners and the accuracy of the calculations, preliminary targeting is carried out first. It will be discussed first.
The easiest way to determine antenna angles is to go outside and see where the antennas of other satellite TV users are looking. Naturally, given which satellite they are targeting (from advertising on dishes, or from a conversation with neighbors). Minus - accuracy, and such that the first time you can generally catch another satellite.
The first thing that will become clear is whether trees and buildings interfere with the reception. If they interfere, then you need to determine another place of attachment, but it is highly desirable that the cable be no more than 10, maximum 20 meters long (signal attenuation (almost 2 times) otherwise it will reduce all your success in installing the antenna to a mediocre result).
A completely different question is how to direct the antenna exactly at these angles.
If you have a compass (however, metal on the roof and balcony cannot be avoided, as well as fictitious declination), it will still be possible to approximately install the antenna, and then you can adjust it manually. In the Russian Federation, maps with the location of houses and objects relative to the north pole (N true) and even a view of the church sometimes help (the cross on a normal church is oriented strictly to the North). Along the vertical angle, a little easier - along a plumb line and a protractor.
If there is nothing, then according to the zenith of the sun (the highest point above the horizon). We did not specifically indicate the time (in our country this is a separate issue). Let's say - around 14 o'clock today. This is the South, and it is from it that we count the direction to the satellite exactly by eye, by successive division along the horizontal (90/2 \u003d 45, 45/2 \u003d 22, 5, etc.) Simple, but it works.
Similarly - you can estimate the angle of the antenna during installation - by successive visual division along the vertical (90/2 \u003d 45, 45/2 \u003d 22.5, 22.5/2 \u003d 11.25, etc.) Simple, but it works.
What accuracy is needed in calculations? Without going into an excursion into the dependence of the range of the satellite location and accuracy, let's say that 2 degrees for the Russian Federation (for most satellites) is the limit, for the average value during calculations and installation. We also take into account the accuracy of fasteners, mounting deviations and deformation of the antenna, which should be immediately reduced and provided for.
Satellite Antenna Alignment - a program for calculating the angles required when installing a satellite dish. The program is free and works from XP to windows 7. It is available in Russian, which makes it easier to work.
The program "Satellite Antenna Alignment" is designed to calculate the angles required when installing a satellite dish. The azimuth and elevation (elevation) for each satellite are calculated. The main difference from similar programs is the ability to calculate all satellites at once. Thus, a clear picture is formed about which satellites are physically visible from the antenna installation site, and which are not.
It should be remembered that in this program the calculation is purely theoretical, according to formulas, and in real conditions, when installing the antenna, many more factors must be taken into account, such as various obstacles (buildings, trees), terrain, altitude, transponder directivity, polarization etc.
Additionally, the program implements the calculation of the azimuth to the sun, and now you can do without a compass!
This program will allow you to estimate the position quite accurately. The resulting calculation can be saved to a text file, copied to the Windows clipboard, or immediately output to a printer. Export to MS Excel, MS Word, HTML and CSV files is available. It is possible to remember the list of places for which the calculation was made. The program has a multilingual interface (English, Russian, Ukrainian, German, Lithuanian, Dutch, Romanian, Polish, French).
The latest versions can be downloaded from the site - http://www.al-soft.com/saa/satinfo-ru.shtml
Perhaps you will be asked to take a small survey, or an antivirus will squeal, but usually not everything is so bad, it's just that the program is free and the company somehow makes money. There are also older versions on the Internet without ads and surveys (as well as without antivirus warnings).
You need to start working with the program by entering the geographical coordinates of your satellite dish installation point. Enter your coordinates in the "Antenna location coordinates" section. North latitude is "N", south latitude is "S". Similarly, east longitude is "E", west longitude is "W". After the coordinates are entered, on the left side of the table you will receive the calculation of the angles for all satellites at once.
The azimuth and elevation angle of the antenna (elevation angle) is calculated. The resulting azimuth is the direction to the satellite in degrees from north in a clockwise direction. The elevation angle is the angle (in degrees) between the direction of the satellite signal and the tangent plane to the ground at your point of reception. If the elevation angle is negative, then the satellite is hidden behind the horizon and reception of a signal from it is basically impossible. Thus, from your point of view, satellites are theoretically visible, for which the elevation angle is a positive value. Knowing the azimuth, you can quickly navigate and determine the direction to the satellite, determine the obstacles in the way of the antenna direction (neighboring houses, trees).
As mentioned above, the program operates with absolute values and calculates everything according to formulas. Thus, the resulting azimuth is the angle relative to the absolute north, and not from what your compass can show, because. a compass is a very unstable thing, especially in urban areas. It is better to navigate by the sun)
Additionally, the program implements the calculation of the azimuth to the sun, and now you can do without a compass! The calculation is made for the point whose geographic coordinates you specified to calculate the azimuth to the satellites. Altitude above sea level is considered to be 0 meters. You can specify a date (by default, the current date is taken) and calculate the movement of the sun with a resolution of one minute. The calculation results are displayed in the table on the left side. For the sun, both azimuth and elevation are calculated at the current time. Thus, this gives you the opportunity to do without a compass at all when installing an antenna. First, determine the azimuth to the satellite you need. Then calculate the azimuth to the sun on the day you plan to install the antenna. Find in the table the azimuth of the sun that is most equal to the azimuth to the satellite, and you will get the time (and date) when the sun will be in the same direction as the satellite. At the right time, we turn the antenna directly to the sun, the azimuth of the sun at this moment coincides with the azimuth of the satellite. Or just mark this position, turn the antenna later. When calculating, do not forget to indicate your time zone (Moscow +3 hours from Greenwich Mean Time). Additionally, the program calculates the azimuth of sunrise and sunset, as well as the time and elevation when the sun is due south.
The program does not take into account the transition to summer time! Therefore, for summer time, you need to add +2 hours to the results of calculating the azimuth to the sun.
The program draws a simple sketch showing the sides of the horizon. The yellow sector indicates daylight hours, the eastern part of it is sunrise, the western part is sunset. On the same diagram, you can schematically display the direction to the satellite you need. Select a satellite in the drop-down list, the direction to it (azimuth) is drawn with a red line. If the elevation angle to the satellite is negative, then the red line is not drawn (the satellite is not visible).
Currently, offset satellite dishes are widely used. Such an antenna, standing strictly vertically, already has a certain elevation angle (~ 20-25 degrees). You can enter the dimensions of your offset antenna (height and width) and the software will calculate the exact angle of elevation for that antenna. The calculation is made only for antennas whose height is greater than the width. Enter the dimensions of the antenna in millimeters. It will also show the angle of elevation to the satellite you have chosen, and the angle at which you really need to install the antenna (in degrees from the ground plane)
There are ready-made calculations for the main cities of the Russian Federation
http://www.al-soft.com/saa/webreports/
For example, for St. Petersburg, the calculated angles for each satellite will help you when installing a satellite dish for satellite Internet or satellite television NTV-Plus, Tricolor TV, Raduga TV, HD Platform, Continent TV.
| Azimuth and elevation to satellites for Sankt-Peterburg - [Latitude: 59°55"N, Longitude: 30°15"E] |
||||
| Satellite | Azimuth | elevation angle | ||
First you need to choose a place to install the antenna. It must satisfy two conditions: a direct line of sight to the satellite and the ability to securely mount the antenna. The fact that the satellite in your city is above the horizon does not mean at all that it has a direct line of sight anywhere in the city. Almost nowhere on land we can see the entire sky, part of it is always covered by mountains, trees or buildings, that is, obstacles that have a non-zero angular height. To check if the satellite is obscured by such an obstacle, it is necessary to perform the following procedures.
First you need to determine the azimuth and elevation of the satellite. Azimuth (Az) - the angle in the horizontal plane between the direction to true North and the direction to the satellite. Elevation (El) - the angle in the vertical plane between the horizontal and the direction to the satellite. The initial data are the longitude (orbital position) of the satellite and the geographic coordinates of your city. High accuracy is not needed - an accuracy of + 0.5 degrees is quite enough. Therefore, you can take the coordinates from any geographical map, even a small one. If you live in a small locality, which is not on the map, the coordinates of another city located 100-200 km from you will do. There are several databases of geographical coordinates of cities on the Internet. For example, a convenient Russian-language "online" database is located here: http://goroskop. org/horoscope/location/index.shtml. To calculate the azimuth and elevation, you can use one of the calculator programs, for example Satellite Antenna Alignment, which can be downloaded for free on the Internet here: http://chishma.ru/download/satellite-antenna-alignment.html If there is no computer, you will have to calculate the azimuth and elevation using the formulas:
Az \u003d 180 ° + arctg (tg A / sin f);
El \u003d (cos A cos f - 0.1509) / (sin ^ 2 A + cos ^ 2 A sin ^ 2 cp) ^ 1/2;
where Az is the azimuth, El is the elevation angle,
f - geographical latitude of the city (northern),
^g ^c - geographical longitude of the city and longitude of the satellite (east - positive, west - negative).
Then you should determine the angular height of the obstacle, located exactly in azimuth to the satellite, and compare it with the elevation angle of the satellite. It is easiest to determine the calculated azimuth on the ground using a compass - you need to go to the antenna installation site and orient the compass body so that the “North” arrow is aligned with the zero of the azimuth scale. An imaginary line passing through the axis of the arrow and the division of the scale corresponding to the calculated azimuth will indicate the direction to the satellite. However, this method is very inaccurate. Almost everywhere on Earth, the magnetic azimuth differs from the true one - the Earth's magnetic poles somewhat do not coincide with the geographic one.
In addition, there are magnetic anomalies - distortion magnetic field Earth deposits of magnetic rocks. Even if these factors are taken into account, the influence of large masses of iron that surrounds us in a modern city remains: building frames, pipelines, mechanisms, etc. The resulting magnetic compass error can be 10 degrees or more. Therefore, you can use the compass when there is no doubt: in a wide sector of angles around the desired direction, the angular height of the obstacles is much less than the elevation angle of the desired satellite. If such doubts exist, you should use a more accurate way to determine the azimuth - on the map.
You need to take a map of the city or a plan of the area, a printout from an electronic map is quite suitable. Bases electronic cards cities can be found on the Internet, for example, here http://maps.yandex.ru, here http://www.mirkart.ru or here http://www.eatlas.ru. A large collection of Russian-language electronic maps is available here: http://www.geocities.com/rip_ru. On the map, you need to put a point in the place where the antenna is supposed to be installed, and use the protractor to draw the calculated azimuth from this point, remembering that on all maps the vertical direction corresponds to the direction to the North. Then, with this map, you need to go to the antenna installation site and turn the map so that the directions on the map coincide with the same directions on the ground. The easiest way is to use directions on the ground. The easiest way is to use the direction of the street - you need to orient the map so that the drawn street is parallel to the wall of a real house facing this street. Now the pencil azimuth on the map indicates the exact direction to the satellite. The determination of the azimuth on the map has another advantage - you can immediately see what obstacles are in the direction of the satellite, they can also be used as landmarks for pointing the antenna. For example, the figure shows that the calculated azimuth crosses diagonally the roof of a high-rise building opposite and touches the corner of another high-rise building in the yard. Looking out the window, it is easy to find this direction.
If the antenna is mounted on a wall, first of all it is necessary to check whether it is possible to receive from this wall at all. Any wall limits the view to 180 degrees, you need to make sure that the calculated azimuth falls into this sector. Otherwise, you need to put the antenna on another wall of the building.
In the calculated direction, there is almost always one or another obstacle. If the height of the obstacle is certainly less than the elevation angle of the satellite, for example, if the elevation angle of the satellite is 25 degrees, and in the direction of the satellite there is only a far-standing low house, the angular height of which is approximately equal to 5-10 degrees, we decide on the suitability of the antenna installation site. On the contrary, if a high house is located close to us in the direction of the satellite, the angular height of which is obviously greater than the elevation angle of the satellite, we look for another place. If in doubt, more accurate means of measuring angular height should be used. Of course, a special device, such as a theodolite, would be the best solution, but it is not so easy to get it. You can use one of the "folk" methods.
One method is described in Soviet school textbooks. You need to take an ordinary student's ruler vertically in an outstretched hand and "measure" in centimeters or millimeters the distance b between the direction to the upper edge of the obstacle and to that point of the obstacle, the absolute height of which coincides with the height at which you are. For example, if you intend to install an antenna on the wall of a house at the level of the third floor, and the obstacle is a neighboring five-story house, you need to measure the distance between its third floor and the roof ridge. Then, using a long ruler or a tailor's meter, measure the distance B from your eye to the ruler in your outstretched hand. The angular height of the obstacle is approximately equal to:
B = arcsin(b/B)
The disadvantage of this method is the unreliability of the "artificial horizon", because in fact the third floor of a neighboring building can be much higher or lower than your third floor. If there are such doubts, it is better to use a pendulum goniometer. A pendulum goniometer can be bought at companies selling satellite equipment - a thing that is generally useful. But you can do it yourself, for this you need a small rectangular sheet of plywood, fiberboard or thick cardboard, a school protractor and a plumb line (thread with a weight). The protractor must be fixed on a plywood sheet so that the base of the protractor is parallel to the edge of the sheet (you can even redraw the protractor onto plywood). In the place where the center of the protractor is located, you need to make a hole in the plywood and pass a plumb line through it. Having gone to the place of the intended installation, you need to “aim” at the upper point of the obstacle with the edge of the sheet parallel to the base of the protractor, and fix the position of the thread - mark it on the sheet with a pencil or simply press the thread to the sheet. The mark will indicate the height of the obstacle.
With the help of these simple tools, you can not only more or less accurately assess the visibility of the satellite, but also select a new installation site if the original one is unsuitable. Consider the same example: we put the antenna on the level of the third floor, exactly in the direction of the satellite there is a nearby five-story house. It turns out that its roof covers elevation angles up to 15 degrees, and the elevation angle of the desired satellite is only 10 degrees, that is, the chosen location does not provide direct visibility and you need to raise the antenna higher. How much? We determine a point on the wall of the interfering house, which has an angular height of 10 degrees. It is located five meters below the top of the building, which means that it is enough to raise our antenna by five meters to make the satellite visible.
Equipment for digital television- this is what you can buy in our store. Our company has been operating in the market of terrestrial and satellite equipment since 2003 and we already know most of our customers by sight.
For regular customers of our online store there is a system of discounts, which is calculated automatically according to the coupon number assigned to you personally.
All equipment undergoes pre-sale preparation, namely, it is installed latest version Software for satellite and terrestrial set-top boxes. All receivers are tested for performance.
Our company delivers equipment, both in Moscow and throughout Russia. with most companies courier delivery Agreements on preferential delivery price have been concluded.
In our online store you can find almost any equipment that you may need to receive satellite and terrestrial television. We tried to make the ordering process convenient for anyone. If you plan to order more than one item, but several, then you can use the search in the store and pay attention to related equipment. If you want to pick up equipment for receiving satellite TV, then you should go to the tab menu " Satellite television"if for receiving terrestrial or cable TV, then " Terrestrial television"etc. If you have any questions during the ordering process, then you can use the online chat, which is located on each page of the online store or order back call.
We hope that in the digital TV online store you will be able to spend the minimum amount of time ordering the required equipment.