Most modern smartphones run an operating system Android systems, which occupies the majority of the market. By the way, its main developer is the Internet giant Google.
The system can be linked to an account, and the account acts as mailbox Gmail.com, which is also owned by Google. Very convenient: you create one account that you can use in the most various services Google, including its Android device. You can even use one account on multiple devices. Be that as it may, an account is required, among other things, to be able to download applications from Google Play Market, as well as for data synchronization. Let's talk about the last point in more detail.
What is data synchronization?
Speaking in simple language, synchronization is the exchange of data between a device and an account. Here's the simplest example: you have a lot of phone numbers written down on your phone that you're afraid of losing. This is not a problem - you synchronize the device with the server and now, even if you delete all the numbers (it’s better not to do this, of course), they can be restored by synchronizing with the server. Agree, this is very convenient.
Interestingly, some companies offer their own services other than Google. They also allow you to synchronize information and restore it in case of any problems. You can use several data storage services at once with subsequent synchronization if you are so worried about the safety of your data.
There is one interesting point: if you add a contact to your account, say, through Google services on your computer, after which synchronization occurs (by the way, it usually happens automatically as soon as the device gains access to the Internet), the contact will appear on your smartphone if you use the same account. Of course, this can be changed through the settings.
How to set up synchronization?
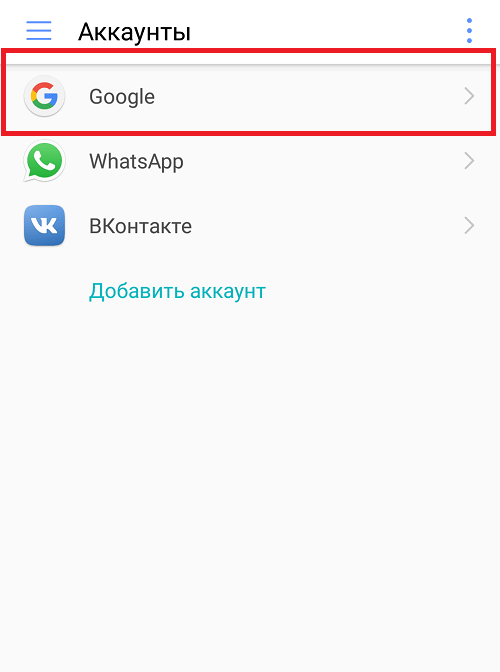
By default, synchronization is enabled, so you usually don't need to turn it on. If the need arises, go to the settings (the example is shown for a device from Huawei, but the instructions are universal and suitable for any Android smartphone).


Choose a Google account.
If syncing is disabled, you will see something like this:

Turn on the services that you need (you can select all), and then tap on the “Synchronize” button (if it is missing, then synchronization will occur automatically when you connect to the network).

Data is synchronized.

If you don't already have a Google account, you must create one.
To date Android platform occupies a leading position in the mobile gadgets market. The developers have done a great job for their users, and in the application store you can now find almost any tool for entertainment and work. The operating system is tightly linked to Google services, which make it easier and more secure to work with personal data and use all kinds of applications. But the smartphone system may fail and a problem may arise when, for example, Android contacts do not sync. The fight against this malfunction will be discussed in this article.
Synchronization can be useful to you when you have several gadgets, regardless of Android or iOS. It is with its help that you can easily transfer all available information from one device to another. The first thing you should do for this is create a Google mailbox.
When you log into your “account” on your smartphone, the system will automatically start copying all your contacts and other information to the Google server (to the cloud). At any time and from any device, you will have access to files transferred to the cloud, where you can always view phone numbers, photos and other important records.
You can view the data copied to the cloud by following the link and selecting Contacts in the top left menu.
To make changes, you need to go to the phone settings menu and click on the “Accounts and Synchronization” tab, and for more precise settings of the service, there is a whole section in the OS called “Google Settings”.

Solutions to the problem
Checking the Internet
The first thing you should do before you start troubleshooting is to check whether your device has an Internet connection. To do this, open a web browser and go to any page or run a program that requires network access to enter. For obvious reasons, it is unlikely that it will be possible to solve the problem without a connection.
It won’t be superfluous to check your access to Google mail - enter your login and password on gmail.com. In addition, you should make sure that there are no failures on the company’s servers.
To make sure your account is active, try logging into Play Market and start downloading any program. If there is no access, the service will give you a corresponding warning about the need to create a new one or log into an existing Google service.
Checking auto-sync
It is also worth paying attention to whether the auto-sync mode is activated. It is necessary so that all data is automatic mode connected to the Cloud, which does not require any additional actions from you. Enabling automatic synchronization produced in the settings of a mobile gadget. Scroll through the menu and go to the “Accounts” section, inside which you will find the Google line, in the window that opens, in the upper right corner you need to click on the vertical ellipsis and in the drop-down menu activate the “Auto-sync data” function.

Turn off airplane mode
Try turning airplane mode on for a few minutes and then turning it off. To do this, click on the tray icon. After it is disabled, the network will be re-registered and a new one will be launched. automatic exchange information.
Clear storage
When internal memory device is full, data is not recorded or sent. To restore functionality, delete unused applications, duplicate photos and music, or files that you no longer need. This also applies to the list of required numbers, since when the memory allocated for them is full, the phone will not be connected to the Cloud.
Delete gmail data

Be careful before starting this step. The fact is that after it is carried out, all SMS drafts and saved signatures, sounds of incoming alerts and other related settings will be deleted. Delete data only as a last resort when other methods cannot solve the problem. Follow these steps:
- Go to your phone settings menu.
- Select “Applications and notifications” and in the window that opens, click on the “Application information” line.
- Click on the Gmail button where you need to go to Storage.
- Click on the “Erase data” function.
- Reboot your smartphone.
- Re-login to your Google account manually.
Instructions
- Go to your smartphone settings.
- Select "Users and Accounts".
- Click on yours account.
- Click on the “Synchronize accounts” option.
- In the upper right corner, tap on the three vertical dots, and then on the “Synchronize” line.
- Google account synchronization on Android is running.
Removing and re-adding a google account
When carrying out this procedure, you don’t have to worry about the safety of your files and contact list, they will all remain on the server.
To delete an “account”, go to “Accounts”, select Google tab and call the submenu (three dots in the right corner), click “Delete”. Now you need to reboot the device and re-login to your account by entering your username and password.
Forced synchronization

There are two methods for this procedure, which will entail a forced connection of your Android phone with the Cloud.
Change the date and time settings. Go to the settings, disconnect the gadget from the network and enter the incorrect clock and date settings. Go out to home screen and make the settings again, only specifying the correct numbers.
Make the gadget connect with the “account” via the ussd command. Open the dialer and enter the code: *#*#2432546#*#*.
Third Party Application
Alternatively, the “Fix contact synchronization” program will help resolve the problem. Download it from the Play Market and follow the instructions in the description, try to restore the Google service.
Conclusion
In principle, there is nothing special to add to all the instructions given here, one of the methods must definitely work, the main thing is to follow the recommendations given and you will overcome the error.
Video
Menu modern smartphone based on Android can greatly surprise the user who is holding such a device for the first time. Moreover, many menu items mean absolutely nothing. For example, does everyone know what synchronization is on a smartphone? Let's answer this question.
Data synchronization is the process by which the receiver synchronizes with the transmitter during data transmission. Simply put, this is the exchange of information between a smartphone and a server. For what? The server stores the most important data, which can be restored if lost. Want a simple example? Please: contacts linked to your Google account, which are synchronized between the smartphone and the server. They can be restored at any time; moreover, it is enough to log in on another device so that the contacts are downloaded from the server. If synchronization is not available, contacts must be transferred from one smartphone to another in another way.
In general, synchronization is enabled by default and we do not recommend disabling it. However, the peculiarity of the Android system is that the user can independently choose what data can be synchronized.
First of all, turn on the Internet so that synchronization with the server is possible.

Go to settings.

Open the "Accounts" section.

Select your Google account.

Move the switches to the “On” position next to the items you want to synchronize. Move to the “Off” position for those items that do not need to be synchronized.

Interestingly, by default, auto-sync is configured for all existing accounts. If you need to disable synchronization for all accounts used on the device, on the account selection page, click on the button in the form of three dots.

And uncheck the “Auto-sync data” checkbox.

Previously, we had to write down contacts in special phone books and notepads, and those of us who could boast of excellent memory simply memorized them. Those old phones we used a little less than 10 years ago had too little memory to hold all the familiar phone numbers.
Those whose positions were supposed to have many contacts used organizers. “Planners” were inaccessible to ordinary people - they were expensive.
As soon as the first models began to appear mobile devices, which had software on iOS and Android, synchronization was in the air. And only with the advent of the fourth version of Android (Ice Cream Sandwich) and iOS, we learned to understand this mysterious word.
In this article we will tell you how you can synchronize contacts on smartphones with operating system Google Android and Apple iOS.
Google - Android
We learned about the possibility of synchronization in Google Android when accounts appeared in email addresses. With the account we could:- go to the application store;
- navigate in time;
- synchronize contacts;
- look for your mobile device if it gets lost;
- and this is not all the possibilities.
Contacts on Android syncs with Google to keep everything you have across all your mobile devices in one place. This is very convenient if you have several devices. For example, your smartphone, iPad, smart watch and a couple of other gadgets store different phone numbers. It seems like there shouldn't be any problems, but...
You urgently need to make a call, but the tablet on which this contact is stored is out of access or discharged. And now the question arises: how to make sure that this situation does not arise? It's as simple as combining all the phone numbers from all your mobile devices and moving them into one place - your Google account. How to do this, read on.
Go to settings, scroll down until you see the appropriate item.

Click on it and you will see the “Add account” button. Click again and move on.

Here you will see all the programs that are already preinstalled. All require an account (entering a password and nickname). Things may look slightly different on your device. For example, if you use the free calling program, Skype, it will be displayed for you.
It's not the quantity that's important to us here. preinstalled programs, and a Google account. Click on your account.

If you have one, enter your password and nickname, if you don’t have one, register.

We recommend that if you do not yet have an account, register not on your mobile device, but on personal computer or laptop. When registration is completed, log into your account and click on the icon with arrows in the right corner. The synchronization process is complete.

Open the Contacts tab on your mobile device.

Call context menu (special button with settings) and click as indicated in the picture below.

Where will you synchronize the numbers from: from a SIM card or smartphone memory? Once selected, click “Next”.

Select your email account as the new contact storage.

IN cloud storage You can transfer any contacts. Click on the required ones, click on the icon and wait for the procedure to complete.
You can check the success of synchronization in your email by going to: . On this page you will see all the phone numbers that were stored on your devices.
Edit all contacts to your taste, dividing them into groups. What if when updating software, will arise critical errors, you won't lose any of yours phone number, since they are all uploaded to cloud storage.
iOS - Google
Owners of an iPhone with the iOS operating system also use the services search engine Google.To synchronize or simply transfer all contacts from your iPhone to your Google email service, you need to do a few simple steps. Open apps and find settings.

Select "Mail". Click on this item and go to the tab where you can add an account.


You will be offered several mail services. Select Google Mail.

Carefully fill out all fields, especially the second and third. The first field is for a nickname or name, and in the description field you can give the name of the new phone book.

Click on synchronize contacts.

You won't see anything in your contact list. To complete the transfer (copy) procedure, contacts must be synchronized back.
Go to settings postal service and find the contacts section. Click on “Contacts from mail”.

Open contacts and wait for the synchronization procedure to complete. Everything went well.

Make it a habit not to clutter the memory of your mobile devices with hundreds of numbers. Storing contacts on the cloud will allow you to:
- save space in the device memory;
- do not be afraid of flashing;
- do not be afraid of accidental deletions;
- create groups of people.
Combining all mobile devices into one account is a convenient innovation that will allow you not to lose contacts and always have access to them.
Contacts with Google provides a large number of benefits. For example, if you use contact synchronization, then you don't need to worry about transferring them if you change your phone. In addition, synchronized contacts can be managed from a computer via online service « Google Contacts" Therefore, you should not refuse to use this function. Now we will talk about how to synchronize contacts on Android with Google.
Enable synchronization of contacts on Android with Google
If synchronizing contacts on Android with Google is not working for you, then most likely it is disabled in the settings and you just need to enable it. To do this, go to the Android settings and find the “Accounts” section there. IN this section A list of all accounts in the various services that you use on your Android smartphone will be displayed. In this list you need to find your Google account and open it.

After this, a list of data that can be synchronized with your Google account will appear. Here you need to check the box next to “Contacts” and click on the “Synchronize” button.

Android will then sync your contacts with Google.
Add a Google account for synchronization
If, when you try to enable contact synchronization, you find that your Android device no added Google accounts. Then, click on the “Add account” button


Enable display of contacts from your Google account
In some cases, contacts that have been synced do not appear in the Contacts app and the user cannot access them. In such a situation, you need to launch the Contacts application and open the application's context menu. This can be done using a hardware button on your Android phone or tablet. If there is no such button on the device, then you can call the context menu using the button in the application interface. Once you have opened the application's context menu, select "Show contacts".

After this, a list of contact sources that you can use will appear. Here you need to select your Google account.

Your Google-synced contacts will then appear in your Contacts app.


