A disk image is a complete, “photographic” copy of an optical disc (such as a CD or DVD). Unlike a simple copy of a disk, its image is not just a set of folders, but a file that contains information about the disk format, boot data, its structure and the data itself.
Disk image files very often have the extension .iso. Typically, images of boot disks or disks circulate on the Internet in this format. computer games. Let's look at how you can create an iso disk image.
To create an iso disk image, emulator programs are used that create on the user's machine virtual drives, which, however, the computer operating system perceives as quite real. There are several such programs, but we will look at how to create an iso disk image using two of them: Daemon Tools and UltraISO.
How to create an iso disk image, Daemon Tools
The program is a simple and free version that allows you to create an iso disk image from any optical disc placed in the drive of your computer.
After installing the program on your computer, the Daemon Tools program icon will appear in the lower right corner of the Desktop. By clicking on it right click mouse, we will see the following picture:
Using the tooltip, look for the “Image Creation” icon (second from the left). After clicking on this icon, a window with the same name will open:

In this window, after we insert the disk into the computer drive, we will mark the save folder and the format of the future disk image file (iso), decide whether we will compress it or not, and whether we will use or refuse to protect the iso file with a password.
Click “Start” and at the end of the processing operation we find the created ISO disk image in the specified folder.
How to create an iso disk image, UltraISO
The UltraISO program is more functional than the free version of Daemon Tools and allows you to create an iso disk image from files stored in computer folders.
The UltraISO interface window consists of two parts, each of which has a conductor structure.

We find in the lower part the file or folder from which we want to create an iso disk image and drag it to the upper part.

Then open the “Properties” window by clicking on the button next to the “Image” field, set in this window the type-size of the desired disk image and the file name format to “standard”. Click OK in the “Properties” window, and “Save As” in the main program window.

In the window that opens, select the file format (ISO file), give it a name, specify the save folder and click “Save”. That’s it, after the processing operation we find the created iso disk image in the specified folder.
Today, many are interested in how to create an ISO disk image of the Windows 10 operating system. Let’s say right away that this is quite simple to do, but to create an image you will need a special utility developed by Microsoft. Moreover, this program allows you not only to update the current system, but also to record it on removable media(CD or).
You should start by preparing a removable drive - it is important that its volume is at least 8 gigabytes; creating such a drive is available for the following versions of the described OS:
- Windows 10 Pro;
- Windows 10 Home.
Now let's proceed directly to the process. Below is an algorithm of the required actions.
Step-by-step guide to creating an ISO disc in Windows 10 using the installer
First, connect a disk (obviously, it should be a DVD-R) or a removable drive to the computer, and then check whether the storage medium has the required amount of memory. Then follow the instructions.
Step one. Click on the "Windows 10 Setup" icon. Then a window will appear in which you need to select the second option (“Create installation media...”) as shown in the image below. After that, click the “Next” button.
Step two. In the next window, this utility will prompt you to set the required parameters, including architecture, language, etc. Having selected everything you need, click the “Next” button again.

Pay attention! It is extremely important that the chosen architecture ISO image corresponded to the parameters of the computer itself where it is planned to be installed. Typically, the program allows you to select not only a 32/64-core system, but also both options at once.
If you chose the first option, then you will have two options:
- burn to DVD;
- first create a disk.
In the second option, accordingly, recording is possible exclusively directly to a removable storage device.
Step four. When you select the appropriate item, click “Next”. If recording occurs directly to a flash drive, the operating system will demonstrate the available media.

Pay attention! For those who don’t know, during recording, all information on the flash drive will be deleted.
Step five. When you click Next again, the installation or recording will continue.

Step six. In the first option, that is, when we're talking about When you select the “ISO file” item, several folders will be attached at once where the image or drive will be saved. It is quite obvious that there should already be a DVD-R disc containing the required amount of memory. Once saved, you can subsequently record it on any convenient medium.

Pay attention! Such operations are only possible on computers running Windows 7 or higher.
Features of installing Windows 10 from an image
Installing the operating system is quite simple; it does not require any special skills or knowledge. To start the installation, insert a USB flash drive or disk, then, when the computer restarts, press any button after the corresponding message appears (“Press any button to boot...” or something similar, it all depends on specific type systems). Before this, you need to click boot from disk or flash drive in the BIOS settings.

The next step is that the system will ask you to enter your product key. You will find this key on the package or, if you are just updating the OS, select the “I don’t have a key” option.

Accept the user agreement and decide on the installation type. If you are not an “advanced” user, then it is better not to use a custom installation.


Then you will find yourself in a window for selecting a partition where the operating system will be installed.

When all the required actions are completed, the system will install, after which it will ask you to configure it “for yourself.” More specifically, these settings include:
- installation/configuration of standard programs;
- creating your account.
Here you can decide for yourself whether to leave the basic settings or configure the settings again. That's all, now you know how to create an ISO Windows image 10. For more detailed information, we recommend watching the thematic video below. Good luck!
Video - Create a Windows 10 boot disk
Any operating system is not one hundred percent protected from unexpected crashes, breakdowns, or malfunctions. Windows 7 is no exception. To avoid losing valuable system settings that you for a long time adjusted to your needs, it is recommended to create a disk image with the iso extension at least once every six months. In this way, you will protect yourself from long and tedious recovery after failures or breakdowns operating system. You can burn the resulting file to a DVD disc, memory card, or any other digital media. And at the right time, just download it back. If you still decide to do this, follow the instructions in this article.
Creating an ISO image for Windows 7 through the official Microsoft website
Not long ago, a software company made it possible for users to independently generate image files directly through the official website. To do this, follow the link: https://www.microsoft.com/ru-ru/software
Before you start, make sure that your storage device has more than 4 GB of memory, as well as a stable Internet connection:
- follow the link above and check out a number of tips and instructions,
- scroll down the page and you will see the input field for your Windows 7 product key,
- now minimize the browser and go to the control panel,
- select the "System and Security" tab,

- in the window that appears, click on the “System” section,

- you will be immediately redirected to a page where at the very bottom is the activation key for your product. Carefully rewrite it in the browser line and click “Check”

- wait until the system checks your Windows 7 and the relevance of its license. The process will take from a minute to five. If everything is in order with the key, then the utility in the browser will immediately begin creating an ISO image of your entire system. If there is something wrong with the key or this method does not suit you for other reasons, go to the second step of the instructions.

Creating an ISO image of Windows 7 without third-party programs
- You can create an image inside your computer without installing unnecessary software. To do this, go to the control panel again and find the “Backup and Restore” section.

- In the window that appears on the left, find the “Create a system image” link. Click on it.

- Wait a few minutes while Windows finds all the ways to create and burn the image.

- The system will automatically open all possible options for recording the image to media. Most likely, you will have three options: “hard drive”, “DVD media” and “network storage”. If you have dvd disk, paste it and choose the second method.

- If your computer has only one disk, as in the screenshot below, then you won’t have to select it. If there are several disks, then you can select one of them or all of them. Click on the “Archive” button to start burning the ISO image to disk.

- If you chose the third option: online hosting, then the process will be slightly different. Please note that the file may not be protected in a network location.

- Enter the network location address.

After pressing the “ok” button, copying will begin. It is also possible to manually record the image through programs such as Daemon Tools. The process is very similar, but takes a little longer. To do this, you need to download the program, mount the image in it and burn it to a digital medium.
If you were unable to create an image of Windows 7 after all the above points, then perhaps it will be easier for you to download ready-made ISO images from the Internet.
You can learn a few interesting words about Windows 7 images from the video below:
A disk image is a file containing full copy structure and content of data located on the disk. It stores all the information that duplicates the location and contents of a specific data storage device. The order of data sectors is repeated on the image, but the structure built on it is ignored.
The original purpose of creation was backup disk data, where the exact original structure was preserved. Currently, due to the spread optical media, more images are found in as ISO files, which can be used instead of CDs. ISO has less data - no service information.
Using archive programs that support opening this type of data, you can extract and view the contents of this file. How and with what tools you can reproduce a disk image will be discussed further.
Creating an image using ultraISO
One of the most accessible methods for creating an ISO is to use the UltraISO utility. The program is paid, but you can use the trial version, which you download from the official website.

The essence of use is as follows: yes two main fields– the directory tree of the mounted image on the left and the data stored in them on the right. Below are the directories and files stored on the computer.
Set the name future copy, for which we left-click on it, property – Rename. Introducing a new name.

Then we drag folders and files from the storage area on the computer to the image file area. To find the ones you need, use the directory explorer presented below.

Please note that at the top it is displayed overall size documents.
Actually, to complete the operation, all that remains is to save: File – Save as.

From the proposed formats we take ISO and save.
![]()
The saving process will appear, after which you will find a copy in the location you specified.

Burning an image using Daemon tools
An equally popular image burning program is Daemon Tools.
There are several variations of this software, including the free DAEMON Tools Lite. After installing the free license, you will have a virtual DVD drive.
After launch, click on the button below to create a copy of the disk.

IN settings we refer to drive, where the disk and folder where the image will be saved is located.
Specify copy type MDS or ISO.


Mount You can check it in a virtual drive.
Using Ashampoo Burning Studio Free
The free version of this program is free and will allow you to burn a disk image. Download from off. site, simple and straightforward installation.


After installation, the application will launch on its own. Choose Disk image – Create.

If we create it based on a real disk, first insert it into the drive.

Specify the storage location and click Next to start the process.

Once the procedure is complete, you can open the folder containing the file.

How to create a copy of a disk using CDBurnerXP
To create an ISO in the CDBurnerXP utility, select from the menu File – save project like ISO.

Specify the directory, where to save the file and click Create ISO.

Can be customized parameters, such as: name, description, date, identifier, copyright and other settings. Once you open Boot Options, you will see a dialog box with additional options.

ISO using ImgBurn
ImgBurn is a convenient tool for burning ISO images. Everything is done very quickly and quite simply.
After downloading and installing the program, you will see the following window.

As you can see, here you can: write down image to disk, so make it from existing files.
In this case, we are interested in the latter.
Special additional settings you don’t need to specify (the only thing is, if you wish, you can change the recording speed and number of copies), specify the drive from which you want to read data and click Reading

The copying process will begin, after which a message will signal to us that it has been successfully completed.

Free DVD ISO Maker
The program is free, easy to use and simple.

After launch you will need to select Select CD/ DVDdevice, that is, the drive for reading (specify the path). Next is the place where we will save the resulting file. Then click Covert and wait for the final completion of the copying procedure.
We use ISODisk
It is also free, download it from the official website. 
The interface, although in English, is quite intuitive. Some users do not recommend using it for mounting virtual drives, but it copes with the task of creating an ISO with a bang.
If something suddenly happens to your operating system, this may entail huge amount problems. In the best case, you will have to reinstall it, search on the Internet for drivers and installers of the programs you need. In the worst case, there is a risk of completely losing all personal information, unique photographs, important documents and projects. Typically, restoring the OS is unlikely to help in this case - it only works with Windows settings. Therefore, to save your data, it is important to know how you can create a backup disk image of your Windows 7.
Types of images
You don't need to have the DVD itself for this. There is a specialized software(for example, the UltraISO utility), with which you can do everything you need right on your computer. You prepare a set of folders and files, and use the program to create a disk image.
The second type is a backup copy of the operating system. It can be done even using standard Windows tools. It is needed to restore your OS in case of unforeseen emergency situations.
In fact, this is a cast of the hard drive. The computer scans the entire contents of the specified HDD and packs it into a special archive. If something happens, you can always restore everything back.
Windows Backup
To create a backup of data on disk, you do not need to install any additional software. You just need to do the following:

The whole process can take quite a while long time. The volumes of stored data are usually large. In general, the duration depends on the amount of information being copied, the generation of USB or SATA/SAS interfaces, network speed (depending on where the backup is saved) and computer performance.
Recovery disk
After completing the backup process, the system will prompt you to create a special recovery disk. This is a set of useful programs that can help users if their OS stops starting. On it you can find utilities for restoring the MBR boot sector, sets of system files necessary for startup, and so on.

Creating an ISO image
If you want to burn DVD or CD content to digital ISO format, you will need a special program. The simplest and most reliable example of such a utility is free application ImgBurn.
Creating a system imageWindows 7. You can’t imagine how many times this image has helped me out during serious system crashes and various troubles, and how much time it has saved me. Hope you can apply successfully this information in practice.
Note: Friends, this article was written two years ago, read our more complete article on this topic - using a standard archiving tool on DVDs, or on a portable hard drive USB and how to recover from these images, you will also learn how to connect a disk drive to your laptop or netbook SATA interface, IDE or old hard drive and store your backups on it.We also have an article - or another hard drive using the tools built into the operating system.
Creating a system image
Sometimes, due to our own erroneous actions on the computer or a virus attack, it is not possible to download Windows 7 by any means. Or it will be possible to load the operating system, but working in it can be simply unbearable, due to serious problems and malfunctions, and if you imagine that there is not one computer, but ten. There are also many friends who, unfortunately, also have computers and in the evenings you have to solve their problems, such a life would truly seem like a nightmare if such a tool as Creating a system image.
This image may be useful if none of the remedies did not help you, and therefore all our previous articles did not either. First I will describe how create a system image Windows 7 using the Computer Data Backup tool, then we will restore our Windows 7 from the image. Below are examples of how to restore individual files of your data from an image.
- It is important to know that when restoring Windows 7 from a system image, all information from the partition hard drive, to which you deploy the image, will be deleted and replaced with the contents of the image. By the way this operation can be done using the program.
Creating a system image
Start->Control Panel->Backup computer data->Create a system image.
In the dialog box that appears in front of us - Where should the archive be saved? The operating system will give us a hint, for example in mine Windows case 7 selected Local disk (E:), with a capacity of 339.19 GB, located on the second hard drive (I have two hard drives), one contains the system itself, and the second contains Images Windows systems 7, made using our computer data archiving tool. If you have one hard drive, then the system image needs to be created on a free partition.
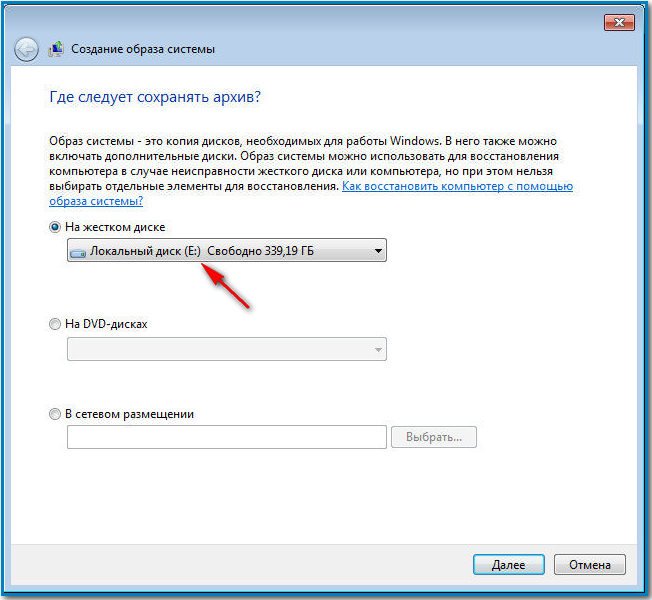
Just in case, I am attaching a screenshot of the Disk Management window on my computer.

Important Note: Ideal for storing system images - portable USB hard drive or a specially purchased SATA hard drive. If you choose DVDs, you will need a lot of them, this option is in my opinion the most inconvenient, you can also store images online, but this method deserves a separate article. You also need to know that, unlike the archives of our data, the system image can only be saved on a disk with file system NTFS.
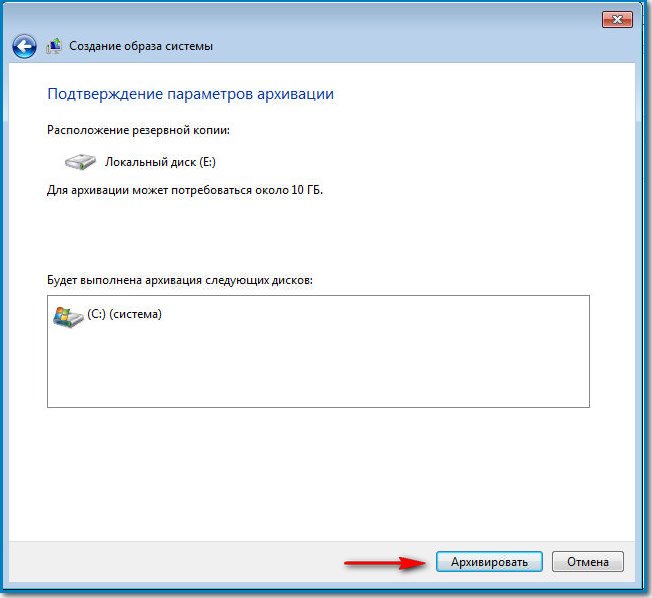
Which partitions of your hard drive should be included in the backup? By default, the Local disk with the Windows 7 operating system will always be selected, in our case (C:). You can additionally choose to include in the system image any disk with your personal data or all disks, this means that the System Image you create will contain all the information stored on your computer, as long as there is enough space on the media where you are creating the image. Click next.

We confirm the archiving parameters, we see a warning that to create a system image in my case you will need 9.42 GB, your requested space may be more. Click Archive, the process of creating a System Image will begin, which may immediately result in an error if we do not have enough space to store the image.

At the end of the process, you are prompted to create
ISO is a standard designed to bring the structure of compact discs to uniform standards. An ISO image in the general sense has now become a virtual version of a real media with an operating system on board. The OS on it can be in a state ready for installation, or it can be launched directly from it - the so-called Live version.
One of the popular operating systems is Windows 7. Therefore, for installation, they often use the method of creating its image for subsequent installation. You can then burn it to a CD or flash drive. How to create an ISO image of Windows 7 will be discussed in this article.
Why do you need an ISO image of the operating system?
The first images appeared in the era of global development of compact discs. And many wanted to have a copy of a game or operating system in order to be able to use it in the future. To do this, we used special grabbers and programs that completely copied the structure and data of the CD. This data could be written to another CD or deployed on a flash drive, thus making it bootable.
The image can also be used as installation disk For virtual machine, in which testing of the operating system will take place.
How to create an ISO image of Windows 7 from Windows itself
In order to create an image, you will need some source, for example a folder with Windows files or a real CD. The original ISO image of Windows 7 can be downloaded from the official Microsoft website. True, you will need an activation key that will help you use it in a legal way. But on the Internet you can find a lot of different assemblies that are downloaded completely free of charge.
So, there are two types of sources - a real CD and a folder with files on the computer's hard drive. It is worth listing several options with which you can create an image.
UltraISO - the most popular program for working with images
The program is shareware, i.e. in the Free version all functionality will not be available.
Main window UltraISO programs divided into several small zones. The top left window shows the structure of the current image. In the right window are its contents. The bottom left one reflects the structure of the contents of the computer on which the program is running. And on the right is what is inside the selected folder on the left.

By default, the image is created with the date in the name. We need to fix this and rename it in a way that is more convenient, because this is the entry that will be displayed when it is loaded.
To add files to a project, you need to select a folder or media in the lower left window, and in the right window - which files you are interested in. You can simply drag them with the mouse into the top window.
When the required set of files has been selected, you need to go to the file and select “Save As”. A dialog box will open asking you to specify the file name, its future location and format. Select “ISO file” from the list of available file types. By clicking the “Save” button, a progress window will appear, after which the Windows 7 ISO image file will be ready.
Let's move on to other options.
How to create an ISO image of Windows 7 on Linux
This operation in Linux operating systems is slightly different from this procedure in Windows. In Windows you had to install the program and create an ISO image, but in Linux everything is ready out of the box. You just need to insert the existing media into the CD drive and enter a few lines in the terminal:
dd if=/dev/cdrom of=~/image_name.iso
This command will read the data from the disk inserted into the reader and create a complete copy of it on the hard disk with the specified name.

List of programs with image creation function
Ashampoo Burning Studio Free. Free program with a good set of settings and functions. Nice and simple interface. Can both create images and write them to disk
CDBurnerXP is a compact application that comes with built-in advertising. But if you search a little on the developer’s website, you can find the Portable version. Capable of recording, erasing, and creating copies of discs.
ImgBurn is distributed free of charge and has quite powerful functionality. Writes, erases and creates images.
PowerISO is a powerful combine that can handle almost any task related to images and disks. The only drawback is for full version you have to pay, and the free one has limited capabilities.
IsoDisk is a small utility that can quickly create a disk image from media in a CD drive. Weighs little, comes free and does only its job without overloading the user various settings and installations.

Conclusion
In this article, we briefly looked at a couple of ways to create an ISO image of Windows 7. This may be useful for those who are doing this for the first time or have forgotten a few simple steps.
More complex operations, such as creating a bootable USB flash drive, are described in much greater detail and are beyond the scope of this article. In addition, you need to have at least basic computer skills. It is worth noting that manual creation boot image makes it possible to launch several systems for installation or even from a disk in the Live version.
This tutorial will go into detail on how to create an ISO image. On the agenda are free programs that allow you to create an ISO image of Windows, or any other bootable disk image. We will also talk about alternative options to accomplish this task. We'll also talk about how to make an ISO disk image from files.
CDBurnerXP is another convenient one free utility in Russian, which allows you to burn discs, and at the same time create their images, including in Windows XP (the program works in both Windows 7 and Windows 8.1). With good reason, this option is considered one of the best for creating ISO images.
Creating an image takes place in a few simple steps:

As a result, a disk image containing the data you selected will be prepared and saved.
You can download CDBurnerXP from the official website https://cdburnerxp.se/ru/download, but be careful: to download the clean version without Adware, click “More download options”, and then select either the portable version of the program that works without installation, or the second installer option without OpenCandy.
ImgBurn is a free program for creating and burning ISO images.
Attention (added in 2015): despite the fact that ImgBurn remains great program, I couldn’t find a clean one on the official website unwanted programs installer As a result of scanning in Windows 10, I did not find any suspicious activity, but I recommend being careful.

The next program we'll look at is ImgBurn. You can download it for free on the developer’s website www.imgburn.com. The program is very functional, yet easy to use and will be understandable to any beginner. Moreover, Microsoft support recommends using this program to create a bootable Windows disk 7. By default the program is loaded on English, but there you can download the Russian language file on the official website, and then copy the unpacked archive to the Language folder in the folder with the ImgBurn program.

What ImgBurn can do:
- Create an ISO image from a disk. In particular, you cannot use it to create a bootable ISO of Windows from the operating system distribution.
- Easily create ISO images from files. Those. You can specify any folder or folders and create an image with them.
- Burning ISO images to discs - for example, when you need to make a bootable disc in order to install Windows.
PowerISO - advanced bootable ISO creation and more
The PowerISO program, designed to work with boot images of Windows and other operating systems, as well as any other disk images, can be downloaded from the developer’s website https://www.poweriso.com/download.php. The program can do anything, although it is paid, and the free version has some limitations. However, let's consider the capabilities of PowerISO:
- Creating and burning ISO images. Creating bootable ISOs when missing boot disk
- Creating bootable Windows flash drives
- Burn ISO images to disk, mount them in Windows
- Creating images from files and folders, from CDs, DVDs, Blu-Ray discs
- Converting images from ISO to BIN and from BIN to ISO
- Extracting files and folders from images
- Support for Apple OS X DMG images
- Full Windows support 8

These are not all the capabilities of the program and many of them can be used in free version. So, if creating boot images, flash drives from ISOs and constantly working with them is your thing, take a closer look at this program, it can do a lot.
BurnAware Free - Burn and Create ISO
You can download the free program BurnAware Free from the official source http://www.burnaware.com/products.html. What can this program do? A little, but essentially everything necessary functions it contains:
- Writing data, images, files to disks
- Creating ISO Disc Images
Perhaps this is quite enough if you are not pursuing some very complex goals. Boot ISOs also burn perfectly provided you have a boot disk from which this image is made.
ISO recorder 3.1 - version for Windows 8 and Windows 7
Another free program that allows you to create ISOs from CDs or DVDs (creating ISOs from files and folders is not supported). You can download the program from the website of the author Alex Feinman http://alexfeinman.com/W7.htm
Program properties:
- Compatible with Windows 8 and Windows 7, x64 and x86
- Creating and burning images from/to CD/DVD discs, including creating bootable ISOs

After installing the program, in context menu, which appears when you right-click on the CD, the option “Create image from CD” will appear - just click it and follow the instructions. Burning an image to disk occurs in a similar way - right click on ISO file, select “Write to disk”.
Free ISODisk program - full-fledged work with ISO images and virtual disks

The next program is ISODisk, which can be downloaded for free from http://www.isodisk.com/. This software allows you to perform the following tasks:
- Easily make ISOs from CDs or DVDs, including a bootable image of Windows or another operating system, computer recovery discs
- Mount the ISO on the system as a virtual disk.
Regarding ISODisk, it is worth noting that the program copes with the creation of images with a bang, but for mounting virtual drives It is better not to use it - the developers themselves admit that this function only works fully adequately in Windows XP.
Free DVD ISO Maker
Free DVD ISO Maker can be downloaded for free from the website http://www.minidvdsoft.com/dvdtoiso/download_free_dvd_iso_maker.html. The program is simple, convenient and no frills. The entire process of creating a disk image takes place in three steps:

- Run the program, in the Selet CD/DVD device field, specify the path to the disk from which you want to make an image. Click "Next"
- Specify where to save the ISO file
- Click "Convert" and wait for the program to finish.
Done, you can use the created image for your own purposes.
How to Create a Bootable Windows 7 ISO Using the Command Line
Let's finish with free programs and look at creating a bootable ISO image of Windows 7 (may work for Windows 8, not tested) using the command line.
- You will need all the files contained on the disk with Windows distribution 7, let's say they are in the folder C:\Make-Windows7-ISO\
- You will also need The Windows® Automated Installation Kit (AIK) for Windows® 7 - a set of utilities from Microsoft, which can be downloaded at https://www.microsoft.com/en-us/download/details.aspx?id=5753. In this set we are interested in two tools - oscdimg.exe, by default located in the folder ProgramFiles\WindowsAIK\Tools\x86 and etfsboot.com - a boot sector that allows you to create a bootable ISO of Windows 7.
- Run command line as administrator and enter the command:
- oscdimg -n -m -b»C:\Make-Windows7-ISO\boot\etfsboot.com» C:\Make-Windows7-ISO C:\Make-Windows7-ISO\Win7.iso
Note on last command: no space between parameter – b and indicating the path to boot sector- this is not a mistake, it’s necessary.
After entering the command you will observe the recording process bootable iso Windows 7. Upon completion, you will be told the size of the image file and written that the process is complete. Now you can use the created ISO image to .
How to create an ISO image using UltraISO

UltraISO software is one of the most popular for all tasks related to disk images, flash drives or creating bootable media. Making an ISO image from files or a disk in UltraISO does not present any particular problems and we will look at this process.
- Launch the UltraISO program
- At the bottom, select the files that you want to add to the image, by right-clicking on them you can select “Add”.
- Once you've finished adding files, select "File" - "Save" from the UltraISO menu and save it as an ISO. The image is ready.
Creating an ISO on Linux
Everything that is required to create a disk image is already present in the operating system itself, and therefore the process of creating ISO image files is quite simple:
- On Linux, launch a terminal
- Enter: dd if=/dev/cdrom of=~/cd_image.iso- this will create an image from the disk inserted into the drive. If the disk was bootable, the image will be the same.
- To create an ISO image from files, use the command mkisofs -o /tmp/cd_image.iso /papka/files/
How to create a bootable USB flash drive from an ISO image
If for some reason the methods and programs listed here were not enough for you to do what you wanted and create a disk image, pay attention to this list: Programs for creating images on Wikipedia - you will certainly find what you need for your operating system.
Due to our own erroneous actions on the computer or a virus attack, it is not possible to download Windows 7 by any means?! Or the operating system boots, but working in it is simply unbearable?! If you are familiar with these situations and would like to correct the situation within a minimum time, you need to prepare in advance for such problems and sometimes (once a month/every two months) make an image of the system and, if necessary, restore the operating system by rolling back to the created image. Windows 7 has a built-in system archiver, which is very simple and intuitive, no need to install additional programs to create an image of your system, and even more so spend money on these programs.
How to make a system image of Windows 7? There are several ways to launch System Archiving, here is one of them. Come along the way
In the window that opens, you will see on the left "Creating a system image"- this tool will allow you to create a system archive once, if you look at the right side of the window, you will see a button, i.e. It is possible to configure archiving automatically.  It is up to you to choose which method suits you; in this article I will describe both of these methods.
Creating a system image
Click "Creating a system image", in the window that opens, select the location where the system backup will be stored, the ideal option is an external hard drive, you can use a CD/DVD, but keep in mind that you will need a lot of them. It is also better not to use a local disk, since in the event of a virus attack, recovery from local disk not always possible.
 After choosing a location to save the backup, you need to choose what to archive. If you have enough space, save all local drives. IN in this example I will only save drive C.
 In the next window, confirm our choice and click "Archive".
 Next comes the archiving process/creating a system image; it can last for quite a long time, it all depends on the amount of space being archived and the power of the computer.

Upon completion of archiving, the system will offer to write the data to disk, since I am archiving on external hard disk, I don’t need it, click “no”, besides, I don’t really want to write 32 GB :)
 This completes the process of creating a system image, the backup is located on a removable disk, the folder name is WindowsImageBackup.
Setting up automatic system image creation
I remind you that we originally came along the way “Start-Control Panel-Backup and Restore”,press "Tune backup» , in the window that opens, select the location where the system backup will be stored, please note that the specified backup location must be available when it is launched according to a schedule. The ideal option is an external hard drive; CD/DVD is not entirely suitable, since it will not be very practical to spend several disks on each backup. It is also better not to use a local disk, since in the event of a virus attack, recovery from the local disk is not always possible.
 In the next window, we select what we will archive or present the choice to the system, i.e. leave it as default, in this example I will leave it as default. Click "Next".
 In the next window, select the schedule for executing the system image, I recommend once a month, although this is individual, it all depends on how often you make changes to the system.
 After clicking "Save settings and start archiving", the archiving process will begin. System archiving can take a long time, up to several hours, it all depends on the volume of data and the speed of the computer.

I hope you will never need a system backup, but situations are different and to be on the safe side, I strongly recommend making an archived image of the system.