A simple solution to this problem (wrong placement of partitions on) using the Paragon Alignment Tool utility.
What is hard drive partition alignment? This operation is needed if the beginning of the partition on the disk does not coincide with the beginning of the sector, but is located at an offset. This leads to increased read/write operations, delays, and slower performance. This is also relevant for SSD drives, since repeated rewriting of memory cells leads to their rapid wear.
In order for the drive to work with maximum speed, without performing unnecessary operations, we need to perform the partition alignment procedure, for which we will use the Paragon Alignment Tool program. If the procedure seems complicated to you, then you can contact specialists, for example, this computer repair service center in the Cheryomushki area , offering prevention and correction services various problems arising with computer technology.
Reasons for unaligned partitions
If there is only one partition created on the disk, and the OS was installed from scratch (we are talking about versions starting with Vista), then problems with partition placement do not arise. It’s a different matter if a system restore operation was performed from backup copy or by cloning from another drive.
The same can be said for non-system partitions: cloning or restoring from copies may well lead to their incorrect placement on the disk. Here it is important to pay attention to the software that is used to transfer partitions between disks. Any similar software will do the basic job well, but not everyone can automatically solve the problem of unaligned partitions.
Thus, Acronis software successfully copes with this task, but the AOMEI Backupper program does not automatically perform this operation. It is available in the recovery options, but not every user pays attention or understands such subtleties.
Another reason for unaligned partitions is that they were created in the old Windows XP operating system.
Description of the Paragon Alignment Tool program
This program diagnoses the location of partitions on the disk and, if necessary, aligns them. She copes equally well with work on ordinary hard drives, and on . There is no data loss.
Like all other programs from this manufacturer, Paragon Alignment Tool is paid.
Getting started
After the program is launched, in the first window you need to click the “Next” button.
A search for installed drives will begin.
In order to ensure the safety of data when aligning partitions, it is highly undesirable to interrupt the program. Care should be taken to ensure that the computer does not suddenly lose power. In the case of a laptop, you need to connect it to a landline network. If possible, use a UPS to connect your desktop computer. Also check that they are deactivated various programs, which can control the computer's power.
The developers have provided for the possibility of an emergency situation, so in the “Alignment Options” window, by default, parameters are set that protect against possible problems. If the likelihood of power outages is high, then in the “Protection against accidental data loss” item, select the “Power off” option.
After setting all the parameters, click the “Next” button.
Analysis results and alignment
After the drive analysis is completed, a window with the results will be displayed. Aligned sections will be marked in green, those that require alignment will be marked in yellow, and sections that the program cannot correct for one reason or another will be highlighted in red.
The program will automatically check the boxes next to the sections marked in yellow, indicating that the highlighted problems will be fixed. You can leave it as is, or mark only those disks that need to be processed in given time. After that, click the “Align Partitions” button.
If there are a large number of partitions that require alignment, their large sizes and the presence of many files on them, the operation can take a long time. Additional complications are created by the selected type of failure protection, which also increases operating time. You can sacrifice security and set the minimum security settings, but this increases the risk of data loss in an emergency. If such a failure occurs, it would be better to contact a good workshop. On the website https://launch.rf you can find out how much it will cost to repair a laptop, restore data, what may be needed and what is the likelihood of saving the data.
If alignment is not performed on the system partition, but the computer has sufficient performance, then you can use it to perform everyday tasks. The main thing is not to forget that important work is being done with partitions of other disks. If a similar procedure is necessary for the system partition, then you can use the computer only after the program has finished running.
Need to reboot
After clicking the "Align Partitions" button, sometimes a message appears asking you to restart your computer. Most often it appears when working with the system partition. This means that Paragon Alignment Tool cannot access system files to move them.
You must agree, close all programs and click the “Restart and level” button. Operation will continue in partial OS loading mode.
If such a message appeared when starting an alignment operation on non-system partitions, then most likely some files on them were blocked due to the operation of some programs. You need to exit all applications, and then click the “Restart and level” button. A reboot will not occur, and the program will begin working with the disk.
Partition alignment progress
The main window will show which disks have already been processed, at what stage the alignment of the serviced one is in at the moment disk. The estimated time until completion is shown at the bottom of the screen.
After all the work is completed, the program will report that the alignment of all sections was successful. The program can now be closed. (Fig 7)
It all started with the fact that I used the Paragon Partition Manager 11 Professional program to create a partition on it. After creating the test section SSD looked like this (the disk is completely new - only the system is installed):
Due to my inexperience (at that time I had no idea what partition alignment was) I did not pay attention to the inscription 31K-BAD and continued installing drivers and programs, after which the test became like this:

As you can see, it is not much different from the first one. After further research on the topic SSD I came across one on the Internet, which described in detail about partition alignment and its impact on SSD. Here I will not go into technical details (if anyone is interested, follow the link above), but I will highlight the main thing - if the alignment is incorrect, system performance decreases, since data management hard drive performs two operations on two sectors instead of one, as with proper partition alignment. This also affects the service life of solid-state drives, because they have the disadvantage of a limited number of rewrite cycles - if the alignment is incorrect, instead of one write operation (in one sector of the disk), two are performed (in different sectors). The last factor finally convinced me and I decided to level my SSD.
There are several ways to do this, I will describe the one I used - it is the simplest, most reliable and free :-). Disadvantages of this method: after leveling it was necessary to reinstall the system, it requires installed Windows 7, to which we connect our disk. Next we go to disk management delete old and create new section on disk. Windows 7 itself aligns the partition as it should. After this, the disk test will look like this:

As you can see, the indicators have improved significantly. And they became even better after installing the AHCI driver from AMD:

This is how partition alignment affects SSD speed. I hope this article will be useful to you.
P.S. A year has passed since the note was written and some additions have appeared. If you install a “seven” on the SSD, then you don’t have to bother with preliminary alignment, because "Seven" will do everything right and all you have to do is make sure of it. It's worth being on the safe side when installing XP or some build of the "seven".
Finally, a video on the topic of SSD drives:
The emergence of modern hard drives with 4 KB sectors (instead of 512 bytes) made the problem of partition alignment relevant for both IT specialists and ordinary users. The thing is that a mismatch between the physical and logical distribution of data can lead to a sharp decrease in the performance of the entire system and a reduction in the service life of the equipment.
To explain the essence of partition alignment, we will illustrate the placement of data stored on regular hard disk:
The figure shows a simplified segmentation scheme, where one partition occupies all the disk space and all sectors. The section corresponds to the first sector, the beginning of the section corresponds to the beginning of the first sector. However, this is an overly simplified diagram. After all, a section consists of logical units/blocks. Let's look at how they relate to sectors:
The figure shows that one cluster corresponds to two sectors. This means that when reading data, for example a small text file from one cluster, the storage device reads data from two sectors.
Please note: the beginning of the partition corresponds to the beginning of the first sector and all clusters are aligned to the sectors, therefore the partition is aligned. Data operations are performed at maximum speed.
Now let's look at the reasons for the discrepancy between partitions and sectors and the consequences of this phenomenon.
How and why mismatched partitions and sectors slow down work hard disk?
The physical sector sizes of modern hard drives (for example, Western Digital) is 4096 bytes, per physical level 4 KB data blocks are processed, however, for external equipment and software such disks look like “traditional” ones, having 512-byte sectors. This allows for compatibility with earlier versions of the software. In such cases, another level is added - the compatibility level.
The figure shows three levels of data distribution. The lower level is, in fact, the hard drive and 4 KB physical sectors. The second level is an abstract representation in the form of 512-byte sectors for external systems. And the top level is an actual file system with 2 KB clusters, each equal to four abstract sectors and half a physical sector. Thus, 1 cluster = 4 abstract sectors = ½ physical sector.
Note that all three levels are aligned with each other and the beginning of the disk. Thus, reading or writing data from one cluster is implemented using four 512-byte sectors and one 4KB sector. The number of read-write operations is minimal; The disk is running at maximum performance.
But the situation takes a turn for the worse when the logic layer clusters are shifted relative to the underlying layers, as shown in this figure:

As you can see, the partition is offset relative to the beginning of the disk by one sector of 512 bytes. As a result, several logical clusters were associated with two 4KB physical sectors (second, fourth and sixth), resulting in a doubling of the number of read-write operations. In this case, system performance decreases, since control data hard The disk performs two operations on two sectors instead of one, as with properly aligned partitions.
What are the reasons for the bias? All versions of Windows operating systems prior to Vista, when creating volume clusters, focus on 512-byte sectors and place the start of the partition according to them, rather than with 4 KB sectors as shown in the previous figure, where the start of the partition is shifted by one 512-byte sector.
Usually the section starts from sector 63. 63 sectors is the established cylinder size for a disk, and some older versions of DOS or Windows require the partition to be aligned to the cylinder for proper addressing and access to sectors. Modern operating systems do not use the legacy CHS (cylinder/read head/sector) addressing scheme. But for a number of reasons everything Windows versions Pre-Vista versions create partitions using this rule.
Interestingly, partitions aligned to 63 sectors are, for purely mathematical reasons, not aligned to 4 KB sectors.
Obviously, 63 512 byte sectors does not correspond to a whole number of 4 KB sectors. Thus, the first and all subsequent disk partitions will be located with an offset.
What does the Paragon Alignment Tool do?
In the coming days, Paragon Software will introduce the Paragon Alignment Tool (PAT). Essentially, it moves partitions into a number of 512-byte sectors, flattening the volumes. For example, to align a 63-sector partition, you simply move it forward one 512-byte sector.

Now the beginning of the partition corresponds to the beginning of the 4KB sector, and this partition and all subsequent ones are located correctly.
PAT offsets the start of the partition by 2048 sectors of 512 bytes from the beginning of the disk, which corresponds to 1 MB, and is also great for 4 KB sectors.
The need to align partitions for SSDs
For solid state drives SSD problem Incorrect partition placement is even more pressing than for traditional hard drives. The size of memory modules in modern SSDs is 4096 bytes, which is equivalent to 4 KB sectors. Thus, all the previously mentioned problems associated with partition alignment also arise when using an SSD.
However, in addition to reducing the operating speed file system, there is another problem that is unique to SSDs. SSD memory cells fail faster when there are many writes. Thus, if the partitions on the SSD are placed incorrectly, not only the speed of the system is reduced, but the system itself is also at risk. solid state drive.
Partition alignment using PAT eliminates redundant read/write operations, which can significantly increase the speed and extend the life of the SSD.
The need for partition alignment for SAN and RAID
RAID technology allows you to combine many hard drives and other storage devices into one large data array. The system perceives this array as one large storage device, and the data is distributed across all its resources. The volume after which data stops being written to one disk of the array and begins to be written to another is called the stripe size, which, in turn, can be very different (8 KB, 16 KB, 32 KB or 64 KB).
When using software or hardware RAID, system performance may be reduced if the starting position of the partition does not match the stripe size. In this case, the number of data operations on multiple disks of the RAID array increases.
To solve this problem, PAT shifts the partitions into 2048 sectors. This offset is suitable for most stripe sizes. Working with data becomes faster by eliminating redundant operations.
The need for partition alignment in virtual environments
Partition alignment in a virtual infrastructure environment is critical to performance, hardware life, and effective use storages. Incorrect partition distribution results in virtual machine receives more data from the array than requested. This not only reduces operational efficiency, but this excess load also requires more resources to store data.
This figure shows the configuration of a VMware ESX\Server\vSphere server using RAID/SAN storage. Here, partitions are incorrectly positioned on two levels at once, which leads to a serious decrease in performance. For example, to read data from the first cluster, the system must read three VMFS blocks and four RAID blocks (and even more stripes).
Currently, PAT cannot move VMFS volumes themselves, but it can align partitions on virtual disks.
With this configuration, all volumes and partitions are located correctly and the overall speed of data operations doubles.
After driving on bad roads, almost any discs become deformed, including alloy ones. However, the discs can be aligned. Straightening alloy wheels can be performed in different ways, but it is best to do this using the following technology.
Wheel straightening is performed on special compact machines that can be easily placed in a private workshop or your own garage. On one of them diagnostics are carried out, on the other - rough straightening, and on the third - finishing leveling. This equipment allows you to restore the geometry of the disk with high accuracy.
Diagnostic machine
First of all, you need to diagnose disk damage. To do this, just attach it to the machine shaft and rotate it several times. During the rotation of the disk, special detectors identify places where geometry is violated. After identifying all the defects, you need to install the disk on the extraction stand.
Diagnostics is an extremely important step in alloy wheel repair. It is used to control the alignment result. It is advisable to check the discs at least once every 10,000 km. mileage
Drawing machine
On this equipment, you need to center the disk and secure it well with a special nut. Then they begin to sequentially eliminate all deformations. On a good stand you can fix not only creases, but also figure eight. Such equipment restores geometry rim, but the ideal result is achieved on a rolling machine.
At the stage of primary geometry restoration, harsh mechanical effects are used. It is very important that the alignment occurs smoothly. In this case, the primary structure of the alloy can be largely preserved. Alignment in several stages guarantees the most gentle impact on the disc.
Rolling machine
With this equipment, the disc is not rolled in the literal sense, but is bent by rollers. To do this, the machine must be configured so that three rollers are simultaneously involved in the alignment. This way, any bumps are pressed out and any depressions are straightened out. After rolling, the wheel is restored to its original condition.
This equipment performs alignment in three planes. Several points can be activated at the same time, on which dosed pressure is applied. The rolling machine eliminates the smallest errors that may remain after rough alignment. If the disc is slightly damaged, it can be immediately sent for rolling, bypassing the intermediate stage.
Painting alloy wheels
As a rule, after impacts on the road and wheel straightening, damage remains on the paintwork. In this case it will help. You can entrust this procedure to professionals at a car service center or do it yourself. Naturally, the latter will cost much less.
Note
Paint alloy wheels It can be in the color of the metal or in any other color, for example, in the color of the body. Before painting, preparation must be done. The alloys from which cast wheels are made most often have an aluminum base.
This non-ferrous metal has many beneficial properties, one of which is self-protection against corrosion. All parts made of aluminum or its alloys begin to be covered with a film of oxides from the moment of casting. This film has the highest tightness and protects the alloy from contact with oxygen.
However, the oxide film has very low adhesion. The paint does not stick to it and will peel off after a while. To be precise, the paint falls off along with the top layers of oxides. One way or another, high-quality painting of aluminum parts without special training impossible.
Preparing alloy wheels for painting consists of:
- stripping to bare metal;
- applying a special primer (adhesive primer for non-ferrous metals);
- painting;
- application of protective varnish.

To clean the disc, use an angle grinder with a fine abrasive or wire attachment or a sandblaster. Most high quality sandblasting ensures sandblasting, since the surface of the disc is complex and the grinder head does not reach everywhere.
If painting is done with your own hands, and there is no sandblasting equipment available, then fine cleaning can be done with a drill. However, this will take much more time and effort. There are also chemical methods for removing old coatings, but in garage conditions their implementation is problematic.
Note
Primer for non-ferrous metals performs an insulating function. The alloy wheel should be primed immediately after cleaning and degreasing. It should be remembered that the oxidation process of non-ferrous metals occurs very quickly, and an extremely undesirable film of oxides may appear within a few hours.
After applying the first layer of primer, after a short technological break, the second layer is applied. In this form, the disk can be left for any time. The soil will reliably protect the alloy from the appearance of patina.

Both special paints and body paints are suitable for painting the disc. You can paint it with metallic, xerallic and even liquid rubber. By the way, liquid rubber in cans, which is found on the shelves of car dealerships today, does not require lengthy preparation of the disc. It is enough to wipe its surface with solvent and wait until it evaporates completely.
Whether a hard drive partition is aligned or not - the performance of the computer depends to some extent on this. On an aligned partition, disk operations will be performed at maximum speed, and correct work Windows file system will eliminate unnecessary slowdowns and freezes. If the partitions are unaligned, the following picture physically occurs on the hard disk: clusters overlap larger number sectors, resulting in a greater number of erase and rewrite operations required for these sectors. In addition, an unaligned partition also contributes to faster wear of SSD drives. The beginning of a hard disk partition must always correspond to the beginning of the first HDD sectors or SSD. Thus, all clusters will be aligned by sector, and this, in turn, will determine the alignment of the disk partition as a whole. Below we will look at how in the operating room Windows system alignment is carried out hard sections disk. And we will use a narrow-profile tool specially designed for these purposes - the Paragon Alignment Tool program. But first, a few words about how in most cases the problem arises with unaligned disk partitions.
Causes of unaligned hard drive partitions
The system disk partition does not require alignment if Windows ( we're talking about about its modern versions, starting with Vista) was installed from scratch on a formatted drive C. But if operating system appeared, figuratively speaking, not in a natural way, but, for example, as a result or as a result, the probability of misalignment of the C drive will exist. The situation is similar with non-system partitions: the reason for their unalignment, as a rule, is restoration from a backup or cloning - processes designed to preserve, in addition to direct user data, also the original structure of disk partitions. So, not all programs are for backup provide, along with data recovery or cloning, an operation to align partitions. For example, a backup program from the well-known company Acronis automatically resolves the issue of incorrect partition alignment. But in the AOMEI Backupper program, this operation is potentially possible, but it is not included in the default recovery options. And, accordingly, it can be ignored by users who have a superficial understanding of data recovery issues.
The reason for unaligned hard disk partitions is also their initial formation by means of old Windows XP.
About Paragon Alignment Tool
Paragon Alignment Tool is a narrow-profile program designed purely for alignment HDD partitions and SSD by moving partitions across a number of sectors. With its help, the alignment process occurs without data loss. The program is both a diagnostician of the problem and a tool for eliminating it. Like all Paragon developer products, Alignment Tool – paid program(RUB 299). It can be purchased and downloaded from the official Paragon website.
Starting the program
After launching the Paragon Alignment Tool, in the welcome window of the Partition Alignment Wizard, click “Next”.
At the next stage, the program will scan the available storage media - hard drives, flash drives, other data storage devices.

An interruption is not desirable for the hard disk partition alignment operation. Prudent developers from Paragon took care of Windows security and user data in case an unexpected computer reboot occurs or file system errors occur on the aligned partitions. We will see the default optimal parameters for such protection in the “Alignment Options” wizard window. If power failures frequently occur in the room where the computer is located, instead of the default “Reboot” value set in the protection against accidental data loss column, you need to set “Power off”. Click “Next”.

Although the Paragon Alignment Tool provides protection against unexpected reboots, before starting the partition alignment operation, you need to take care of connecting the laptop to the network and resolve the issue with software that has access to power management. For example, suspend computer shutdown timers.
Diagnostic results and start of partition alignment
In the next window we will see the results of the program diagnostics: in the tree structure of all storage media connected to the computer, their aligned partitions will appear green, and yellow and red indicate unaligned sections. The red color of the sections, as we see from the explanation on the additional program panel on the right, means that the Paragon Alignment Tool cannot align them. Sections that the program can align are marked in yellow. Unaligned sections, indicated in yellow, have preset checkboxes to align all sections in a single operation. You must leave all the preset checkboxes or set them only to individual partitions and then click the button at the bottom “Align partitions”.

As you can see in the screenshot above, in our case there were quite a lot of unaligned sections. And all of them, ticked by default, were aligned in a single operation. But this comprehensive solution problems may not be suitable for every case. Thus, the duration of the operation to align six sections was almost a whole day. A serious disadvantage of the Paragon Alignment Tool is the lack of forecasting the time duration of the planned volumes of the operation. Still, we are talking about a process that cannot be interrupted. At the stage of setting the alignment options (the third step of the “Alignment Options” wizard), Paragon Alignment Tool provides an option to speed up the operation, but only at the expense of increasing the risk of system failure and data loss.
In our case, the experiment did not bring any particular discomfort, since there were no problems with the power supply, and the hardware power of the computer ensured the full execution of parallel tasks. Since the active system partition was not included in the number of aligned partitions, you could freely work on the computer on the Internet, as well as locally, but only with data from non-system partitions, which were also not included in the number of aligned partitions. But in the case of low-power devices and with a large amount of data stored on aligned partitions, recklessly launching an operation based on Paragon Alignment Tool presets can seriously paralyze the user’s work. In such cases, it is better to carry out step-by-step alignment: one section - one operation. The duration of the operation directly depends on the actual weight of the sections being aligned.
Notification that a reboot is required
After clicking the “Align Partitions” button, in some cases a notification will appear indicating that the program is unable to gain access to certain partitions and that the computer must be restarted. This is a template notification and is only relevant when the active system disk partition is being aligned. In this case, naturally, the Paragon Alignment Tool needs to free the files involved in the process Windows operation to move them. You must click the “Reboot and level” button for the operation to proceed in preboot mode. If Paragon Alignment Tool cannot access non-system disk partitions, what you need to do in this case is to close all used files, all installed and portable programs, which are placed on the aligned sections. And after clicking the “Reboot and level” button, no reboot will follow.

Progress of the operation and its completion
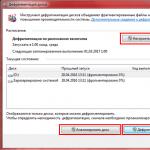
In the operation progress window, we can track which sections have already been aligned, which have not yet, and which are currently being aligned. The time until the operation is completed will be displayed at the bottom of the window.

Upon completion of the operation, we can close the program window.

Have a great day!