Application examples
08.12.2014NetPing devices use the NTP protocol to synchronize time. Using this protocol, all devices on the network adjust their time according to to the specified server. NetPing devices connected to the Internet can use a public NTP server, as recommended in article. If there is no access to the Internet, then you can set up a local NTP server. Such a server can be any computer running Windows OS with a configured service W32Time (« Windows Time Service "). This service does not have a graphical interface and is configured either through the command line or by editing registry keys.
Instructions for setting up an NTP server on Windows 7/8/2008/2012
Let's look at setting up a time service by editing the registry. The setup is the same for Windows versions 7/8, Windows Server 2008, Windows Server 2012.
For this setting, you must have Windows OS administrator rights.
Open the registry editor either through the dialog box “ Execute", caused by the key combination " Win» + « R", or through the search form, where we type " regedit».

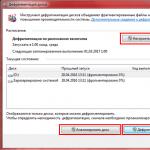
In the editor that opens, in the left tree menu, open the “branch” “ HKEY_LOCAL_MACHINE\SYSTEM\CurrentControlSet\services\W32Time\TimeProviders\NtpServer", where we look for the key with the name " Enable" Click right click mouse and select “Edit”. Change the key value from 0 on 1 .

By changing this parameter, we indicated that this computer acts as an NTP server. The computer simultaneously remains a client and can synchronize its time with other servers on the Internet or local network. If you want the internal hardware clock to act as a data source, then change the value of the key parameterAnnounceFlags on 5 in the thread " HKEY_LOCAL_MACHINE\SYSTEM\CurrentControlSet\Services\W32Time\Config».

For the changes to take effect, we need to restart the service. Services are accessed through " Control Panel» from menu « Start» -> « Control Panel» -> « Administration» -> « Services" It is also found in the search form when you enter “ services.msc" In the list of services that appears, we find the one we are interested in “ Windows Time Service" and through the menu called up with the right mouse button, select the item " Restart».
The other day I needed to configure ntp again and, as usual, it turned out that after years of previous configuration, everything had been forgotten nafik. Therefore, we write ourselves a note for the future, so as not to look for it next time. Well, it looks like it will be useful for my readers.
Installation
As usual, Gentoo will serve as our installation platform. The ntp service is net-misc/ntp.
First of all, we update the portage tree:
Server setup.
Let's decide who we'll take the time from. I suggest using exact time servers, Stratum 1 after all.
ntp1.vniiftri.ruThe parameters for launching the ntpd daemon are defined in the file /etc/conf.d/ntpd
ntp2.vniiftri.ru
ntp4.vniiftri.ru
# /etc/conf.d/ntpdHere -g is the key that allows transition to a large time jump, -c is the ntp service configuration file, to specify a pid file different from the default one, you can use the -p key, for example:# Options to pass to the ntpd process
# Most people should leave this line alone ...
# however, if you know what you"re doing, feel free to tweak
NTPD_OPTS="-g -c /etc/ntp.conf"
NTPD_OPTS="-p /var/run/ntpd.pid -g -c /etc/ntp.conf"The ntp service is configured by default in the /etc/ntp.conf file, if you specified a different one in the previous paragraph, then edit the one you specified
# /etc/ntp.confLaunch ntpd
# Our local server
server 192.168.0.1
# Servers online
server 195.2.64.6
server ntp1.vniiftri.ru
server ntp2.vniiftri.ru
server ntp4.vniiftri.ru#Paths to service files
driftfile /var/lib/ntp/ntp.drift
logfile /var/log/ntpd.log# Permissions to access our server
restrict default ignore # Access is denied by default
restrict localhost # Everything is possible locally
restrict 192.168.0.0 mask 255.255.255.0 nomodify nopeer notrap # You can only read the time over the internal network# We allow synchronization with external servers, otherwise synchronization will not work.
restrict 127.0.0.1
restrict 192.168.0.1
restrict 195.2.64.6
restrict ntp1.vniiftri.ru
restrict ntp2.vniiftri.ru
restrict ntp4.vniiftri.ru# This entry allows you to assign Stratum 3 to yourself so that the server trusts itself
server 127.127.1.1
fudge 127.127.1.1 stratum 3
Add ntpd to startup
Now you need to wait 10 - 20 minutes, because synchronization does not occur immediately, but after some time.
Checking on the server
That means everything is fine, synchronization has started. Let's take a closer look at the notations in the resulting table.
remote refid st t when poll reach delay offset jitter
==============================================================================
192.168.0.1 .INIT. 16 u - 1024 0 0.000 0.000 0.000
-ntp1.zenon.net 195.2.64.5 2 u 596 1024 377 2.261 -0.104 0.680
*ntp1.vniiftri.r.PPS. 1 u 909 1024 377 4.266 -0.603 0.353
+ntp2.vniiftri.r .PPS. 1 u 562 1024 377 3.914 -0.453 0.457
+ntp4.vniiftri.r .PPS. 1 u 554 1024 377 4.487 -0.664 0.249
LOCAL(1).LOCL. 3 l 229m 64 0 0.000 0.000 0.000
Table fields:
remote- names of remote ntp servers
refid- server with which the remote ntp server synchronizes
st- stratum (level) remote server. 1 is the highest, 16 is an ordinary machine/client.
t- peer type (u = unicast, m = multicast, l = local)
when- indicates how long ago the synchronization with the server was made
poll- frequency in seconds with which the NTP daemon synchronizes with the peer
reach- server availability status, this value stabilizes at 377 if the last 8 attempts to synchronize with the remote server were successful
delay- delay (in milliseconds) of response from the server
offset- difference in milliseconds between system time and remote server time; value with a minus - lag, with a plus - running away
jitter- time offset on the remote server
Icons in table rows:
* - peer with which synchronization was performed last time
+ - server suitable for updating
- - server unsuitable for updating
X- the server does not respond
We check on the client:
25 Oct 17:28:04 ntpdate: adjust time server 192.168.0.1 offset -0.016567 secHowever, you may receive the following message:
25 Oct 17:29:14 ntpdate: no server suitable for synchronization foundTo understand what kind of nonsense we do:
Let's look at the answer:
192.168.0.1: Server dropped: strata too highThis means that the trust level is very low (stratum=16, the lowest level), that is, the server does not trust itself to give time. You must either wait or change the list of servers with which it synchronizes. Since our config states that our server is stratum 3, we are unlikely to see such a message.
server 192.168.0.1, port 123
stratum 16, precision -8, leap 11, trust 000
We set up clients.
LINUX
My clients are also Gentoo; basically, the client configuration is written in the /etc/conf.d/ntp-client file. Let’s not be too clever here, we leave everything as it is, just specify our server in the synchronization parameters:
# /etc/conf.d/ntp-clientAdd to startup:# Command to run to set the clock initially
# Most people should just leave this line alone ...
# however, if you know what you"re doing, and you
# want to use ntpd to set the clock, change this to "ntpd"
NTPCLIENT_CMD="ntpdate"# Options to pass to the above command
# This default setting should work fine but you should
# change the default "pool.ntp.org" to something closer
# to your machine. See http://www.pool.ntp.org/ or
# try running `netselect -s 3 pool.ntp.org`.
NTPCLIENT_OPTS="-s -b -u 192.168.0.1 "
# rc-update add ntp-client defaultIt should be kept in mind that the ntp-client service synchronizes time only once, at system startup, so for machines running long time without restarting we do the following:
Create an executable file with the following contents in the /etc/cron.hourly folder
#!/bin/shThat's it, now our machine will synchronize with ntp hourly.
NTPCLIENT_OPTS="-s -b -u 192.168.0.1"Ntpdate $NTPCLIENT_OPTS >> /dev/null 2>&1
WINDOWS 2003 Server
All body movements are performed in command line.
#w32tm /config /syncfromflags:manual /manualpeerlist:192.168.0.1Next, in the command line we specify the priority NTP server, restart the time service and force the time to be synchronized:
#w32tm /config /update
#net time /setsntp:192.168.0.1As a result you should get:
#net stop w32time && net start w32time
#w32tm/resync
Synchronization command sent to local computer...After some time, you can check the system event log. If everything is configured and worked correctly, then the log will show information message from the W32Time source with ID 37 and the text "The time provider's NTP client is receiving correct time data from 192.168.0.1" and then with ID 35 and the text "The time service is synchronizing the system time with the time source 192.168.0.1."
The command completed successfully.
UPD
WINDOWS 2012 Server
Everything here is similar to Windows 2003 Server, but we do everything in Windows PowerShell running as administrator.
We indicate which ntp server to use for synchronization:
PS C:\> w32tm /config /syncfromflags:manual /manualpeerlist:192.168.0.1 /syncfromflags:MANUALNext, in the command line we restart the time service and force the time to be synchronized:
PS C:\> w32tm /config /update
PS C:\>Service-Stop w32timeAs a result you should get:
PS C:\>Service-Start w32time
PS C:\> w32tm /resync
Sending a sync command to the local computerWe check:
The command completed successfully.
The output should be something like this:
Interference indicator: 0 (no warnings)
Strat: 3 (secondary link - synchronized using (S)NTP)
Accuracy: -6 (15.625ms per time clock)
Root delay: 0.0356903s
Root variance: 7.8069513s
Time Reference ID: 0xC0A86301 (Source IP Address: 192.168.0.1)
Time of last successful synchronization: 03/22/2016 16:21:25
Setting time in server rooms operating systems Windows using NTP protocol is critical for many services. Without the correct configured time, or rather, if the clocks on the server and workstations are mismatched, many protocols cannot work correctly Active Directory and synchronization services. Setting and maintaining a clock using NTP is a simple task, but sometimes comes with some complications, which we will try to address in this article.
For example, we will use a not the latest system - Windows Server 2012. It is the most common and, at the same time, for many other systems, including Windows Server 2008, Windows Server 2016, similar commands and rules apply. It should be noted that the description concerns an environment setup with a single master PDC controller. More complex options are not considered.
Reset NTP Settings
In order to put the NTP service into the “default” state, you must run the following commands:
| Stop- Service w32time w32tm / unregister w32tm / register |
Stop-Service w32time w32tm /unregister w32tm /register
In this case, they stop the service, unregister the service and register it in the system again. You should only run these commands when absolutely necessary. As a rule, there is no need for them - NTP is configured if other system circumstances are taken into account.
Normal NTP Installation Commands
To configure the network time protocol to Windows controller Server, first of all you need to disable synchronization via Hyper-V if the controller is virtualized using this technology. To do this, go to the settings and uncheck the Time Synchronization item in the Management -> Integration Services section
For those who do not use Hyper-V, the previous step can be omitted.
w32tm /config /manualpeerlist:"0.de.pool.ntp.org 1.de.pool.ntp.org" /syncfromflags:MANUAL
UDP protocol for NTP and firewall blocking
The time protocol uses UDP port number 123 for its communication in its standard configuration. You must ensure that the firewall does not block this port. If blocking occurs, there will be a lot of information in the ntp logs that the connection is impossible:
Log Name: System
Source: Microsoft-Windows-Time-Service
Event ID: 47
Level: Warning
Description: Time Provider NtpClient: No valid response has been received from manually configured peer pool.ntp.org after 8 attempts to contact it. This peer will be discarded as a time source and NtpClient will attempt to discover a new peer with this DNS name. The error was: The peer is unreachable.
In order to make sure that this is the problem, you can enable the output of additional debugging information. We configure Windows Server logs so that all necessary information, but they did not grow more than 20 megabytes:
w32tm /debug /disable
Blocking ntp The firewall catches the following phrase in debugging:
— Logging error: NtpClient has been configured to acquire time from one or more time sources, however none of the sources are currently accessible and no attempt to contact a source will be made for 1 minutes. NTPCLIENT HAS NO SOURCE OF ACCURATE TIME.
In this case (yes, in general, immediately for verification purposes), you need to check the rule in the firewall

And, if necessary, change the rule or add it.
Checking that ntp is working correctly
To check if everything is working correctly, you can start synchronization manually:
| w32tm/resync |
If everything went well, you will receive the following message:
Sending resync command to local computer
The command completed successfully.
If there are problems, message:
The computer did not resync because no time data was available.
In the second case, you need to check everything first: the firewall, the correctness of the specified servers (whether you made a mistake in the name). If anything, we have already provided information about resetting the settings.
The release of WordPress 5.3 improves and expands the block editor introduced in WordPress 5.0 with a new block, more intuitive interaction, and improved accessibility. New features in the editor […]
After nine months of development, the FFmpeg 4.2 multimedia package is available, which includes a set of applications and a collection of libraries for operations on various multimedia formats (recording, converting and […]
Linux Mint 19.2 is a release with long-term support, which will be supported until 2023. It comes with updated software and contains improvements and many new […]
Release presented Linux distribution Mint 19.2, the second update to the Linux Mint 19.x branch, based on the Ubuntu 18.04 LTS package base and supported until 2023. The distribution is fully compatible [...]
New BIND service releases are available that contain bug fixes and feature improvements. New releases can be downloaded from the downloads page on the developer's website: […]
Exim is a message transfer agent (MTA) developed at the University of Cambridge for use in Unix systems connected to the Internet. It is freely available in accordance with [...]
After almost two years of development, the release of ZFS on Linux 0.8.0 is presented, implementation file system ZFS, packaged as a module for the Linux kernel. The module has been tested with Linux kernels from 2.6.32 to […]
The IETF (Internet Engineering Task Force), which develops Internet protocols and architecture, has completed an RFC for the ACME (Automatic Certificate Management Environment) protocol […]
The non-profit certification authority Let’s Encrypt, which is controlled by the community and provides certificates free of charge to everyone, summed up the results of the past year and talked about plans for 2019. […]
 Came out new version Libreoffice - Libreoffice 6.2
In this article we will look at setting up an NTP client.
Setting the time zone
First, let's look at what time zone we have set. To do this we use the command.
# date Fri Mar 8 17:38:47 MSK 2019
If the time zone is set incorrectly, then set the correct time zone. To do this, create a file /etc/localtime from the corresponding time zone from the /usr/share/zoneinfo/ directory. For example for Moscow.
Ln -sf /usr/share/zoneinfo/Europe/Moscow /etc/localtime
Configuring NTP client synchronization with NTP server
Install the ntp package
Yum install ntp
To synchronize a local client machine on Linux with an NTP server, you need to edit the file /etc/ntp.conf. The following example specifies multiple time servers, which is useful in case one of them is unavailable. Or you can register other external servers, for example pool.ntp.org
Server 0.rhel.pool.ntp.org iburst server 1.rhel.pool.ntp.org iburst server 2.rhel.pool.ntp.org iburst server 3.rhel.pool.ntp.org iburst
iburst: This option improves synchronization accuracy; instead of one packet, eight are sent. When the server is not responding, packets are sent every 16 seconds; when the server is responding, every 2 seconds.
Server 192.168.1.1 prefer
prefer: If this option is specified, the specified server is considered preferable to others, but if the response from this server differs significantly from the responses of other servers, it will be ignored. Instead of 192.168.1.1, enter the IP address of your server
Starting the NTP service
After changing ntp.conf and setting the necessary parameters, start the NTP service (daemon). Depending on the settings, it can work both as a server and as a client.
Systemctl start ntpd
and add it to startup
Systemctl enable ntpd
to check the time, type the command
Checking NTP Status
You can check the NTP status using the ntpq command. If you receive a connection refused error, it means that the time server is not responding, the NTP service on the client is not running, or the port is closed.
Sudo ntpq –p remote refid st t when poll reach delay offset jitter ===================================== ===================================== *elserver1 192.168.1.1 3 u 300 1024 377 1.225 -0.071 4.606
remote– name or address of the time server. It is preceded by a service character, in this case “*”, which means the server being used. “+” means that the server is suitable for updating, “-” - that it is unsuitable, “x” - the server is unavailable;
refid– server higher in the Stratum hierarchy;
st– server level in the Stratum hierarchy;
t– connection type (u – unicast, single connection, b – broadcast, broadcast connection, l – local clock);
when– time elapsed since the last response;
poll– polling period in seconds;
reach– availability status (when represented in binary form, 1 means a successful attempt, 0 means failure. After 8 successful attempts, the value is set to 377);
delay– time of double turnover of the package;
offset– current time offset relative to the server;
jitter– standard deviation of time.
Meaning jitter should be low, if not, check the clock offset in the driftfile. If it is too high, you may need to change the NTP server. The following command manually synchronizes the time with the NTP server:
Manual time synchronization
To query the NTP server and set the date and time manually, use the command ntpdate. This is usually only required once.
First, disable the ntp service
Systemctl stop ntpd
Start synchronization by specifying the server from which you want to synchronize time
Ntpdate 192.168.1.1
Start the ntp service
Systemctl start ntpd
After this initial synchronization, the NTP client will regularly poll the NTP server to ensure that the local time is accurate.
If you find an error, please highlight a piece of text and click Ctrl+Enter.