In cases where someone else uses the computer besides you, for example, family members or colleagues, it is recommended to set a login password for the account that belongs to you. This way, you will limit access to important data stored on your PC, which means the risk of information loss will be significantly lower.
If the user is the only person using the computer, then he may want to remove the password. In Windows 8, by default, the system requires you to specify it to log into your account. This is not entirely convenient, because the user has to spend time entering a set of characters. If the password is complex, then you can completely forget it.
That is why many users are looking for an answer to the question: “How to remove a request Windows password 8? After reading this article, you will be able to perform this operation without the help of a specialist.
Reset your password using the Run tool
So, you decided that you don’t need to regularly enter a password to log into your user account, so you decided to disable it. How to do this? It's actually very simple. To carry out this procedure, you can use one of the commands.
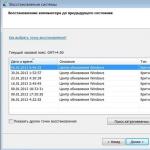
The initial stage to remove the password Windows login 8, - launch the “Run” tool. Go to the Start menu and find this option on the right. In addition, you can call it using the “R” and “Win” buttons. When the window of this program appears, you will need to enter one of the commands into it: netplwiz or control userpasswords2.

After you click on “Enter” or “OK”, a window will open where you can view all user “accounts” registered on the computer. Select the one in which you want to remove the password in Windows 8, and then uncheck the checkbox next to the “Require a password and username” option.
The last step is the “Apply” button and restarting the PC.
How to change or disable your password using the Charms Bar
Now that you have learned how to disable password entry using the Run tool, it is recommended that you become familiar with the steps required to perform the same operation through the Charms Bar.
So, to change the Windows 8 login password or disable it, go to the right area of the screen. A panel will appear about which we're talking about. Here you are interested in the “Options” section. Once there, click “Change computer settings.”
A page will open on which you will need to go to the “Users” item. Switch to a local account by clicking the corresponding button. Now click “Change Password” and enter your current password.

In the next step, you can specify a new character combination or leave the fields blank to eliminate the need to enter a password when logging into your account.
That's it! As you can see, even a novice user can handle this procedure.
How to reset the Administrator password in Windows 8
If you need to remove the Windows 8 “Administrator” password, then prepare an installation disk. After you insert it into the PC, you will need to go to the BIOS and specify booting from the disk.

When a window appears asking you to select a language and time format, press the "F10" and "Shift" buttons to bring up " Command line».
Now you need to find out which disk the OS is installed on and copy the “sethc.exe” file to its root, and then replace it with “cmd.exe”. That is, if you have the operating system installed, for example, on the “C” drive, then the commands will look like this:
copy c:\windows\system32\setch.exe c:\
copy /y c: \windows\system32\cmd.exe c: \windows\system32\setch.exe
The next step is to close the Command Prompt and restart Windows. Installation disk can be removed from the PC.
When the OS boots and a password prompt appears, click “Shift” five times to bring up “Command Prompt” again. Now specify New Password and username using the "net user" command. For example, do this: “net user Vasiliy MoiPassWorD”.
The last step is to replace the “setch.exe” file with the real one. To do this, insert the command into the CS:
copy /y c:\setch.exe c:\windows\system32\setch.exe
Reset your Microsoft account password
In the new Windows 8 OS, there are two types of accounts - Microsoft LiveID and local. If you use the first option to log into your account, then in order to change the password you will need to perform slightly different steps.
First of all, find a computer with Internet access and go to the official Microsoft page. Then refer to the "Support" section. Under the “Login” button you need a link “Can’t access your account.” Follow it. Check the box next to the “I don’t remember my password” option. Now enter email address, which you specified when creating your Microsoft account.

At the next step, select how you would like to receive a link to reset your password - at mobile phone or email. Follow the link sent and enter a new password in the appropriate box.
Now you can start your PC and use the password you just created to log into your account.
Before making a decision regarding the question of whether to remove the password in Windows 8 or leave it, it is recommended to listen to a few tips from advanced users:
- If someone else is using the device besides you, then it is better to leave a password, since situations can be completely different. For example, a child accidentally logged into your account and deleted a document that you had been working on for several days or months. As a result, you will have to restore the file, and it’s good if you can do this.
- You can disable the password in cases where you are the only user or if you are completely sure that none of your family members will make changes to the password. system files, services, projects you are working on.
- Do not constantly log into the Administrator account. If you have made some necessary changes to the OS, go to your “account”.
By the way, for fast switching between users you can use the Alt, Delete and Ctrl buttons.
Conclusion
So, now, if the need arises, you can remove the password in Windows 8 or set a new one. As mentioned earlier, it is not recommended to do this on a shared computer.
Of course, if you have confidence in your colleagues, you can disable password entry so you can quickly get started. However, it is better to leave it, but keep it simple. For example, use your dog's name as a password.
Good afternoon. On my last project this was the most popular topic. But it’s clear why. Microsoft imposes the use of an account to activate some additional functions. But, on top of that, thanks to the synchronization of the account and its settings, it is somewhat easier to reinstall the system and synchronize between several devices (For example, a PC and a tablet or laptop). Just enter your username and password and you will automatically receive your language settings and even your desktop background image. But there is also a small drawback: after switching to a Microsoft account, you will have to enter the password every time you turn on the computer, and after waking up from sleep. Fortunately, it can be eliminated;) And now I will tell you how easy it is to do.
The article consists of two parts: requests when turning on the computer and.
How to disable Microsoft account password prompt when you turn on your computer
Don't be afraid, everything is very simple. But you need to be careful. So, press the Win+R key combination and enter in the window that opens:
control userpasswords2
If this command does not work for you, then enter this one, they open the same window:
netplwiz
In the window that opens, select attention, your account with the “Administrators” group. I specifically noted this point, since there may be several accounts (like mine), but we need to use the working one. If you are using a guest account, then select it. If you are an advanced user, then I think you will figure it out yourself, but I am writing an article for maximum quantity users, and the vast majority use administrator accounts.
Once selected, uncheck the “Require username and password” checkbox.
Click the “Apply” button and a small window will appear in which we must enter the login and password for the account that we want to facilitate the launch of. And click OK.
That's it, we got rid of the password when turning on the computer. Drink some coffee and let's move on to the second part :)
How to disable the password request when waking up the computer (coming from sleep, hibernation)
I think some people will come to this article after following the first instructions from some other resource. Because this point is often forgotten. The bottom line is that even if you disable the password prompt when you turn on your computer, the password prompt when you wake up will remain. And it turns off in a slightly different place. But let's get down to business ;)
We need to get to the "Power Options" section in the "Control Panel". You can do this manually, but I suggest just clicking Win+R What to launch the Run utility and copy the following command into it:
The Power Options window will open. Click on the treasured link “ Request password on wakeup" on the left side of the window.
Initially, the ability to make changes to the item we are interested in will be closed, to open access you need to click on the message “ Change settings that are currently unavailable«.

At the final stage Windows installations 10 The installer requires you to enter the login and password for your Microsoft account or register a new account. If you agree to enter this data, then operating system will require you to enter a password every time you turn on the computer.
Naturally, this is quite annoying, so many users are interested in how to disable the password request in Windows 10. And now we will try to answer this rather popular question.
Step No. 1. Execute the “netplwiz” command.
In order to disable the password request in Windows 10, you need to configure it to be entered automatically. To do this, we need to open the User Accounts window. To do this, you need to run the “netplwiz” command. Therefore, open the “Run” menu (combination Windows-R keys) and enter this command.
You can also run the command "netplwiz" through the search engine Windows string 10. In this case, you need to enter “netplwiz” into the search and open the program that the operating system will offer you.

Step No. 2. Disable the password request in Windows 10.
After executing the “netplwiz” command, the “User Accounts” window will appear in front of you. In order to disable the request here, you need to uncheck the box next to the “Require username and password” function. After that, just click on the “Ok” button.

Step No. 3. Confirm that the password request is disabled.
After you uncheck the box and click on the “Ok” button, a window will appear in front of you to confirm the changes. In this window, you will need to enter your current password that you currently use to log into Windows 10 twice.

After entering the password and clicking the “Ok” button, the password request will be disabled. And the next time you start Windows 10, you won't have to enter it.
It should be noted that this method disabling the password request should be used only in cases where there is no danger that your computer will be used by strangers.
Addition. The method described above only works to turn on the computer. After resuming from sleep mode, you will still be prompted for a password. In order to disable the password request when exiting sleep mode, you need to make some additional settings.
If you have Windows 10 without the latest updates, then you need to open “Power Management” and disable the password requirement for the active power plan there. This is done quite simply. Click right click from the Start menu and select “Power Management”.


Here you need to activate the “Do not ask for password” function and save the settings.
 As a result, we disable the password request completely.
If you have installed latest updates for Windows 10, then you will not have the settings described above in the “Power Options” section. In your case, you need to use the new “Options” menu. To do this, click the “START” button, go to “Settings” and open the “Accounts - Sign-in Options” section there. IN this section, there will be a feature called "Login Required" you need to switch it to "Never" state. After this, the system will not require a password either when turning on the computer or when exiting sleep mode.

If you have Windows 10 Professional or Windows 10 Enterprise, you can also disable the password when resuming from sleep mode using the editor group policies. To do this, run the command “gpedit.msc” and in the window that opens, go to the section “Computer Configuration - Administrative Templates - System - Power Management - Sleep Settings”. In this section, you need to disable two options related to the password request when waking up the computer (marked in the screenshot below).

Once again, I note that the Group Policy Editor (gpedit.msc) is only available for Windows 10 Professional or Windows 10 Enterprise. If you have Windows 10 Home, you can disable the password prompt when resuming from sleep mode only through the Settings menu.
Romanov Stanislav 10.01.2019 1669202
How to remove password when logging into Windows 10?
Do you want to quickly boot into work? Windows table 10, skipping the login screen? Want to avoid entering a password? account every time you turn on the computer? You can easily disable the login password and configure Windows operation 10 on automatic download to the desktop or start screen without entering it.
The main advantage of logging in without a password is that the account will not require you to enter it, which means you do not need to remember it and spend several seconds during loading. That is, it will launch the desktop a couple of seconds faster. But, on the other hand, remember that it is much easier to access a PC without a password (for example, for children).

The procedure for setting up automatic login in Windows 10 is very similar to the same operations in Windows 7 and Windows 8. Therefore, some of the screenshots were taken in Windows 8.1. This method applies to both a local account and a Microsoft account. In other words, you can use these instructions regardless of your account type.
Warning: Enable automatic login only if you are the only user of the PC. If the computer is used by other people (and children), it is best to keep the accounts locked.
You can follow one of the methods below to enable automatic login. Windows system 10 without entering a password.
Method No. 1 for automatic login without entering a password
This is the easiest way to remove password from Windows 10 login screen.
Step 1: Open the Run window by pressing Win+R (Windows logo key and R key) at the same time. In the dialog box, type Netplwiz and then press enter.

Step 2: This will bring up the "Accounts" dialog box, select the user account, and then uncheck the "Require username and password" option. Click the “Apply” button, then the “Automatic login” window will open.

Step 3: In the automatic login dialog, enter the password, re-enter it to confirm, and click “OK”.

Step 4: Make sure the check mark is gone. You can try rebooting the system to check the effect.

Method No. 2 to remove the password through the registry
If, for some reason, you are unable to set up automatic login in Windows 10 by following the above method, please use this one.
Step 1: Open Registry Editor. To do this, open the Run window (using the Win+R keyboard shortcut), type Regedit in the available field and press Enter. Click the “Yes” button if a new window appears asking you to make changes to the system.

Step 2: In Registry Editor, navigate to the following section:
HKEY_LOCAL_MACHINE\SOFTWARE\Microsoft\Windows NT\CurrentVersion\Winlogon

Step 3: On the right side of the editor, find the option called DefaultUserName, double-click on it and make sure that the name of your Microsoft account or local user account is mentioned in the “Value” field.

Step 4: Next, again in the same part of the window, find the DefaultPassword parameter. If there is no entry, create one by right-clicking on the empty space, clicking the "New" button, and then clicking on " String parameter"(String Value). Rename it DefaultPassword and enter the password in the Value field. Click OK.

Step 5: Lastly, you need to enable automatic login. To do this, in the same part of the editor, find the entry labeled AutoAdminLogon, and then change its value from “0” (zero) to “1” (one).
The G8 has one cool feature - saving user settings and synchronizing them with a personal account in Microsoft. It's very convenient. For example, when reinstalling the OS, you do not have to set them to a new one - you just need to restore them using your own account.
But there is also a minus - due to the excessive “concern” of the developers, the system constantly requires a password when logging into Windows 8. And this is annoying. Especially if only you use a laptop or computer, and there is no need for such protection. It is logical that in similar situation I want to remove the password when logging into Windows 8.
The first method is to disable the password via the command line
This is done as follows:

Then open “Computer Settings”, find “Sign-in Options” and in the “Policies” section click on the “Change” button.

This is how you can remove the password when logging into Windows 8. This is a classic method that should help in most cases.
What should I do if Windows 8 requires a password at login, just like before? Try the next option.
The instructions here are also simple. To remove the Windows 8 startup password, follow these steps:

You can now log into Windows 8 without a password.
This method implies refusal of registration. recordings and switching to local. Thus, you lose the benefits that the first option provides. Of course, in this way you can disable the password request when booting Windows, but it is still not recommended to use it. Better try again the standard method described above.