The Disk Cleanup program is perhaps the safest means of getting rid of accumulated “garbage” on your computer’s hard drive. Disk Cleanup is very effective at removing unnecessary stuff, but it doesn't take away any important files or cause errors. As a rule, third-party utilities promise to clean everything down to the ground, and do it quickly and safely, but experiments with such software do not always go smoothly. Yes, they will clear a few extra megabytes, but such cleaning may interfere with stability. Unfortunately, not all authors of such utilities understand this. Sometimes following material about disk cleanup continues with searching for information on how to recover files, how to fix an error, or how to reinstall Windows.
Standard launch
Start ---> All programs ---> Standard ---> Service---> right click Disk Cleanup, and select Run as administrator.
Running as an administrator allows you to immediately access system file cleaner, as well as two additional ways cleaning. If you do not run the utility as an administrator, you can proceed to clean up system files later, but then you will have to wait again while the utility scans the disk.
If there are several disks, then at startup you should select which one to clean on:

Disk Cleanup tab
Contents will vary depending on the availability of certain files.
For non-system drives, as a rule, only the "Recycle Bin" item is available.
For the system disk, several items are always present:
- Downloaded Program Files
- Temporary files from the Internet
- Basket
- Temporary files
the rest are displayed only if there are files:
- Temporary Setup Files
- Debug dump files
- Old Chkdsk program files
- Previous installations Windows
- Setting up log files
- Memory dump files for system errors
- Minidump files for system errors
- Temporary files Windows installations
- Sketches
- Files thrown away by Windows update
- Custom bug report archives
- Custom error reporting queues
- System error report archives
- System error reporting queues
- Windows Update Log Files

Advanced Tab
- Programs and components. Opens Programs and Features in Control Panel, where you can remove unused programs. The Size column in Programs and Features shows how much disk space is used by each program.
- System restore and shadow copying. Deletes all recovery points from the disk except the most recent one. System Restore uses restore points to return system files to a previous state. If your computer is running smoothly, you can delete earlier restore points to free up disk space. In some editions of Windows 7, restore points may include previous versions of files, called shadow copies, and images of archives created with Windows archiving CompletePC. These files and images will also be deleted.

Setting parameters
The program has interesting opportunity- setting up various configurations for automatic cleaning. For example, you can create one for complete cleaning, the second - to delete the contents of the TEMP folder (temporary files), the third - to delete thumbnails, etc.

Repeat steps 1-3 to create each configuration. I'll create the 3 above:
cleanmgr /sageset:1- complete cleaning,
cleanmgr /sageset:2- cleaning the TEMP folder,
cleanmgr /sageset:3- deleting thumbnails.
Where are the settings stored?
The settings will be made to the following section of the system registry:
HKEY_LOCAL_MACHINE\SOFTWARE\Microsoft\Windows\CurrentVersion\Explorer\VolumeCaches
Launch with configured parameters
To run disk cleanup with configured settings, you must use the command:
Cleanmgr /sagerun: n
Where n
It is convenient to create a shortcut with this command (I will have 3 of them):

Repeat steps 1-3 for each configuration.

When you start cleaning using this command (shortcut), the program will display a window showing the progress of cleaning, but will not specify additional questions.
If you need to access all files - (method No. 1 or No. 3).
Scheduled launch
You can easily maintain order on your HDD by automatic regular cleaning launched from the task scheduler.
Let's launch task scheduler (Start---> All programs ---> Standard---> Service---> Job Scheduler) and press Create a task:

We indicate Name for a new task and check the box Run with highest rights:

Go to the tab Triggers, press Create, set the desired cleaning interval (for example, once a week, as in the screenshot below). Click OK:

Go to the tab Actions, press Create, in the next window click Review:

Specify the path to
C:\Windows\System32\cleanmgr.exe
and press Open:

In the field Add arguments indicate:
/sagerun: n
Where n- configuration number specified at .
Click OK:

And once again OK:

The task has been created and will perform automatic cleaning once a week (in my case). When launched, the program will display a window showing the cleaning progress, but will not ask additional questions.
Cleaning in disk properties
Availability of a button Disk Cleanup in the disk properties depends on the method for deleting files specified in the Recycle Bin settings.

Right click on Cart and select Properties:

- If the "Set size..." item is selected - the button Disk Cleanup will be in the disk properties.
- If "Destroy files immediately..." is selected, the button will not appear in the disk properties.

Cleanup in the disk context menu
To add to context menu disk item Disk Cleanup use the registry tweak:
Windows Registry Editor Version 5.00 "Icon"="cleanmgr.exe" @="cleanmgr.exe /d %1"
The tweak must be added to a REG file and imported into the registry.

When you select this item, cleaning will start for the selected disk.
Enjoy using it!
During its operation, the operating system creates a lot of temporary data that is stored on disk (usually drive C) in the form of files and registry entries. These can be files from update packages, archivers, shadow copies, content downloaded from the Internet, etc. They behave in a similar way third party programs, for example, browsers that cache website data. Some temporary files are deleted automatically after a certain time, others remain on the disk until they are forcibly deleted.
If the user does not perform regular maintenance and cleaning of the C drive, free space it becomes less and less, to the point that the disk eventually ends up filled to capacity with temporary files, which prevents further writing of any data to it and reduces its performance. There are two ways out of this situation - either increase the size of the system partition at the expense of the user volume, or perform a comprehensive cleanup of it, which is more preferable. Let's see how to free up space on your local C drive in Windows 7/10.
What can you delete if the disk is full?
The system volume contains many important files that ensure the normal operation of Windows, so deep cleaning it should be approached with the utmost care. What can be removed from the C drive to free up space and not disrupt the system? All its contents can be divided into three groups. The first includes files that can be deleted without any fear. The second consists of files, the deletion of which, although it will not harm the system, can still cause certain problems under some circumstances. The third group includes files that cannot be deleted, as this can make programs and the system inoperable. You can clean up drive C without negative consequences by deleting:
- Cart Contents.
- Library catalogues.
- Folders and Downloaded Program Files in the Windows directory.
- Cache of browsers and some third-party programs.
- Icon sketches.
- Logs and memory dumps for system errors.
- Old Chkdsk utility files.
- Bug reports.
- Files created by the Windows debugger.
With some caution, you can delete shadow copies () created during the installation of updates and stored in backups, files from previous system installations (Windows.old folder), unnecessary components and applications, folders of uninstalled programs in the ProgramData, Program Files and Roaming directories, MSOCache folder Microsoft Office. If not used and quick start, you can delete the file hiberfil.sys in the root of drive C, having previously disabled these functions in the settings. It is acceptable, but not recommended, to delete the swap file pagefile.sys. Other files and folders on drive C cannot be deleted so as not to disrupt the operation of the system.
Cleaning junk and temporary files using Windows
First, let's see how to clear the C drive from unnecessary files in Windows 7/10 using the most operating system. Windows has a built-in utility for these purposes. cleanmgr.exe, which can be launched either through the properties of the partition being cleaned or through the “Run” dialog box. After the utility scans the disk for outdated files, check the boxes on the “Disk Cleanup” tab and click “OK.”
If you click the “Clear” button system files", reports, device driver packages, error dumps and, additionally, recovery points, with the exception of the most recent one, will become available for deletion.

For a deeper and more thorough cleaning of drive C from garbage, you can use the built-in console utilities Dism And vssadmin. The first allows you to delete temporary data from the WinSxS folder, including backups created before installing Windows updates. To do this, use the following commands executed in the CMD console running as administrator:
- DISM.exe /online /Cleanup-Image /StartComponentCleanup
- DISM.exe /online /Cleanup-Image /SPSuperseded
- vssadmin delete shadows /all /quiet
The first command does the same thing as the cleanmgr.exe utility, only more thoroughly.

The second deletes all backup update packages from the WinSxS folder.

The third command can delete all restore points, including the last one.

However, you should use these tools with caution, since after executing the indicated commands, you will no longer be able to roll back the system to a working state or a previous version.
Note: Before cleaning the WinSxS folder, it is recommended to set its true size, thereby making sure that it really needs cleaning. To do this you need to do command line team Dism.exe /Online /Cleanup-Image /AnalyzeComponentStore and compare the actual size of the component store with the size indicator in the Explorer properties.

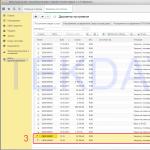
After Windows updates up to more new version a folder appears at the root of drive C Windows.old, which can take up significant disk space.

The contents of this directory are copies of the system files of the previous installation Windows versions. If you are determined not to return to old version system, the Windows.old folder can be deleted. This is done again either using cleanmgr.exe or using the command line. In the first case, you need to find and select the “Previous Windows installations” item on the “Advanced” tab; in the second case, run it in a console running as administrator cmd command rd /s /q c:/windows.old.

You can get a little extra space on the C drive by removing unused components, the same ones that the classic Add/Remove Programs applet provides access to.

The standard Dism utility is also used here. To select and uninstall unused Windows component, run the following two commands in the CMD console running with elevated rights:
- DISM.exe /Online /English /Get-Features /Format:Table
- DISM.exe /Online /Disable-Feature /featurename:NAME /Remove
The first command displays a list of all components in the system, the second deletes the selected element. IN in this example its name must be substituted for the NAME line element.


Manual removal of programs and files
Except for universal ones Windows applications 8.1 and 10, almost all desktop programs are installed in the folder Program Files. If a program is no longer needed, it should be deleted so that it does not take up disk space, but this must be done either using a standard uninstaller or using special third-party programs. However, after uninstalling applications, folders with configuration files may remain on the disk, the weight of which can reach several hundred megabytes. Such data must be deleted manually.
Let's say you deleted from Microsoft computer Office or Skype and you also want to get rid of all their “tails” remaining on the C drive. To do this, carefully check the Program Files and ProgramData directories in the root of drive C, as well as the folders C:/Users/Username/AppData. If the folder name matches the name remote application, it can be deleted.

The AppData folder is a little more complicated. This hidden directory contains three subfolders: Local, LocalLow and Roaming. The first stores files created during the operation of various programs. You cannot clear it entirely, as this will most likely lead to the loss of saved application settings, however, half-empty folders of uninstalled programs can be completely safely deleted. You can also safely clear the contents of the folder located in it Temp.


The same applies to the LocalLow and Roaming folders; it is permissible to delete from them only those directories that belonged to previously uninstalled applications.

Note: By clearing the contents of the Local, LocalLow and Roaming folders, you lose user settings and data saved in their cache. For example, after deleting its folders in your user profile, you will lose your current messenger settings and part of your message history.
As for removing universal applications, they are uninstalled using the standard tools of the system itself or the CCleaner program, which will be discussed below. You can also transfer some universal applications from drive C to drive D, if they support this feature.

Transferring desktop programs to another volume is also possible; for these purposes there is special utility SteamMover, which you can download from the developer’s website www.traynier.com/software/steammover.
Using CCleaner
Many novice users are interested in how to delete unnecessary files from drive C using third-party programs, as well as which of these programs are more effective and safe in this regard. These can be recommended CCleaner– simple, fast, convenient, and most importantly safe disk cleaner and Windows registry. This program allows you to delete temporary data from the Internet and Windows itself, the contents of the thumbnail cache and DNS, Index.dat files, memory dumps, fragments of chkdsk files, various system logs, outdated prefetch files and a lot of other non-essential data.

WITH using CCleaner you can clear invalid entries system registry, optimize, enable, disable or remove browser extensions, analyze content hard drives, search for duplicates and, of course, uninstall unnecessary applications, including universal ones.


CCleaner's interface is very simple, so understanding its simple functionality will not be difficult even for a novice user.
Considering, however, that the main purpose of CCleaner is still cleaning, all of it additional tools have limited functionality. If your C drive is full of unknown things, and you want to find out what exactly it is, then for these purposes it is better to use specific utilities, for example, Scanner, JdiskReport or their analogues, showing more accurate information about file structure media with the ability to navigate through subdirectories.

Other ways to free up space on drive C
Clearing the Driver Store
The steps described above are usually enough to free up enough space on the system volume, but what if drive C is still full? What else can you do to get additional space? One option is to clear the contents of the folder FileRepository located at C:/Windows/System32/DriverStore.

This directory contains copies of device drivers that have ever been connected to the computer, and can also store outdated versions drivers. Before deleting driver packages from the FileRepository folder, it is highly advisable to create a complete list of them and find only outdated versions in it, leaving the rest untouched. It also wouldn't hurt to create a complete copy of all drivers installed on the system. To list the DriverStore drivers in a file, run the following command in an elevated command prompt:
pnputil.exe /e > C:/drivers.log

Compare the driver versions in the list and remove only the outdated ones.

To remove the selected driver, immediately run the command in the console pnputil.exe /d oem№.inf, where № is the name of the driver in the list.

If an error appears in the console when uninstalling a driver, it means the driver is being used by the system. There is no need to touch such a component.
As an alternative to the command line, you can use free utility Driver Store Explorer, just designed to remove old unused device drivers.

Disabling hibernation
Thanks to the hibernation mode, the user can quickly return to work in running applications, on the other hand, its use requires the allocation of significant space on the system disk, slightly less than or equal to the volume RAM. If having free space on your hard drive is a priority for you, you can disable hibernation mode by deleting the hiberfil.sys container file.

Launch the CMD console as an administrator and run the command in it powercfg -h off. Hibernation will be disabled and the bulky hiberfil.sys file will be removed.
Note: The hibernation file can be compressed by a maximum of two times with the command powercfg hibernate size 50.
Disabling the page file
In addition to other hidden system objects, there is also a file in the root of drive C that can be deleted under certain conditions. This is the swap file pagefile.sys. This file plays the role of a RAM buffer, and if an application does not have enough RAM to operate, its data is temporarily written to . Accordingly, if there is no swap file, a heavy application will slow down greatly or simply freeze while waiting for faster RAM to become available. Therefore, disabling and deleting the paging file is not recommended unless the computer has very large volume RAM.
If your PC has more than 10 GB of memory or you do not intend to run resource-intensive applications, you can try carefully disabling swap. To do this, open Advanced system settings and on the “Advanced” tab in the “Performance” block, click the “Options” button.

This will open another window. Switch to the “Advanced” tab, and then click the Change button in the “Virtual Memory” block.

Uncheck the “Automatically select paging file size” checkbox, turn on the “No paging file” radio button, save the settings and reboot. The pagefile.sys file will be deleted.

Removing the MSOcache folder
For users who have installed Microsoft package Office, in the root of the system volume there is hidden folder MSOcache, the weight of which can reach several gigabytes.

This folder is a cache office suite and contains files that may be needed for recovery Microsoft work Office in case of damage. The MSOcache folder is not involved in launching Microsoft Office or working with documents, so it can be deleted in the standard way. Just keep in mind that if Microsoft Office is damaged for some reason, you will have to restore the package installation disk with its distribution.
Compressing the contents of a system volume
You can free up some free space on drive C without deleting anything from it at all. Instead, all system files can be compressed. To do this, just open the properties of drive C, on the “General” tab, check the “Shrink this drive to save space” checkbox and click “OK”.

To compress system files in Windows 10, you can use the function CompactOS by running one of two commands in the CMD console running as administrator:
- compact /CompactOs:query
- compact /CompactOs:always

The second command performs the same actions as the first, but in forced mode. It is used if you really want to compress system volume, and the first command rejects the operation, considering it inappropriate. The compression is completely reversible and to return file system to normal state, just execute the reverse command compact /CompactOs:never.
In addition to NTFS compression, LZX compression is available in Windows 10, but it has a number of disadvantages, which is why it is not widely used. LZX compression is applicable to read-only files and directories, but an entire system volume cannot be compressed with its help due to the risk of an unbootable system.
When working with a computer, a certain number of unnecessary files gradually accumulate on the disks. Many programs create temporary files, but not all delete them when they are finished. Of course, only you can say about most files whether they are needed or not, but in your work, Windows system It itself creates a lot of files that waste disk space. Program Disk Cleanup(Disk Cleanup), also classified as a utility program, is used to remove unnecessary files from the disk. The disk cleanup program can be launched either automatically or manually. Automatic start occurs when there is less free space on the disk than the limit set in the system. In this case, a dialog appears warning about this (Fig. 1). Please note that the less free space remains on the disk, the more often this dialog will appear.
Fig 1.Dialogue warning about low free space
To run disk cleanup where there is little space left, click the button Disk Cleanup(Disk Cleanup) of this dialog. If you want to run the cleaning program yourself, then open the folder My computer(My Computer) in main Windows menu. Right-click on the icon representing the disk you want to clean up and select the command from the secondary menu Properties(Options). In the dialog that appears, click on the shortcut General(General) to select the desired tab. On this tab, click the button Disk Cleanup(Disk Cleanup) to launch the appropriate program. The cleanup program searches the specified drive for files that can be deleted automatically. After viewing the disc, a dialog appears on the screen showing the results of this check (Fig. 2). The list in the center of the dialog shows groups of files that can be deleted and the disk space they occupy.

Fig 2.Disk cleanup settings dialog
During Windows operation There are many files on the disk that are created for temporary purposes. When there is a lot of disk space, the number of these files does not matter of great importance. When disk space runs out, deleting extra files may help in solving the problem.
When viewing a disk, several groups of files are considered to be deleted6
First of all, this is the contents of the folder Basket(Recycle Bin), which is where the files you delete go, since most of the files that go into it are intended for final destruction.
Next comes the folder Temporary Internet Files(Temporary Internet files), containing files that appeared on the computer while using the Internet. These files are needed to quickly re-view Web pages that you have already visited, and nothing bad will happen if they are deleted.
Many programs, during their operation, create temporary files to store some parts of the information being processed. Windows provides a special folder for such files. Sometimes these files are not destroyed when the programs that used them finish running. To delete such files, a special group is provided.
Several other groups of files are also offered for cleaning. To specify the deletion of groups of files, you should select the appropriate dialog boxes.
When you click the OK button of the dialog, the cleaning process will begin.
When asked whether you really want to delete files, you should answer in the affirmative by clicking the Yes button in the dialog that opens.
A dialog will appear with a progress indicator that illustrates the cleaning process (Fig. 3).


Fig3. Disk Cleanup Process
Sometimes deleting unnecessary files does not solve the problem of low disk space. In this case, the system may prompt you to remove some Windows components or installed programs.

You can do the same thing yourself if you select the tab Additionally(More Options) dialog Disk Cleanup(Disk Cleanup) (Fig. 4).

Fig 4. Additional features cleaning
This tab offers you three options for increasing free disk space by deleting some of the files used by the Windows system.
First group
Controls allows you to remove some Windows components that you don't currently use. To remove some Windows components, click Clear(Clean up). The first Windows Component Wizard dialog appears. This dialog presents a list of system components that you can remove. Selecting a list item displays a comment at the bottom of the dialog about what the selected component is, and the disk space occupied by this component is also displayed. To mark a component for removal, check the box next to the corresponding list item. Second group
makes it possible to delete earlier installed programs. Pressing a button Clear(Clean up) in this group of controls will cause a dialog to appear Installing/removing programs(Add/Remove Programs. This dialog also displays currently installed programs in the form of a list. By selecting a program to remove, you will see the disk space it occupies. To remove a program, click the button Delete(Delete). The Uninstall Program Wizard will launch.
As using Windows Temporary files accumulate on the disk system programs, contents of the recycle bin, old OS recovery images and other data. You can delete them.
Right-click in Explorer system disk(usually drive C) and select Properties → Disk Cleanup. In the next window, mark the items that take up the most space, click OK and confirm deletion.
To erase even more temporary files, including update data and outdated restore points, click Disk Cleanup again and click Clean up system files. Mark the largest objects in the list that appears and delete them. Then go to the Advanced tab, click Clean up under System Restore and Shadow Copies and confirm deletion.

It is especially useful to perform such cleaning after updates, since a large backup copy of the previous version of Windows may remain on the computer.


Browsers and other installed programs fill the system with temporary files over time. Sometimes this data can take up a significant amount of storage space. But you can quickly get rid of such garbage with the help free utilities like .

There may be large files on your computer that you don’t need and are just wasting disk space. Searching for them manually is a thankless task. Moreover, there are programs that analyze the disk and display a list of all folders and files on the computer, ordered by size. Use one of them to find and remove unnecessary objects.

Over the years of using a computer, duplicates usually accumulate on it: accidentally copied pictures, songs downloaded several times, and other objects. You don't need these copies, and together they can take up significant storage space. To avoid searching for them yourself, use one of these to find and remove duplicate files.

Windows 10 comes with a built-in Compact OS utility that can make your system smaller. This happens by removing unnecessary OS elements and compressing the remaining data. This way you can free up to 6 GB on the local drive where Windows is installed (usually drive C). If you're interested, back up your important data just in case and use .
Hello, question! How to delete a section on the command line hard drive, for example - (D:)? For some reason I can neither format it nor delete it in« Disk Management", an error appears.
I also wanted to know how to delete hidden hard drive partitions (including system and service ones)!
How to delete any hard drive partition (including system and service) in the command line
Hello friends! If you cannot format or delete any partition of your hard drive, this could be for several reasons:
- The file system on your hard drive is damaged! To fix it, run the command line utility and use it to check the partitions of your hard drive for file system errors. After fixing the errors, try formatting the problematic partition again in the “This PC” window or using free program.
- There are bad sectors (bad blocks) on your hard drive, check your hard drive, it may be faulty and need to be replaced.
- Do you want to delete any system or service partition? The easiest way to do this is in Windows PE (details later in the article) or using .
If Chkdsk does not find any errors, and the Victoria program shows that the hard drive is working, then try deleting the non-deletable partition of the hard drive in the command line, it’s very simple.
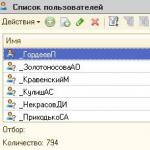
Let's go to Disk Management on my laptop.
For example, let's first delete the non-system partition (M:) size 293 GB and create it again.
Open command prompt as administrator

and enter the commands:
diskpart
sel par 5 (with this command we select the fifth volume (M:) size 293 GB
del par (delete this section)
creat par prim (create a new partition)
format fs=NTFS quick (use quick formatting to the NTFS file system)
assign letter M (assign the drive letter M to the created partition:)
exit

In a running operating system, using this method you can delete almost all partitions on the hard drive except system or service ones (recovery environment, 100 MB hidden partition encrypted (EFI) system partition, and also hidden partition with factory settings), but these partitions can also be deleted in Windows PE or by changing the attributes of the hard drive partition.
How to delete a system or service partition of a hard drive at the command line
For example, let's delete a hidden partition of a 100 MB encrypted (EFI) system partition.
I want to say that you shouldn’t delete these sections “just for fun”, as this promises various problems in the subsequent operation of the operating system, since .

In the initial operating system installation window, press Shift + F10 and the command line opens.

Enter the commands:
diskpart
lis dis (with this command we list all disks and drives connected to a computer or laptop)
sel dis 0 (select the only hard drive)
lis par (list all hard disk partitions)