Wireless router link dir 615 is a convenient “home” router that provides Wi-Fi connection at speeds of up to 300 Mbit/s according to the 802.11b, g and n standard.
Externally, the model is a “classic” stationary router with two external antennas and connectors for cable connection external devices. Among the functional features here we can note a built-in firewall, the ability to work with SIP protocols and support for all wireless communications.
D-Link Dir-615 provides a stable Internet connection when working with providers such as Rostelecom, Dom.ru, MTS, Beeline, etc. The device can also be used to connect to the worldwide network via a dedicated line and Dial-up technology - in this case you will need additional customization modem
d link dir 615: technical specifications
wifi router dir 615 operates in the frequency range 400 ~ 2483.5 MHz.
On the back panel of the device there is one INTERNET port for connecting the Ethernet cable provided by the provider and four LAN connectors for connecting to a router and other stationary devices via a network cable.
Modem dir 615 supports functions and static IP routing.


The router status indicators are located on the front panel of dir 615:
- - separate “standing” power indicator;
- - Internet connection activity indicator (if this LED is not lit, it means that the Internet from the provider is not reaching the router: there may be a line break or a technical failure of the service provider’s equipment);
- - wifi indicator, the green light of which characterizes the ability to connect to the d link dir 615 router wirelessly;
- - four LAN indicators that light up when the corresponding LAN connector is active;
- - WPS indicator, which lights up when activated.
How to connect a d link dir 615 router?
Installation of the d link dir 615 router is carried out according to standard instructions, identical for most network devices.
- 1. First, provide “power” to the device from a standard 220V power supply. To do this, connect the power adapter plug to the round connector on the back panel of the device, and the adapter “plug” to any AC outlet.
- 2. Turn on the router using the ON/OFF button and wait until the router OS loads - the corresponding indicator on the front panel of the device should light up.
If your router has ever been in use, it is recommended to first reset the d link dir 615 settings to factory settings. To do this, you need to press the RESET button recessed into the case with a needle or paperclip, hold it pressed for 10-15 seconds and wait for the device to reboot.
- 3. For the initial setup of d link dir 615, you need a “hard” connection of the router to the computer. For cable connection, you can use the patch cord supplied with the device or a piece of twisted pair, crimped on both sides with RJ 45 connectors. On one side network cable must be connected to any LAN connector on the back of the router, and on the other - to the port network card your desktop computer or laptop.
- 4. To connect d link dir 615, you will also need the appropriate settings for your computer’s network card. Step by step instructions for Windows7 and Windows8 OS is presented in the article, and setting up network parameters on Windows XP is described step by step in the article.
How to configure the d link dir 615 router yourself?
The d link dir 615 router is configured through the device’s web interface, and you can enter the menu from a computer connected to the router through any web browser.
For this purpose in address bar enter the static IP address of the device (in most cases this is the combination 192.168.0.1), which is indicated on the service label of the device.

Press Enter and in the authentication window that appears, enter your login and standard password dir 615.
The default password for the d link dir 615 router is admin and the login is admin. If the settings were changed, and the user subsequently forgot the router password, just reset the device to factory settings and enter the standard password.

At the first stage, you configure the Internet through the d link dir 615 router. To do this, you need to clarify:
- - what type of Internet connection was provided to you by your provider;
- - is it necessary when connecting to global network indicate login/password;
- - what Internet parameters were provided to you by your communication service provider.
These parameters are specified in the agreement with the provider, and they can also be clarified in the provider’s 24-hour support service.
If there is already an automatically generated WAN connection in this window, it is recommended to delete it.

- - for a PPPoE connection, in the PPP subsection that opens, enter your username and password for connecting to the Internet from the agreement with the provider;

- - for a connection of the Static IP address type, you will need to specify the IP address, Network mask, gateway IP address and Primary DNS server (also from your contract);

- - for dynamic IP, in the IP column, uncheck the “Obtain DNS server address automatically” and enter the primary DNS server provided to you.

Wireless router dir 615: wifi setup
Setting up wifi on the d link dir 615 router is carried out in the corresponding menu tab:
In the main router settings window, click the “Wi-Fi” button and go to the “Security Settings” section.

Please note that you should set a complex and unique Wi-Fi password for wireless communication security.
Router dir 615: setting up iptv
To connect iptv on the wireless dir 615 router:
- 1. Connect the TV set-top box to a free LAN port of the device.
- 2. In your personal account, select “Advanced settings” and the “IP television” section.

- 3. Select the appropriate device port in the “Iptv Setup Wizard” and click the “Change” button.

This completes the iptv setup successfully.

To help with remote setup, it is recommended to use an online emulator - http://support.dlink.com/emulators/dir615_revC/310NA/login.htm
By default, Login is Admin, password is empty.
Courier adjusters must change the password in the settings to Serial number indicated on the box (S/N). When reconfiguring, it is also recommended to use S/N (serial number) as a password for the router and wi-fi.
Resetting the router settings is done by pressing and holding the Reset button on the back panel of the router for 10 seconds.
Authorization.
In order to get to the router’s web interface, you need to open your Internet browser and type http://192.168.0.1, User Name in the address bar admin, Password – leave blank(provided that the router has factory settings and its IP has not changed).

Changing the factory password.
Default: Login admin, password is empty.
Courier installers must change the password in the settings to the Serial Number indicated on the box (S/N). When reconfiguring, it is also recommended to use S/N (serial number) as a password for the router and wi-fi.
In the router interface, you need to go to the tab Tools (TOOLS), menu Administration (ADMIN).
In the field Password enter New Password.
In the field VerifyPassword repeat the new password.
Repeat the same operation with the user password

Then click the button SaveSettings.After this, the router will prompt you to re-enter its settings.
SettingsWi-Fi on the router.
In the router interface, you need to select the “ SETUP ", left - " Wireless Settings " Here we press the button “ Manual Wireless Connection Setup ».

Set the parameters:
1. In section "WI-FI PROTECTED SETUP" It is better to uncheck the Enable item, since not all wireless adapters support Wi-Fi technology Protected Setup."
2. Check the box " Enable
Wireless
»; « Always
»
3. In the column " Wireless Network Name
"we write the name for demon wired network.
4. 802.11 Mode – Mixed 802.11n, 802.11n and 802.11b.
5.Security Mode: WPA-Personal
;
6.WPA
Mode: WPA-
Only
;
7. CipherType: AES
;
8.
Pre-
Shared
Key
: here we enter the password to access the wireless network. For password use Serial number indicated on the box (S/N). After all parameters have been entered, press the button “ Save Settings
" On this Wi-Fi setup on D-Link router DIR-615 is finished.

Setting up an Internet connection.
Setting in "" modeBridgeMode".
1. Change the password for the router.
2. Set up Wi-Fi on your router.
3. Tab SETUP, menu Network Setting.
4. Set Wan Port Mode– Bridge Mode.
5. Next, you need to configure your Internet connection produce atPC(manuals for setting up an Internet connection are on the page).
After saving the settings, control of the router will be available via the IP specified in the field RouterIPAddress address (accordingly, on the PC you will need to manually set IP 192.168.0.2, mask 255.255.255.0, gateway 192.168.0.50, in this case).

Setting up an Internet connection in router mode.
Press the button Manual Internet Connection Setup

Setting up in router mode.
1.SettingsPPPoE when automatically obtaining localIP addresses (DHCP).
2. My Internet Connection is: Russian PPPoE (Dual Access)
3.UserName: Your login from the contract
4.Password: Your password from the agreement
5.VerifyPassword: repeat password
6. Press the button Clone MAC Address
7. Connectmodeselect– connection setup mode “ Alwayson» for permanent connection (recommended).
8.MTU – 1472.
9. Save the settings with the button SaveSettings and wait until the router reboots.

Configuring PPtP (VPN) while automatically obtaining a local IP address (DHCP).
1.In the field My Internet Connection is: select Russia PPTP Dual Access.
2. Address Mode - Dynamic IP
3.PPtP Server IP Address– ppp.lan.
4.Username
5.Password
6.Verify Password
7. Meaning MTU – 1372.
8. Click the button
9.ReconnectMode Alwayson
10. Save settings by pressing a key Save Settings

Setting up PPtP (VPN) with a static local IP address.
1. In the field My Internet Connection is: select Russia PPTP Dual Access.
2.AddressMode– Static IP (You can check the values with the provider’s technical support by calling 980-24-00, 24 hours a day). Enter:
3.IP Address— IP Address issued to you by your provider.
4.Subnet Mask– subnet mask.
5.Gateway– gateway.
6.Primary DNS Address– provider’s preferred DNS Server ( 212.1.224.6
).
7.Secondary DNS Address – alternative DNS provider server ( 212.1.244.6
). Save settings by pressing a button Save Settings.
8.PPtP Server IP Address– ppp.lan
9.Username– username for authorization in the provider’s network.
10.Password– password for authorization in the provider’s network.
11.VerifyPassword– repeat the password to log in to the provider’s network.
12. Meaning MTU – 1372.
13. Press the button Clone Your PC's MAC Address.
14.ReconnectMode— connection setup mode. Select " Alwayson» for permanent connection.
15. Save settings by pressing a key Save Settings
NAT when automatically obtaining an IP address (DHCP).
1. In the field My Internet Connection is: select from the list Dynamic IP.
2. Press the button Clone MAC Address.
3. Save the settings by pressing a key Save Settings.

Saving/restoring router settings.
To save the current router settings, you must press the button SaveConfiguration. The settings file will be saved to the specified location on your hard drive.
To restore settings settings from a file, you must click the button Review, specify the path to the settings file, then click the button RestoreConfigurationDefaults.
Attention! Pressing a button RestoreDevice will restore factory settings!
To reboot the router you need to press the button ReboottheDevice.
This is the second most popular router, which is praised throughout Russia. Its advantage is low price, stable operation – both over a wired network and over Wi-Fi. DIR-615 is perfect for both home and small office. It is possible to connect 4 computers or devices via a wired network and up to 15 machines via a wireless one.
The setup is quite simple and does not take much time. The developers tried to make automatic customizable firmware. At the same time, you can do more detailed configuration, which will control data flows on the network. The article will be divided into two parts, in the first we will tell you how to quickly set up the Internet and Wi-Fi.
The second part will be intended for more detailed settings: blocking sites, filtering connected devices, connecting TV and much more.
NOTE! The setup is quite simple, but if you have any difficulties or have questions about this router, write them below in the comments and I will answer them right away.
Appearance
First, let's take a closer look at our beast, find out what indicators and holes it has, and what they are intended for. This is necessary so that in the future you can easily understand what is wrong if the network or Internet is disconnected.
Front
The picture shows the DIR-615S N300 model, but they have approximately the same structure, so you won’t get confused. Let's start with the indicators, arranged from left to right:
- Nutrition:
- Lit means it's on
- Doesn't light - off.
- Wireless WIFI network:
- Off means the network is turned off.
- Lit means it's on.
- Flashing - indicates that there is a connection with another device and data transfer.
- WPS:
- Flashing – wireless network connection using WPS.
- Off – WPS is disabled.
- Internet:
- On - there is a connection.
- Flashing – Traffic is moving in one direction.
- No light - no internet.
- LAN ports 1 to 4, which indicate devices connected via cable:
- Lights up – there is traffic.
- Off – there are problems with the wire or network card, there is no traffic.
These indicators constantly show that the router is operating correctly.
Rear panel

- ON and OFF button
- VDC connector for power.
- Button to enable WPS - an encrypted secure protected network. This function is not needed for home use.
- 1-4 LAN ports, for connecting a computer or other devices via twisted pair cable.
- The yellow connector for the Internet cable of your provider.
Installation
Once we have become familiar with the device from all sides, we can begin installation and connection.
- First, turn on your computer or laptop.
- There should be a network cable in the box, connect one end to the network card of your computer or laptop, and plug the other into one of the 4 LAN ports.
- Take the power supply and connect one end to a special connector in the router, and the plug to a power outlet.
- Press the power button.
How to set up
NOTE! If this router was previously used by someone else, then you need to reset the settings to factory settings. To do this, on the bottom, find a hole with the inscription RESET. Take a needle or paperclip and press into the indentation. Hold this for about 10 seconds until the router stops flashing. After that, proceed to the settings D-Link router DIR 615.
- We launch any browser and enter the IP address of our device in the address bar – 192.168.0.1;
- Now the master will greet you initial setup. Just click "BEGIN".

- Select a language.

- Next you will be asked to enter a new administrator password. Come up with one that you can easily remember or write it down. Do not leave the field empty to avoid hacking your device from the outside. In the Network name (SSID) field, enter the name of the Wi-Fi network.

- The next step gives you the choice of connection. Put it in the field "Connection method" – "Wired connection". That is, the Internet is connected via a wire. A little lower in the field "Operating mode" choose "Router". You can poke around and see what other connection options there are, but this is the most common option.

- After that, click "NEXT".

- You can change the mask and IP of the device, or simply continue working with the old data.
- The next step is setting up the Internet. In the section "Internet connection type" You must indicate all the connection data used by your provider. This information is contained in the agreement with the Internet provider. You can also call the hotline number and clarify the connection details. Depending on the choice in the first field ( PPPoE, IPv6 PPPoE, PPPoE Dual Stack, PPPoE + DynamicIP (PPPoEDualAccess)) there will be settings that need to be entered. There is nothing complicated here and don’t be alarmed, just enter what is specified in the contract in the connection section.
- Click "NEXT."
- Now we set up the wireless network. Enter the name WIFI networks and password. You can immediately set a speed limit for devices that will be connected to Wi-Fi.
- Let's move on.
- The next step is necessary if you want to connect your TV through this Router. If not, then just uncheck the boxes and click next. To configure LAN ports for IPTV/VoIP, select and check the box “A set-top box is connected to the device”. If you are connecting via VLAN, click "Use VLAN ID" and provide the data (the provider has all this information in the contract for this service).

- The next step is setting up IP telephony, if your provider provides this option. Uncheck the boxes and move on or make the settings in the same way as in the previous step.
- You will again be asked to come up with a more complex password for the admin panel.
- Next you will see all the entered data. You can press the button “SAVE FILE WITH SETTINGS” and use them in reset cases.
- Click "APPLY".

- Now you will see a window like this if everything is entered correctly and the Internet is working. If there are any problems, you can check the connection again by clicking on the button “CHECK AGAIN.”
If there is no connection, then the problem may be with the provider. Just call technical support, the number is indicated in the contract. You can also call tech. D-Link support, the number will immediately appear on this page.
Manual setting
If you want to reconfigure the router, you can do this from the main menu.
- Go to settings, then “ WAN".

- Select existing connections and delete them.
- Click the add button and select the connection type from the list.
- Next, carefully enter the connection settings and find out about them from the provider.
Everything is done in approximately the same way as in the previous instructions.
The computer does not connect to the Internet after setup
Perhaps you have the wrong IP address and network mask set in the network card settings. To do this you need to set automatic search and installation of this data. We act according to the instructions.
Windows XP
- Click Start.
- Next "Control Panel", Then "Net" And "Internet connections" and onwards "Network Connections".

- Click right click by connection and select "Property".
- Next in the tab "General» Looking for "Internet Protocol (TCP/IP)", click once with the left mouse button and then on "Properties".

- Check the boxes as in the picture below: "Obtain an IP address automatically" And "Obtain DNS server address automatically".
- Click OK.
Windows 7
- "Start", Then "Control Panel" and click on .
- Selecting the viewing type "By category" in the upper right corner.
- Click on "Network and Sharing Center".
- Next "Changing adapter settings".
- Right click and "Property".
- Choose "Internet Protocol Version 4 (TCP/TPv4)", Then "Property" and check the boxes as in the case of settings in XP.
Configuring VLAN groups
You can configure subnets that will use different LAN ports. To do this:
- In the Dlink menu select "Additionally", and then "VLAN".
- Next, click on lan.
- Select the ports that you want to put in a separate group and uncheck them.
- Now we create a new VLAN using the ADD button.
- Fill in the values.
- We apply the setting and now the network is divided into two, due to the ports.
Setting the speed of Delink ports
In the menu click "Additionally", and then "Port Settings". You will see a list of active and disabled ports. By clicking on each, you can reduce the speed and also set the duplex mode. This is necessary if the router is used by several computers that constantly use traffic.
Remote access
Great opportunity for system administrators, manage and change settings in the router.
- To do this, in the tab "Additionally" choose "Remote access".
- Next, click "Add".
- In the first field, select the IP protocol that will be used by the remote computer.
- If you enable “Open access from any external host”, then the router can be accessed from any computer on the Internet. If you remove the value, you need to enter the IPv4 address or IPv6 address, as well as the network mask of the connected machine from which external control will be carried out.
- Also indicate the port for the router through which the connection will be made, as well as the protocol. The standard is HTTP.
- Click "SAVE".
Filtering by MAC addresses
This will prevent careless freeloaders from connecting to the network, even if they know the password. Filters are set by MAC address.
- Let's go to "Firewall" and click on MAC filter.
- Click "ADD" to create a new rule.
- If we put "Prohibit", then this computer will not have access to the router’s network. If we put "Allow", then the user with this MAC address will have access to the Internet from the network.
- Enter the MAC device and click "SAVE".
Parental Controls
If your child likes to climb harmful sites, clogging his young head with prohibited information, then you can set a rule that will prohibit visiting the URL.
- In the menu go to "Firewall".
- Next is the URL filter.
- Move the switch to enable the filtering rule.
- In the filters section, enter the addresses that will be banned in the format: www.plohoysayt.ru or plohoysayt.ru.
- Now these sites will be blocked.
- You can block all sites except certain ones. This is useful for the office when workers work in a certain range of sites.
Update and flashing
- Updating the router firmware is easy. In the section "System" we find "Software update".

- Check the box "Automatically check for updates".
- Or just click "Check for update".
- We wait for a while and as soon as everything is ready, click "APPLY SETTINGS".
You can also do manual update, if there are problems with auto search.
- Download the firmware from the official website - http://www.dlink.ru
- In the same section in the left window "Local update".
- Select the file, upload it and click "UPDATE SOFTWARE".
Specifications
| Microprocessor | RTL8196D @ 390 MHz |
| Allowed Internet connections | PPTP/L2TP - static and dynamic |
| PPPoE - static and dynamic | |
| IPv6 PPPoE | |
| Stat. and dynam. IPv4 | |
| Stat. and dynam. IPv6 | |
| Internal memory | 32 MB |
| Functionality and support | RTSP |
| UPnP IGD | |
| DHCP | |
| DNS relay | |
| Dynamic DNS | |
| VLAN | |
| SIP ALG | |
| Internet port | WAN 10/100BASE-TX |
| Application | UDPXY |
| Filtration | IP |
| IPv6 | |
| 4 network ports | LAN 10/100BASE-TX |
| 2 Antennas | 5dBi gain |
| Nutrition | 12V DC 0.5A |
| Frequency Range | 2400 - 2483.5 MHz |
| Data transfer rate | Up to 300 Mbps via IEEE 802.11n technology |
Before we start setting up the router, let's check the local network connection settings. To do this:
Windows 7
1. Click on " Start", "Control Panel".
2. Click on " View network status and tasks".

3. Click on " Changing adapter settings".
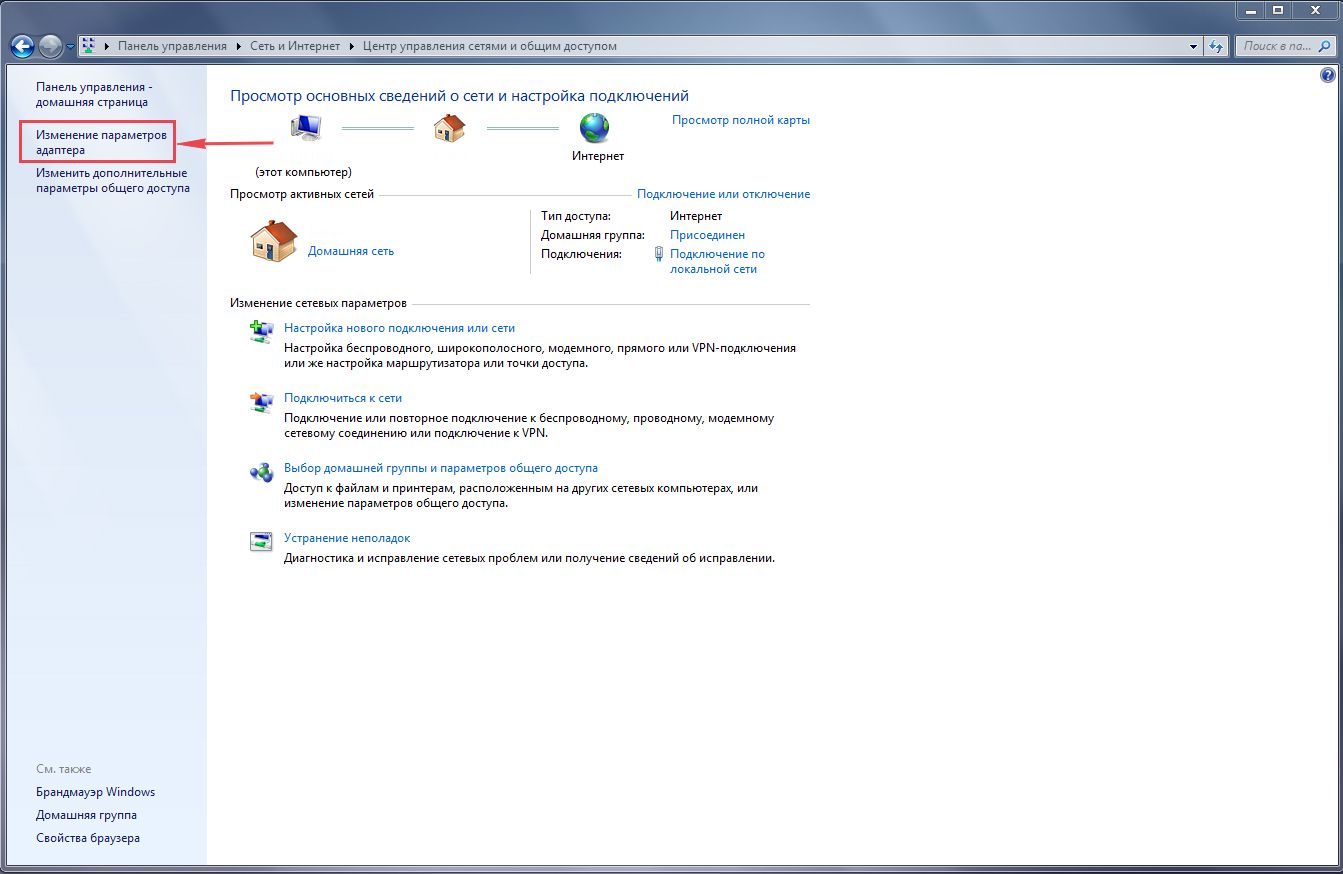
4. Local network connectionProperty".

5. From the list select " Internet Protocol Version 4 (TCP/IPv4)" and press " Property".

6. " and "", then press the " button Ok".

Windows 10
1. Click on " Start", "Options".

2. Click on " Network and Internet".

3. Select " Ethernet" and click on " Configuring adapter settings".

4. In the window that opens we see " Ethernet". Right-click on it and select " Property".

5. From the list select " IP version 4 (TCP/IPv4)" and press " Property".

6. In the window that opens, you need to check the box " Obtain an IP address automatically" And " Obtain DNS server address automatically", then press the button " Ok".

Connecting a router D-Link DIR-615 to the computer
The next step is to connect the router D-Link DIR-615 to your laptop or Personal computer. To do this, you need to connect the cable that your provider provided to you to the router port where it is signed "INTERNET", in older models this port is signed as "WAN". Connect the cable that came with the router at one end to your laptop or computer, and connect the other end to one of the four ports, which are marked in black on the router (the colors of the ports may differ depending on the version of the router). And yes, don't forget to connect the power cable.

Authorization of the D-Link DIR-615 router
So, we connected the router, now you need to use any browser (be it Google Chrome, Mozilla Firefox, Internet Explorer, etc.) get into its web interface. To do this, open the browser and enter the router address in the address bar: 192.168.0.1
- Username - admin
- Password - admin
So, enter the data and press " Enter"

Setting up the router D-Link DIR-615.
And finally we got to the router’s Web interface and now you need to configure the equipment. First of all, let's secure the wireless network by setting a password for wi-fi. Then you will need to find out what type of connection is used to access the Internet, is it PPTP, L2TP or PPPOE. You can find out by calling your provider (this is the organization with which you entered into an agreement to provide Internet services). So, let's start setting up the router. First, let's change the language of the Web interface to Russian. To do this, move the mouse cursor over the word " English"and choose" Russian"

Setting up a Wi-Fi password on a router D-Link DIR-615.
1.
In the web interface menu, select " WiFi"and we get into" Basic settings"
2.
Let's check" Turn on wireless connection
" And " Broadcast wireless network", must be checked.
3.
Below in the line " SSID:“Create and specify a name for your wireless network; this name will be displayed in the future when you connect to the network.
4.
"Country" - "Russian Federation", "Channel" - "auto", "Wireless mode
" - "802.11 B/G/N mixed".
5.
Click " Apply".

6.
In the menu " WiFi"choose" Security Settings".
7.
In the line " Network authentication:"choose" WPA2-PSK".
8.
In the line " PSK encryption key:“You need to come up with and enter a password for the wireless network that we created above.
9.
Click " Apply".


Setting up PPTP on the router D-Link DIR-615.
1.
Net"go to settings" WAN".
2.
Click " Add".

3.
At point " Connection type:"choose" PPTP+Dynamic IP".
4.
Place a check mark next to " Connect automatically".
5.
Username:"), password (in line " Password:Password confirmation:VPN server address:").
6.
Apply".

Setting up PPTP with a static IP address on the router D-Link DIR-615.
PPTP with static IP address on the router D-Link DIR-615
1.
In the web interface menu, select " Net"go to settings" WAN".
2.
Click " Add".
3.
At point " Connection type:"choose" PPTP+Static IP".
4.
Below in the section " IPIP address:", subnet mask in line " Network mask:", default gateway in line " Gateway IP address:" and DNS in the line " Primary DNS server:".
5.
Place a check mark next to " Connect automatically".
6.
Below we enter the Username (in the line " Username:"), password (in line " Password:"), confirm the password (in the line " Password confirmation:") and indicate the server address (in the line " VPN server address:").
All of the above data is provided to you by the provider (the organization that provided you with the Internet).
All this data is usually specified in the contract with the provider. If for some reason you could not find them, you need to call hotline Your provider and find out how you can get them.
7.
After all manipulations with the settings, press the button " Apply".

Setting up L2TP on the router D-Link DIR-615.
1.
In the web interface menu, select " Net"go to settings" WAN".
2.
Click " Add".
3.
At point " Connection type:"choose" L2TP+Dynamic IP".
4.
Place a check mark next to " Connect automatically".
5.
Below we enter the Username (in the line " Username:"), password (in line " Password:"), confirm the password (in the line " Password confirmation:") and indicate the server address (in the line " VPN server address:").
All of the above data is provided to you by the provider (the organization that provided you with the Internet).
All this data is usually specified in the contract with the provider. If for some reason you could not find them, you need to call your provider's hotline and find out how you can get them.
6.
After all manipulations with the settings, press the button " Apply".

Setting up L2TP with a static IP address on the router D-Link DIR-615.
Let's look at the connection setup L2TP with static IP address on the router D-Link DIR-615. Typically a static IP address is provided legal entities, or as additional service to the basic tariff for individuals.
1.
In the web interface menu, select " Net"go to settings" WAN".
2.
Click " Add".
3.
At point " Connection type:"choose" L2TP+Static IP".
4.
Below in the section " IP"specify the IP address in the line" IP address:", subnet mask in line " Network mask:", default gateway in line " Gateway IP address:" and DNS in the line " Primary DNS server:".
5.
Place a check mark next to " Connect automatically".
6.
Below we enter the Username (in the line " Username:"), password (in line " Password:"), confirm the password (in the line " Password confirmation:") and indicate the server address (in the line " VPN server address:").
All of the above data is provided to you by the provider (the organization that provided you with the Internet).
All this data is usually specified in the contract with the provider. If for some reason you could not find them, you need to call your provider's hotline and find out how you can get them.
7.
After all manipulations with the settings, press the button " Apply".

Setting up PPPOE on the router D-Link DIR-615.
1.
In the web interface menu, select " Net"go to settings" WAN".
2.
Click " Add".
3.
At point " Connection type:"choose" PPPOE+Dynamic IP".
4.
Below we enter the Username (in the line " Username:"), password (in line " Password:Password confirmation:").
All of the above data is provided to you by the provider (the organization that provided you with the Internet).
All this data is usually specified in the contract with the provider. If for some reason you could not find them, you need to call your provider's hotline and find out how you can get them.
5.
After all manipulations with the settings, press the button " Apply".

Setting up PPPOE with a static IP address on the router D-Link DIR-615.
Let's look at the connection setup PPPOE with static IP address on the router D-Link DIR-615. Typically, a static IP address is provided to legal entities, or as an additional service to the basic tariff to individuals.
1.
In the web interface menu, select " Net"go to settings" WAN".
2.
Click " Add".
3.
At point " Connection type:"choose" PPPOE+Static IP".
4.
Below in the section " IP"specify the IP address in the line" IP address:", subnet mask in line " Network mask:", default gateway in line " Gateway IP address:" and DNS in the line " Primary DNS server:".
5.
Below we enter the Username (in the line " Username:"), password (in line " Password:") and confirm the password (in the line " Password confirmation:").
All of the above data is provided to you by the provider (the organization that provided you with the Internet).
All this data is usually specified in the contract with the provider. If for some reason you could not find them, you need to call your provider's hotline and find out how you can get them.
6.
After all manipulations with the settings, press the button " Apply".

Connecting a computer to wi-fi
After connecting and setting up the router, you need to connect the computer to a wireless network (wi-fi), consider connecting to wi-fi in two operating systems, these are Windows 7 and Windows 10:
Windows 7
Video instructions
1.

2. Sultan

3.
Connect automatically" and press
"Connection".

4. You must specify " Security keyOK".

5.

Windows 10
Video instructions
1. In the lower right corner of the desktop, find the wireless network (wi-fi) icon and click on it with the left mouse button.

2. A window pops up with a list of available wireless networks. Select a wireless network, in my case it is the network " Sultanova"(You select the network whose name was given at ).

3. After selecting the network, check the box next to " Connect automatically" and click " Connect".

4. You must specify " Security key"This is the wireless network password that you specified when . After you have specified the key, click " Next".

5. We wait perhaps a couple of seconds and you are connected to your wireless network.


