In order to independently, without any practical knowledge, assemble and install a set of satellite television at home, you need to follow a certain step-by-step sequence of work.
Consider the main points that you should pay special attention to when assembling the plate, wiring diagrams, and also focus on common mistakes performed by inexperienced installers.
Mounting materials
Let's start with necessary materials. For assembly you will need:


Without them, if you have several heads, you will get such a Christmas tree. 


It will be required if you want to simultaneously connect several TVs from one dish.
Converters
To begin with, it is worth considering the converters themselves in more detail. 
They differ in polarization. There are models:
- with linear polarization (vertical and horizontal)
- circular polarized
With circular, they are used to receive Tricolor TV and NTV + channels from a satellite of 36 degrees. To receive MTS and Telecard, you will need a Ku band with linear polarization. 
You can tell them apart by their markings. On the left in the figure is circular, on the right is linear. 
They can also have a different number of outputs:


The converter itself consists of three main elements:
- irradiator
- waveguide
- the electronic unit
 Under the cover of the irradiator, you can see a dielectric plate. Its presence indicates that this is a circular polarization converter.
That is, it can be used to receive Tricolor and NTV Plus channels. To turn such a converter into a linear one, to search for other satellites, it is enough to pull out and remove the plate. 
By the way, the loss or deterioration of the signal can sometimes be associated with damage to this record. Due to temperature fluctuations in the street, it gradually collapses and crumbles.
Special converters for multiswitches have 4 outputs.
However, they are not all equal. One with vertical, the other with horizontal polarization. Plus two subranges - upper and lower. This is important when connecting cables via a multiswitch.
Multiswitch connection diagrams
The multiswitch itself must be selected depending on the number of cables and TVs in your home. The wiring diagrams for the most popular satellites are as follows:


If you also have a regular TV antenna, then the multiswitch must have a TerrTV input. 
Scheme of connection via the multiswitch of the ABS-2A satellite for receiving a package of channels from MTS: 
Keep in mind, when using a multiswitch, dysik = Diseqc is no longer needed.
Assembly satellite dish
From the assembly tool, a pair of open-end wrenches for 10 and 13 is usually enough, plus a Phillips screwdriver. For fastening to the wall, you will need a puncher and anchor bolts. 
When you have decided on the package, first of all, you need to correctly assemble the plate itself. There are several nuances here.
For example, when assembling the traverse, please note that the transverse bar, which is attached to the plate mirror itself, should be superimposed exactly on top of it. 
If you screw it on the other side, and this is physically possible, then:
- firstly, you will have poor hole alignment
- secondly, the opposite end of the traverse, where the heads cling, will go out of focus
As a result, it will initially be difficult to catch at least some signal. In addition, the mount that goes to the bracket, when setting up satellites above the horizon (relative to your geographical location), should cling with the adjustable part down. 
And for satellites below the horizon - on the contrary, the adjustable part is up. 
Since in this case, you will no longer need to raise, but lower the mirror.
How to collect multifeed
The assembly of a multifeed is also associated with some features. In a collapsible kit, initially there are two unequal "ears". One is more, the other is less.
A small one is put on a tube assembled with plastic. 
A large one is attached to the central traverse. In this case, both ears can be positioned relative to each other in two different ways.
On the same level or in different planes. Most installers are located in the same plane. 
Although if you do the opposite, it will make it easier to perform the most initial setup satellite dish and save time when searching for additional side satellites. 
The assembled heads will be on different levels, one above, one below. 
Actually, as the satellites themselves fly along the horizon. 
But this is of course true if your converters catch three different satellites. When two heads catch one satellite, for example Eutelsat 36E, but with different software packages, then place them in the same plane.
But the third head, mount as described above. The gap between the converters also depends on the diameter of the mirror. The smaller its size, the closer the heads will be located relative to each other. 
After the bar is screwed, try to set the head at least by eye so that the central axis of the plastic (where the two halves of the casting meet), and this very attachment to the traverse, are at an angle of 90 degrees. Further, everything will be regulated relative to this initial position. 
The order of alternation of multifeeds also matters. The first and closest to the dish should be the multifeed, the position of the satellite of which is closer to your place of residence. 
For example, if you live above 40 degrees, then Eutelsat 36.0E should go on your plate first, then Hotbird 13E, and the last Astra 5.0E. The same is true for other satellites.
After fixing the dish on the wall or roof, run coaxial cables from this place to the tuner or switch. 
You sign each end from which head it comes from. 
If you have a dysec, there will be only one output cable.
F connector connection
To connect coaxial cables, they need to be stripped and put on F-connectors. This can be done in two ways.
1st method - cut off with a knife only the outer sheath of the cable at a distance of 20-25mm. The screen cannot be damaged. 
All the wires are carefully bent onto the shell. 
Now you need to remove the insulation from the central core. It should protrude from the screen by a maximum of 2mm. 
After that, screw on the F connector. 
Shorten the excess stock of the central core, leaving no more than 5 mm from the connector plane. 
The 2nd way is easier. Again, take a clerical knife. Step back about 1 cm from the edge of the cable and cut off all the insulation. Including external and internal, up to the central core. 
Then, stepping back 3mm, cut off only the outer braid. 
Make sure that no fibers or wires get between the braid and the central core. 
There is no need to remove the insulation and bend anything. Just insert and screw on the f connector from above.
Next, you do the cabling around the apartment in all the rooms where you have TVs. You also sign all of them. 
At the same time, it is much more reliable to run the cable directly into the device, and not connect it through a satellite TV outlet. This can be associated with both a loss of quality and a general loss of the signal. 
The wiring diagram when using a multiswitch may look like this: 
Connecting Diseqc
If there is only a daisik, the connection and configuration of satellites is carried out in the following sequence. 
Remember that any self-respecting store of satellite equipment and similar systems, always sells tuners already flashed for certain channels and satellites. Otherwise, competitors will simply survive from the market.
At the same time, when buying, be sure to ask the seller to write you the ports of the Diseqc switch, since they were set by him during the settings. It is through these ports that you will have to make all cable connections. 
When mounting, you first connect the cables to the heads, and then run them to the dysik. Just the same on it, it is advisable to connect everything initially with the “factory” tuner settings. 
If you have any satellite in the receiver configured on the first port, accordingly, do not let it go to port number 1. If on the second, then port No. 2 is also used in the switch, etc.
All input ports are always signed. The central single connector is the output to the tuner itself. 
Search for satellite and channels
Setting up and searching for a satellite can be done without sophisticated devices using the receiver itself. 
True, you will have to drag the tuner itself + some small TV to the roof.
Unless, of course, you will install a motor suspension. 
Another setup is done by two people. One person on the roof is moving the plate, the other cell phone controls the TV signal at home.
If you are not satisfied with either one or the second option, you can buy a cheap portable device from the Chinese for tuning and analyzing a satellite signal - or here. 
Then the setup will not be difficult at all. By the way, it will come in handy in the future if, after a strong wind, your signal worsens or you want to add a satellite over time, or maybe even change heads. Set up satellites with MTS and Tricolor, instead of Amos, Astra, etc. 
Start tuning from the center head. Initially, set the plate with a slight rise to the horizon. In order to orient in the direction, look at the nearest neighbors.
In our time, you will clearly not be a pioneer, and finding a pair of three tuned cymbals will not be difficult. Sometimes there are so many of them that they interfere with each other. 
In extreme cases, you can use the programs on smartphones - Satellite Director or SatFinder.
Install the program, run it and start turning the smartphone in different directions in search of the desired satellite. The coordinates of most of them are already loaded into the program and you don’t need to look for anything. 
An icon marked with a circle or a cross will show the correct direction for the satellite dish. Check it out for him. 
Turn on the tuner, select a satellite from the central converter and look for at least some signal from this head. The search is performed by raising, lowering and turning the antenna itself. 
The signal quality is indicated as a percentage scale and is located at the bottom of the screen. You need to achieve the maximum possible value. 
To do this, very, very slowly begin to turn the plate in different directions. The mirror itself cannot be closed at the same time.
If there is no signal, or if it is of very poor quality, the dish will lower slightly. Further, the process of reversal to the sides is repeated. As soon as a good quality signal is caught in height, the dish is preliminarily fixed vertically. 
After that, again, you can twist it around to the right and left to find the highest possible quality. There will never be 100%, just look for the highest possible figure - 68-75%, etc. 
Having found the best position, finally clamp the rotary mechanism to the right and left. Just do not immediately completely tighten one bolt at a time, otherwise the plate will be taken to the side by a couple of degrees. Tighten the nuts evenly, as on the wheels of a car or engine head. 
When the corners are all set, it is necessary to again adjust the entire structure in height. After loosening the fasteners, you begin to raise or lower it vertically, all the while controlling the signal.
Remember that the maximum is always searched for by dropping down.
What is it for and what does it give? In the process of long-term operation under the weight of snow, wind, rain, the dish will still go down a little, worsening the signal. 
You also need to expose it as if in a stretch. This will keep the signal quality for a long time.
Keep in mind that the plate must initially be fixed to the wall or roof exactly in level. 
If this is not observed, then having found the maximum of the signal horizontally, you will start looking for max vertically. And in the process of doing this, the horizontal position will go away. You will have to adjust the horizontal-vertical several times.
Then proceed to the next stage of setup - scrolling around its axis of the central converter clockwise or counterclockwise. Here you can also achieve a signal improvement of several percent. 
Thus, you have set up the cymbal itself and the central head. Let's move on to setting up side converters from other satellites.
Switch the tuner to the next satellite and call its information line. Thanks to the multifeed, the converter of this satellite can also be rotated up and down, zoomed in or out of the dish. 
As well as with the middle head, first look for the maximum on the vertical, and then move the side converter closer or further away from the center one. At the end of the settings, rotate it around the axis. 
When tuning satellites from the side converters, pay close attention to where you stand in relation to the dish. On the side heads, the signal from the satellite enters the center of the mirror and, as in billiards, is reflected on the converter.
So, in order not to block this signal with your body, you should be located on the nearest side of the adjustable head, and not on the opposite side.

After searching and setting up a satellite from all three converters, the process can be considered completed. Hide and seal the daisy from rain and precipitation, and securely fasten the satellite cables with cable ties so that they do not dangle in the wind.
Installation and connection errors
1 Incorrect crosshead assemblyAt the very beginning, make no mistake with the fasteners of the traverse to accommodate the converters. It should be installed under the bracket, not on top of it. 
Otherwise, there will be big problems with finding a signal even on the central head. It will be the wrong focus that will be to blame.
2 Using feed-through sockets Pass-through sockets are the first enemy of satellite TV. From such devices, there may not be a signal at all.
Therefore, only terminal ones can be used. Often they are paired with television. 
They can only be used for analog television. Satellite TV should not have any splitters. The fact is that the broadcast of channels usually occurs on two polarizations. 
And the splitter is not able to simultaneously pass them through itself. As a result, some channels on some TV will simply be absent.
4 Large number of connectionsAny connection is a loss of signal quality, including seemingly convenient sockets. 
Make sure that there are no connections in places of high humidity - attics. In bad weather, the signal will generally disappear because of this.
5 Cheap cable Do not buy a Chinese cable of dubious production. Almost half of the level of the signal that comes from the dish to the receiver can depend on the quality of the cable.
Never wrap a dysek in a plastic bag. Even if this saves you from direct raindrops, condensation will still form inside over time. 
And it is he who will cause the failure of the switch, which necessarily requires ventilation and communication with air. The easiest and cheapest option is empty plastic bottle also doesn't help much.
Therefore, it is best to place a waterproof box next to the plate and install the switch in it. 
 Also, do not tape the F connectors. Such insulation does not help much against rust, and only worsens the situation, since sooner or later moisture still penetrates under the electrical tape.
And instead of gradually evaporating or rolling off the surface of the connector, it lingers on it and accelerates the corrosion process several times. Also remember to put an insulating cap on the free Diseqc port.
In our online store you can purchase a complete set for watching satellite television NTV + Vostok with an antenna. The kit includes everything you need to install the antenna. The kit consists of satellite receiver NTV+, access cards with a contract, a high-quality Supral satellite dish with a diameter of 0.6 m, with a wall bracket, a NTV+ circular polarization converter, a good cable 15 m long, two F connectors.
An antenna tuner is supplied free of charge with the kit. With this device and detailed instructions, you can independently, without the help of an installer, set up an NTV + dish on the Express AT1 satellite.
Important note: satellite dish NTV + Far East must be equipped with .
How to set up a satellite dish NTV + Vostok
The antenna is tuned to the Express AT1 satellite located at position 56 gr. o.d.
First you need to choose the location of the antenna and determine at least an approximate direction to the satellite.
Where to direct the antenna, or what direction to set horizontally?
For settlements, located west of 56 ° E. the satellite will be in the southeast (and if you live exactly on the 56th parallel, then the satellite is exactly in the south for you). If you live east of 56 ° E, then the satellite for you will be in the southwest.

For example, you live in Izhevsk. The city is located exactly on the 56th parallel. This means that the NTV + Vostok satellite (Express AT1) will be in Izhevsk exactly in the south. That is, in azimuth (horizontal) we turn the antenna to the south.
In Novosibirsk, which is located at 83°E, the NTV + Vostok antenna installation site is located to the east of the position where the satellite is located (56°). So you need to turn the antenna to the west about 83° - 56°= 27°.
Kyzyl, for example, is located at 94° east longitude. So you need to turn the antenna to the west by 94 ° - 56 ° = 38 °.
It is by this principle that we calculate the angle of rotation of the antenna in azimuth. It is clear that it is almost impossible to calculate the direction of the antenna to the satellite absolutely accurately without special instruments and calculations. But in this way we narrow the horizontal search sector to 5-10 degrees. And this will greatly simplify the process of tuning the antenna to the NTV + Vostok satellite.
If you have internet, then finding out the direction of the antenna is even easier. To do this, go to the site NTV + Coverage area, in the line "Search by address" enter the name of your locality and you will immediately receive detailed information indicating the required antenna size and direction to the satellite. For example, I live in Kyzyl. I enter the name of the city and get the necessary information:

If desired, by zooming in, you can with great accuracy, sometimes right up to the house, find out the direction of the antenna to the satellite. We increase the scale, move the pointer to the address we need and get a picture with the direction to the satellite. Very comfortably.

In the case of small settlements, the card will not be able to give a picture with an accuracy up to the house, but you can still get a completely acceptable result. For example, for a small Tanzybey

Also, here you can switch to satellite mode and get an image on which you can quite accurately assess the presence of obstacles interfering with NTV + reception.

When choosing a place to install the antenna, it is important that no obstacles block the signal from the satellite. Since the exact position of the satellite in the sky cannot be established without special calculations, it is better to choose a place to install the antenna, where there are no obstacles in the place of the intended direction to the satellite, or their height is not much higher than the height of the antenna installation site.

How to determine how much to tilt the antenna?
Again, without going into exact calculations, one should adhere to the following principle: the farther the antenna installation site is from the 56th parallel, the more the antenna must be tilted forward. To begin with, you can set the antenna a little higher than the vertical (so that it looks up a little), and then, as you scan, as indicated in the figure below, tilt the antenna until a signal appears.

Antenna tuning to the NTV + Vostok satellite (Express AT1) using a Rexant satmeter
The Rexant antenna alignment tool, despite its simplicity, will provide you with fast and accurate satellite alignment.

The satmeter has an arrow scale of the signal level, and an audible buzzer. When approaching the satellite, the arrow begins to deviate to the right, and the buzzer changes to a higher tone. That is, you can tune the antenna even without looking at the device, focusing only on the sound. This is very convenient in difficult conditions, either at night or in bad weather (you can wrap the device in a plastic bag and tune only by sound). The sensitivity control is used to reduce or increase the sensitivity of the device. How to use it will be written below.
To tune the antenna, the device is connected to a cable break. The Satellite input is connected to the converter, and the Receiver input is connected to the receiver.

The satmeter should be connected near the antenna. For example, it is very convenient to do so.

And the hands are free and the readings of the device are clearly visible.
If you purchased from us, then all receivers are either already programmed with a test list of channels, or they have a list of transponders on which you can tune the antenna.
Having connected the satmeter to the converter and the receiver, you should turn on the receiver in the network. After loading the receiver, the receiver will display a message on the TV screen about the absence of a signal, and the backlight will turn on on the satmeter scale, which means that power is being supplied to it. It is possible that the buzzer will make a faint, hoarse sound. Now you can start tuning the antenna.
Having established the approximate position of the antenna horizontally and vertically, we slightly tighten the nuts for fixing the antenna suspension, so that turning left-right and tilting up and down is given with little effort, we begin to smoothly turn the antenna left-right by 15-20 gr. around the average. Before starting the adjustment, use the satmeter sensitivity regulator to set the arrow approximately in the middle of the scale, or slightly to the left.
During the rotation of the antenna, we follow the arrow of the device and the change in the tone of the sound. An indication of the approach to the satellite will be the deviation of the arrow of the satmeter to the right and the increase in the tone of the sound signal.
If the arrow of the satmeter deviated to the very last division, you should slightly reduce the sensitivity of the device with the adjustment knob so that the arrow moves away from the right edge and continue to adjust the antenna to the maximum position of the arrow. Further, again slightly reduce the sensitivity and repeat the procedure.
In this way, you can very accurately tune the antenna to the satellite.
If during the first pass the signal is not detected, slightly (by 2 - 3 degrees) we tilt the antenna forward and scan this sector again. And so on, until a signal appears. Perhaps, if you do not have the proper experience in tuning antennas, this procedure will have to be repeated more than once - scan the sector by gradually tilting the antenna down, then up.
Important. Processing by a receiving device (satellite meter, receiver) of a satellite signal, in contrast to the on-air signal, does not occur instantly, but with some delay (fractions of a second) in time. That's why turn the antenna slowly and keep an eye on the instrument readings all the time.

After setting the antenna to the maximum level, tighten the antenna mounting nuts. It should be tightened carefully, crosswise, all the time observing the signal level on the satmeter, since when the nuts are tightened, the position of the antenna may change.
This completes the antenna tuning process. We disconnect the satmeter, connect the receiver directly to the antenna, activate the contract and you can start watching NTV + Vostok satellite television channels.
When setting up the antenna according to the dial gauge, it may happen that you set the antenna to the maximum signal level, and the receiver still displays a message about the absence of a signal. This can happen if you have tuned the antenna to another satellite. And since the receiver already comes with a programmed list of channels, it is obvious that it cannot see the channels of another satellite. Therefore, the presence of a preset list of channels will help to avoid such an error. If, having achieved the maximum reading of the instrument readings and deciding that you have tuned the antenna to the desired satellite, you see a message on the receiver about the absence of a signal, then the setting was not made to the desired satellite and you should continue the procedure.
Video instruction for setting up an NTV + antenna using a pointer satmeter
There are TV models that are equipped with a built-in receiver. Their benefits can hardly be overestimated. Firstly, there is no need to buy a receiver. Secondly, you do not need to use an HDMI to HDMI cable. Thirdly, you can switch channels and use other functions with the TV remote control.
The only caveat is to watch satellite channels paid operators connection, the digital tuner must support the DVB-S2 standard.
Of course, you can't do without a correctly tuned satellite dish.. Most TV models can easily scan TV channels in any mode. They can provide signal reception from 4 satellites. But even after correct setting antenna on the TV screen, the familiar inscription "Code Channel" will appear on the TV screen. In order to fully view the TV channels of any company, you need a decoding device, that is, an access card.
How to set up your Samsung TV to receive satellite TV
1. We do not need factory settings, so we reset them. We go in the menu, select the section "Support", go to "Self-diagnosis", click on "Reset" and confirm the selection with the OK button.
2. After the reboot, we again go to the menu. Here it is necessary select the "Channel" section, go to "Antenna" and then "Satellite". Select "System" and enter the password (on all TV models of any manufacturer - this is 0000). It is necessary to remove the marks from each satellite (if this fails, we pull out the CAM module from the slot and reset the TV again).
3. AT Select satellite EutelsatW4 36E, transponder 12130 R, lower gen. LNB - 0, upper - 10750. Click "Manual settings", transponder 12130 R, click on "Network search" and confirm the choice. When the channel search process is completed, save the found. If you wish, you can sort the TV channels.
4. In the absence of the EutelsatW4 36E satellite, proceed as follows. We stop the choice on "User sat 1". Next, create your own satellite and save. Please note that "LNB power" must not be turned off.
We go to LNB and select the following characteristics:
DISEqC - off, lower gen. LNB - 10750, Upper gen. LNB - 10750Tone 22KHz. - Auto.
Next, go to the "Settings" section, from it - to "Manual Setup", we begin to scan the newly discovered satellite. The "Transponders" section is left blank. Select "Create". It is necessary to enter transponder frequencies, flow rate, polarization type for all TV channel packages.
5. When the network name appears on the device screen (in our case, ""), you must click on "Search" and confirm your choice by clicking on the "OK" button. The procedure is repeated over and over for each individual transponder.
How to set up LG TVs to receive satellite TV
1. We connect the antenna cable to the connector on the SATTELITE device. We insert the DVB-CI + CAM module. Please note that the numbers on the module must be from your side. We take the remote control and press "SETTINGS". You will automatically be taken to the main menu. From here you need to go to the "Channels" item. Click "OK".
2. A window will pop up in front of you. Select "Program mode" and confirm with the "OK" button. A list will appear in front of you. It is necessary to put a checkmark in front of "Satellite", select the inscription "OK" and press "OK" on the remote control.
3. We do not need an automatic search for TV channels, so we refuse it. In the "Channels" window, select "Satellite settings", confirm the choice.
4. After opening the window, go to the "Satellite" field. You will see a list of satellites. We stop the choice on "EUTELSAT 36 A / B 36.0 E", click OK.
5.
We return to the "Satellite Settings" and specify the following parameters:
LNB frequency: 9750/10600 for 2-band LNBs and for 1-band - 10750.
6. Power on the LNB.
7. We return to the "Channels" and begin manual tuning.“Digital satellite TV” should appear on the screen of the device. We need the "Transponder" field. In it, click "Add" and enter the parameters. xxxx frequency. Polarization Right xxxx, Char. Speed (kS/s) 27500. DVBS2 transmission. We confirm "OK".
8. After the active entry appears, click OK. Next, add the following transponders.
Other TV models are configured similarly.
To configure the reception of the Tricolor TV satellite signal, you need to use the following transponder parameters:
|
frequency |
polarization |
standard | modulation |
symbol speed |
correction mistakes |
It is necessary to configure each transponder out of 14 separately. But, if the operator's network was identified and defined as Tricolor or NTV-plus during the initial input of the first transponder, then you can set automatic search, while all the transponders of the Tricolor or NTV-plus operator will be determined and configured.
To configure the reception of the NTV-PLUS satellite signal, you need to use the following transponder parameters:
For the West region (Eutelsat 36A/36B (W4/W7) satellites):
|
frequency |
polarization |
standard | modulation |
symbol speed |
correction mistakes |
| R(V) | |||||
| R(V) | |||||
| R(V) | |||||
| R(V) | |||||
| R(V) | |||||
| R(V) | |||||
| L(H) | |||||
| R(V) | |||||
| L(H) | |||||
| R(V) | |||||
| R(V) | |||||
| R(V) | |||||
| R(V) | |||||
| L(H) | |||||
| R(V) | |||||
| R(V) | |||||
| L(H) | |||||
| L(H) | |||||
| R(V) | |||||
| R(V) | |||||
| L(H) | |||||
| R(V) |
For the East region (DirecTV-1R/Bonum-1 satellites):
|
frequency |
polarization |
standard | modulation |
symbol speed |
correction mistakes |
| R(V) | |||||
| R(V) | |||||
| R(V) | |||||
| R(V) | |||||
| R(V) | |||||
| R(V) |
If your antenna is correctly configured and connected, then the data of the entered transponders, as well as the channels found, will be stored on the TV.
1. How to manually tune a TV with a built-in satellite receiver to the NTV Plus or Tricolor TV satellite?
For the sample, we chose a 2015 LG TV on operating system"WEB OC". Basically, the manual tuning algorithm for other TV models is not much different.
So. The TV is connected to a tuned and working satellite dish, and is set to receive TV - "Live TV". On the screen we see, respectively:
On the remote, press "Settings" or "Q.MENU".
Select "Advanced Settings" from the menu that appears.
Menu appears full settings, where we select "Channels", "Search for channels".
After clicking on "Search channels", select there "Manual search" and "Satellite"(if there is no additional terrestrial antenna or cable TV connected).
The most important search menu appears with parameter settings.
Suppose you need to find all the channels of the operator "NTV Plus" and only him!
Satellite select "Eutelsat 36".
Highly important parameter: "LNB frequency" (in different TVs it may be called a little differently: "intermediate frequency", "upper and lower frequency separately" ... It doesn't matter.
Always and everywhere we put there 10750
. For in other models 10600, 9750, 5100 can be offered ..., but we set only 10750 everywhere.
Next, select the "Transponder" (or the frequency of one of the satellite's transmitters). Since we need NTV Plus channels, we take any frequency from the section (if tuning to Tricolor TV is necessary, then we take it from the section What are the frequencies and parameters of Tricolor TV channels?).
We have now chosen a transponder with a frequency of 12130 MHz, right circular polarization.
Next, we monitor the scales of the level and quality of the signal. If everything is set correctly, then they should be more than 70%.
We make the "Search for a network" parameter enabled! Then the TV will automatically find all the others and only from the operator "NTV Plus" (and not another ~ 250 channels of unnecessary "garbage" from Tricolor TV, etc., which happens in the automatic search mode).
Some TVs do not have a network search mode. Then you will have to manually scan each transponder from the list (which was referred to above) separately.
As a result, we see that the TV found all 17 transponders of the NTV Plus operator.
Click "Finish", exit the settings menu and watch the channels we need if there is a CI + module with activated card access.
P.S. If in the end you suddenly realize that it is difficult to edit channels there, create and switch favorite lists, inconvenient TV guide, etc. (which is inherent all primitive satellite receivers built into TVs) and it is so annoying that they are ready to use 2 remotes (the first one is for turning on / off the TV, the other for everything else), we recommend that you purchase any of the specialized satellite receivers we offer for your access module . Which, by the way, are often purchased by owners of high-end TVs, which, of course, have a built-in satellite receiver and a slot for a CI+ access module.
2. A TV (receiver) with a CI + CAM NTV Plus module displays on the encrypted channel "Incorrect equipment settings. Please contact your operator". The service has been paid. What to do?
It is necessary to reboot the CI + CAM module ("reset to factory settings", "factory reset")
On the example of the TV "Samsung".
Go to TV menu
Select the command "System"
Select the command "Settings"
Select the command "Common interface"
Select the command "Menu CI"
By selecting the "Information" command, you can see information about subscriptions - have the money in the account run out? Then, perhaps, the problem is not in the module, but in the payment.
But, initially we assume that you are sure about the payment for services. So click on "Settings"
Select "Factory setting"
A menu appears asking:
Click "OK" to confirm and wait for the module to reboot. After that, we leave the device turned on on the encrypted channel and wait for the picture to appear.
The picture will not appear immediately. The wait can be several hours.
All transactions are carried out at "your own risk". If you are not sure (and there is a possibility that you will drop something else, very important), then it is better to contact our store for setting up the module and the card.
3. What are the frequencies of Tricolor TV? What are the frequencies of NTV Plus? What are the open channels on the satellite from which Tricolor TV and NTV Plus broadcast? Information on channel parameters - how to manually tune channels. What channels are there on the satellite yet?
Tricolor TV and NTV Plus are broadcast from Eutelsat 36A/36B satellites, "hanging" in geostationary orbit at an altitude of ~30,000 km strictly above the Equator at 36.0°E (east longitude). Taking a map, you can roughly determine the direction, the azimuth from Kaliningrad towards this satellite position.
It is difficult to find a house where there is not a single TV. But free channels are one thing, and quite another when we are talking about paid satellite TV. Quantity pay channels NTV Plus depends on the package that the user paid for. But to get them, you need a little setup, which you can do yourself or by contacting the service for help.
Then you will have the opportunity to watch your favorite films, sports programs, programs of domestic and foreign production, and much more. In addition, it is not difficult to find out which settings are correct for NTV Plus, since the official website has all the instructions, not only general, but also dependent on specific models receivers.
Widget from SocialMart
Setting up satellite equipment
A lot depends on how the equipment is configured, including the quality of the signal. Therefore, you need to understand some of the features of installing equipment, if the user decides to save money, and not to order the services of a master who will install and configure everything himself. So here are the instructions to follow:
- Since NTV satellites are located above the equator, in order to catch a signal, you need to point the dish at south side. In order not to guess where it is, take a compass or use the online compass by downloading this application on your smartphone. But as for the tilt angle of the satellite dish, depending on the location and manufacturer, it should be somewhere in the range of 17-38 degrees;
- Carefully inspect the area to determine if there is interference. It is very simple to do this - if the view in the right direction is good, then everything is fine, and if not, then you need to find another place with a better view;
- Try to fix the plate as firmly as possible so as not to knock down the settings. Every time you get tired of tuning channels, so it’s better to use a reliable bracket and enjoy satellite TV from NTV with pleasure;
- And of course, for any TV channel to work normally, it is important to choose the right cable that will be resistant to weather conditions. Snow, rain and other precipitation will fall on it, so the equipment must be reliable;
- The cable must be connected to the receiver, and the receiver to the TV;
- Even if you don’t know the exact settings, you can catch them yourself by turning the plate in a horizontal and vertical plane until an image appears on the TV screen. When there is a picture, you need to look at the signal reception level - it should be above 50%;
- Log in to the site and get access rights to various packages. The operator helps beginners to fully enjoy broadcasting. There is a small amount on the account of a newly registered user that pays for the broadcasting of a standard package - all that remains is to set up the channels.
When the “Registration of the contract” operation is completed, the access card will activate its work, and within a day a person will be able to see what the provider has prepared for new users.
Setting up NTV Plus channels
On the this moment There are several ways to set up channels from the NTV Plus provider. There are two most popular options.
- An automatic setting that looks like this:
- Enter the menu using the remote control;
- Find the subsection “Search for channels” there;
- Click it and monitor the status of the search. When it ends, all channels will start showing.
- Setting up the TV manually has the following specifics:
- First you need to reset the tinctures. This is done in this way: “Settings” → “Default setting” → “Channels” → “Antenna” → “Satellite settings”;
- The device will require you to enter a password. Feel free to enter four zeros, but only if this option has not been changed;
- After that, when manually searching for TV channels on NTV Plus, you need to uncheck the boxes next to satellites, which are allowed by selecting only the one that NTV Plus works with. In this case, it is EutelsatW4 36E. Sometimes it happens that the service in question is blocked by the tuner or TV itself, and in order to open access, you just need to remove the access card and insert it back;
- Next, you need to configure the transponder. Here are the settings: 12130 R and Lnb levels (low = 0; high = 10750).
When the whole procedure is completed, you can proceed to the final step: Select the transponder and set the command "Search on the network". After that, you have to wait, because the setup takes a long time. But if all the changes were correct, then in half an hour all paid TV channels will work for you.
Setting up NTV Plus Vostok channels
The NTV Plus television company is one of the most popular in Russia, but there were interruptions in broadcasting in the eastern part of the country, which were resolved with the help of a new package and the Express-AT1 satellite. The change took place in 2014, so in 2017, users can enjoy the excellent broadcasting of popular channels and more in 2017 for several years.
If, for some reason, your equipment does not want to receive a signal that comes from this satellite, you can manually search for TV channels after entering the settings. This is not so difficult, since the reconfiguration can also be done manually. Soon television will start operating in standard mode, delighting viewers with a full package of TV channels.
So, in order to access the package, you need to check the satellite settings, and if they are not there, then first enter this satellite, and then fill in the broadcast parameters. Instructions on how to set up channels are simple:
- Open the receiver settings through the remote remote control and the "MENU" button;
- Turn on the search for NTV channels;
- Go through "Settings" - "Installation" - "Password" - "Search Mode" - "Enable";
- Enter transponder parameters: frequency - 12475; polarization - to the left; transfer rate - 27500; broadcasting - DVB-S2; modulation - 8PSK; FEC: 5/6;
- Check the "Level" and "Quality" of the signal. Click on "Search" again;
- Wait for the results and save them.
Setting up LG and Samsung TV
The user will need instructions for setting up Samsung and LG TVs, because these devices have a CAM module, so their work with NTV satellite equipment is slightly different from the standard. However, we will provide simple instructions how to deal with the problem and set up the equipment correctly.
You can install NTV Plus channels for Samsung like this:
- Enter the menu, and go to the "Broadcast" item;
- Select the antenna "Eutelsat W4 36E", and save the data;
- Enter "LNB Settings", and select the transponder by turning on the DiSEqC mode - off. The lower LNB should be 9750. The upper LNB should be 10750. And the tone switch is 22 KHz;
- Go to manual search to enter channel settings;
- Take the Eutelsat W4 36E satellite and select transponder 11900(V/R) 27500 by setting "Manual search" or "Network search".
The setting for LG looks similar, so you can figure it out without difficulty.
Everyone chooses the way to receive channels in digital quality, that's what I proceeded from when choosing:
Terrestrial digital television did not suit me, because of the small number of channels.
Cable TV - everything is more complicated here, the operator who provides television through coaxial cable without the use of coding (no set-top boxes are needed) does not serve my home, and the operators who provide TV through the set-top box did not suit me either, because to pay subscription fee for connecting one TV 300 rubles or more, in my opinion it is expensive. Based on this, I chose satellite TV. The disadvantage of this method is that in order to use it, you must initially have an amount of about 10 thousand rubles. for the purchase of equipment. But you can always save money, for example, I had old receiver NTV +, according to the action, I exchanged it with an additional payment for more detailed satellite television technology.
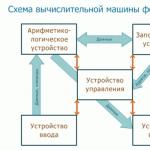
The television signal is broadcast from a geostationary satellite "hanging" above the Earth. If you go a little deeper, then - the satellite rotates in the plane of the earth's equator at an altitude of about 35,000 km above the Earth's surface. The period of revolution in this orbit is one day. That is, a satellite moving in a geostationary orbit does not change its position relative to the Earth's surface (it constantly "hangs" over the same point on the equator).
With the help of a satellite dish, we focus the signal from the satellite to the point where the converter is located.
The converter is a receiving device that is mounted at the focus of the signal reflected from the satellite dish and converts this signal into an electrical one, after which it transmits it to the receiver - receiver.
The receiver is a device that converts the signal coming from the converter into a signal "understandable" for the TV. The receiver is connected to the TV using the HDMI, SCART, "tulip", etc. interface. depends on the model of the receiver and the connectors on the TV.
The general scheme is presented below.
Installing the NTV+ dish
So, we move from theory to practice. Below I will describe how I installed and configured NTV + (for those who configure Tricolor, the connection scheme will be similar).
I climbed onto the roof of my house and saw the following picture - two satellite dishes are hanging, there was a place just under mine.
If you pay attention, one dish is used for Tricolor (judging by the inscription on the plate, although this may not be the case), this is good, since Tricolor and NTV + broadcast from the same satellite, which means they are directed to the same point in the sky, adjust the direction accordingly antennas will be easier because the sample will be located nearby. You, too, when installing a satellite dish, can look around, since most people use either Tricolor or NTV +, respectively, you will understand in which direction you need to turn the antenna. If there are no dishes nearby, turn the dish to the south (since the satellite "hangs" on the equator), it should be noted that there should not be any trees and buildings on the path between the satellite and the direction of the dish, as they will not allow the signal to reach the dish.
First of all, you need to fasten the antenna bracket using anchor bolts (usually they come with the antenna). To do this, attach the bracket to the wall, mark the places where you need to drill holes, and use a drill to make holes with a depth and a radius of the anchor bolt. Then insert the bolts there.
Then attach the bracket to the wall and screw it on.
As a result of all actions, check that the bracket is firmly fixed and does not wobble.
After that, assemble the plate and attach to the bracket.
Next, you need to run a coaxial cable from the receiver (where the TV will be) to the satellite dish converter. If the cable is longer than 10 meters, you can buy a quality 75 ohm coaxial cable of the desired length.
After that, using an HDMI, SCART or "tulip" cable, connect the receiver to the TV. Then turn on the receiver, select the AV mode on the TV (corresponding interface). You will see the receiver menu, select the satellite in the settings (I remind you that for NTV + and Tricolor it will be the same satellite), for the European zone it will be EUTELSAT W4 / W7 or EUTELSAT 36A / 36B (they have been renamed).
The next step is to set the dish strictly to the satellite. What not to use additional devices to help set up channels that cost a lot of money (and nothing if you want to set up one satellite dish for yourself), you will need an assistant to monitor the signal level, and in the meantime you will turn the dish. A cell phone can be used to communicate.
You should turn the plate by a millimeter in order to catch a good signal. The antenna rotates not only horizontally, but also vertically, do not forget about it.
As a result, I set up the NTV + dish (I decided prematurely).
I managed to achieve a signal of more than 70 percent, it was cloudy, so the result was no better. Having gone down after setting up the antenna, I quickly tuned the channels using auto-search and was quite pleased. BUT, when I turned on the HD channel, an information sign "No signal" appeared in front of me.
How so?! all channels work fine, and all HD write "No signal".
Call to service technical support brought no result. I decided to spin the plate some more to achieve at least some signal level (as you can see in the picture below, the signal level of HD channels is 0%). To do this, in the menu, I chose the TP List - 11823/27500/V (it is responsible for some of the HD channels).
I climbed onto the roof and again began to slowly turn the antenna, my assistant remained near the TV and spoke the signal level. After literally 10-15 minutes, I managed to set up HD channels, they showed a signal level of about 73%. Having gone down, I could already see the channels in HD quality, the rest of the channels also showed excellently.
The bottom line of this whole story, do not believe people who say that only specialists with special equipment can install and configure satellite television. Almost anyone can do this!
Installing an NTV Plus antenna includes several main steps, namely, the purchase and installation of equipment, connection and channel search. To connect satellite TV, first of all, you need to contact the representative office of the TV company in your region or make an application on the official website.
The subscriber will be helped to choose the equipment, services, channels that are optimal for him, as well as draw up an agreement.
To install NTV Plus you need:
- agreement;
- installation instructions;
- access card;
- converter;
- satellite dish. Choose the largest possible diameter, at least 60 centimeters;
- coaxial cable with appropriate connectors;
- built-in set-top box or satellite receiver.
Important! Before installing NTV Plus, you must register on the official website of the television company, as well as register the equipment itself.
Self connection
If the client has decided not to use the services of the company's masters, and prefers to do everything on his own, then first of all it is necessary to carefully study the instructions. It is in the equipment package, it describes in detail the entire process of installing and connecting an NTV satellite dish.
 To install a satellite dish, it is important to choose a convenient place, with a minimum of interference that prevents direct signal reception - tall buildings, trees, and so on. The wall of the house or the roof is best suited. We must not forget that the plate must be protected from bad weather - snow, hail, rain, so it is important to choose the safest points.
Using the instructions, the satellite dish is assembled and installed on the bracket. Consumables for installation are supplied in the kit.
Equipment setup
An access card is inserted into the receiver, in the "Menu" section, the "Signal Information" tab is selected.
This stage requires the participation of two people, since one needs to be directly involved in setting up the NTV antenna, and the other one remains at the equipment and monitors the signal quality. For convenience, you can use a cell phone.
First, slowly rotate the plate until the first appearance of the minimum image and sound. After each turn, we wait 2-3 seconds so that the prefix has time to contact the satellite.
As soon as the signal appears, carefully adjust the plate until a high-quality picture appears, after which we firmly fix all the fasteners.
Important - it is better to do the adjustment on a sunny day, as bad weather conditions greatly affect the quality of the resulting image.
Channel search
To independently configure NTV channels, you can use two methods of varying complexity:
- auto. We go to the settings section, after which we launch the "Search for channels" command. If the initial adjustment was made correctly, the list will quickly update automatically.
- debugging manually. A difficult process that requires patience. It will be necessary to manually enter a large amount of broadcast data and parameters, taking into account those inherent only to a particular region.

Manual debug scheme:
- We reset all the settings of the receiver, for which we go to the "Menu" item and select "Default Settings". Next, go to the "Channel" and select the "Antenna" item in the menu.
- Enter a four-digit password in the request box. The default is "0000".
- Another menu appears, in which you should remove the marks from all the satellites shown, leaving only one - EutelsatW4 36E.
- Set up the transponder. LNB levels (upper 10750, lower 0). Parameters - 12130 R.
- After entering all the required information, a network search is started. It may take quite a long time, after which all found channels will appear.
Outcome
Installation and debugging of satellite TV devices is a process that requires skill and patience.
At self installation newbies often have various problems with installation, configuration difficulties and large losses of time. If there is even minimal experience, installing and configuring NTV equipment will not be a problem for the subscriber.
21.08.2017 30.08.2017 by Eve
For self NTV+ settings, You need to take into account the angle of the direction of the dish mirror itself to the satellite: it varies from 17 to 38 degrees. You can find out the exact value from the manufacturer of the satellite dish or see the attached instructions.
Setting up the NTV + antenna carried out in the following stages:
- Point the plate to the south. On the official website of NTV + you can see that the trajectory of the Eutelsat 36A (B, C) satellites is located on the equator. Use a compass for accurate determination.
- Often problems with the quality of the resulting picture are not related to the equipment. It is the presence of interference in the form of trees, houses, towers that prevents the signal from entering or significantly muffles it. For the city, the ideal place for installation is the roof, and for the countryside, the pole. But if there are no obstacles near the installation point, then installation can be done near the window.
- Fastening is considered an important aspect: it must be rigid and strong. In winter, when the windage of the dish is most noticeable, a good mount will not bring down the signal level. It is best to fix the plate with stainless steel anchor bolts.
- Connect the convector to the antenna and then route the cable to the receiver.
After installation, you must turn on the receiver and set up NTV+ channels. Go to the main menu, select manual or auto mode, then tap Search Channels.
Schematically, it looks like this: Menu / Settings / Installation / NTV-Plus (auto search). You will see a list in which you need to select NTV-Plus (auto search). You can also periodically update the installed software manually or specify in advance in the settings " Automatic update ON".
For manual settings, you need to go to the main menu and select the "Default setting" item. In this case, the software will work according to the manufacturer's specified algorithm. Enter the "Channels" item, then directly to the "Antenna" column, after which you will see a list in which you should click "Settings satellite system and satellite."
Next, the tuner will ask for a password, which must be entered manually. After entering the password, a window will appear in front of you in which you need to remove the checkmarks in front of all positions, except for the desired satellite - Eutelsat 36A (B, C, E). These manipulations are monitored by the system and blocked, so you can remove the operator card from the tuner in advance.
Next step: setting up the transponder. In order for the system to work smoothly, the following data must be entered into the program:
— The level of the lower Lnb = 0;
- Upper Lnb level = 10750.
Save the entered parameters and select the necessary transponder from the list in the column " Manual setting". After that, start the search for the channels of the NTV + operator and add the one you like to the main channel list.
There are cases when the Eutelsat 36A(B,C) satellite is not in the list of satellites. In this case, you need to create a new network (User sat 1) by enabling the "LNB Power" function. Set all necessary parameters and save them without specifying a transponder. Go to the "Manual setup" tab and scan the entered satellite. Then create a new transponder with new characteristics. If you did everything correctly, then a new network should appear in the main window, called "NTV Plus". Now you need to add channels: click the "Scan" button and link the channels to the transponder.