Order manual loading and updates:
You can download the latest version Epson Stylus C67 from our driver database below. Windows Device Manager allows you to manually install and update the driver.
| Manufacturer: | Epson |
| Device type: | Printer |
| Model: | Stylus C67 |
| Operating systems: | Windows 10, Windows 10 (64 bit), Windows 8.1, Windows 8.1 (64 bit), Windows 7, Windows 7 (64 bit), Windows 2008, Windows 2008 (64 bit), Windows Vista, Windows Vista (64 bit), Windows 2003, Windows 2003 (64 bit), Windows XP, Windows XP (64 bit), Windows 20 |
| Driver creation date: | 2015-09-04 |
| Filename: | d2014187.exe (Download) |
| File size: | 60.00 MB |

Recommendation: As a general rule, most Windows user We highly recommend using a driver update utility such as DriverDoc to update your Epson Printer drivers. DriverDoc makes it easy to update your Stylus C67 drivers by automatically downloading and updating them.
DriverDoc can be used to automatic update not only Printer drivers, but also all other drivers on your PC. This utility has access to a database containing more than 2,150,000 device drivers (the database is updated on a daily basis), so you will always have them installed on your PC latest versions necessary drivers.
Install optional products - DriverDoc (Solvusoft) | | | |
![]()
Drivers are small programs that enable the operating system to properly communicate with the Stylus C67 Printer, acting as a means of "interfacing".
What operating systems are compatible with Stylus C67 drivers?Latest Stylus C67 drivers are supported by Windows.
How to update Stylus C67 drivers?You can update Stylus C67 hardware drivers manually from using Device Manager (Device Manager) or automatically using driver update software.
What are the benefits and risks of updating Stylus C67 drivers?Updating your Printer drivers will improve your PC's performance, unlock hardware features, and resolve any incompatibilities. The risks of installing the wrong Stylus C67 drivers include software crashes, loss of functionality, PC freezing, and system instability.
About the Author: Jay Geater is the President and CEO of Solvusoft Corporation, a global software company focused on innovative services. He has a lifelong passion for computers and loves everything related to computers, software and new technology.
Utility for automatic search drivers Carambis Driver Updater - a program for automatically searching and installing all drivers on almost any computer, laptop, printer, webcam and other devicesA program for searching and installing new drivers and updating those already installed on a computer running operating systems Windows. Search for drivers for any devices not recognized by the system, fully automated download and installation of drivers for Windows 10, 8.1, 8, 7, Vista and XP.
for free*
A program for optimizing and accelerating Windows Carambis Cleaner - a program for increasing computer performance and correcting operating errors Windows systemsA program that will significantly increase the speed of your computer by fixing system errors, cleaning registry entries left after uninstalling programs, removing duplicate files, large unused and temporary files. Compatible with Windows 10, 8.1, 8, 7, Vista and XP
for free*
* This software is provided by Carambis as shareware. This means that for free you can: download it from our website or the website of a partner company, install it on your computer, use some of the functions that are available in the free version. For example, Driver Updater can scan your computer for outdated or missing hardware drivers. However, only the paid version provides updates and automatic driver downloads. All issues related to the operation of the program, purchasing a license key, support, etc., are resolved exclusively with the company that provides this software.
Minimum distribution version: Ubuntu 13.00.4, Debian 8.0, Mint 15.0.Buy Reset Codes and Firmware Codes for the PrintHelp program:
Choose a convenient payment method and buy
Codes are sent instantly after making an online payment to the email specified when making the payment.
If you have not received a Reset Code or Firmware Code within 1 hour after payment - click here.
Description:
The SuperPrint development team (Resetters) created the PrintHelp program to service inkjet printers Epson.
This program replaced SPUA, which performed only one function - resetting the diaper usage counter.
Requirements:
Internet - diaper reset is only possible on a computer connected to the Internet.
The program can perform the following functions for Epson printers (not for all models):
- checking the current value of the waste ink counter
- reset the waste ink counter (some models require a RESET CODE)
- cleaning the print head
- enhanced cleaning of the print head during initial refilling
- read and write serial number printer
- reading and USB recording ID
- read and write HEAD ID
- read and write EEPROM
- paper pulling test
- nozzle check and test
- printout of template for verification different modes print
- initialize or disable PF deterioration offset
- obtaining status about the printer status
- downgrading the firmware (for cases when the printer has updated the firmware and non-original chips are not visible)
- changing the printer firmware to “chipless” - the printer no longer needs chips, the ink level is always 100% (only for models XP-600, XP-601, XP-605, WF-2650, WF-2750, WF-3540, WF- 3620, WF-3621, WF-3640, WF-3641, WF-4630, WF-5110, WF-5190, WF-5191, WF-5620, WF-6090, WF-7110, WF-7111, WF7610, WF- 7620, WF-7621, WF-8090, SC-P400, SC-P600, etc.) - Chipless Firmware Code required - Buy Chipless Firmware Code
- ink level reading
- Ink Level reset and Diaper reset in L100, L200, L800 printers for free ( soft reset ink level is only possible for these three models)
Work via USB:
- Before operating the printer USB cable You must disable all applications that could potentially communicate with the printer.
- Be sure to turn off Epson Status Monitor (a utility that shows the amount of ink remaining when printing) and MyEpson Portal.
- With a high degree of probability, if one communication error occurs with the device, it will be repeated until restarted.
- If an error occurs, you must turn the printer off and on before using it again.
Work via Wi-Fi or Ethernet:
- Printers that support network access will be found automatically if they are on the same subnet as the user's computer.
- Otherwise, you need to add the IP address manually in the program settings.
- When performing service operations, data exchange with the printer occurs via the UDP protocol. The procedure is very sensitive to network problems, especially packet loss.
- Currently, the following ports are used to exchange data with the printer: 3289 (ENPC), 161 (SNMP), 515 (LPD).
PX: PX650, PX659, PX660, PX700W, PX710W, PX720WD, PX730FWD, PX800FW, PX810FW, PX820WD, PX830FWD
PX:
PX-045A, PX-046A, PX-047A, PX-048A, PX-049A, PX-1001, PX-1004, PX-101, PX-105, PX-1200, PX-1600F, PX-1700F, PX- 201,
PX-203, PX-203A, PX-204, PX-404A, PX-405A, PX-434A, PX-435A, PX-436A, PX-437A, PX-501A, PX-502A, PX-503A, PX- 504A, PX-505F,
PX-535F, PX-5500, PX-5600, PX-5V, PX-5VII, PX-601F, PX-602F, PX-603F, PX-673F, PX-7V, PX-7VII, PX-A640,
PX-A720, PX-A740, PX-FA700, PX-G5000, PX-G5100, PX-G5300, PX-K100, PX-M650, PX-M650A, PX-M650F, PX-S05B, PX-S05W, PX- V600, PX-V630, PX-V780
Photo: Photo 820, 830U, 890, 900, 950, 960, 1280, 1290, 1390, 1400, 1410, Photo 1430, Photo 1500, 2100, 2200
PictureMate: PM100, PM200, PM210, PM215, PM225, PM235, PM240, PM245, PM250, PM260, PM270, PM280, PM290, PM300, PM310, PM400
PM:
PM-3500C, PM-A820, PM-A840, PM-A840S, PM-A870, PM-A890, PM-A900, PM-A920, PM-A940, PM-A950, PM-A970,
PM-D770, PM-D800, PM-D870, PM-G4500, PM-G5000, PM-G800, PM-G820, PM-G850, PM-G860, PM-T960, PM-T990
R: R200, R210, R220, R230, R240, R245, R250, R260, R265, R270, R280, R285, R290, R295, R300, R310, R320, R330, R340, R350, R360, R380, R390, 800, R1800, R1900, R2000, R2400, R2880, R3000
RX: RX420, RX425, RX430, RX500, RX510, RX520, RX530, RX560, RX565, RX580, RX585, RX590, RX595, RX600, RX610, RX615, RX620, RX630, RX640, R X650, RX680, RX685, RX690, RX700
S: S20, S21, S22
Sure Color: SC-P400, SC-P408, SC-P600, SC-P608. SC-P800
SX:
SX100, SX105, SX110, SX115, SX117, SX125, SX130, SX200, SX205, SX210, SX215, SX218, SX230, SX235,
SX400, SX405, SX410, SX415, SX420W, SX425W, SX430, SX435, SX510, SX515, SX525WD, SX600FW, SX610FW, SX620
T: T10, T11, T12, T13, T20, T21, T22, T23, T24, T25, T26, T27, T30, T33, T40W, T42WD, T50, T59, T60, T1100, T1110
TX:
TX100, TX101, TX102, TX103, TX105, TX106, TX109, TX110, TX111, TX115, TX116, TX117, TX119, TX120, TX121, TX125, TX129, TX130
TX200, TX209, TX210, TX219, TX220, TX230, TX300F, TX320F, TX325F
TX400, TX405, TX408, TX409, TX410, TX415, TX419, TX420W
TX510FN, TX515FN, TX525, TX550W, TX560WD,
TX600FW, TX610FW, TX620FWD, TX650, TX659
TX700W, TX710W, TX720WD, TX730,
TX800FW, TX810FW, TX820FWD, TX830FWD
WorkForce:
30, 40, 42, 60, 310, 320, 325, 435, 500, 520, 525, 600, 610, 615, 620, 625, 630, 635, 645, 840, 845, 1100
WorkForce (WF):
WorkForce WF-2010, WF-2011, WF-2510, WF-2511, WF-2518, WF-2520, WF-2521, WF-2528, WF-2530, WF-2531, WF-2538
WorkForce WF-2532, WF-2540, WF-2541, WF-2548, WF-2630, WF-2631, WF-2650, WF-2651, WF-2660, WF-2661WF-2750, WF-2751, WF-2760 , WF-2761
WorkForce WF-7010, WF-7011, WF-7012, WF-7015, WF-7018, WF-7110, WF-7111, WF-7510, WF-7511, WF-7515, WF-7520, WF-7521, WF -7525,
WorkForce WF-M1030, WF-M1560
WorkForce (WF) (diaper reset and reading are NOT available, only additional service functions are available):
WorkForce WF-3010, WF-3011, WF-3012, WF-3510, WF-3511, WF-3520, WF-3521, WF-3530, WF-3531, WF-3540, WF-3541, WF-3620, WF -3621, WF-3640, WF-3641,
WorkForce WF-4630, WF-4640, WF-5110, WF-5113, WF-5190, WF-5620, WF-5623, WF-5690, WF-6090, WF-6093, WF-6530, WF-6590, WF -6593,
WorkForce WF-7110, WF-7111, WF-7610, WF-7611, WF-7620, WF-7621, WF-8010, WF-8090, WF-8093, WF-8510, WF-8590, WF-8593,
Workforce WF-100 WF-R4640, WF-R5190, WF-R5690
WorkForce (WP) (diaper reset and reading are NOT available, only additional service functions are available):
WorkForce WP-4010, WP-4011, WP-M4011, WP-4015DN, WP-M4015, WP-4020, WP-4022, WP-4023, WP-4025, WP-4090, WP-4091, WP-4092, WP -4095DN,
WorkForce WP-4511, WP-4515, WP-4520, WP-4521, WP-M4521, WP-4525, WP-M4525, WP-4530, WP-4531, WP-4532, WP-4533, WP-4535,
WorkForce WP-4540, WP-4545, WP-4590, WP-4592, WP-4595, WP-M4595
XP:
XP-20, XP-30, XP-33, XP-55,
XP-100, XP-102, XP-103,
XP-200, XP-201, XP-201, XP-204, XP-208, XP-202, XP-203, XP-206, XP-205, XP-207, XP-210, XP-211, XP- 214, XP-216, XP-212, XP-213, XP-215, XP-217, XP-220, XP-225, XP-230, XP-231, XP-235, XP-240, XP-241, XP-242, XP-243, XP-245, XP-247
XP-300, XP-301, XP-302, XP-303, XP-305, XP-306, XP-310, XP-311, XP-312, XP-313, XP-315, XP-320, XP- 322, XP-323, XP-325, XP-330, XP-332, XP-335, XP-340, XP-342, XP-343, XP-345
XP-400, XP-401, XP-402, XP-403, XP-405, XP-406, XP-410, XP-411, XP-412, XP-413, XP-415, XP-420, XP- 422, XP-423, XP-425, XP-424, XP-430, XP-431, XP-432, XP-435, XP-434, XP-440, XP-441, XP-442, XP-445, XP-447
XP-510, XP-520, XP-530, XP-540
XP-600, XP-601, XP-605, XP-610, XP-615, XP-620, XP-625, XP-630, XP-635, XP-640, XP-645
XP-700, XP-701, XP-702, XP-710, XP-720, XP-721, XP-750, XP-760,
XP-800, XP-801, XP-802, XP-810, XP-820, XP-821, XP-830, XP-850, XP-860,
XP-900, XP-950, XP-960
Canon printers:
Canon G1000, G1100, G1400, G1900
Canon G2000, G2100, G2400, G2900
Canon G3000, G3100, G3400, G3900
MX470 Series
MX490 Series
MG5100 Series
MG5200 Series
MG5500 series
MG5600 series
MG5700 series
For those printers in which the diaper is made in the form of a separate cartridge with a separate chip, it can only be reset using chip programmers
Description additional functions for printers and support.

Using the program is free. All functions are supported incl. and diaper reset function. For some models, this function works after entering a code that will be attached to each CISS Resetters-Superprint. You can also buy codes in our online store - Buy a code to reset your diaper
The PrintHelp program is a universal tool for the service engineer and home user of an inkjet printer!
Discussion of the PrintHelp program with Canon printers- V .
| Message Posted 28 July 2011 - 09:31 rootNikolai67 said:
I would also like to add calibrations.
Everything can be added if you have a printer. Those. so adding calibrations for all models in one fell swoop will not work.
Take it specific model and you begin to look at what you can do and what should happen.
When you achieve the desired result, it means that this function already works for this printer model.
This is how the models are supplemented with service functions, methodically, painstakingly and at the same time slowly.
| Message Posted 28 July 2011 - 09:55 root
How can I add my printer to the list of supported printer models in the RESETTERS utility program?
1. Download and run the Resetters.exe utility program
2. Click the FOR UNSUPPORTED PRINTERS button.
(149.32K)
Number of downloads:: 13159
3. Press the START button. We are waiting for the result:
If the report is successfully created and sent to our server, the program will display the following message:
If you get the message "Search end. Couldn"t gather any useful information from printer" - perform a re-START,
by first going to the SETTINGS tab and checking the box "Check support for the test set of commands"
As a result of creating and sending the report, the following message should appear:
"The report has been sent to developers department. Your printer model will be supported in a few days."
(54.62K)
Number of downloads:: 12282
Within 1-2 days we will process the received report about an unsupported printer model and add this model to the list of supported models, which we will report in the news, as well as in installed version an update will become available for the program.
In order to install updates, click on the CHECK UPDATES button, then GET UPDATE LIST, then INSTALL (if there are updates).
Somewhere far away
Open: HELP -> Additional functions:
There is a table at the bottom of the page.
That table shows printer models and the functions that work in them.
Each model has its own set of operating functions.
Find your model and see what features are currently available.
I actually took the individual squares for the Color Check Pattern from you, DC-AC. But for the print head identifier, I still tore out the data myself, in the anti-diaper, by the way, it is not always read correctly (at least on the r290, I didn’t look at the others).
I have one question for you - but by mail, check your mailbox.
Yes, I know that in 2.0.0, perhaps in 2.0.1 there was a small bug on the R290/T50. And it is connected with the symbols * % +. These symbols appear in the ID code once a year (and I pass through quite a few similar devices).
The issue with Head ID recoding is closed.
My previous statement about disassembling AntiPampers Prof is not true, I apologize for the premature conclusions.
Tell me where to find a list of models supported by your program. In particular, I am interested in the epson T1100 model. On some sites (in particular, it is indicated that the printer is supported. This model is not in the help for the program itself. I understand that you need to trust the help, but deep down I hope , that maybe I downloaded the wrong version.
Can you please tell me other ways to reset diapers for the above printer?
What is this?
(23.56K)
Number of downloads:: 10977
Download the Resetters program for free. You launch it. Just in case, click UPDATE to be sure that all the latest updates are downloaded.
Open the list of supported models.
Enter T1100 into the search box
Downloaded it. Installed it. Launched. My two R270s are visible in the program window. Ink levels are readable. They are equal to what the status monitor shows. The diapers are being read.
Service functions are working. OS. Vista 64.
Hi all! Today I will show you how to reset the diaper on the Epson XP-302 printer, but using this example you can reset it on other models. My relatives' printer started printing in black and yellow. They sent it for repairs, they were told that it couldn’t be done, they needed some codes... Well, I decided to figure it out...
At first I thought, I’ll do a few calibrations and everything will be resolved... But the printer began to display this message: The service life of the ink-absorbing pad has expired.
I started googling what this is all about) There is a reset program on the Internet epson counters, is called PrintHelp, but it asks for codes that you need to buy! Well, that’s not the point) But on some printers you can reset the Epson diaper for free.
If PrintHelp did not reset your counter for free, then on the Internet there are Epson program Adjustment Program (Epson forbade posting it).
If the program does not help, then you can try SSC Service Utility or. We launch the program to reset the Epson diaper. It's called Epson Adjustment program. So if suddenly it doesn’t work for your printer, then look for another version.
And so, after launch, select the model and port:
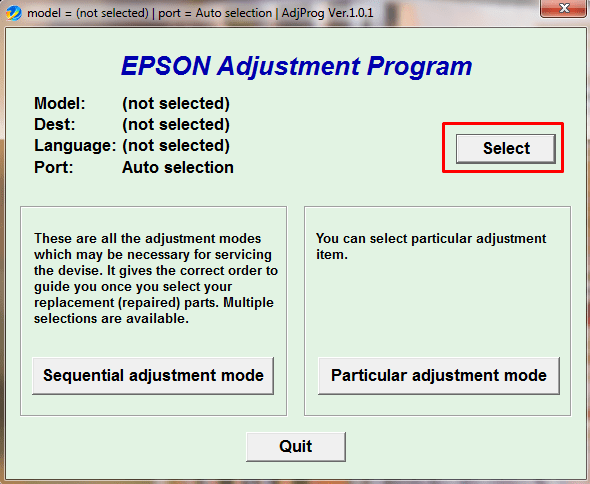
If your model is not there, no problem, just choose like mine.
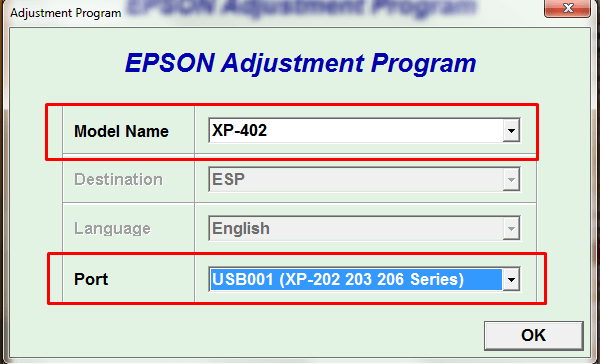
The main thing is that the drivers are installed. Otherwise, the program will not see the printer port. Click ok and then select Paricular adjutment mode.

Select waste ink pad counter. This is an ink and diaper counter.

We check all the boxes and click Check, thereby we will check the counters.

I have already reset the counter and managed to print a certain number of pages. But if your printer complains about diapers, then in the lower field you will have a value of 100%. Select the top counter and click Initialization, i.e. Epson counter reset.
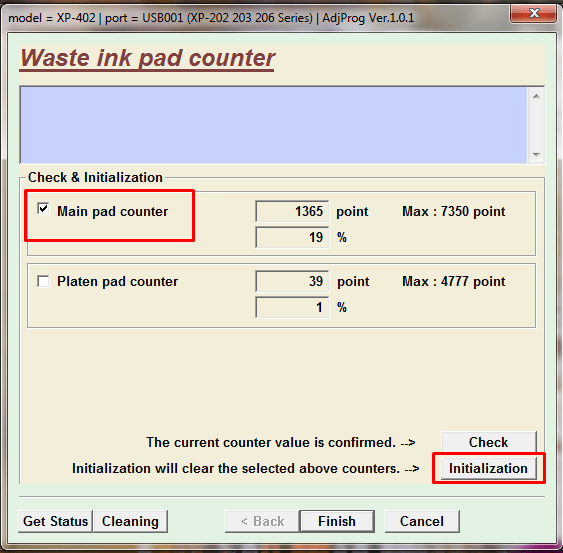
The program will ask you to turn off the printer.


Click ok after it turns on and we can check. Select the top checkbox and click check again.

As we see the reset Epson diapers completed successfully! But don’t forget, it’s not for nothing that Epson gives such an error. In addition to resetting, I also recommend cleaning the gasket located under the cartridges.


