Today, email is an integral part of any communication. It is very convenient to use, because you can instantly send a file of almost any format to your interlocutor or receive an incoming one. It is very important to create an email address and that it is easy to use and reliable. Therefore, this article will help you to know about gmail.com mail.
Using this mailbox couldn't be easier. In order to log into the server, you must register your own Google account. In this article we will describe how to log into your mailbox. In addition, we will tell you how to set it up and edit it in the future, as well as how to secure your gmail mail.
If you have not yet created your own account on the Google server, proceed to register it. Then come back to this page to be aware of how to properly log in and set up your gmail email address.
Reasons for experiencing difficulties when logging into mail
After creating your own account, the server will automatically authorize you. That is, you will immediately log into your saved gmail mailbox. However, to use it successfully, you will be forced to log in and out of your own mailbox each time in order to secure your correspondence. It is especially important to log in and out of the “mail” if you did not log into it from your computer (from your work computer, for example).
Since there are people who are faced with the problem of logging into their Google mailbox, we were interested in what exactly this is connected with. We tried a variety of computer equipment and also worked with completely different software. But we didn’t have any difficulties: we logged into mail from any device in the standard way. Based on this experience, we came to the conclusion that perhaps some steps were not being reproduced correctly.
Sometimes incoming users do not separate gmail.com and gmail.ru emails. The first is from Google, the second is from a completely different server. Therefore, you need to make sure that you are trying to enter exactly the saved mailbox from Google. In addition, sometimes the mailbox interface changes, which also causes some difficulties when trying to log in. But in fact, you need to abstract from the appearance of the service, since everything happens in a standard way, despite the updated interface.
Gmail mailbox: how to log in and out?
If you want to use mail and log into your gmail mailbox, do the following:


If you need to sign out of gmail, look at the top right corner of the page. You will see your own photo there. Click on it and click “Log out” in the menu that appears.

Google Email Settings
Today there are very convenient functions in mail (interface, way of working), which you will definitely want to change at your discretion. For example, you have the opportunity to create a permanent signature, change the appearance of labels, or choose a different theme for the appearance of your mail.
In order to change gmail settings, you need to do the following: pay attention to the upper right corner of the page. There you will see a gear icon. Click on it and click “Settings”. This is where you have the opportunity to transform and change the category you want.


Attaching contacts
Mail from Google server contains a very convenient function. It makes it possible to create, save and access the necessary contacts in an address book specially created for this purpose. This feature gives you the opportunity not to clutter your head with all the email addresses of your interlocutors. In addition, there is an opportunity to come in and add additional information to the contact. For example, mobile number, date of birth, residential address.
If you decide to add a contact:


To log in and change contact information:
- On the left settings menu line, click “My Contacts”.
- Select the contact you want to make changes to.
- After this, you have the opportunity to create any changes to the contact information.

It is also worth noting that in the case when you send a letter to an email address unknown to the system, the gmail.com server can automatically put the corresponding address in your contacts. By selecting “Contacts” from the menu, you can easily add changes to the information about this contact.
Transfer email and contacts
Maybe you have a ready list of contacts in another email box? But does mechanically importing every single pin take too long? Then this setting is for you. Mail from Google server includes a function that allows you to transfer your contact list from almost any other mailbox. In addition, it gives you the ability to import all your correspondence.
It is convenient to transfer letters and contacts from Yandex and Mail.ru services. But this can also be done from other emails. For this:
- Click the gear icon located at the top right corner of the gmail page. You need to go in and click “Settings”.
- Select the "Accounts" category. Check mail from other accounts (using POP3). By following the instructions that appear on the setup screen, you can easily transfer contacts or emails.

gmail email security
If you think that you are an ordinary person, a simple user, and no one will want to enter your email, no one will encroach, then you are very mistaken. Today there are a huge number of attackers hacking mail for personal gain. Undoubtedly, if your mail is used exclusively for everyday correspondence with friends, then there is nothing to worry about. But in the case when the mailbox is linked to other important accounts, especially financial ones (for example, WebMoney), you must secure your own mailbox and funds so that no one can enter it. Many servers make it possible to link important personal pages with a mobile phone number. However, most of them continue to sync with the email address.
If you value outgoing information that is synchronized with your email, and want to prevent gmail from being hacked, you must configure your gmail.com mailbox correctly. Enter “Settings” (top right corner after clicking the gear):
- First, make sure that "Use http only" is selected in the General panel. If there is no outgoing checkbox, then you need to check it. This is necessary to ensure that the data comes out in encrypted form. If the checkbox is not checked, and you use mail in a public place with free access to a Wi-Fi network, there is a risk that attackers will intercept information in unencrypted form and be able to log into your email;
- those who use email clients will be forced to change their connection type settings from simple to secure (TLS). In the connection settings panel, you need to click on the secure connection type, and also change the mail receiving port (POP) from 110 to 995, the sending port (SMTP) from 25 to 465. Typically, the ports change independently after clicking on the TLS connection;
- for those who do not use email programs, it is worth disabling this function: go to the “Forwarding and POP/IMAP” panel to check the “Disable POP” and “Disable IMAP” checkbox;
- Double authentication must be enabled. Its presence serves as the difference between mail from Google and mailboxes from other servers. After establishing dual authorization, to enter your mailbox, you will need to enter a password sent as an SMS message to your mobile phone number. This greatly enhances the security of your email.
How do I enable two-step email verification?
For this:
- you need to go to the “Accounts and Import” panel, click “Change password recovery settings”.
- On the outgoing page, enter your personal mobile number. In addition, there is the opportunity to specify another email, through which you can recover a forgotten password (linking another email is also not entirely safe, so I recommend not linking it);
- click on “Other Google account settings”;
- On the page that appears, in the “Security” branch, click “Change” two-step authentication. In the new window, select the “Proceed with setup” option;
- In the initial field, please indicate your current mobile number personally. It will receive SMS messages from Google with confirmation codes. If the phone number is already synchronized with the account, skip this field, since the number will already be there;
- Select the Trusted Computer option. It allows you to enter a verification code from a selected computer only once every 30 days.
Thus, you have enabled two-step verification!
Application passwords
Following the establishment of two-step authorization, any applications that used the username and password of your Google page will stop working. An error message will appear: “Invalid username or password.” For them to work as before, you need to generate and change application passwords. To do this and ensure that passwords are saved, do the following (after two-step authentication):
- click “Create passwords” or click on the link: https://accounts.google.com/IssuedAuthSubTokens ;
- on the page, enter the password name you like;
- Click “Create a password.” The creation wizard will give you a password. It must be saved by you, as it will no longer be possible to find it. It is issued only once. Naturally, it can later be changed to something invented personally. His name has no meaning. It will work with any application;
- then enter this password into applications, replacing it with the password name of your Google page.
Enjoy!
Hello, dear readers of the blog site. Today I want to talk about a free service Gmail.com email. The main feature of this mailbox is its incredibly convenient and functional web interface.
It is, perhaps, in no way inferior to desktop email programs, but at the same time it will be accessible from absolutely any device capable of accessing the Internet. Therefore, using the Gmail box, you can safely forget about such a thing as synchronization.
Besides, Google mail has one of the best (if not the best) spam cutter in the world (it is because of it that I collect correspondence in this mailbox from, and other services that do not fight spam in any way), allows you to automatically sort correspondence in dozens of different ways, mark letters, import them and from any, and also knows how to remove and send correspondence from dozens of your existing mailboxes, and even in such a way that your opponent will not suspect a substitution.
Plus, working using a secure protocol and warnings about access to your mailbox from other IPs - what could be cooler. Probably nothing, so in this article I will try to take Gmail apart and show all its capabilities with examples. Don't switch.
By the way, quite recently it came out on top in the world, overtaking another popular email service called . However, in Russia the undisputed leader is, although it does not have any outstanding functionality (it just appeared earlier).
Registering and creating a mailbox in Gmail
Let's start with the trivial, but in need of some comments, registering a mailbox on Gmail. Addresses must be distinguished Gmail.com and Gmail.ru. Historically, the s.ru service at the end appeared before the Jimail mail service, and Google could not get this domain (although last year they seemed to succeed). For example, about ten years ago I almost fell for this incident, because gmail.ru also had a free email service.
How to create an account in Google Mail
Actually, receiving a mailbox is a nice bonus when creating an account. If you are now go to the Jimail page If you don’t have an account in Google, you will be asked to correct this misunderstanding:

Clicking the button "Create an account", you will be taken to a page with a web form that you will need to fill out very carefully. Due to the enormous popularity of Gmail, it can be quite difficult to use it, but still, if you show your imagination, you can choose something suitable.
For example, you can insert dots in the name, which means it is acceptable to use the domain name of your site, which with a high degree of probability will not be taken:

Please note that the reliability of the information you provide must correspond to the tasks that you will assign to this particular mailbox. Of course, Gmail.com is very well protected from hacking (work is carried out through the encrypted https protocol), but no one has canceled the human factor.
For example, the simplicity of the password I once came up with for my mailbox on Gmail became the reason for its hacking and subsequent theft of money from my own electronic wallet in the WebMoney system. I registered this email in time immemorial, when I didn’t even think about it, so I chose a surprisingly complex QWERTY password. Now, which gives a certain amount of peace of mind.
You also need to understand that an unrealistic alternative E-mail address or phone number can play a cruel joke on you, because they could help you restore access to your account in case you lose your password or your mailbox is hacked by various scammers:

You will receive a confirmation code in an SMS message to the mobile phone specified during registration, which you will need to enter to complete the registration (unfortunately, you will not be able to create a jmail.com account without a phone).


Next, fill out all the fields, click on the “I Accept” button to agree to the terms of the box and send the data. You will be asked to scroll through a small slider “Young fighter course from G Mail”, and at the last step a button will appear to enter the web interface for managing your mailbox - “Go to Gmail”.
Login and get acquainted with the Jimail interface
If you already have a Google account, then you will receive you can always log in from any page of any Google service, simply click on the button next to your name in the upper right corner:

Well, or just by typing in the address bar of your browser gmail.com and clicking on Enter.
Gmail interface quite understandable and familiar (it has not undergone significant changes for quite some time, which, in my opinion, is a good thing, because there is no need to solve another puzzle on the topic - “where is it now?”):

It appeared quite a long time ago separation of correspondence to Unsorted, Social Media, and Promotions (at the top of your inbox). If you click on the plus sign next to it, you can also add “Alerts” and “Forums”.

If you don’t need this sorting (like me), then simply uncheck the unnecessary checkboxes in the settings (six in the upper right corner - “Settings”) on the “Inbox” tab:

When you first log into G-Mail, you will immediately be told that although your account has been created, there is still something to add and configure to it. In particular, you will be offered to quickly set up the import of mail from your existing mailboxes (both in G-mail and in other similar services). We will talk about this in detail below.
You will also be prompted to quickly add a photo to your account and, if desired, choose a different design theme. You can really do this right now, because everything is implemented in literally two clicks (don’t get lost).
A new mail interface is already available in Google Mail for everyone
Lately, Google Mail has been actively promoting its new interface. You can try it by clicking on the settings button (gear in the upper right corner) and selecting the first item “Try new version of G-mail”.

It is currently in testing and is not used by default. There aren’t really many striking differences, but you still have to get used to it.

If you wish, you can return back to the old interface, and you can also configure the location of letters in the new Gmail by clicking on the “Interface” button in the settings drop-down menu. Three options are offered, differing from each other mainly in compactness and clarity:

I am still using the old interface (and I will show everything using its example), but you are free to choose for yourself (I think you can figure it out by analogy in my screenshots).
When loading the mailbox web interface, your browser is checked to see if it supports all this beauty, and if a discrepancy is detected, the good old Html version will be loaded. Although you yourself, in case of a long loading of the new frame, can switch to the retro interface:

By default, you are offered a mailbox approximately 15 GB in size(although this is not only for one email, but also for yours, and), but if you wish, for a fee you can increase this limit.

The few letters that will already be present in your mailbox tell you about some of the features of Gmail (for example, importing contacts and letters from any mail service you previously used) and about the delights of .
Pros and cons of Gmail, security settings
What’s noteworthy is that by registering a mailbox on Gmail, you are not obliged to give up all the others that you have received over your long life on the Internet. It is possible to configure the reception and sending of mail to them from the Google mail interface. This is very convenient, and I have been using it successfully for a long time (we’ll talk more about the necessary settings below).
Gmail is an online service that is as convenient as email programs
Also, one of the default messages will talk about the ease of using Gmail on mobile phones using a proprietary application. In general, use for working with mail using the web interface, rather than a desktop program, has one huge advantage - you no longer need to synchronize your different email programs on different devices (desktop PC, laptop, phone, tablet, etc.).
A web interface will be an excellent universal solution, but only if it allows you to implement all the goodies that abound in email programs. Well, of course, Google, together with its wonderful Jimail, is striving with all its might to become this ideal option, and, frankly speaking, they are doing it very well.
At the beginning of its journey, Google Mail found itself at the epicenter of a scandal precisely because of the ads that appeared with contextual advertising (by the way, if you have your own website, you can too) and not because of the irritation caused by its display. No. It’s just that the theme of contextual advertisements in its ideology corresponds to the text that takes place in this message. This meant that the system was reading our letters, which caused a storm of indignation.
But over time, all the goodies that Google threw at users of its free email outweighed the negative from the invasion of their personal space. In short, we were bought. Sometimes the thought still comes to mind that this corporation is gradually becoming an “empire of good”, and besides, how beautifully it all began (read my account). However, let's return to our sheep.
Let's talk now about security of working with your mailbox. I advise you to immediately go into the settings for this purpose (find the gear in the upper right area and select Settings from its context menu):

Immediately pay attention to the link located in the footer (bottom) of the Gmail web interface called “Additional information”. There you can monitor or set up an alert for suspicious calls to your mailbox.

Protecting your email login
If the data stored or received in your mail account is extremely important, then you can sacrifice the simplicity of working with the mailbox and configure it (using a password and confirmation code sent to your mobile phone). You can do this on the page " Security and entry" your Google account:

There is never too much security, and the main thing is to take care of it before, and not after the thunder strikes (learn from my mistakes). Well, I’ll still briefly describe all the possibilities that this double security system provides. So, two-factor authentication in Gmail allows you to do the following:

Passwords for applications to access your mail from any device
If you use any email reading applications on your desktop computer or mobile phone (tablet), then after activating two-factor authentication, these same applications will not be able to access your mailbox. What to do?
There is a way out and it is quite simple. You will need in the area "Application Passwords"(see screenshot above - located on the “Security and Login” page) click on the spoiler. The page that opens will list the applications that already have access to your Gmail account (by the way, you can disable them if necessary).

And at the very bottom there will be an opportunity to set a password for any application to access Jimail mail (it doesn’t matter, mobile or desktop, for example, an email client).
First, from the drop-down list, select the Google application you want to log into (mail, YouTube, or another), then from the second list, select the device from which you want to log in, and click on the “Create” button. As a result, you will receive a password for this application and instructions for using it:

All you have to do is go to the settings of the mobile or desktop application to change the Gmail access password there to the one you just generated.
In my opinion, everything is very simple and convenient. Personally, I am very happy about this opportunity make your mailbox as secure as possible from the encroachments of all sorts of radishes seeking to steal money, websites and other material and virtual values. Respect to the developers for this.
Okay, now let's understand the features of Jimail mail and configure this miracle of programming thought to suit ourselves and our habits.
Shortcuts (folders) and their configuration in Gmail
To sort correspondence in Gmail, use shortcuts and filters. The latter allow you to automatically distribute letters into various folders (shortcuts) based on specified characteristics. A shortcut, in fact, is very close to the usual concept of a folder, but has broader capabilities. By default, Google offers you a certain set of shortcuts and folders, which are located in the left column. But we are free to customize everything to suit our needs.
How to create a shortcut in Google Mail
First, you will probably need to go to the settings (Gear - Settings) and on the second tab, using the “yes” or “no” activation, configure the display of left menu items (some shortcuts can not only be disabled, but also deleted).

There will also be an opportunity to create a new one using the corresponding button. Create a shortcut in Gmail You can also when viewing a letter (from the context menu of the icon called “Shortcuts” on the top panel):

In general, I don’t really understand these icons, so for more information and clarity, you can check the “Text” option in the settings on the “General” tab in the “Button Labels” area.

After this, instead of mysterious icons, clear inscriptions will appear on the top panel of G-Mile:

As you can see from the above screenshot, in fact, even the Inbox folder is a shortcut. In Gmail, shortcuts can be nested (previously this required installing an add-on from the Laboratory), which gives even more opportunities for targeting.

How to customize appearance and use shortcuts
The created shortcuts should be observed in the left menu(additional directories with the names of shortcuts will appear), and their configuration or deletion can be easily done by clicking on the arrow button that appears on the right (the left arrow reveals a list of nested shortcuts, if any) when you hover the mouse cursor over any of them in your mailbox:

A context menu will open where you will be asked to select a color for this shortcut, as well as make a number of additional settings:

Now, after assigning a unique color, when viewing incoming messages in Jimail, you can very easily see what labels they are marked with.
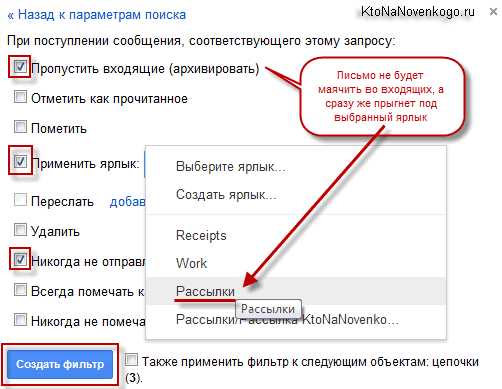
Although, in my opinion, it is best to configure filters to automatically remove messages from your inbox if they meet any condition for moving under a label (there is no need to clutter your inbox - only unfiltered messages will be there):

When viewing this letter, you will also have the opportunity, if necessary, to remove unnecessary cross labels:
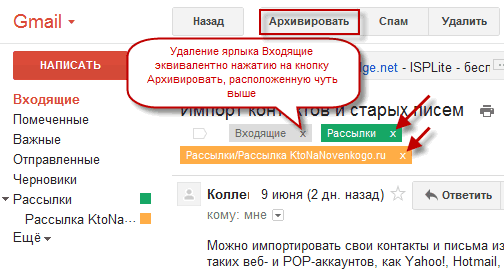
Removing an Inbox shortcut sends the letter to the archive, but it will still be available in other existing shortcuts (folders, in other words). And, of course, in the “All Mail” folder you can always find them safe and sound. Okay, at first it’s difficult to figure it out, but you can imagine all this shamanism as creating the folders you need in the future. There is a possibility if necessary, but this is a last resort.
It is clear that when reading messages you will be able manually assign them to one or another shortcut (in other words, place them in folders) using the button of the same name located at the top and its context menu. In fact, in this way you can manually distribute the letters from your mailbox in Jimail into the folders you need and pre-created. However, this is a tedious task and, if possible, I would like to automate the routine.
Filters in Jimail and a detailed example of their use
How to do it? Using a second tool codenamed Google Mail filters. These wonderful filters are available in the settings (from the gear menu) on the corresponding tab. There you will see the filters you have already created (if any) and a link that allows you to create a new impeccable example of indestructible logic (called Create a new filter).

In the window that opens, you need to enable logic and try to set a unique algorithm by which Gmail will filter the correspondence you need. If someone has used desktop email programs before, then there will be no problems with this.

If the filter doesn't work, you can always correct it. You can filter, for example, by the subject of the letter, by specific terms found in it, by the address of the sender or recipient (if the message is sent to Jimail from another mailbox of yours).
At the next step of the filter creation wizard, you will be asked to assign the fate of those unfortunate letters that are filtered in accordance with the algorithm you specified. For the example given with filtering mailings coming from the left mailbox, you need to check the boxes in accordance with the screenshot:
Let's Let's look at an example of this Gmail filter:
All. Create a filter, test its suitability, correct shortcomings and enjoy cleanliness and order in your correspondence on the most wonderful web-based email client.
Importing addresses and letters into Gmail, collecting mail from other mailboxes
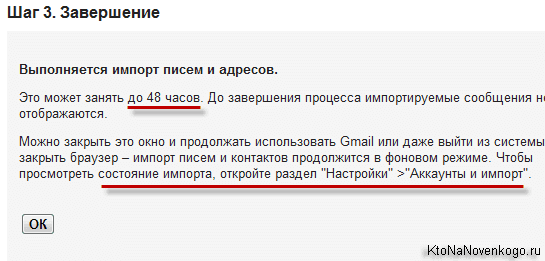
Now let's assume that my agitation for Soviet power had an effect and you were inspired by the idea moving to Gmail with all his belongings, i.e. with accumulated contacts and tons of letters. It won’t be that difficult to do this, although not very quickly (even with Google’s unlimited power, transferring an array of correspondence can take up to two days). However, all this will be done automatically, and you will only need a little patience in making the necessary settings.
In addition to, in fact, a complete move with all your property to Jimail, this email service will allow you to use all your mailboxes that have accumulated over a long time to the fullest, and your opponents who will send messages to them will not even notice that you are no longer there live (responses to their letters will come with the same return address to which they wrote). It's actually a wonderful thing that also works great.
Import contacts into Jmail from your other mailboxes
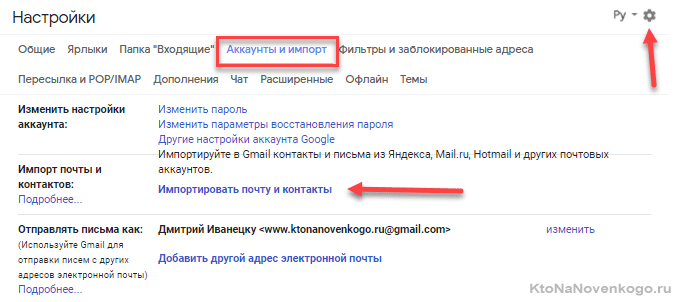
All settings are made on the tab "Accounts and import". In the “Import mail and contacts” area, you need to click on the link shown in the screenshot:
Import from a huge number of email services is supported, a list of which you can see on this page. In the first step, the wizard will ask you where Google will collect contacts and messages, and in the second step you will be asked to enter the password for that mailbox.

After clicking the “Import” button, you will be notified that this is not a quick process. You can verify that the process is complete in the Google mail settings using the path indicated in the screenshot:
You can teach Google to pull chestnuts out of the fire (letters to Gmail from your other mail services), but the collection will not be carried out in real time, but sporadically with an interval of one hour. If the speed of collecting correspondence is critical for you, then it’s better do the reverse operation— go to the settings of those same third-party accounts and add to them the forwarding of all mail to Google.
Forwarding mail from other mailboxes to Jemail

Well, it’s probably worth mentioning that in the Gmail settings on the tab Forwarding and POP/IMAP you can set all incoming correspondence to be forwarded from your new Google mailbox to your current main mail account.
And if you are used to using a desktop program to work with mail, you can, if necessary, disable the POP protocol and enable a more advanced one IMAP to pick up correspondence and read it on your computer.
Useful Settings and Gmail Lab
Among all the possible settings of Gmail (Gear - Settings), we have not considered the “chat” tabs (which I don’t use and don’t know what to say about them), as well as the settings for enabling the smart mode for separating inboxes into important and unimportant on the “Inbox” tab ", and a tab "Themes", where you can put the most pleasing skin on the web interface:

By and large, there is nothing interesting there.
Let's see if there's anything left that we haven't covered "General" tab of Jimail settings:

- The interface language - well, there’s nothing to talk about here.
- Maximum page size - the number of letters (chains, which, by the way, are an amazing invention of Google - all correspondence with the same user reduced into one chain, where you can remember the essence of the matter) and contacts (available from the drop-down list of the Gmail button located above the left list - I advise you to add photos to all your contacts in the settings or for style).
- Chains of letters - you can disable the wonderful function described just above, but I assure you, it’s not worth it.
- Shortcut keys are disabled by default, but perhaps constant work with mail will become more convenient when activated. A list of hotkeys can be seen on this page.
- Desktop notifications - if you work with Gmail from Chrome, you can enable this function, and when new messages arrive, a pop-up window with information about this extraordinary event will appear in the lower right corner of the screen.
- Signature - if you don’t want to write “With respect, Dmitry Petrovich!” at the end every time, then just fill it out once in the general settings and this template will be automatically inserted into all letters you send.
- Autoresponder - you probably received an almost instant reply with general words in response to your letters (I’m not here right now, but I’ll definitely answer). This is what an answering machine is. This kind of stuff just pisses me off.
All other settings have either already been discussed above or do not deserve to be said anything more about them. So, trifles, which, however, may seem useful to someone.
Laboratory and advanced settings in Jmail
Let's move on to a tab that has not yet been touched upon by us, but nevertheless, probably the most interesting tab from settings – Laboratory.

It is, however, only present in the settings of the old interface, and in the new one there is a tab instead "Advanced". Some of what could be enabled in Labs is now available there (in the new interface).

But in the new interface there is also an opportunity on the “General” tab to check the “Enable access to experimental functions” field and after saving the settings, they should, in theory, appear on this very “General” tab. But I have not yet noticed any changes from checking this box.
In general, Google mail was born in 2004 and was in the beta stage until 2009. During this time, "Lab" took root and became the main source of innovation in this by far the best online email client.
I have repeatedly observed that additions from the “Lab” over time took up space in the main settings. Apparently, Gmail, therefore, tests out new features and makes a verdict on their implementation based on the collected statistics of their popularity (this is similar to a test browser, the successful developments in which are then implemented into the main project -). Well done, what can I say.
But let’s see what interesting things are being tested in the “lab” now, although if you read this article after a while, you won’t find much there. I will only review what I use in my account (please don’t kick me too hard for this). So, what useful little things can you do? attach to your Gmail.com mailbox:
- Unread messages icon- a small but pleasant trifle. After activating this function, the number of newly received messages will be displayed in the tab of your browser where Google mail is open. It probably won't be superfluous.

View area— this cartoon seemed extremely convenient to me, because I’m slowly switching to Gmail from an email client integrated into Opera, where everything is organized exactly like this. Now you can close the window for viewing the list of messages and view the contents of the selected letter in the freed-up area. Comfortable.
Activate, save the settings and, having gone to view the list of letters, glance at the top panel, see a new button that will allow you to configure the screen split vertically (shown in one of the top screenshots), horizontally, or not at all:

Response templates— I use it often so as not to retype the message every time. Quite convenient, but requires a little initial setup. First, activate this cartoon, and then open the dialogue for writing and replying to a letter. Did you see the arrow at the end below?

First, go to the only item from the context menu “Response Templates” and name the future template. Then, in the letter writing field, enter the text of the future stamp and select it completely. From the "Canned Answers" context menu, now select the name of your template, but only what is in the "Save" area:

- Custom shortcut keys - I haven’t used them yet, but it’s a rather interesting option that allows you to assign the most common operations to hot keys.
I also forgot to mention that in some browsers (Chrome and Firefox for sure) you will have the opportunity to create an online email client Jimail default program on your computer, which will contain . This is very convenient if you are interested in this client and do not think about working in any email program. When you open the mail web interface in Chrome, a line will appear at the top of it asking you to commit the act of vandalism described just above:
Until you answer “Yes” or “No”, this inscription will not stop haunting you.
Good luck to you! See you soon on the pages of the blog site
You might be interested
 Creating icons from E-mail and ICQ numbers, as well as getting to know Gogetlinks Yahoo Mail - updated free mail
  How to create an email - what is it, how and where to register and which email to choose (mailbox)
How to create an email on Gmail.com - a free service from Google? Nothing could be simpler. In this case you will receive the most functional and secure email service. But that's not all, along with your email you will receive Google account, and with it access to numerous free services from Google. Google provides Gmail.com email for free.
1. What services from Google will be available with Gmail?
- Google drive— cloud storage (15 GB),
- Youtube— access to creating your own channel on a popular video hosting site,
- Google+- this is a social network, if you have your own website, then for promotion on Google I recommend publishing article announcements here,
- Google Play- a huge portal for downloading games, programs, books,
- Google Docs— presentations, tables (free alternative to xls), drawings,
- Blogger- free hosting for hosting websites,
- Google Keep— to save the necessary information in one click,
- Google Calendar- for planning meetings and business,
- Google Hangouts— online chat and video and voice communication (alternative to Skype),
- Google photo— storage, editing, publication of photos. Photos are stored on disk,
- Google Translate— translation of websites and texts.
More recently, Google's Gmail service took 1st place in the world in terms of the number of users, overtaking the popular Outlook.com service.
2. What are the benefits of Gmail.com?
- functionality that is many times greater than other email services,
- access from any device that is connected to the Internet,
- the ability to enable the forwarding of letters from your other mailboxes,
- security, hacking protection (working via an encrypted https protocol),
- automatic sorting of incoming letters,
- anti-spam protection, one of the best spam cutters.
3. How to choose a name for your email address?
If you need mail for online business, I recommend using your real name or the name of your website, this will inspire maximum trust in your partners and clients.
Since Google is extremely popular, getting the desired name for your email address is quite problematic. Keep in mind that you can use dots when creating it.
IMPORTANT! Before proceeding with the registration instructions, I think I should tell you this useful information. Do not confuse the Gmail.com service with Gmail.ru. The latter has nothing to do with Google. Gmail.ru is a paid email service.
4. How to create an email on gmail.com?
To create an email on Gmail.com, follow this link:
Gmail.com mail registration >>>
Enter your details, including a phone number to recover your password if necessary, enter your country, click “Next”.

On the next screen, confirm your agreement to Gmail's Privacy Policy and Terms of Use by clicking Accept.


5. How to set up a secure login to your mail and protect your mail from hacking?
At this step I highly recommend you configure security and login. If you want to protect your email from hacking, set up two-step verification Login to Gmail mail: with entering a password and sending a code to the phone. Moreover, when it is activated, you can define your computer as reliable, then when you log in to your email from it, you will not have to enter the code sent to your phone every time. Settings can be made using this link:

Here is an explanatory video about double authentication from Google developers:
6. How to log into Gmail.com?
You can always log in to your mail, either by typing “gmail.com” into the search bar, or from any page of any Google service, click on the button, which is located in the upper right corner of the screen. Then click on the Gmail mail icon and voila - you are in your mail!

So here you go interface of your new Gmail.com mail. The first welcome letter from Google arrived.

7. How to make basic settings?
There are a lot of settings and useful functions. A separate article would be needed to describe them. To use mail, it will be enough to make a few settings, which I will talk about now.
- "Install the Gmail app" button. To access your mail from your phone, install the Gmail application on your mobile phone by clicking on this button and follow the simple instructions.
- “How to use Gmail” button. Be sure to check it out, there is a lot of useful information here.
- The Select Theme button gives you a choice of background for your mail.
- The “Change Profile Photo” button allows you to set a profile photo by selecting and uploading a photo from your computer. The photo will be displayed in the upper right corner of the screen.
- The “Import addresses and mail” button will allow you to configure the forwarding of letters from all your other mailboxes in order to see all letters in one application. You will be able to receive letters and send them on behalf of any of your mailing addresses.
8. Gmail.com inbox - how to set it up?
Here it is necessary to note the fact that Google mail has one of the best spam cutting tools in the world, while other mail services do not fight spam at all.
Further, if all letters end up in one Inbox folder, then you will very soon accumulate thousands of unread letters. Therefore, it is better to set up automatic sorting of letters. In particular, I am annoyed by mailings from which you cannot unsubscribe. So, you can make settings to send them to a separate folder (create a shortcut for it) and simultaneously delete them.
It is very easy to set up automatic sorting of incoming letters in Gmail using this useful video:
So, you now know how to create an email on gmail.com, how to set up a secure login and protect your email from hacking, how to perform basic email settings, including the very important automatic sorting of incoming emails.
I wish you inspiration for all your plans and projects!
Write your questions in the comments.
Hello friends. In the last article we went through. Today's topic or how to register in Google.
For those people who do not yet have their own mailbox there, I advise you to create one. Google mail (gmail) has less spam and is more protected from hacking than all other mail services.
Mail from Google
Of course, any email can be hacked if you guess the password. Therefore, I advise everyone to set complex or at least medium passwords, which should consist of letters and numbers, preferably in different cases (capital and small).
I learned about Google email relatively recently, about three years ago. At that time, I only used Mail.ru, which was enough for me. Mail actually has several disadvantages (for me personally, you may have more or none at all): a fairly high percentage of mailboxes being hacked and regular spam mailings.
I have not yet encountered such problems with Google mail and I hope that they will not arise in the near future.
Let's proceed directly to registering with Google and creating mail to Gmail .
Registration by mail
The first step is to turn on our computer. Go to any Internet browser that you are used to and often use (I have two of them - Google Chrom and Opera).

In the address bar you need to type the Google website - www.google.ru.

In the top tabs, select and go to Mail, which is located between News and Disk.

We will see the Gmail page. Google's approach to email.

In the lower right corner, you can select a language convenient for you, so that the registration procedure is clear to you and you do not need to use various translators.

On this page you can use two links Create an account and Create an account, which redirect to the same registration page.


We get into creating a Google account.


On the right is the registration form that we need to fill out.

This is a standard procedure and should not take much time. Fill in the column What is your name - first and last name.

In the next step, you need to come up with a username that ends in @gmail.com.

In the Create a password column, you need to write your password, which should be quite complex and consist of letters and numbers (you can use additional symbols) so that it does not get hacked.

In the next step we confirm our password (they must match).

Go to the Birthday column, fill in the day, month and year.

The next step is to select the gender; if you do not want to show it, you can select Not specified.

In the Mobile phone section you can write your number. You can use it if you forget your password; after a while an SMS will be sent with further instructions on how to restore it.

You can write a backup email in your backup email address. In cases of suspicious activity on your account, a corresponding notification will be sent to it.

Prove that you are not a robot by filling out the captcha and entering the two words shown in the picture.

If you don't see the symbols, you can refresh the picture and listen to what is shown on it. If you entered a mobile phone number, you can skip this check.

In the country column you need to select the one where you live. I live in Kazakhstan, so I chose Kazakhstan.

The next thing you need to do is check the box I accept the terms of the agreement and agree with Google's policies.

If you want to familiarize yourself with them, you can follow the two blue links.

You can also check the box if you want to see what your friends recommend using the computer and the Internet using the plus +1 button.

If you are a curious person and want to know why Google collects this information, you can find out by following this link.

If you have any difficulties or problems filling out the registration form, you can use the help.


Account Verification
After this we are taken to the Verify account page.

Next, you need to select your country and indicate your mobile phone number, if you did not indicate it when filling out above. Then you need to choose how to receive the code in the form of a regular SMS or a voice call and click continue.

A confirmation code should be sent to the specified mobile phone in a couple of minutes, maybe even earlier. If he does not come within 15 minutes, then you need to try again.

Mail setup
Your profile should then appear, where you can Add a photo or click Next.

A congratulations page appears with your email address and a blue button Go to the Gmail service.

We go to the Gmail service and a new mailbox opens in front of us, which we just created. In my case there was a Greeting and four incoming messages, yours may be different.

If you need to log into your new mail, you need to go to Google.ru or go to www.gmail.com and enter your username and password.

This is the procedure registration in google, namely, the creation of a mailbox on the Gmail service is completed. Inside the mail, you can customize everything for yourself, choose a design, set a background screensaver, get acquainted with Gmail and much more.
Let's sum it up
In today's article registration in google - mail to Gmail, we went through the entire process of registering a new mailbox from start to finish. I have several accounts on Gmail, as well as on Mail.ru.
Registration in Google - mail to Gmail
Perhaps you still have or have questions related to creating a mailbox on Gmail, you can ask them below in the comments to this article, and also use the form with me.
Thank you for reading me on
Hello! Today I would like to talk about Gmail email service(email from Google). Surely, you are already familiar with him; I personally met him relatively recently, about 4 months ago. Before that, I used Mail.ru, but after switching to Gmail, I realized that the latter is truly the best in the world. Why? I'll tell you more about this below.
What made me switch to another email service? This is beautiful, that is, now my mail looks like this: petr@site. Not bad, right? Yes, of course, this can be done in Yandex, but for some reason I settled on Gmail and I don’t regret it at all. Register for Gmail.com It won’t be difficult, but I still recommend that instead of regular registration, you immediately create a beautiful email with your own domain name (I told you how to do this).
How I use Gmail email
1. I empty my inbox.
In the “Inbox” folder I only have relevant letters that require some action: reply, follow up on some actions, etc. When a certain letter becomes irrelevant, I just I'm sending it to the archives. What is an archive? These are emails that are not visible in your inbox but are searchable. Here is the “Archive” button:
Also, letters that are sent to the “Archive” are available through the “All Mail” folder. This way, my inbox is always clean. If you are sure that you will definitely never need a particular letter, then instead of “Archive” you can safely click on the “Delete” button.
2. I mark important emails.
Some letters require an urgent response or are extremely important to me. And while I’m sorting out my mail, the first thing I do is go to the “Tagged” folder:
Marking a letter is very simple: just click on the “star” in the upper right corner:
If one star is not enough for you, you can use a bunch of marks. To enable them, you need to go to Settings -> General -> Stars:
3. I use “Shortcuts”.
For example, at the moment it is taking place and it is very convenient for me to collect letters from each participant in a separate folder. What did I do for this?
- I opened a letter from a marathon participant and clicked on the arrow in the upper right corner:

- From the list I selected “Filter similar emails”:

- In the “From” field, I entered the email address of the marathon participant and clicked on the “Create a filter according to this request” button:

- In the “Apply shortcut” line, click on the “Select a shortcut...” button:

- Already there I clicked on the “Create shortcut” button:

- I gave the shortcut a name (in my case, I wrote the website address of this participant) and clicked on the “Create” button:

- That's all! The shortcut has been created, now all letters from [email protected] will automatically go to the pupkin.ru folder:

This way you can filter letters by mailbox, subject, etc.
Assign a specific color to each label, thereby increasing visibility significantly:
4. I mark automated emails as read.
Letters often come from exchanges such as Rotapost and others. I need them, but I don't like them to be “unread emails.” For such letters from exchanges, I also create filters, just in step 4 of the previous paragraph (see above), I check the box next to “Mark as read” (I do not create labels for these letters):
6. I actively use search.
Do you need to collect all correspondence with a specific recipient? No problem! This is very easy to do in Gmail. Just enter the mailbox address of the person you need and voila! , all the letters from him are before your eyes:
It really helps when the person you are corresponding with does not use the message history in their email. Then they wonder why I don’t answer their letters? And sometimes I don’t even remember what I talked about with this person. Honestly, the search is very useful. I also search for all sorts of keywords and actually find the letters I need.
Also, what’s great about Gmail is that all emails that are replies are collected in email chains(saving space in the list of letters and making it easier to track history).
7. It is very convenient to use Gmail email through your mobile phone.
You can easily find an application for almost any phone here http://gmail.com/app. Or you can use the browser version of the Gmail website, which is still very convenient (mail is “narrowed” to fit the screen size). There are also a lot of applications produced by third-party developers. For example, on my beloved iPhone I use the Sparrow app, which is really very convenient. On the iPad, I use mail in the browser, everything works great.