Surely not many users of Android OS devices know that there are so-called engineering (service) codes, which, by the way, appeared much earlier than the release of the first version of the Android OS. This set special characters The developers called it the “Engineering Menu”, which is recommended to be manipulated only by specialists, but, nevertheless, this kind of information will be clearly interesting and probably useful for ordinary users.
The main purpose of this system is the work of specialists with it. service centers for repairs and more fine tuning mobile devices. Therefore, after reading this material, and having learned the combination of characters to enter one or another block of the engineering menu, you decide to experiment with your own device, without having sufficient knowledge and training, you should be aware that all responsibility for the consequences will lie only with you.
What can be changed in the engineering menu
Now we will tell you what can be done using one or another engineering code:
Engineering menu codes and their functions:
- Find out the IMEI ID - *#06#
- Settings and details - *#*#4636#*#*
- Android firmware, version - *#2222#
- Delete all SMS - #*5376#
- Getting information about the phone (usage statistics) and battery - *#*#4636#*#*
- Reset account Google account of the owner of the phone and others system utilities without deleting the pre-installed software with the preservation of programs located on the memory card (SD) — *#*#7780#*#* (before resetting the settings, you will be asked to confirm the action being performed, so there is still a chance to change your mind).
- Perform factory formatting - delete absolutely all settings and files, including those stored in internal memory, and reinstalling the smartphone firmware - *2767*3855# (The introduction of the code does not give a chance for reflection, it is only possible to quickly remove the battery and restore data via the PC)
- Camera Information - *#*#34971539#*#* The following options are available here:
- updating the firmware of the phone's camera into an image,
- Receipt firmware versions,
- quantity information firmware updates,
- updating the camera firmware on the es-di card.
Important! You should NEVER use the first option yourself in order to avoid a complete failure of the camera.
- Change the modes of the button "Hang up" (On.Off.) — *#*#7594#*#* By default, a long press of the button shows on-screen options to switch to modes: silent, flight, or turn off the smartphone. Here you can turn off your phone automatically without selecting options.
- Opening the file copy screen — *#*#273283*255*663 282*#*#* Here you can get backup copies of your own data (photos, audio, etc.).
- Entering the service mode (launching various tests (by pressing the "menu" button), changing settings in the service mode) — *#*#197328640#*#*
Factory test codes:
- Wi-Fi MAC address - *#*#232338#*#*
- WLAN- *#*#232339#*#*
- GPS test - *#*#1472365#*#* or *#*#1575#*#*
- Bluetooth - *#*#232331#*#*
- Bluetooth address - *#*#232337#*#
- Batch Loopback Tests − *#*#0283#*#*
- Version touch screen — *#*#2663#*#* (test *#*#2664#*#* )
- Motion sensor test - *#*#0588#*#*
- LCD test - *#*#0*#*#*
- Vibration and backlight *#*#0842#*#*
- Melody test - *#*#0673#*#*
- RAM Version - *#*#3264#*#*
We have given information only about the main Android codes that solve some problems in the operation of the device and therefore may be of interest to advanced users. But, nevertheless, we remind you once again: DO NOT enter any code if you do not know what they are for!
To enter the Engineering Menu, you need instead telephone number enter into the dialer a certain combination of characters that are different for different manufacturers:
- For Samsung - *#*#8255#*#* or *#*#4636#*#*
- Smartphones based on MTK processors - *#*#3646633#*#* (Maybe *#*#54298#*#* )
- HTC- *#*#8255#*#* or *#*#3424#*#*
- Sony - *#*#7378423#*#*
- Huawei- *#*#2846579159#*#* or *#*#2846579#*#*
- Fly, Philips, Alcatel - *#*#3646633#*#*
Immediately after entering the engineering menu should open. In case of failure, you can try to press the button that makes the call.
To launch the engineering menu on smartphones with an MTK processor, there is a special application that you can use if the service does not open through the dialer.
In fact, as can be seen from the material, service menu opens up huge opportunities for setting up or troubleshooting the device, but amateurs still should not use it in order to avoid “bricking” their Andryukha. Keep this note in mind if your hands are itching to urgently enter the coveted code.
In order for developers and testers software and mobile devices could obtain some system information and debug smartphone functions, Android OS contains some hidden opportunities. Among them - connecting to a PC in developer mode, viewing detailed information about networks and hardware, etc. One of the tools for this is the engineering menu.
Engineering menu- This is a special settings menu that contains tools for testing and calibrating the hardware of a smartphone. By default, it is hidden, and in order to get into it, you must perform a certain procedure. The appearance of the engineering menu is different on different smartphones, depending on the manufacturer and SoC model. The customization options will also be different.
There are several ways to enter the engineering menu, which differ depending on the smartphone manufacturer and chipset model. You can try to start by entering one of the codes in the dialer application:
- *#*#3646633#*#* - smartphones with
- *#*#6484#*#* - some smartphones with Qualcomm;
- *#*#54298#*#* - some smartphones with MediaTek;
- *#0*# - some Samsung smartphones;
- *#*#7378423#*#* - some Sony smartphones;
- *#*#4636#*#* - on some devices opens only the network menu;
- *#*#2846579#*#* - some Huawei devices.
If none of the codes helps, on a smartphone with MediaTek, you should install the program "Launch MTK Engineering Menu" from the market. On Xiaomi devices, you can enter the menu if you go to "Settings", select "About phone" and there five times in a row press the line "Kernel version".
What can be configured on a smartphone in the engineering menu
The engineering menu on different platforms is different, in many cases it only allows you to test some parameters. On the Xiaomi Redmi Note 3 Pro and Note 4X, built on Qualcomm chips, the engineering menu allows you to test various functions. Among them are the screen, sensor, sensors, cameras, sound and microphone, communication, battery, navigation, etc. There is no possibility to change something, you can only find out if everything works correctly.
There are much richer opportunities on the MediaTek platform. In Oukitel U7 Plus (MT6737 chipset), the engineering menu allows you to configure the network, sound, communication modules, and other modules. On Redmi Note 2 with MTK Helio X10, the menu was identical, and on other devices with MTK it is not particularly different. On his example, we will describe the possibilities.
Telephony Tab
This section is responsible for setting up the modem cellular communication. Here, BandMode, Network Selecting and GPRS options provide interesting opportunities.
BandMode
AT this menu You can select the communication standards that will be active on your phone when you establish a connection with mobile networks. The menu item has a choice frequency bands for each SIM card, if there are two SIM cards - full list usually available only on the main page (usually the first one). Once you know exactly which frequencies your carrier uses in the region, you can uncheck all the others. This will slightly increase the time battery life due to the fact that the device will not look for operator towers in these ranges, spending extra energy on scanning the air.

Sometimes some communication standards (especially for LTE) are supported at the chipset and core levels, but are disabled in the firmware. By checking the box next to them, you can activate support for these networks. It is worth warning that it does not work everywhere: on the same Redmi Note 2 (Chinese version), TDD-LTE was turned on in this way, and on Oukitel U7 Plus, these items are not activated.
network selection
The name speaks for itself: this item is also responsible for the choice of networks. Only in this case, the user can choose which types of networks to use. The goal is the same as in the previous paragraph: to reduce the burden on cellular modem thus reducing charge consumption. You can choose to work only in 2G, 3G, 4G, or combine several standards.

If your carrier does not have 3G or 4G at all, these items can be turned off so that the smartphone does not constantly try to look for LTE networks, thereby speeding up battery drain. You can also turn off 3G and 4G if you need constant communication (for example, to correspond on the Internet), but the traffic is limited and uncontrolled use of WCDMA and LTE background processes can quickly spend it.
GPRS
Despite the name, this item is interesting not for the GPRS communication settings, which are no longer needed by many, and it is not recommended to change the settings themselves for "mere mortals". main feature- this is the ability to record the IMEI of the smartphone. In the corresponding item, you can enter the device identification number and click Write to save it.

The ability to write IMEI is often required after an unsuccessful flashing, when it "flies" and the device cannot register in the operator's network. By rewriting this code from the smartphone box, you can restore functionality. Attention! illegally changing the IMEI of a smartphone in many countries (including Russia, Ukraine) is a crime! In addition, rewriting this code to a random one belonging to another subscriber of your operator may cause communication problems due to a hardware conflict. Therefore, we recommend that you always keep the box or sticker with the IMEI in case unsuccessful firmware. Indeed, on devices with a fixed cover, this identifier is not written under the battery.
Connectivity tab
In this tab, the functions of testing and fine-tuning the Bluetooth module, radio receiver and Wi-Fi are available. The vast majority of users have nothing to do here, since there are no interesting settings for a non-professional, but disrupting the normal operation of Bluetooth by entering something wrong is easy.

Hardware Testing Tab
This settings item in the engineering menu is responsible for the configuration hardware. The Audio and TouchScreen items are interesting for users. The latter contains HandWriting and MultiTouch items. It is easy to guess what these parameters are responsible for.

Using the first one, you can check the clarity of the touchscreen operation, check for the presence of "blind zones". This menu is especially useful when buying a smartphone, in particular, from hands without a guarantee. The second point allows you to do the same, but with the participation of several fingers. With it, you can test how well the smartphone handles gestures of several fingers at the same time.
Audio
It is this cherished item that is needed by those who are looking for how to increase the volume in the engineering menu. The upper items allow you to control the volume of the device, and are responsible for different modes.

Normal Mode is the mode normal use, with the output of music or video sounds to the music speaker. Headset Mode is responsible for controlling the volume in the headphones. The LoudSpeaker mode allows you to adjust the volume of a conversation when using the speakerphone. The last item is a combined one, it is responsible for speakerphone when headphones are connected. In order to change the sound in the engineering menu, you need to select which device you want to configure.

- Sip - settings for Internet telephony;
- Mic - microphone sensitivity
- Sph - conversational speaker;
- Sph2 - the second conversational speaker (a rare beast among smartphones);
- Sid - after changing this parameter, an echo of your voice may appear during a conversation, so you do not need to touch it;
- Media - multimedia speaker, what most people need.
In order to adjust the volume, you need to enter the desired mode (for the volume of the multimedia speaker, this is Normal Mode), select the Media item and set the volume value in the specified range.

The Level parameter will be responsible for the volume value set by the rocker on each division. Level 0 is the smallest value (one division), the highest Level is all divisions, on Oukitel U7 Plus it is 14, on other smartphones it may differ. The value can be from 0 (speaker silent) to 255 (full volume). It doesn't make much sense to change the value, but if after a certain division it seems to you that the sound suddenly becomes much quieter, you can increase the values \u200b\u200bfor this division (and lower levels) by a couple of units. The main thing is that the conditional Level 6 does not turn out to be louder than Level 7, due to too high a value.
But to increase the maximum volume in general, you need to change the value in the Max Vol item. The maximum level corresponds to 160, but manufacturers often bet less (on the tested device it was 128). By setting the number higher, the volume will increase, but side effects such as gurgling, noises and wheezing are possible. Optimal value should be selected by the "scientific poke method": increase the value by several units, save, check the sound on video or music, and if everything is fine, increase it again.
Conclusion
It is worth repeating once again that the engineering menu is different on different smartphones. What is available on the MediaTek platform cannot be done on Qualcomm. Codes for entering hidden settings may also not be suitable in some cases, we cannot guarantee their 100% performance. In addition, everything that you do with your smartphone is done at your own peril and risk, as improper settings can affect its performance. In such cases, only a general reset or flashing will help. So if you really want to experiment with settings, the meaning of which you do not fully understand, it is advisable to take screenshots before that, so that if something happens, enter the factory values.
What is rooting for? android devices and what opportunities it gives is known to a fairly large number of users, which cannot be said about the hidden advanced menu of hardware settings, also called the engineering menu. Few people know about these settings, and even fewer mobile device owners know how to use them. What is the Android engineering menu and why is it needed?
Engineering android menu- this is nothing more than a special subroutine intended for testing by developers operating system and device sensors. The interface of this program is represented by a set of options that allow you to change the hardware configuration of the mobile device. With its help, you can get comprehensive information about the hardware of the gadget, test the processor, operational and physical flash memory, modes wireless connection, adjust settings for the camera, display, microphone, speakers, and more.
Entering the engineering menu
All this, of course, is good, but here's how to enter the engineering menu, if in Android interface there is no corresponding option? Entering the advanced hardware settings menu is carried out using a special code entered in the line for dialing a telephone number. The menu should open immediately after entering the last character of the combination, but in some cases it may be necessary to press the call button.
There is nothing complicated in the procedure itself, however, it should be borne in mind that for different models mobile gadgets have their own codes. Below we have provided a list of codes for the most popular manufacturers.
The engineering menu codes in Android are universal, however, they correct work on phones with "left" firmware is not guaranteed. To access hardware Android settings can also be used special programs, for example, "MTK Engineering Menu" or "Mobileuncle MTK Tools".

Such applications are especially useful on tablets, the firmware of which does not provide for the presence of a “dialer”. The interface and the set of available options in these programs are somewhat different, however, it will not be difficult to deal with them.
Whichever method you use, you need to exercise maximum caution when working with the engineering menu. Before starting work, it is strongly recommended to write down all the values of the original parameters in order to be able to restore the settings. Experimenting with the engineering menu just to find out what will come of it is unacceptable, as you can render your device unusable!
To get a list of engineering codes for a specific phone model, you can use a special application Secret Codes available on Google Play. On some models of mobile devices, full access to the engineering menu may require superuser rights (root).
What can be changed using the menu
You know how to get into the engineering menu, now let's find out what settings you can make with it. The possibilities are more than wide. The menu subroutine supports changing the speaker volume and microphone sensitivity, built-in camera settings, audio settings, GPS modules, Bluetooth and Wi-Fi, turning off unused frequencies to save battery power. You can also test the key components of your device and external card memory, configure I / O operations, determine the exact temperature of the processor and battery, the level of harmful electromagnetic radiation.
Another useful feature is access to the recovery mode - an analogue of the BIOS on computers, which in turn contains a whole set of settings. Recovery Mode features include resetting the device to factory settings, updating the firmware, creating a backup copy of the operating system, gaining root access, deleting sensitive user data. It is not possible to list all the options of the engineering menu within the framework of one article, the more sensors and components in the phone or tablet, the more extensive it will be.
Increase the volume of the phone through the engineering menu
And now we will demonstrate how to work with hardware settings using the example of one of the most popular operations and find out how to increase the volume on Android through the engineering menu. So, go to the menu using Mobileuncle MTK Tools or by entering the “magic” code, then find and open the Audio subsection. If you entered the menu through the Mobileuncle Tools program, this subsection will be located in the Engineer Mode high-order section, in other cases it is usually located on the Hardware Testing tab.

In the Audio subsection, the following options will be available to you:
- Normal Mode- normal mode, which works when a headset is not connected to the device.
- Headset Mode - headset mode, which is activated when headphones or speakers are connected to the smartphone.
- LoudSpeaker Mode - loudspeaker mode. Activated when the speakerphone is turned on, provided that a headset is not connected to the device.
- Headset_LoudSpeaker Mode - loudspeaker mode with a connected headset. The same as the previous one, but with headphones or speakers connected.
- Speech Enhancement - this mode is activated when talking on the phone without using the speakerphone.

There may be other settings in the section, for example, Debug Info and Speech Logger, but it's better not to touch them. Select the mode for which you want to change the volume level (let it be Normal Mode), select Type in the list that opens and indicate for which function we will change the volume. The following functions may be available:
- Ring - volume setting for incoming calls;
- Media - adjust the volume of the speakers when playing multimedia;
- Sip- sound settings for Internet calls;
- Sph - sound settings of the conversational speaker;
- Sph2 - sound settings of the second conversational speaker (option may not be available);
- Mic - change the sensitivity of the microphone;
- FMR - FM radio volume settings;
- Sid - it is better not to touch this parameter, otherwise there may be problems with the voice of the interlocutor.
Having selected a function, scroll through the current list, set the desired Value (from 0 to 255) and click to apply the new Set settings.

To change the volume level, you can also use the preset templates - the Level option. Most phones have seven levels, from 0 to 6. It is advisable not to touch the Max Vol setting, just as you should not set too high values for Value, otherwise the sound in the speakers will begin to wheeze. Other modes are configured in the same way in the Audio subsection.
Some models of smartphones and tablets require a reboot for the new settings to take effect.
Reset
And the last thing we'll look at today is resetting the engineering menu settings to factory defaults. It may be needed if, after making changes, the device began to work incorrectly. There are several ways to reset. If the system boots normally, go to the settings and open the "Recovery and Reset" subsection.


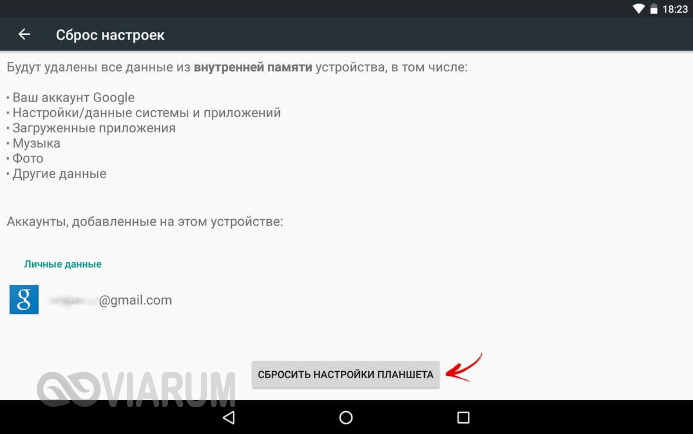
You can also reset the engineering menu by entering a special service code. This is usually *2767*3855#, *#*#7780#*#* or *#*#7378423#*#*, but your phone model may require a different code.
Another option is to use the recovery mode, which was mentioned above. To get into it, use one of these combinations:
- Power button + volume down.
- Power button + volume up.
- Power button + Home button + volume up/down.
- Power button + volume up + volume down.
In the list of options that opens, select "wipe data / factory reset" → "Yes - delete all user data" → "reboot system now". The device will reboot and the settings will be reset.


There is another way to reset the engineering menu settings, but it requires superuser rights. Using any file manager with the support root rights, go to the root directory of the system, and then delete all or part of the contents of the folder data/nvram/apcfg/aprdcl and reboot.

Files in a folder aprdcl just responsible for the settings of the engineering menu. It is not necessary to delete all files at once. If you screwed up, say, with the audio settings, to restore the original settings, it is enough to delete the files that have the audio string element in their names. And one moment. Regardless of the reset method, always do backup your personal data and applications, as they may all be lost.
Access to the engineering menu of your Android smartphone is additional features gadget control.
In addition, this is a real opportunity to change "immutable settings", enable functions blocked, but incorporated by the developer, and really improve (or spoil with inept intervention) your gadget.
Engineering menu - what is it
The engineering menu and hidden settings were present in the very first phones!
This gave and gives the opportunity to developers to configure and test gadgets in the most unusual modes.
True, most are still designed for smartphones and tablets based on the MediaTek processor.
Do not forget that if applications do not work correctly, you can make problems much bigger than the problem of getting into the engineering menu, so be careful.
In addition, it is not a fact that the first application you choose will work correctly on your smartphone.
Therefore, you will most likely have to download and install several options before you find one that suits you.
What parameters are available for configuration in the engineering menu
Of course, different smartphones design schematics and menu functions may vary.
Therefore, when you get to this function, you can find several different options and menu items in different phones.
Therefore, for example, a device on Qualcomm Snapdragon the possibilities will be rather scarce and everything will be limited only to viewing various parameters and testing them.
At the same time, smartphones based on MediaTek will have much wider opportunities.
At the same time, remember that these settings are hidden by the developer for a reason.
When changing them, you must be aware of what you are doing, otherwise it may end badly for your gadget.
Important! Make it a rule to never change settings that you don't know the value of or are unsure of how it will affect the operation of the device. Otherwise, you risk spoiling your mood for a long time.
Information that can be obtained through the menu
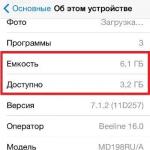
Basic data available on any type of smartphone:
Phone IMEI– personal identification (unique) number of the device.
Phone number- sometimes not indicated;
Net- your operator;
Roaming– are you in roaming;
Network Information– are you being serviced and is the network turned on;
Call forwarding- Is it currently in use?
Network type, network index;
Signal volume.
Your location coordinates.
There is also a section on battery it will contain the following data:
1 State– whether the battery is currently being charged or not.
2 Charge level- as a percentage of the charge / discharge.
4 Battery Type- production technology
5 Time elapsed since last charge.
In addition to this information, the engineering menu may contain much more various useful data, depending on the type of menu provided by the developers.
Testing a Smartphone with Engineering Mode Capabilities
It often happens that with all the correct visible settings, the phone does not function correctly.
The speed of the processes does not correspond to the declared parameters, the amount of random access memory less than it should be, failures in operation or installation of valid applications are detected, as well as the absence of proper functions.
And the standard user menu does not give any way to find the cause of such problems.
The engineering menu just makes it possible to conduct in-depth testing of the system and the device itself for hidden malfunctions or incorrectly set parameters.
The following modes are available:
1 General (Automatic Test)– this test will test every parameter of the smartphone;
2 Report– a full test report is displayed;
3 Testing of all functional modules, processor, memory cards and SIM cards, vibration, speakers, microphone, connectors - literally everything that the phone is stuffed with can be checked for adequate operation.
4 Screen tests- such parameters as brightness, clarity, sensitivity, reaction speed, correspondence between visualization and touchscreen;
5 Job Testing gyroscope, cameras, accelerometer, flash, and more.
This is what test mode looks like.
To open it, you need to go to the appropriate section (most often "Testing" or something like that).

This is just a small part of what the engineering menu can provide for testing, while, as you might expect, different phones will have different tools for testing and the points of the tested objects will differ.
However, the benefits of such opportunities cannot be overestimated.
Such testing can help to understand whether changing the settings will help in solving a particular problem, or needed.
Or maybe there is a problem at the level of physical damage, and it makes sense, for example, to replace the part.
Also, a similar test will be useful when buying a used device.
Thus, you can immediately detect non-working or error-prone modules and understand whether it is worth buying a gadget or not.
Let's consider examples of using the mode.
Adjusting the sound volume (Audio)
Thanks to the engineering menu, you can change the volume settings of the speaker of the external speaker, the speaker of the earphone, the headphone output, and, last but not least, the microphone.
However, at the same time, you should also be guided by a real need, for example, if you are told that you are hard to hear (due to loud noise in the microphone, or because no matter how loud you add sound, namely you are heard quietly, others are heard well , namely you quietly).
Then it makes sense to change the microphone settings.
Otherwise, if your microphone works well, you risk ruining people's enjoyment of talking to you on the phone by changing the microphone setting, the result of which you yourself do not hear.
To customize the sound, do the following:
1 Enter the menu and select the tab hardware testing, then audio. Select the desired mode. They are as follows:
- normal mode- the sound mode of the main speaker of the phone (which is near the ear);
- Headset mode– headphone volume adjustment;
- LoudSpeaker– the volume of the external speaker – the loudspeaker that is used during hands-free calling;
- Headset_LoudSpeaker Mode- this is the sound level in the mode when the headphones and the loudspeaker are working at the same time.
2 From the tab list, select which device settings you want. Again, there are options:
This parameter is very difficult to set up, so it is better not to change it.
After incorrect settings, the phone may begin to hear itself, as a result of which noises, whistling or unpleasant echoes may appear.
So you or your interlocutor will begin to hear himself during the conversation.
- Line Level this is the value parameter of each volume setting step in the standard menu. The ideal setting is 0. It's best not to touch it, as this setting is rarely messed up or misconfigured.
- "value is" and here is the parameter of each step of the volume of the external speaker (ring tone);
- Line "Max Vol", and there is a parameter that sets the upper sound threshold, that is, the maximum volume that can be set on the phone simply by adding sound to the maximum, for example, during a call.

Configuring Cellular Settings
In this case, we will adjust the frequencies.
If you don't know what cellular settings your carrier is using, changing this window may result in loss of connection, so it's best to let your phone automatically select frequencies for communication.
However, unchecking unused frequencies gives a small bonus to energy savings.
At the same time, if your phone is designed for a different region and the manufacturer did not initially assign the frequencies you need, then this menu will just help you turn them on.
Attention! There have been precedents of criminal prosecution for unauthorized change IMEI numbers. Moreover, the punishment can be both a fine and a suspended sentence, a criminal record, and in some cases even imprisonment.inprison!
Android Special Codes
In addition to the engineering menu itself, there are also various secret codes that help you manage the parameters of your phone.

Rice. 8. Special codes on Android OS
The ability to manage and change settings is a definite advantage.
But let's not forget that it is not for nothing that they are hidden and intended for those who know what they are doing.
We don't have access to the parameters of the laws of physics of our universe for a reason, don't we?
Who knows what would happen if we were able to change the force of gravity or the boiling point of water? It's disturbing, isn't it?
Use power carefully.
Android engineering menu and secret codes. What does the Android OS allow you to configure through the engineering menu? Sound volume, sensors and much more, read about all this in our article.
Our smartphones carry a lot of secrets that are hidden by manufacturers. Do you know anything about the engineering menu on Android? Have you heard of secret codes? Since our article was opened, it means that something is remote, but heard. All these tools appeared at the birth of the first mobile phones, but, naturally, over the years they have become more functional and understandable.
However, what should be noted right away is that the manufacturers' plans do not include making the engineering menu or secret codes for (as the name implies) available to everyone. And this makes sense. Let's go in order.
What is the Android engineering menu, secret codes?
So, Engineering Mode (engineering menu) is a special application that is installed on almost any smartphone. Used by the manufacturer to conduct various tests and optimize the operation of functions, sensors and other parameters of the phone or tablet.
By default, it is hidden in the system so that every user cannot access it. Called, as a rule, by means of a small code entered using a standard dialer. Thanks to the wide possibilities, access to the engineering menu, as well as its management, can be done using third-party applications.
Why is the engineering menu hidden? Careless use of the application's capabilities can harm your smartphone or other device. As noted above, the engineering menu is intended for manufacturers (developers, for testing). Therefore, you should be careful when making any changes here.
Secret codes for Android (service, engineering) are somewhat different from the considered menu. If the engineering menu provides access to many parameters at once, then one entered service code leads to only one, as a rule, function. There are a lot of codes.
Moreover, there are both universal ones (they work on most Android smartphones, even mobile phone) and codes for specific models devices. A little later, we will analyze the most popular ones.
How to access the engineering menu on an Android device - codes
 Android engineering menu - the most popular code
 There are two popular ways: using a secret code or using special software. Naturally, the first method is simpler and more reliable, but not without nuances. There is no universal code that will definitely take you to the engineering menu.
On one smartphone, one works, on the other - the other, on the third - the third. However, Android is not the first year, because users have deduced the most popular codes that work on most devices. So:
- *#*#3646633#*#* - the most common entry code to the Android engineering menu;
- *#15963#* and *#*#4636#*#* - if the previous one did not work, try these ones;
- *#*#7378423#*#* or *#*#3646633#*#* or *#*#3649547#*#* - used on smartphones from Sony;
- *#*#3424#*#* or *#*#8255#*#* – we draw the attention of owners of HTC devices;
- *#*#197328640#*#* – works on Samsung in some cases;
- 3845#*855# - often used to access the engineering menu on LG Android smartphones;
- *#*#54298#*#* - works on many devices with a MediaTek processor;
- *#*#2846579#*#* or *#*#14789632#*#* - and Huawei has its own set of codes.
At least at least one, but it should work on your device. Simply enter the code using the dialer ("Phone" application on the desktop). As a rule, you don’t even need to press the call button (not always) - at the end of dialing, automatic start services. But not everything is so simple, there are certain difficulties in launching the engineering menu on some Android phones.
I can’t enter the Android engineering menu: reasons
- firstly, on many smartphones or tablets with Qualcomm processors Snapdragon, Intel or Tegra either do not have a menu, or it is very difficult to access it. In some cases, you don't even have to try.
- secondly, custom firmware may be the cause of the problems. Some of them simply lack or block access to configuration tools. For example, you will not find the engineering menu in the CyanogenMod firmware, which is very popular among users. The reason is simple - the firmware was originally developed for devices based on Snapdragon.
- thirdly, the source of problems can be the manufacturer himself, who hid the engineering menu more reliably or decided to remove it altogether. Here we also include various kinds of errors, from which none of the devices is insured.
Actually, solutions to problems lie on the surface. If the smartphone is based on Snapdragon, Intel or Tegra, then in most cases nothing can be done. However, on these devices, you can also access a number of hidden settings, which we will discuss below.
By the way, on Xiaomi smartphones, which for the most part are based on chips from Qualcomm, access to engineering can be obtained by clicking several times on the "Kernel version" in the smartphone settings ("About phone" section). Finally, in some cases, flashing an Android device to a stock (official) firmware will help.
The second way to open access to the engineering menu can be applications. There are quite a few of them, you can download them for free from, but almost all of them are designed for smartphones based on the MediaTek processor.
Again, it is not a fact that each of the programs will work seamlessly on your device - there are a hundred reasons why they will refuse to function. These tools are developed by small companies, so you will probably have to try several.
What can be configured in the engineering menu?

How appearance interface, and the set of parameters for setting may differ for different smartphones. If you take a device on a Qualcomm Snapdragon, then often all you can do is look at information about the various modules and perform some tests.
You cannot make any changes to the settings. But smartphones based on MediaTek offer much more options: sound configuration, network settings, various modules, and so on.
So, no matter what the external interface of the engineering menu may differ in different devices, to deal with the points of labor will not be. Let's go through the main features.
Once again, you make changes at your own peril and risk. Don't change the values of parameters you don't know anything about.
Informative features of the Android engineering menu
The first thing that the Android engineering menu offers is to study various information about the device. It mainly concerns the network, wireless interfaces and batteries (on smartphones with Snapdragon processors via *#*#4636#*#* command). What can you see in these sections:
- Phone IMEI - a special (unique) number that is assigned to each smartphone;
- Phone number - not always indicated;
- Network - the current operator is indicated;
- Roaming - whether you are or not;
- Network information - serviced or not, enabled or disabled;
- Call forwarding - used or not;
- Network type, network index;
- Signal volume and your location as coordinates.
In the section "About the battery":
- Condition: charging or not;
- Charge level (in percent);
- Voltage and temperature;
- The technology by which the element is produced;
- Time since last reboot.
One of the sections allows you to view information about the use of applications on your smartphone (name, last launch date, duration). In addition, a separate section of the engineering menu on Android is dedicated to the wireless interface. Here you will find information about the connection status, network name, you can find out the speed and some other data.
Testing smartphone parameters in the engineering menu
Enough interesting opportunity engineering menu that allows you to test various smartphone parameters. Often helps to find the source of the problem, due to which the system is not functioning properly. What specific tests can be done:
- Integrated (Automatic Test) - each parameter of the smartphone is tested;
- Report - a test report is provided;
- Testing buttons, memory cards and SIM cards, vibration, speakers, connectors - all this can be checked for performance;
- Screen tests - for brightness, sensitivity, and so on;
- Testing cameras and flash, flashlight, wireless interfaces and sensors (gyroscope, accelerometer and others).
Again, the set of testing options may vary. It all depends on the engineering menu of a particular Android device. Undoubtedly useful features which will be useful to many users. For example, when buying a used smartphone, you can test the screen for performance.
Changing options in the Android hidden menu
If there is nothing to be afraid of in the case of testing or studying information about a phone or tablet, then you need to make changes carefully.
It is better not to touch the parameters at all, the purpose of which you do not know, and also take screenshots or mark on a piece of paper everything that you change. If you encounter problems, you can return the options to their default values. Consider here the most interesting sections.
Setting up cellular communication (Telephony) and changing IMEI
 Android engineering menu - frequencies
 Settings for changing network parameters are concentrated here. You are unlikely to be able to disable your smartphone by changing these parameters, but you can disrupt the network search, so remember where you shoot and where you check the boxes so that in the future, if anything, return everything to its place.
As a rule, changes in this section are made in order to reduce energy consumption.
First, you can deselect frequencies (subsection Band Mode) that your operator does not work on. We will find out in what ranges your cellular operator works, uncheck all the others. This will help to slightly reduce energy consumption, as it will know exactly which frequencies to connect to.
In the same subsection, on the contrary, you can turn on the desired frequencies. This is necessary when the manufacturer from the factory does not activate the necessary ones for your region. For example, often "out of the box" Chinese smartphones cannot work in Russia with LTE. This problem will help to solve the service menu on Android.
Secondly, in the subsection network selection we can set the priority of the networks that are used for access (2G, 3G, 4G). Everything is done with the same goal: increasing the battery life. As a rule, 3G and / or 4G networks are turned off. Not every region has support for these networks, and the communication module, be that as it may, continues to look for them, consuming energy. Turned it off and no problem. In addition, the device will not switch to 3G or 4G, wasting data.
To subsection GPRS, we, ordinary users, are better off not getting into it, unless there is a good reason for it. Here are the various settings for the smartphone to work with the network, and there is also an item for changing the IMEI.
Attention! There were precedents of criminal prosecution for the illegal change of IMEI numbers. The most common punishment is a fine or a suspended sentence. However, there were cases of actual imprisonment.
The IMEI change function can come in handy after an unsuccessful firmware attempt, when the identification number “flies”. Then you can simply rewrite it from the box that the device came in.
Connectivity
Here, as in the case of GPRS, most have nothing to do. The section itself is intended for making changes to the settings. Wi-Fi modules and bluetooth. In the section, you won’t be able to configure anything so that the smartphone works better, but you can easily harm your electronic friend.
Therefore, here we use only testing functions, and if it is necessary to make any corrections to return the device to working condition, we carefully study the purpose of each parameter on the Web.
Adjusting the sound volume in the Android engineering menu (Audio)
 Android engineering menu - volume setting
 Judging by the number of queries in the search, it is in order to increase the volume that Android users resort to the engineering menu. Everything is quite simple:
- Select the Hardware Testing -> Audio tab. Select the desired mode;
- Normal Mode - responsible for outputting sound to the main speaker.
- Headset Mode - with its help, the volume of the sound in the headphones is adjusted.
- LoudSpeaker - includes settings for adjusting sound parameters during speakerphone.
- Headset_LoudSpeaker Mode - allows you to increase or decrease the sound volume for hands-free mode with headphones connected.
- Now, from the drop-down list, select for which device we will adjust the volume in the Android engineering menu;
Sip - options for Internet telephony. Mic - sets the sensitivity of the microphone. Sph (maybe two) - setting the conversational speaker. Media - multimedia speaker (main). Finally, the item that is better left untouched is Sid. An echo may appear after the changes.
- The line "Level" sets the value of the volume level, which is tied to each step (pressing) of the volume rocker. The default is 0. You can leave it alone, unless, of course, the sound on your device jumps sharply when you press the button.
- The line "Value is" sets the value of each step (volume level);
- The most interesting line is “Max Vol”, with the help of which the maximum volume on Android is increased through the engineering menu.
As a rule, the smartphone manufacturer does not set the maximum value, so we can fix it ourselves. Please note that at the highest level, wheezing of the speaker is observed. To find the most comfortable value, we sort through the options.
Secret codes for Android
In addition to the engineering menu, you can use secret codes to access various functions. Here it is also difficult to predict which of the commands will work on your device. Consider the most popular and useful:
| *#06# | We get the IMEI of the smartphone |
| *#*#232338#*#* | Learn MAC address and Wi-Fi data |
| *#*#232337#*#* | Show Bluetooth address |
| *#*#3264#*#* | Displays information about RAM |
| *#*#1234#*#* , | Learn all about software |
| *#*#2663#*#* | View screen sensor data |
| *#34971539# | Displays information about installed camera sensors |
| *#0*# | Used for comprehensive smartphone test |
| *#*#0*#*#* | Useful for screen test |
| *#*#2664#*#* | Runs a display sensor test |
| *#*#0842#*#* | Produces a vibration test |
| *#*#0289#*#* | Useful for sound testing |
| *#*#1575#*#* | Starts a GPS module test |
| *#*#7262626#*#* | Used to check mobile connection |
| *#*#7780#*#* | Reset smartphone settings - completely or partially |
| #*5376# | Erases all SMS from smartphone |
| #*3851# | Useful for rebooting the device |
| *#2263# | Configuring network ranges |
| *#*#273283*255*663282*#*#* | calls backup files |