Home Media Server is a customizable, free app for sharing and sharing files on Windows 7, 8 and 10 PCs to other UPnP, DLNA, HTTP devices on the network.


It will be a convenient option for watching streaming TV, radio broadcasting and local video on gadgets without additional steps for downloading and converting content, connecting flash drives and HDMI cables.
Home Media Server Features
Processes client device requests for movies, images and audio data, without playing or generating anything on its own. The program supports Smart TVs, game consoles, media players, as well as mobile gadgets - almost any technology can be a full member of the multimedia network. Endowed with a number of possibilities:
- converting content into the desired format;
- adjusting the parameters of the video frame;
- switching audio streams and support for subtitles;
- redirecting streaming online broadcasting;
- support for digital television;
- simultaneous launch on a group of devices;
- working with podcasts;
- remote control via the WEB interface.
The home media server also provides the option to back up the database and settings. It can be useful in correcting errors in the use of the program and possible errors in operation.
Advantages in a Home Media Server
The main advantages in comparison with similar products include:
- Absolutely free. No advertising banners or intrusive third-party software.
- Multifunctionality. A universal "combine", the potential of which knows no boundaries.
- Support for trans coding. Automatically detects and recodes an unreadable source file in real time.
- Russian language localization. With the extensive functionality of the utility, it will be easier to understand the options in an understandable language.
You can download the Home Media Server for free for Windows 10, 8 and 7 operating systems at the link https: // site / domashnij-media-server / below, and a large number of settings and parameters will help users to customize the application as precisely as possible for themselves.
It's no secret that over time we accumulate a lot of all kinds of films, photographs and the like, and this is all usually stored on a computer.
But it would not be bad to watch a movie that you just downloaded from the network on a large TV, and not on a PC screen, but for this you need to transfer this movie to a USB flash drive, or burn it to disk.
In a word, a lot of unnecessary movement. But there are solutions, this is a multimedia server.
Don't be alarmed, this is not exactly a separate computer with hard drives. This is a program that performs strictly assigned tasks.
Let's take a look at several programs that can provide access to media content from other devices or programs.
Let's start with the theoretical basics of what DLNA and Smart Share are.
DLNA(in its own words) is a technology that allows devices that are connected to the same network and support DLNA technology to exchange media content (video, photo, music).
Now, almost all devices support DLNA technology: computers, TVs, smartphones, game consoles, etc.
Smart Share Is a proprietary application (technology) by LG. If I can say so, then this is a kind of shell for working with DLNA.
Other TV manufacturers call these programs differently. Samsung has AllShare. SONY - VAIO Media Server.
And so, without a doubt, you can watch photos, films, etc. on TV that are on your computer or even smartphone.
But from the beginning you need to set up DLNA (Smart Share) between PC and TV. (TV must be able to connect to the network)
What does it mean?
This means that both the TV and the computer must be connected to the same No matter how they are connected. (via Wi-Fi or cable)
And so you have a router, but there is no Wi-Fi in the TV. We can simply lay a network cable from the router to the TV.
Our router must be connected to the Internet and configured. Also, we need a network cable. We connect one end of the cable to the router, into the yellow connector.
On the TV, we connect the other end of the cable to the network connector.
 And you can debug the router itself from the knowledge gained in this article:
Next, we need to set up the distribution of files from the computer so that the TV can play videos from the necessary folders, or show photos. We just need to open access for this. You can even do this with the standard Windows Media Player.
But there is a very good and absolutely free program “ Home Media Server (UPnP, DLNA, HTTP)», Which is an excellent analogue of Smart Share from LG, or for example AllShare from Samsung.
And so, friends, a media server for a computer that will pump your TV and make it much more functional.
Home Media Server
 Home media server (UPnP, DLNA, HTTP) is a program that provides media resources (photos, audio and video files) of your computer to other UPnP (DLNA) devices on your home network.
For example, TVs Philips, Sony, Samsung, LG, Toshiba, game consoles Sony Playstation 3, XBOX 360, media players WD TV Live, Popcorn Hour, Dune, Boxee Box, IconBit, ASUS O! Play, iPad / iPhone / iPod, mobile and PDA devices.
The program includes various transcoders for audio and video files that allow converting media resources into a format supported by the playback device.
It is also possible to convert the frame format of video files to the display format of the playback device (the color of the padding is set by the user), the choice of an audio track, subtitles. You can choose transcoding from any minute.
The program includes transcoding profiles for VLC Media Player, you can redirect streams of Internet radio, Internet TV from your computer to your media devices.
The program supports Digital TV (C, S, T), you can redirect digital TV streams from your computer to your media devices.
The program supports control of DMR (Digital Media Renderer) devices, you can use the "Play to" function for an individual device and a group of devices.
This is a whole combine, the functionality of which knows no boundaries.
The only drawback will be the terrible interface of the program, but since it is needed to play movies on TV, this will not be a big problem. The program is absolutely free and is only available in the version for Windows.
First, we need to download and install the program itself. I recommend downloading from the official website: https://www.homemediaserver.ru/index.htm... There is always a new version!
After installation, launch the program with a shortcut on the desktop. Let's go to the program settings. We will not do anything special there. We will simply indicate local drives, flash drives, external hard drives, or folders, the contents of which we want to see on the TV.
For example, you can only open a few folders with movies, photos and music.
 A window with settings will open. In the first category, Media resources, we need to indicate which disks or folders we want to see on the TV. By default, there are standard folders with photos, videos and music open.
The program tries to sort everything. And in order not to get confused in all these folders on the TV, I advise you to open shared access to local drives. This means that you can open any file on the TV that is stored on these local drives (drives C, D, E, etc.).
You can also specify individual folders, or for example an external hard drive. To do this, click on the Add button on the right, and select the required folder, USB flash drive, or hard drive in the explorer. These are the basic settings, click on the Ok button, and agree to scan media resources.
Further, you can already start the DLNA server itself. To do this, just click on the "Start" button. Now, just turn on your TV. If everything is connected correctly, then it should appear in the "Home Media Server (UPnP, DLNA, HTTP)" program.
To do this, go to the Playback Devices (DMR) tab, and on the right, click the Refresh button.
VIDEO:
So Plex .
The most popular and, perhaps, rather convenient option. Having started the server on a computer, you can control it from a browser, set up a media library, add subtitles, and more.
Plex downloads all information about the movie automatically and does it perfectly in most cases. The TV sees the Plex server without any problems and plays everything perfectly.
The disadvantage of Plex and other similar programs is that the TV does not see the subtitles embedded in the movie, but for me it doesn't really matter to you.
Plex is free, but you have to buy a subscription for additional features.
https://plex.tv/
PS3 Media Server.
Initially, PS3 Media Server was distributed as an add-on to the PlayStation 3, allowing you to play movies on your TV using the console.
Then the program began to live a separate life. Like previous alternatives, it supports DLNA playback and does not require any setup hassle.
http://www.ps3mediaserver.org/
Serviio is far from the most popular multimedia server. The application is free, but for $ 25 you can buy the PRO version, which allows you to access your content from any network, not just your home network.
And this allows you to play content from the WEB (this function is given as an introduction and in the free version). Serviio has applications for Android, however they act as a secondary control panel for the server side of the computer.
http://www.serviio.org/
Kodi or (XBMC)
XBMC was created to bring video playback functionality to the Xbox. Then the project spun off and now Kodi is one of the most popular media centers, supporting almost all platforms due to open source.
Kodi has iOS and Android apps that let you use your smartphone as a remote control. The service lives on donations and is absolutely free.
http://kodi.tv/
Good luck Friends!
In this article, we will look at how to set up your DLNA server on Windows using the Home Media Server (HMS) program as an example.
Nowadays, it is more and more often required to have a DLNA server on the home network, since most modern TVs do not support data transfer protocols such as SMB or NFS, but only work over DLNA.
What is DLNA?
DLNA (English Digital Living Network Alliance) is a set of standards that allow compatible devices to transmit and receive various media content (images, music, video) over a home network, as well as display it in real time. That is, a technology for connecting home computers, mobile phones, laptops and consumer electronics into a single digital network. Devices that support the DLNA specification can be configured and networked automatically at the user's request. (Source - Wikipedia)
DLNA Home Media Server (HMS) Installation
The installation of HMS is very simple, but we will still explain in detail how it works.
First you need to download the installer. At the time of this writing, the official site was down. And it did not work a month before, so below I will give a link to download the latest version of HMS from our server:
There are not many settings here. In this window, you select the directory where the Home Media Server (HMS) program will be installed and the "Program Group" - the name of the folder in the "Start" menu.
After selecting the installation folder and the name of the folder in the "Start" menu, all that remains is to check the box "create a shortcut to launch the program on the desktop", if necessary, and press the button " Install«.
At the end of the installation, which takes less than a minute ( depends on your equipment), we are offered to immediately launch the Home Media Server (HMS) program.
This completes the installation of the program.
DLNA Home Media Server (HMS) Initial Setup
So, we have a freshly installed DLNA server, let's launch it and see what it offers us to configure first, as well as make a couple of useful settings. Let's get started.
After the first launch of the program, we see the initial settings window.
In this window, we are asked to select a device to which the media content will be broadcast. There are many templates on the list.
If you did not find your own device or a device similar to yours, then you can leave the standard DLNA Device, as practice has shown, this does not greatly affect anything. After choosing, go on.
And then a choice of folders appears before our eyes, from which we will take media content. You can select folders with your media content now, or you can add them further. We'll look at how to do this below. After selecting folders, press the button " Ready«.
After the initial settings, we are offered to make a backup copy of the settings, the image cache, the database, and set up an automatic backup schedule. We will not dwell on this in detail now and will go further. To do this, press the button " Close«.
After that, the main window of the program appears in front of us. Let's move on to several "important" settings at once.
On the left are the types of settings, on the right are specific settings.
Let's go straight to additional settings and set up the DLNA server autoloading with the PC turned on.
To do this, select items 2 and 3.

Now let's go to the " Server"And write down the name of our DLNA server. As we will see it on the net.
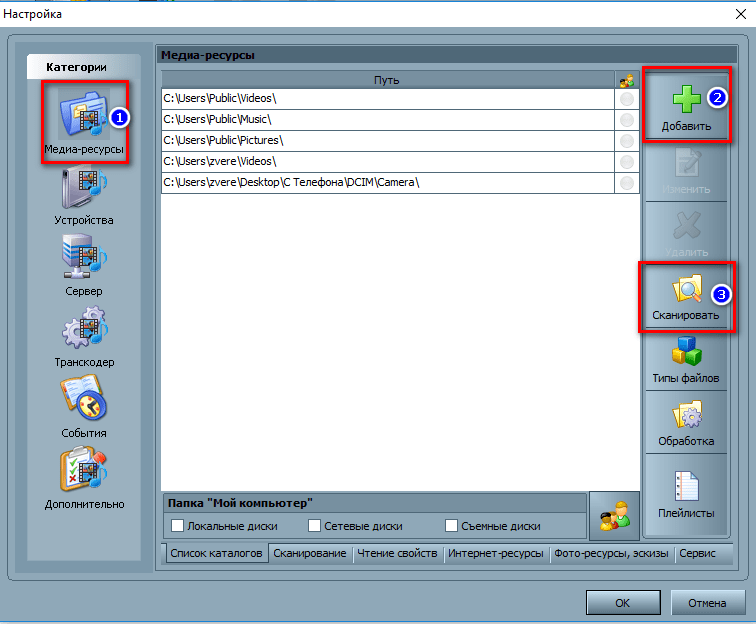
After changing the name, you need to add folders with media content (if you did not do this in the "initial setup" or decided to add more folders. Everything is simple. Press the " Add»(2) and select the folder you want to add. After that, you need to " Scan»(3) so that the files from the folder / folders go to the server.
If you did everything correctly, then your files should appear on the right side (as highlighted in yellow in the screenshot).
If you have your files there, then we already have quite a bit. Launch and use. Everything is very simple here - we press the button " Run«.
If you have Windows Firewall enabled, the system will ask you whether to allow it access to the network. Choose which ones to allow access and click " Allow access«.
 Similar
In this article, we will set up a media server (DLNA) on a computer for a Philips TV. After setup, you can watch movies, photos, and listen to music on your TV on your computer (laptop). All this is DLNA technology. This means that the TV can be connected to a computer via Wi-Fi. More precisely, the computer and TV must be connected to the same Wi-Fi router. Network cable or wireless network.
Let me explain in more detail. Do you have a Philips TV (in this article, we will focus specifically on these TVs), with the support (if you have Smart TV, then DLNA support is definitely there)... Your TV is connected to a Wi-Fi router (via Wi-Fi, or using a cable)... Also, a computer is connected to this router. We launch a DLNA server on a computer, open the necessary folders with video, photos, or music, and just start viewing on the TV. Everything is by air, without wires. It is very convenient, you do not need to record movies on a USB flash drive all the time. We just get access to the computer, select the desired movie and watch.
In the way described below, you can run a DLNA server on Windows 7, Windows 8, and even Windows 10. To start and manage the server, we will use the free, simply excellent Home Media Server (UPnP, DLNA, HTTP) program. I recently showed how, so there we started the server using a proprietary program. Since Philips does not have such a program, we will use the "Home Media Server". The program is really very simple and cool.
We need:
- Philips TV with DLNA support. There must be a TV, or. I will show on the example of Philips 43PUS7150 / 12 with Smart TV (Android TV).
- A computer that is connected to the same router as the TV. It can also be connected via Wi-Fi network, or LAN.
- Home Media Server (UPnP, DLNA, HTTP) software for DLNA server setup.
You can do without third-party programs, and set everything up using standard Windows tools. I wrote about how to do this in the article.
In fact, a server launched in this way will be able to see absolutely any TV: Philips, Sony, LG, Samsung, etc. Sony, by the way, already has models on Android TV. So, the instructions for them should also work. Except that the access may differ before viewing the DLNA server content on the TV itself.
Setting up a DLNA server for a TV with the "Home Media Server" program
First, download and install the Home Media Server (UPnP, DLNA, HTTP) program. I recommend downloading it from the official website: https://www.homemediaserver.ru/index.htm. Click on the button Download opposite the EXE version. The file size is approximately 35 MB.
Save the file, then run it and follow the instructions to install the program.
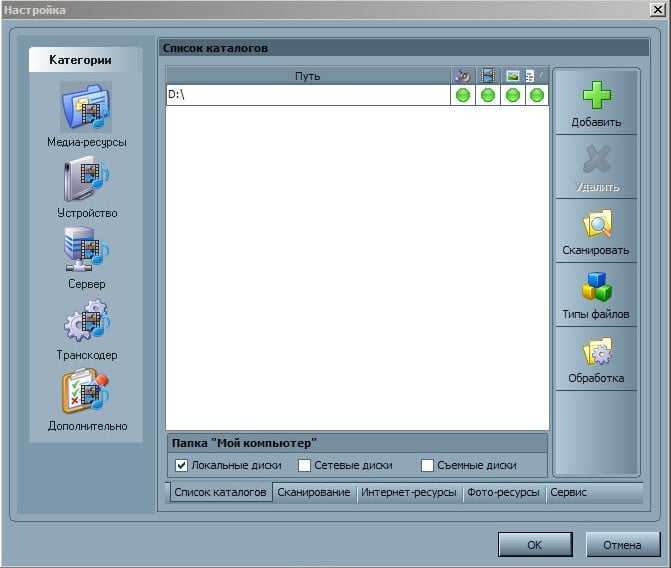
Launch the program with a shortcut on the desktop, or from the Start menu. First of all, we need to configure access to files on the computer. We can only open certain folders for the TV, all local drives, or even removable media.
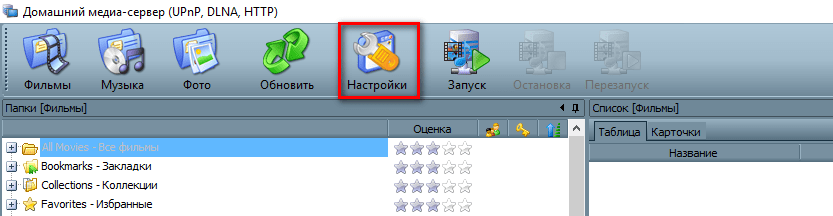
In the program window, click on the top button Settings... We are interested in the first tab Media resources. There will already be three folders open. These are standard. To open access to all local drives on your computer, check the box next to Local drives... To open access to removable drives, check the box next to Removable disks.

If you want to open, for example, only one local disk or folder, then do not check these boxes, but click on the button Add... And in the explorer, select the drive or folder that you want to open for viewing on TV. The folder will appear in the list. You can delete folders by simply highlighting it and clicking Delete.

I think the meaning is clear. You can open only one folder, which contains, for example, your movies. And you can open all the disks. I advise you to check the box next to Local drives. Then, the TV will display the My Computer folder, in which you can view all the files.
At this point, the setting can be completed by pressing the button Ok... If you want, you can also go to the side tab Server, and change the name of your DLNA server. It will be displayed on the TV.

Click the button Ok to exit the settings.
To start the DLNA server, press the button Running.

If your TV is turned on and connected to the router, then in the program window, by opening the tab Playback Devices (DMR), you will see your TV. This means that everything is fine. If the TV does not appear, check the connection and see the tips at the end of this article.

The program can be minimized. You can proceed to DLNA setup on your TV.
Watching DLNA Movies on a Philips TV from a Computer
Press the button on the remote control SOURCES.
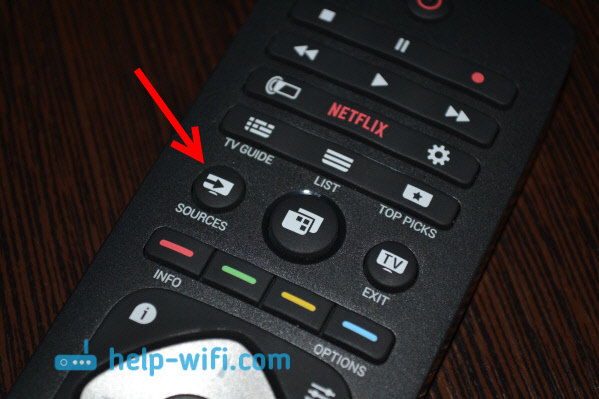
On the menu Sources of choose Network (media)... Or run the program Media from the Android TV menu.

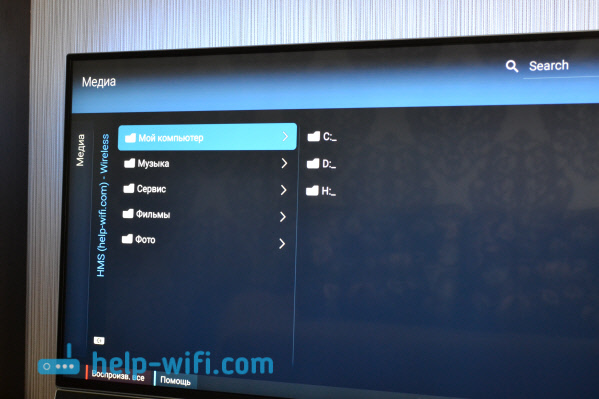
Select the server running on the computer from the list.

If you have opened all local drives, then you will have a My Computer folder. Select it, all disks will be there. You can open the folders you need, and start watching movies, photos, or playing music from them. If you open one of the standard folders: Movies, Photos, or Music, then all available content will be there, sorted into different categories. To view content by folder, select Media Resource Directories.
Select a folder with your movies, and just start viewing the desired file.

That's the whole setup. From the TV, we got full access to the videos, photos and music that is on your computer. The program "Home Media Server (UPnP, DLNA, HTTP)" will prevent your computer from falling asleep and interrupt the movie playback. You can also control the viewing from the program itself on the computer. There are a lot of settings and possibilities there, I think you can figure it out.
Why the DLNA server (files) is not displayed on the TV
The most common problem when setting up such a scheme is the lack of a running server on the TV. When the files from the computer are just not displayed.
In such situations, the first thing to do is always check the Wi-Fi connection of the TV and laptop, or the cable connection. Perhaps one of the devices just turned off. Turn your TV off and on. You can also restart your computer and start the server again. You can also try disabling the antivirus that can block the TV's connection.
If a DLNA movie plays with delays, it is buggy
In such cases, you most likely started watching a very difficult movie. And the router does not cope with the transfer of information. Usually, this problem appears on cheap routers, and when connected via Wi-Fi. Large films, in high quality, which do not want to be played via DLNA, are best watched from a USB drive or hard drive.
If, when opening a video, the TV says "Format is not supported"
There are times when the TV does not want to play some kind of video file. Most likely, the standard player simply does not support the format, there is no codec. In this case, if you have an Android TV, then you can install the VLC player from the Google Play Store. He also knows how to play files from the local network. And most likely, it will play videos that were not opened with a standard player.
Before starting the story about setting up the program "Home Media Server", I would like to clarify that this program will help solve the issue "How to watch movies, listen to music from a PC on a TV with DLNA technology"... This includes Samsung's AllShare technology. Download program "Home media server" you can follow this link.
Supported HMS operating systems:
- Windows 95, 98, ME, 2000, XP, 2003, Vista, 7;
- UNIX-like systems using Wine;
- MAC OS using WineBottler, CrossOver Mac.
Adding directories of media resources to the Home Media Server program
- button "Settings"- chapter "Media resources"- page "Directory List" — "Add"
- drag (and release) the required directories from Windows Explorer (and release) into the main form of the program (can be used with the standard file search in Windows).
To access the server through a browser, you must enable the mode Web, set the constant server port in the section Settings - Server - "Port" field(value from 1024 to 65535). Accessing the server from the browser:
http: // Server IP: The specified server port.
The server IP address can be found in the section Settings - Server - List of allowed network connections - Search.
Launching the Home Media Server program
Pay close attention to all messages that may appear from firewall programs when you first start the server.
Click the button "Launch" in the button bar of the main program window. If the server starts successfully, the button "Launch" will become unavailable, but buttons will become available "Stop" and "Restart", there will be lines in the message log
"Server start".
What to do in case of errors when starting the home server
- check the list of available network connections in the program settings (section Server - List of allowed network connections - Search). If the list of allowed network connections is not empty, then compare it with the list of available network connections by clicking "Search".
- check the settings of the firewall program used, the Home Media Server (UPnP) program must be allowed network activity, for stricter rules, UDP port 1900 must be open for incoming and outgoing packets, the server TCP port specified in the program settings must be available for incoming connections.
You can create a list of allowed network connections from the list of available network connections, mark the network connection for inclusion in the list in the first column. If for the media server in the program settings (section "Server" - field "Port") is set to a constant port number, then the availability of the media server can be checked from the browser at http: // Server IP: The specified server port... If so, the media server welcome page will open. If the section Program settings - Device , Web mode is turned on, the top level of the media resource base will open.
Auto start home media server
- Enabling automatic server start at program start: Settings button - "Advanced" section - "Server autostart at program start".
- Autostart of the program when the user logs on to Windows: Settings button - "Additional" section - "Startup program at the start of a Windows session".
- Installing the server as a Windows service: Settings button - Advanced section - Installing Windows Home Media Server (UPnP) service.
Options for connecting media devices to the server
You can familiarize yourself with the options for crimping network cables. To avoid misunderstandings, a TV is also meant by a media device.
- Computer - Media device... A crossover cable must be used for the connection.
- Computer - Switch - Media device
- Computer - Router (router) - Media device... Straight-through cables must be used to connect devices.
- Computer - Wi-Fi router - Media device. You can find more information about the wireless connection method in the article .
The operation and settings of the media server do not depend on the connection option. When using a router, enable the automatic assignment of IP addresses to devices, for details on how to configure a router (router) read the article. When using 1 and 2 connection options, the IP addresses are assigned manually, the addresses must be different in the last part of the IP address, the subnet mask is 255.255.255.0, the default gateway is the IP address of the computer, if necessary, you can specify the address of the DNS servers, you can specify the computer address. Example: computer address - 192.168.1.4, media device address - 192.168.1.5.
Searching for a server in a media device
The search for a server with shared folders is performed according to the user manual of the media device. If you have any questions, return to the above-mentioned Allshare and Smart TV articles.
If the server is not found, but all connections are made correctly, then in the program settings (Server section) check that the list of allowed client devices is empty or the device's IP address is in the list of allowed ones. When using a firewall program, check the rules for accessing the module's network hms.exe(if the server is running as a Windows service, then for the hmssvc.exe module), if possible, put the firewall in learning mode, restart the Home Media Server (UPnP) program. If you are using other media servers, then it is better to turn them off during the setup phase.
If the server is found, but there is no way to open it in the media device
The Home Media Server (UPnP) settings that may help resolve this issue can be found in section Device: mode "DLNA 1.0", "DLNA 1.5", "Authorization service", "Russian names of the main folders", in the Server section set the constant server port (from 1024 to 65535).
Navigating files on a media device (TV, media player)
If the device supports the Russian language, then in the program settings (section Device) you can enable the mode "Russian names of the main folders", this affects the names of the main folders of the media resource base. If the Russian language is not supported by the media device, select Transliteration for the encoding of Russian names, the “Russian names of main folders” mode is enabled / disabled at the user's request (if disabled, then the English names of the main folders of media resources will be displayed).
The folder names can be changed in the main form of the program by the right mouse button - the item “Change name”.
Excess folders of media resources can be deleted in the main form of the program by right-clicking the "Delete folder" item, or the "Exclude empty folders when transferring information to UPnP devices" mode can be enabled in the Device section.
Slow navigation through the media resource base may be associated with the peculiarities of the media device, the inclusion of the "Exclude empty folders when transferring information to UPnP devices" mode, the presence of slow removable media in the system, frequent changes in media resource directories and the "Automatic scanning directories when they change while the server is running ”. The mode "Exclude empty folders when transferring information to UPnP devices" can be disabled, the "Removable media" folder can be deleted in all sections of media resources (Movies, Music, Photos).
Navigation through the catalogs of media resources in the structure of their storage on the disk can be done through the folder "Watch Folders" (Russian is off), "Catalogs of media resources" (Russian is on).
If some media resources are not visible on the media device, but are present in the main form of the program, then this may be due to the mime-type transmitted by the server for this media resource. The mime-type can be changed in the program settings - the Settings button - the "Media resources" section - "File types" - the choice of the file extension - the Change button.
Watching movies from the server
The server can transfer movies to the media device in their original form or through transcoding (converting the movie into a format supported by the media device). The movie is automatically transcoded if the file extension is not in the list of supported ones or the transcoding profile is selected for the movie. Configuring movie file extensions supported by the media device: button "Settings"- chapter "Device" — "Built-in file support" — "Films"... The list of file extensions is formed according to the user manual of the media device or information on the website of the manufacturer of the media device. If the movie is played in its original form, then the choice of the audio track and the subtitles included in the movie file is possible only if this choice is supported by the media device. When you select a movie through the Transcoding folder, you can select an audio track, internal and external subtitles, audio delay, transcoding profile for converting the movie.
Transcoding profile - a script (macro) that generates parameters for calling the transcoding program or performs transcoding using DirectShow. Editing transcoding profiles: button "Settings"- chapter - button "Profiles".
The used transcoding profile can be selected:
- for all films: Settings button - "Transcoder" section - "Transcoded file parameters" - Films - "Transcoding profile"
- for movie files of a certain type (extension) - the Settings button - "Media resources" - the "File types" button - the choice of the file extension - the Change button - "Transcoding profile"
- for a specific movie: in the list of movies in the main form of the program, by the right mouse button - “Transcoding Profile” or through the navigation of the media device, if the movie is selected through the Transcoding folder in the Settings folder, generated by the server for each movie.
When playing movies, media devices usually stretch the video to full screen, therefore, in order to maintain the aspect ratio of the movie frame, the server generates parameters to complement the original frame size with color to the frame size specified in the setting. The setting of the transcoded frame size and the color of the padding are set in the program settings - the Settings button - the "Transcoder" section - the "Codecs, frame" page - "Frame size". Color completion is not supported by all transcoder programs, therefore, if you select a transcoding profile other than the main ones, it may not be available.
Causes of errors when playing movies from a home media server:
- the original movie file is selected, in which the format, encoding of video or sound track is not supported by the media device, a possible solution to the problem is to select a movie through the Transcoding folder
- a movie is selected through the Transcoding folder, in which the encoding of the video or audio track is not supported by the transcoder program, a possible solution to the problem is to select a different transcoding profile for the movie; problems with the audio track can also be solved by setting in the program settings (section Transcoder - page "Codecs, frame") the number of channels - 2
- media device or server unavailable: reboot media device or server.
Reasons for stopping / slowing down content playback:
- the termination of viewing may occur due to insufficient disk space used to store temporary files; exceeding the file size supported by the device; exceeding the maximum size of the transcoded file specified in the program settings (section Transcoder - "Parameters of the transcoded file" - Maximum size).
- the transcoding speed of the movie is not enough for viewing, you can check this in the main form of the program: perform test transcoding by PCM in the list of movies - The transcoding speed (fps parameter) must be higher than the frame rate of the movie. If the “Transcoding panel display” mode is enabled in the program settings (Transcoder section), then the transcoding speed can be viewed in it after selecting a movie on the media device. You can also turn on the transcoding speed indicator (section Transcoder - "Subtitles, speed indicator"), if the transcoding speed is less than the value specified in the program settings, the current transcoding speed will be displayed on the frame of the movie at the location specified by the user.
Solutions to the above problems:
- select a transcoding profile for viewing with a smaller frame size, video quality
- if the encoding of the video track is supported by the media device, but the movie file format is not supported, then you can select a transcoding profile that converts the movie file format and leaves the video track unchanged (“Movies - TsMuxer” transcoding profiles - formation of m2ts files, “Movies - WMF "- formation of wmv-files). For the "Movies - TsMuxer" transcoding profile, you must additionally download the TsMuxer transcoder program from the home page (in the Transcoding profiles setting)
- stop watching a movie on a media device to form a transcoded movie file sufficient for viewing
- specify a disk for storing temporary transcoding files that is different from the one used by the system for storing the paging file
- optimize the system as a whole - check disk fragmentation, the list of startup programs, etc.
Settings of the Home Media Server program on the example of my TV model SONY Bravia KDL-46XBR9
Install, run the Home Media Server program on your PC, go to Settings by clicking on the appropriate button.
On the right is the "Add" button for disks / directories with media content. In this case, you can choose which of these files will be scanned at the start of the program. Scanning is necessary if you have changed the contents of this directory and there have been changes. A green circle notifies that the type of these files is being scanned.
Now it's worth paying attention to the File Types button on the right pane. Some TV models cannot play PAL video files, you need to add NTSC for the content to be recognized. (for example, MPEG-PS_PAL_NTSC for * avi).

For the * mkv container, select the Transcoding Profile - Core AVC. In DLNA, enter the line MPEG-PS_PAL or MPEG-PS_NTSC depending on your TV.
Now let's look at the left panel "Categories" - "Device". Here you will need to select the type and resolution of your TV. DLNA1 and DLNA1.5 is the old and new version, you can find out about the supported DLNA version of your TV from the manual or on the official website. Also here you can configure Web access to the server. Let's move on to the next category on the left pane of the Server settings section.

Add your TV to the client devices (look in the menu, TV network settings for static IP). When you click on the lifebuoy icon, the program will automatically determine the name of your computer and add it to the Server - Name line. Use the "Search" button to identify devices connected by DLNA technology on the network. Make sure the TV is turned on and connected to a wired or wireless network. After scanning the network, the program will add the found network clients (PC and TV). Click on TV and go to client settings.

By clicking on the Settings button, you will be taken to the individual settings of the device. Set the settings we talked about above.

When you click the "File Types" button, you will be taken to the file registration settings, where you can make the necessary changes.

Return to the main settings window and go from the left panel to the "Transcoder" category.

Set the settings according to the image and go to the bottom tab "Codecs, Frame".

Draw your attention parameter section "Sound - Original soundtrack if compression is the same"... Unchecking this checkbox will help to avoid the loss of the Russian track during video playback. Remember that before transcoding, each file can be viewed and modified if necessary.
The next tab we'll look at is Subtitles.

In this window, you can customize the subtitle display style to your liking and other parameters necessary for their correct display. Let's take a look at the last category of the left panel "Advanced".

Check the checkbox Installing Windows Home Media Server (UPnP) Service... Thus, the program will be automatically loaded when the computer is turned on as a service, I wrote about this in the Automatic Server Startup section.