In the modern world, it is difficult to imagine our life without the use of high technologies. So, probably, many have heard about such a concept as UPnP. What is UPnP and DLNA support, we will try to figure it out. Plus, there are a few basic tips for setting up your hardware, as this isn't always done fully automatically.
UPnP. What is UPnP?
From the point of view of modern computing, mobile and media systems, UPnP is a universal connection of multiple devices when combined into one system. This is the so-called Universal Plug & Play standard. In other words, this technology can be called a universal device connection with its automatic initialization.
In fact, it is this approach that allows you to create a single home UPnP server based on the existing one. In this case, the information stored on one of the connected devices will be available on any other. Most often, computers, laptops, mobile devices, video or music players act as a source, and the playback of media content is carried out on a TV. But! In most cases, such devices should be DLNA compliant.
What is DLNA?
DLNA is a universal set of standards used to connect equipment for transferring media data. An ordinary home local network is used as a data transmission medium based on the automatic assignment of IP addresses to connected devices.

This does not change the external user address. IP is assigned exclusively within one local network. The main component that DLNA (UPnP media server) uses is the router, which is responsible for automating the assignment of appropriate IP addresses to devices. Most often this is (A) DSL modem or router, although there are still gradually aging connections using
Device connection options
To begin with, in this case, the main step is to create a connection between the router and the TV. Today, you can find three main options:
- connection using cables (Ethernet);
- connection using an internal or external Wi-Fi adapter;
- connection by means of the mains without any cables at all.
However, here you need to clearly understand that automatic combination of devices into a single whole will not be enough. You need to create a virtual UPnP DLNA server (if you already have one, say, on a TV like Smart TV, that's great). The corresponding software is responsible for this, which will be discussed a little later.
Home Media Server Benefits
If we consider the list of basic capabilities using UPnP transceiving technologies (DLNA), they are quite diverse, although they are used only for working with media content.
So, for example, when creating a home media server, you can easily view photos and videos present on a computer or laptop, smartphone or tablet on a large TV screen. But this is not all.

Few of the unprepared users know that with the help of such technologies it is possible to arrange and broadcast online television or watch videos on the same YouTube hosting not on a computer (with the appropriate software or a regular Internet browser), but on a television panel. And this, in turn, makes it a universal tool for watching programs, clips or films, listening to music, etc.
Now a few words about the basics regarding setting up a home media server. Understanding UPnP technologies is not enough here. What is UPnP, we have already figured out a little. Let's see how this knowledge can be applied in practice.

First, you will initially need to enable the use of these protocols on your router and on your TV (or, if you have one, your cable or satellite TV box). On a router, as a rule, such settings are enabled by default, but to be sure, you should go to the appropriate section and make sure that the UPnP parameter is in the Enabled state.

But that is not all. In the "operating system", if this service is not involved, it also needs to be activated. To do this, go to the "Control Panel" in the section of programs and components (in older systems - the menu of add and remove programs), where you can view the installed and used Windows components.

In network services, you need to connect the client discovery (management) service, and also use UPnP. What is a PNP client in this case? A universal bridge capable of automatically recognizing any media device, even without installing the appropriate drivers. To make it clearer, they are simply not needed in a local wireless network when a smartphone or any other mobile gadget is connected.
Used programs
At this stage, let's move on directly to the software that allows you to create, use and manage your home media server. Today there are a lot of such packages. But they may have completely different capabilities.

For example, if you install a server based on the Samsung All Share app, the TV will only be able to select music, videos, or photos stored in the shared folders of the devices. There is no question of any broadcast of TV programs from a computer.

It is much more convenient to install a more serious package like Plex Media Server, which has such an impressive list of features that few programs can match it. In addition, the software itself is released in Russian and distributed completely free of charge.
As for mobile systems, for example Android, for such devices it is appropriate to use a small applet called MediaHouse or Bubble UPnP. Both applications can be easily found in the Play Market service and installed on your device absolutely free. The advantage of such programs is that when installing the corresponding computer client, DLNA configuration is not required here at all. It is enough that the smartphone, tablet and computer (laptop) are connected to the same private virtual network. After launching the application from a computer terminal, a list of all available devices is automatically displayed. For correctness in the computer version, you can "expand" the necessary folders (create a shared access). That's all.
Conclusion
Hopefully, this brief information will give many novice users an understanding of UPnP / DLNA technologies. In general, even when setting up a home media server, there should not be any special difficulties either, unless the inclusion of UPnP support on the router, TV and in the "operating system" itself. But, as practice shows, on all modern devices and in the latest versions of Windows, all these services are enabled by default. The user only has to solve the problem by choosing the most appropriate software for his requirements.
In this article, we will set up a media server (DLNA) on a computer for a Philips TV. After setup, you can watch movies, photos, and listen to music on your TV on your computer (laptop). All this is DLNA technology. This means that the TV can be connected to a computer via Wi-Fi. More precisely, the computer and TV must be connected to the same Wi-Fi router. Network cable or wireless network.
Let me explain in more detail. Do you have a Philips TV (in this article, we will focus specifically on these TVs), with the support (if you have Smart TV, then DLNA support is definitely there)... Your TV is connected to a Wi-Fi router (via Wi-Fi, or using a cable)... Also, a computer is connected to this router. We launch a DLNA server on a computer, open the necessary folders with video, photos, or music, and just start viewing on the TV. Everything is by air, without wires. It is very convenient, you do not need to record movies on a USB flash drive all the time. We just get access to the computer, select the desired movie and watch.
In the way described below, you can run a DLNA server on Windows 7, Windows 8, and even Windows 10. To start and manage the server, we will use the free, simply excellent Home Media Server (UPnP, DLNA, HTTP) program. I recently showed how, so there we started the server using a proprietary program. Since Philips does not have such a program, we will use the "Home Media Server". The program is really very simple and cool.
We need:
- Philips TV with DLNA support. There must be a TV, or. I will show on the example of Philips 43PUS7150 / 12 with Smart TV (Android TV).
- A computer that is connected to the same router as the TV. It can also be connected via Wi-Fi network, or LAN.
- Home Media Server (UPnP, DLNA, HTTP) software for DLNA server setup.
You can do without third-party programs, and set everything up using standard Windows tools. I wrote about how to do this in the article.
In fact, a server launched in this way will be able to see absolutely any TV: Philips, Sony, LG, Samsung, etc. Sony, by the way, already has models on Android TV. So, the instructions for them should also work. Except that the access may differ before viewing the DLNA server content on the TV itself.
Setting up a DLNA server for a TV with the "Home Media Server" program
First, download and install the Home Media Server (UPnP, DLNA, HTTP) program. I recommend downloading it from the official website: https://www.homemediaserver.ru/index.htm. Click on the button Download opposite the EXE version. The file size is approximately 35 MB.
Save the file, then run it and follow the instructions to install the program.
Launch the program with a shortcut on the desktop, or from the Start menu. First of all, we need to configure access to files on the computer. We can only open certain folders for the TV, all local drives, or even removable media.
In the program window, click on the top button Settings... We are interested in the first tab Media resources. There will already be three folders open. These are standard. To open access to all local drives on your computer, check the box next to Local drives... To open access to removable drives, check the box next to Removable disks.

If you want to open, for example, only one local disk or folder, then do not check these boxes, but click on the button Add... And in the explorer, select the drive or folder that you want to open for viewing on TV. The folder will appear in the list. You can delete folders by simply highlighting it and clicking Delete.

I think the meaning is clear. You can open only one folder, which contains, for example, your movies. And you can open all the disks. I advise you to check the box next to Local drives. Then, the TV will display the My Computer folder, in which you can view all the files.
At this point, the setting can be completed by pressing the button Ok... If you want, you can also go to the side tab Server, and change the name of your DLNA server. It will be displayed on the TV.

Click the button Ok to exit the settings.
To start the DLNA server, press the button Running.

If your TV is turned on and connected to the router, then in the program window, by opening the tab Playback Devices (DMR), you will see your TV. This means that everything is fine. If the TV does not appear, check the connection and see the tips at the end of this article.

The program can be minimized. You can proceed to DLNA setup on your TV.
Watching DLNA Movies on a Philips TV from a Computer
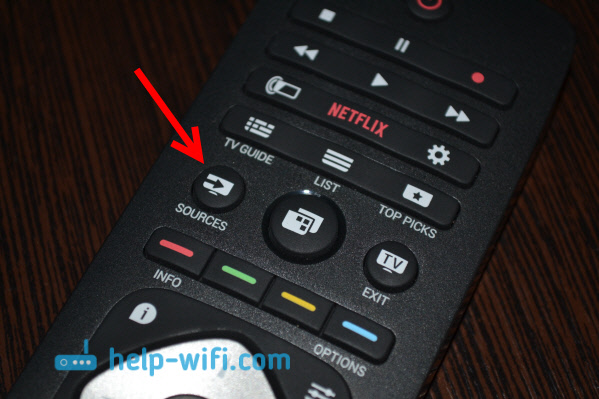
Press the button on the remote control SOURCES.
On the menu Sources of choose Network (media)... Or run the program Media from the Android TV menu.

Select the server running on the computer from the list.

If you have opened all local drives, then you will have a My Computer folder. Select it, all disks will be there. You can open the folders you need, and start watching movies, photos, or playing music from them. If you open one of the standard folders: Movies, Photos, or Music, then all available content will be there, sorted into different categories. To view content by folder, select Media Resource Directories.

Select a folder with your movies, and just start viewing the desired file.

That's the whole setup. From the TV, we got full access to the videos, photos and music that is on your computer. The program "Home Media Server (UPnP, DLNA, HTTP)" will prevent your computer from falling asleep and interrupt the movie playback. You can also control the viewing from the program itself on the computer. There are a lot of settings and possibilities there, I think you can figure it out.
Why the DLNA server (files) is not displayed on the TV
The most common problem when setting up such a scheme is the lack of a running server on the TV. When the files from the computer are just not displayed.
In such situations, the first thing to do is always check the Wi-Fi connection of the TV and laptop, or the cable connection. Perhaps one of the devices just turned off. Turn your TV off and on. You can also restart your computer and start the server again. You can also try disabling the antivirus that can block the TV's connection.
If a DLNA movie plays with delays, it is buggy
In such cases, you most likely started watching a very difficult movie. And the router does not cope with the transfer of information. Usually, this problem appears on cheap routers, and when connected via Wi-Fi. Large films, in high quality, which do not want to be played via DLNA, are best watched from a USB drive or hard drive.
If, when opening a video, the TV says "Format is not supported"
There are times when the TV does not want to play some kind of video file. Most likely, the standard player simply does not support the format, there is no codec. In this case, if you have an Android TV, then you can install the VLC player from the Google Play Store. He also knows how to play files from the local network. And most likely, it will play videos that were not opened with a standard player.
It's no secret that over time we accumulate a lot of all kinds of films, photographs and the like, and this is all usually stored on a computer.
But it would not be bad to watch a movie that you just downloaded from the network on a large TV, and not on a PC screen, but for this you need to transfer this movie to a USB flash drive, or burn it to disk.
In a word, a lot of unnecessary movement. But there are solutions, this is a multimedia server.
Don't be alarmed, this is not exactly a separate computer with hard drives. This is a program that performs strictly assigned tasks.
Let's take a look at several programs that can provide access to media content from other devices or programs.
Let's start with the theoretical basics of what DLNA and Smart Share are.
DLNA(in its own words) is a technology that allows devices that are connected to the same network and support DLNA technology to exchange media content (video, photo, music).
Now, almost all devices support DLNA technology: computers, TVs, smartphones, game consoles, etc.
Smart Share Is a proprietary application (technology) by LG. If I can say so, then this is a kind of shell for working with DLNA.
Other TV manufacturers call these programs differently. Samsung has AllShare. SONY - VAIO Media Server.
And so, without a doubt, you can watch photos, films, etc. on TV that are on your computer or even smartphone.
But from the beginning you need to set up DLNA (Smart Share) between PC and TV. (TV must be able to connect to the network)
What does it mean?
This means that both the TV and the computer must be connected to the same No matter how they are connected. (via Wi-Fi or cable)
And so you have a router, but there is no Wi-Fi in the TV. We can simply lay a network cable from the router to the TV.
Our router must be connected to the Internet and configured. Also, we need a network cable. We connect one end of the cable to the router, into the yellow connector.
On the TV, we connect the other end of the cable to the network connector.
 And you can debug the router itself from the knowledge gained in this article:
Next, we need to set up the distribution of files from the computer so that the TV can play videos from the necessary folders, or show photos. We just need to open access for this. You can even do this with the standard Windows Media Player.
But there is a very good and absolutely free program “ Home Media Server (UPnP, DLNA, HTTP)», Which is an excellent analogue of Smart Share from LG, or for example AllShare from Samsung.
And so, friends, a media server for a computer that will pump your TV and make it much more functional.
Home Media Server
 Home media server (UPnP, DLNA, HTTP) is a program that provides media resources (photos, audio and video files) of your computer to other UPnP (DLNA) devices on your home network.
For example, TVs Philips, Sony, Samsung, LG, Toshiba, game consoles Sony Playstation 3, XBOX 360, media players WD TV Live, Popcorn Hour, Dune, Boxee Box, IconBit, ASUS O! Play, iPad / iPhone / iPod, mobile and PDA devices.
The program includes various transcoders for audio and video files that allow converting media resources into a format supported by the playback device.
It is also possible to convert the frame format of video files to the display format of the playback device (the color of the padding is set by the user), the choice of an audio track, subtitles. You can choose transcoding from any minute.
The program includes transcoding profiles for VLC Media Player, you can redirect streams of Internet radio, Internet TV from your computer to your media devices.
The program supports Digital TV (C, S, T), you can redirect digital TV streams from your computer to your media devices.
The program supports control of DMR (Digital Media Renderer) devices, you can use the "Play to" function for an individual device and a group of devices.
This is a whole combine, the functionality of which knows no boundaries.
The only drawback will be the terrible interface of the program, but since it is needed to play movies on TV, this will not be a big problem. The program is absolutely free and is only available in the version for Windows.
First, we need to download and install the program itself. I recommend downloading from the official website: https://www.homemediaserver.ru/index.htm... There is always a new version!
After installation, launch the program with a shortcut on the desktop. Let's go to the program settings. We will not do anything special there. We will simply indicate local drives, flash drives, external hard drives, or folders, the contents of which we want to see on the TV.
For example, you can only open a few folders with movies, photos and music.
 A window with settings will open. In the first category, Media resources, we need to indicate which disks or folders we want to see on the TV. By default, there are standard folders with photos, videos and music open.
The program tries to sort everything. And in order not to get confused in all these folders on the TV, I advise you to open shared access to local drives. This means that you can open any file on the TV that is stored on these local drives (drives C, D, E, etc.).
You can also specify individual folders, or for example an external hard drive. To do this, click on the Add button on the right, and select the required folder, USB flash drive, or hard drive in the explorer. These are the basic settings, click on the Ok button, and agree to scan media resources.
Further, you can already start the DLNA server itself. To do this, just click on the "Start" button. Now, just turn on your TV. If everything is connected correctly, then it should appear in the "Home Media Server (UPnP, DLNA, HTTP)" program.
To do this, go to the Playback Devices (DMR) tab, and on the right, click the Refresh button.
VIDEO:
So Plex .
The most popular and, perhaps, rather convenient option. Having started the server on a computer, you can control it from a browser, set up a media library, add subtitles, and more.
Plex downloads all information about the movie automatically and does it perfectly in most cases. The TV sees the Plex server without any problems and plays everything perfectly.
The disadvantage of Plex and other similar programs is that the TV does not see the subtitles embedded in the movie, but for me it doesn't really matter to you.
Plex is free, but you have to buy a subscription for additional features.
https://plex.tv/
PS3 Media Server.
Initially, PS3 Media Server was distributed as an add-on to the PlayStation 3, allowing you to play movies on your TV using the console.
Then the program began to live a separate life. Like previous alternatives, it supports DLNA playback and does not require any setup hassle.
http://www.ps3mediaserver.org/
Serviio is far from the most popular multimedia server. The application is free, but for $ 25 you can buy the PRO version, which allows you to access your content from any network, not just your home network.
And this allows you to play content from the WEB (this function is given as an introduction and in the free version). Serviio has applications for Android, however they act as a secondary control panel for the server side of the computer.
http://www.serviio.org/
Kodi or (XBMC)
XBMC was created to bring video playback functionality to the Xbox. Then the project spun off and now Kodi is one of the most popular media centers, supporting almost all platforms due to open source.
Kodi has iOS and Android apps that let you use your smartphone as a remote control. The service lives on donations and is absolutely free.
http://kodi.tv/
Good luck Friends!
- DLNA - what is it and who needs it
- Windows media server dlna,
- A short overview of dlna server programs
- Home media server is the best among equals, or a user's headache
- Server side setup
- Alternative and development
DLNA (Digital Living Network Alliance)- a set of technologies for real-time display of various kinds of media content by devices united in one local network. Initially, several companies (Sony, Intel, Microsoft, Samsung Nokia, Matsushita, Philips, Hewlett-Packard) developed this standard, and also united into a group to create devices compatible with this technology. At the moment, there are more than 200 manufacturers producing compatible equipment.
home media server setup
In simple terms, this is a stationary computer, laptop, tablet, smartphone, TV and other "smart" equipment for viewing photos and video files, listening to musical compositions. Media content becomes shared for each device on the local network. All gadgets must be on the same IP network and connect to each other either wired (Ethernet) or wireless (Wi-Fi).

How to set up dlna
All devices with dlna support are conventionally divided into two types: servers and media players. The former mainly store and provide others with access to content. The latter, for the most part, only reproduce the files the user needs. For example: a personal computer contains photographs; it can store and play them both on its monitor and on the screen of a networked TV, tablet, or phone.
The division is conditional because now a lot of mobile electronics can both store and display content. For example, smartphones with special software installed may well play the role of a server.
This technology is very useful for users with a large number of "smart" devices at home, as it allows you to store multimedia content in one place, and not in the memory of each device. A very relevant "feature" for significantly deprived of memory mobile devices.
Windows and dlna
In the operating system from Microsoft, this technology has appeared since version 7. However, it is hidden so deeply that it was rather difficult for an ordinary user to find it and configure it. In Windows 8, it became possible to use for playing video files on devices connected to the local network.
This is done by right-clicking on the file and selecting the Send to ... item from the menu.

But before that, you still need to set up your home media server. In the "Control Panel" we find the item "Home Group", in the window that appears, select "Create a home group". Next, we will be asked to choose which type of file is available for access for the homegroup.

In the next window, we need the item "Allow all devices on this network, such as TV and game consoles, to play shared content", after clicking on which you will need to come up with the name of the media server and enter it in the proposed window.
This completes the setup and you can already play the allowed files with dlna devices on your computer. For this, each of them has certain points (AllShare, SmartShare ...).
A description of how to use them is included in the instructions for use.
It is easy to use the software built into the system and it consumes less hardware resources. However, there is a high probability that the format of various multimedia files may not be understood by the player, since Windows transfers them as they are. Third party programs have been created to solve this problem.
Overview of dlna server programs
Of the many dlna media server programs, several stand out. They are all free, but provide additional features for a fee. All the rest are either highly specialized, or simply provide information transfer in the local network and are an add-on to the Windows server. The following programs create a non-Windows home dlna server.
Codi- a project that grew out of XMBS. Due to its cross-platform functionality it works on Windows, IOS, Linux, Android.

It is a huge "media combine" that can find on the network, recode, download, play a huge number of formats. For this we are very much appreciated by users of TV set-top boxes.
A very bulky home media server, which is initially difficult to configure, it has a minimum number of add-ons. Different items are downloaded and installed for different functions. In this regard, it is rather difficult to set up, but it has large support and Russian-speaking too.
Plex Is another multi-platform home media server. It has high-quality localization and a huge number of features. But in this regard, it consumes a lot of system resources and is usually used for individual devices used as multimedia set-top boxes.

HMS- a program with a huge number of functions, absolutely free. The main difference is the on-the-fly file transcoding for playback even with outdated devices. Works only in the Windows environment, consumes significantly less resources, and therefore can be installed on a regular home computer. We will consider setting up this program below.
HMS server side (home media server)
The program interface is simple and setting up the first launch takes place in a few clicks. Before setting up the TV, first, click the "Settings" icon, on the "Media resources" tab, add folders that can be viewed by connected devices. Adding is done by clicking on the "+" on the right side. For each folder, you can select the type of files, which further helps when searching for them. =>

On the next tab "Devices" we add devices that are allowed to access files. It is very convenient to select the type of gadget from a variety of presets at the top of the window. It includes a large number of game consoles, TVs from different manufacturers, smartphones and routers. As a result, the settings will change for each selected device. If you tick the box Add devices automatically, the program will automatically detect the type of device and adapt to it.
In the "Server" tab, we only need to enter a name for the created server. The rest can be left blank, unless of course there are several networks and connections at home.
The item "Transcoder" allows you to configure data transcoding so that any connected device would play data, regardless of whether it supports them or not. The tuned HMS processes the file in real time into a format supported by the TV.
The rest of the tabs will allow you to fine-tune the program, which most users will not need at the initial stage. Therefore, close the settings and click the "Run" button at the top of the window. After that, the media server will start scanning the folders open for access and create lists of files that the connected dlna device will see.
In the main window of the program, you can also select the resource we need and, through the menu, by the right button, transfer it to the player on the network. It is very convenient and you do not need to search for data by the dlna device itself.
The program has great user support. The official forum thoroughly understands the problems in the operation of software with various devices, which helps to configure any technique.
Configuring a client device
The process of setting up equipment for playing multimedia files is different for each device and is usually indicated in the instructions for use. The same item on any device is the choice of the server, the name of which we came up with when setting up. And a request to connect to the network, a positive answer to which needs to be done only once, in the future the server will be considered allowed.
Alternative
Recently, there has been a rapid development of cloud technologies. There are more and more devices that have access to the Internet. And storing data on physical media is no longer so relevant. Of course, a collection of films of several hundred copies can hardly fit into any cloud service. And to increase the amount of allocated space you have to pay. At the same time, an unlimited Internet channel with high speed is required.

Media resources are stored in the "cloud", and access to it is provided to any device connected to the account. The plus is that there is no need for the dlna server side as a separate device. Simply put, you do not need a constantly working hard drive with a large number of files. Access to files is not only within the radius of the home local network, but also throughout the territory where there is access to the Internet.
With the development of Internet technologies, the home dlna server, dlna gives way to "cloud" data storage, leaving the former the opportunity for the time being to exist in apartments that do not seek modern user technologies.
If you want to create a home entertainment network based on a TV and a computer, which will provide all the possibilities for playing content in various formats, then you should be interested in learning how to set up a home media server. Let's explore how to install the server creation software and then see what options it provides to users.
Computer and TV connection
Before you start setting up your home media server, you need to resolve the issue of connecting your computer to your TV. It is better to carry out a wired connection of devices using a LAN cable and a router. Of course, you can use a wireless connection, but then you become dependent on the power of the antenna and the presence / absence of obstacles.
To avoid potential problems with playing Full HD movies, it is best to use a LAN cable, carefully routing it between your computer, router and TV.
The router, of course, must be configured to connect to the network, otherwise no media server will work. If you have figured out the question of how to set up the Internet on Windows 7, then you can proceed directly to installing and configuring the program.
Program installation
Download the distribution kit of the program to start installing it. It is better to download from the official site, since the current and tested version of the utility is located here. You can choose between two types of download - as a * .exe file or in archive format. There is no difference between them, so choose according to your taste.
The installation process itself is extremely simple: you just need to specify the directory in which the application's executable files will be stored, and decide whether you need to create a program shortcut on the desktop.
After assigning the installation parameters, click the "Install" button. Wait until the installation is complete to start configuring the program.
Program setting
When you first start the program, it should appear with the initial settings, where you need to select your media device.  Depending on the type of equipment you specified, the "Built-in support" field will display a comma-separated list of supported formats.
If your TV can play some formats that are not in the "Built-in support" field, then check the item "Custom device". Manually write the formats supported by your hardware and click "Next" to go to the next settings window.
In the "Media Resource Directories" window, you need to make directories or local and network drives visible for your device ("share"). By default, standard folders are open, but in order not to be confused with them, it is better to allow access to local drives. To perform this procedure, select the checkboxes of the drives that you want to make available through the media server and click the "Scan" button. 
You can also manually add directories or external media. To do this, you need to click the "Add" button, select the directory you need and start the scanning process. 
After scanning local and removable drives in the program interface, you can see a complete list of audio, video and photos stored on your computer.
Remember that the more multimedia information the program has to check, the longer it will take to start, so do not overdo it with the number of "shared" directories.
The next configuration item is backup parameters. You can specify your own path to store the backup used to restore the program data, or leave it as it is. 
After clicking the "Run" button, the process of creating a backup copy will start. You can specify which parameters you want to save in the backup file by checking the boxes. After the end of the data backup procedure, click the "Close" button.
Server start
After configuring all the important parameters, you can proceed directly to turning on the DLNA server on your computer. To do this, you need to click on the "Start" button - a message will appear on the screen that the start was successful. 
After starting the server, you need to turn on the TV. If the connection is established correctly, it will appear on the "Playback Devices" tab in the program. If the list is empty, refresh it using the special button on the panel on the right. 
Test the server by running files from your computer on your TV screen:

If the Home Media Server program is configured correctly, the file you are running from your computer will appear on the TV screen. But opening media files from a computer is not always convenient, so you need to learn how to additionally run them directly on the TV. 
To prevent the program from interfering with you on your computer, close it by clicking on the red cross. The home server will not shut down because the application will not shut down completely, but will only be minimized to the system tray.
Viewing files on TV
After setting up the server on the computer, you can go to the TV and try to open the "shared" folders through it. On different TV models, the connection to the created server is done differently. For example, LG devices have a built-in Smart Share app. 
Select the created home server as the signal source. If such an item is not in the list, update the list of sources.
Remember to configure your firewall by temporarily disabling it; otherwise, the firewall will block the TV's attempts to connect to the home server.
After selecting the signal source, you will see a directory of folders, among which there will be directories "shared" on the computer. You can run the available files and watch them on your TV screen.
Application possibilities
The Home Media Server software provides users with several interesting features to extend the functionality of a conventional TV to the level of a true home entertainment center.
Interactive television
To take full advantage of interactive broadcasting, you can set up Rostelecom television. But there is another option that allows you to do without concluding an additional agreement with the provider - download an interactive television playlist and run it through your home media server.

For IPTV to work, you need to install the VLC Player program. Installation of this application will not cause any difficulty even for a novice user, since the convenient installation wizard does everything automatically - all you have to do is click the "Next" button.
The next step is to restart the home media server, which is done by pressing a special button on the top panel of the program. 
After that, you can go to the TV and select the "Internet TV" folder in the media server directory. If you downloaded a working playlist and installed it correctly, you will see a list of channels presented in it. 
Of course, this is not the most convenient option for playing interactive television, especially if the user has a Smart TV or an IPTV function from the provider is configured. However, if there is nothing but a home server, then using the Home Media Server program can be called the most adequate solution.
If your TV does not support Smart TV, but you want to be able to watch online broadcasts, you can delegate some of the Smart TV functions to the Home Media Server program using the installed podcasts.
Podcasts in this case are files that allow you to directly launch online cinemas on your TV. For example, on the forum of the official site of the Home Media Server application, it is fashionable to download a podcast for playing and managing video files from the VKontakte social network.
Download the desired podcast to your computer and drop it into the main program window, as you did with the interactive television playlist file. 
Expand the "Podcasts" section and select the application you downloaded for online broadcasting. Right-click on it and select "Update". 
Wait for the update process to finish and go to your TV. Find the "Podcasts" folder and select the application downloaded via the media server inside it.