The times when only a specially trained person could reinstall the operating system on a computer, laptop or tablet are long gone. Today, many PC users (even inexperienced ones) are able to perform a similar operation, having only a flash drive with the required distribution on hand. True, not everyone understands exactly how to create such bootable usb drive, so at this stage of reinstallation, problems often arise.
WinSetupFromUSB is a real salvation for those who prefer to change Windows on their computer themselves. The program is free, so it is widely popular among users. It is designed to create bootable flash drives onto which one or more operating systems are recorded.
WinSetupFromUSB solves a lot of problems that arise while working on a PC, namely, it helps to reinstall the OS, is used to restore the system, treats the device for viruses, copies files from the computer and performs other useful functions.
WinSetupFromUSB is especially relevant in cases where there is no CD/DVD drive, which means replacement operating system can only be performed from a bootable USB flash drive.
Key program features
- Recording various variations of 32-bit and 64-bit Windows operating systems.
- Recording various variations of the Linux operating system.
- Support for operating systems such as BSD, in particular FreeBSD and OpenBSD.
- Creating an emergency recovery disk with an ISO image made on the basis of Linux and the most popular antivirus programs (ESET, Avast, Kaspersky, etc.).
- Support for pre-installation Windows ISO images.
- Ability to create multiboot disks.
- Boot virtual disks, created in the program, can be loaded into UEFI mode and BIOS.
- Support for images compatible with Grub4dos CD emulation, such as the Ultimate Boot CD.
- SysLinux boot menu based on SysLinux and IsoLinux sources as the main boot loader.
- Detailed logging of events at the time of execution of assigned actions.
Pros and cons of WinSetupFromUSB

Like many other programs, WinSetupFromUSB has a number of advantages and disadvantages. In defense of the utility, I would like to note that if there are any shortcomings in it, they are insignificant and do not affect the quality of the created bootable USB drives. But still, it’s worth mentioning some pros and cons so that you know what you’ll encounter during your work.
- The program is simple and easy to use.
- Ability to combine up to 10 distributions on one flash drive.
- Availability of built-in virtual machine QEMU.
- If there is a GRUB4DOS boot loader on the USB disk, it cannot be rewritten, but only menu.lst is adjusted. This means that all menu settings, distributions and programs are saved.
- You can test the operation of a bootable flash drive without overloading your computer.
- Does not require installation on a PC.
- Free utility.
- Lack of Russian-language version of the program.
- Unscrupulous distributors may add viruses to the archive along with the application that will infect your PC.
- Several distributions produce “ugly” folders in the root of the flash drive.
- Lengthy process Windows entries 7 and Windows 8.
Available platforms

As mentioned earlier, you can use it to make a bootable USB flash drive with various operating systems. In the utility itself during creation boot disk you can see five items indicating different distributions. Let's talk about each one separately:
- Windows 2000/XP/2003 Setup. In WinSetupFromUSB you can record Windows from the 2000 version. To do this, you must specify the path to this operating system.
- Windows Vista/7/8/10/Server 2008/2012 based ISO. In this case, everything is simple: this item will be needed by those who decide to write one of the proposed OS to a flash drive. Don't forget to specify the location of the folder with the desired ISO image of one of the distributions.
- UBCCD4Win/WinBoilder/Windows FLPC/Bart PE. This line is used for bootable USB drives that are based on WinPE. During work, you should specify the path to the folder, which includes the folder I
- LinuxISO/Other Grub4dos compatible ISO. Everything is clear here - a point for those who want to record a Linux OS. In addition, by selecting this line you can create a number of programs like “Kaspersky Rescue Disk, Hiren’s BootCD, RBCD. Don't forget to indicate the path to the downloaded ISO images.
Hiren's BootCD is useful utility, allowing you to “reanimate” your computer after any unexpected failure.
- SysLinux bootsector/Linux distribution using SysLinux/IsoLinux. This item can also be used to record Linux distributions, but only if they are installed using the Syslinux boot loader. Before starting recording, you must specify the path to the folder containing the contents of the “SYSLINUX” folder.
WinSetupFromUSB: instructions for Windows 7

Writing Windows OS to a bootable flash drive using the WinSetupFromUSB program occurs as follows:
- You need to open the program W
- Select the flash drive that we will make bootable. Typically it is displayed in automatic mode in the “USB disk selection and format tools” field. You can also identify the disk using the “Refresh” button.
- Check the box “Auto format it with FBinst” and select the “FAT 32” system.
- Now you should select the ISO image of the downloaded Windows systems. Check the appropriate box and specify the path to the image.
- Press the GO button.
- Agree that all information will be erased from the flash drive and accept the formatting settings - click “Yes” in both pop-up windows.
- Wait until the recording process finishes.
- After recording, click “OK” in the notification that opens. Exit the WinSetupFromUSB program using the “EXIT” button.
There are many ways to make bootable virtual disks for reinstalling the OS. But these methods are not always effective. If you want to quickly and easily create a bootable or multiboot USB flash drive, then this program will become the best option. A clear interface, a simple recording process, no lags, accessibility - all this will be at your disposal if you use the WinSetupFromUSB utility.
The WinSetupFromUSB program and, in fact, how to install the “seven” using it? I want to hear answers on your site. The fact is that WinSetupFromUSB has been updated to the final version and now it can even create a bootable UEFI flash drive for Windows 7, 8. In addition, WinSetupFromUSB has learned to create a multiboot flash drive containing two operating systems Windows 7 and Windows 8 at once, and nothing has been written about this yet!
Could you describe in detail:
1) How to create a bootable USB flash drive for Windows 7 in the WinSetupFromUSB program.
2) How to create a multiboot flash drive containing two operating systems: Windows 7 and Windows 8!
3) How to configure the UEFI BIOS to install Windows 7 from a USB flash drive to hard drive GPT style as well as a simple MBR hard drive? After all, some users will want to install Windows 7 from a flash drive on a simple computer or laptop with a regular BIOS, and others on a computer with a UEFI BIOS and hard drive with GPT markup.
How to create a bootable USB flash drive for Windows 7
Hello friends! Our website already has an article using the command line, as well as various programs: UNetBootin, UltraISO, Microsoft Windows 7 USB/DVD Download Tool. You can also create a bootable USB flash drive for Windows 7 using the utility (a separate article has been written).
But, just recently the final version of the WinSetupFromUSB program was released, with its help you can easily create a bootable UEFI flash drive for Windows 7 and Windows 8; the created flash drive can be used for installation either on a GPT style hard drive with a UEFI BIOS, or on a simple MBR hard drive. And what is also important, WinSetupFromUSB can create a multiboot flash drive containing both Windows 7 and Windows 8 operating systems for installation.
Note: For those who don’t know what UEFI BIOS is and the format standard for placing partition tables on a GPT hard drive, read our article, which is called that. Also, don’t forget that if your computer, laptop or netbook has USB ports 2.0, as well as USB 3.0 and you decide to install Windows 7 on it from a bootable USB flash drive, then you need to know that you need to connect the flash drive in USB port 2.0, since Windows 7 does not support USB 3.0 (ports are usually colored blue).
In the recent past, a beta version was posted on the official website of the WinSetupFromUSB program, which I didn’t quite like and used, but now the program has been updated and what the final version of the program can do cannot be compared with the beta version. Let's make sure of this and create a bootable USB flash drive for Windows 7 and Windows 8 with the WinSetupFromUSB program, and at the same time look at the UEFI BIOS settings.
How to create a bootable USB flash drive for Windows 7 using WinSetupFromUSBWe go to the official website of the WinSetupFromUSB program and select WinSetupFromUSB-1-3.exe (22 MB; 385673 downloads), the WinSetupFromUSB program is downloaded to our computer.

Extract the program files to a folder. If we are going to make a bootable USB flash drive for Windows 7 64 bit, then we run the file WinSetupFromUSB_1-3_x64.exe.

Attention: Friends, if you need bootable UEFI USB flash drive with Windows 7, which means you will have to format the flash drive in file system FAT32, this means that the image of your Windows 7 must be less than 4 GB, since the FAT32 file system does not work with files larger than 4 GB. WITH just go to the very end of the article, there is detailed information for you there.
Most users do not need a UEFI flash drive, but rather a regular bootable flash drive with the Windows 7 operating system, which means the image of your Windows 7 may well be more than 4 GB, in which case the bootable Windows 7 flash drive we created will be in NTFS format!
In the main window of the WinSetupFromUSB program you can see the name of our connected flash drive.
Check the box Auto format it with FBinst and check the NTFS box
Check the box Vista/7/8/Server 2008/2012 based ISO and click on the button on the right that opens the explorer window,

If your flash drive is formatted in the FAT32 file system, then this warning will appear, click OK.

Explorer opens, find ISO Windows image 7 64 bits, select it with the left mouse and click “Open”.

Press GO

A warning will open, click Yes.

Here we also click Yes.

The process of creating our bootable USB flash drive begins, which ends successfully.

Click OK.

A bootable Windows 7 USB flash drive has been created!
Now the most important thing is friends. How to actually install Windows 7 from this flash drive.
If you are installing Windows 7 on a laptop or computer with a UEFI BIOS and you want to convert your hard drive to the GPT partition table format standard, then you need to configure the UEFI BIOS itself accordingly; how to do this, read our article.
If you install Windows 7 on a laptop or computer with a simple BIOS, you simply boot your device from the Windows 7 bootable USB flash drive we just created. Perhaps at this stage some of the users will find our article useful
If you have correctly set the priority in the BIOS to boot your computer from a flash drive or simply selected your flash drive in the laptop boot menu,
then the first window will be the menu; in our case, you don’t need to select anything in it and it will disappear within a few seconds.

Next, the GRUB4DOS bootloader window appears, which the WinSetupFromUSB program uses as a bootloader. Select the first option using the arrows on the keyboard 0 Windows NT6 (Vista/7 and above) Setup,

what does operating room installation mean? Windows systems Vista, Windows 7 and higher. Press Enter. In the next window, select Windows 7 SP 1 x64

and the process of installing the operating system begins from our bootable Windows 7 USB flash drive.
Next.

Install.

We accept license agreement. Full installation(additional parameters).
So, we are given the task of creating a bootable USB flash drive for subsequent installation of Windows xp into it. Later versions of this OS are installed with Flash with a bang, but with xp there are many problems during installation, especially on older computers. Therefore, this article will show a method that works in particular on new and old PCs.
Although this OS is considered outdated, it is still in demand thanks to old working configurations, for which there are practically no alternatives other than Linux and Xp. So as long as the old hardware works, there will be demand.
WinSetupFromUSB - free program allowing you to create a bootable USB Flash drive (flash drive) for installing all windows versions. Download latest version programs can be found on the website. After downloading, extract the archive and run WinSetupFromUSB.exe or x64, depending on the bitness of your OS.
Installing Windows XP from a USB flash drive
After starting the program, you need to select the flash drive you need. After this you need to click on " RMPrepUSB".
In the window that opens, select the following parameters:
Boot sector- XP/BartPE bootable.
File system and options - Fat32, Boot as HDD (C: 2PNTS).

Click " Prepare Disk"As a result, the flash drive will be formatted. Two confirmation windows will appear, click "OK".


In a black window ( command line) can be observed in % the preparation process. When finished, it will close itself; you need to close the remaining window by clicking the “Exit” button.
Next, in the main menu of the program, check the box "Windows 2000/XP/2003 Setup" and specify the folder with the installation files. To do this, you will need to first unpack the installation image to a location convenient for you. You can unpack it with archivers 7zip or W inrar, or programs for working with images, for example DAEMON Tools or UltraISO.

After selecting the files, click on "GO". The process of copying files to the flash drive will begin. This takes 5-10 minutes depending on the amount of data.
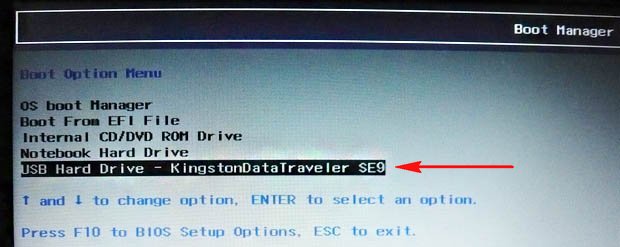
To start installing Windows, you need to set our flash drive as bootable in the BIOS settings. To do this, when turning on the PC, in the first seconds of booting, press the “Delete” or “F2” key on laptops, and look for the boot section or something similar.
If you did everything correctly, then the next time you reboot you will see such a window, just press “Enter”.


Selected item 3. The installation of the operating system will begin. Next, after the first reboot, a window will appear again in which you will need to select item number 4 to continue the installation. That's all, the article is completed.)

WinSetupFromUSB is a program for automating the process of installing various Live-CD assemblies and OS onto a flash drive or USB-HDD. It uses the Grub4dos bootloader with multiple boot options. For example, let's create a bootable Kingston 1Gb flash drive with the ability to install Windows from it.
First, downloadWinSetupFromUSBWe make sure that our flash drive does not have the necessary information.
1. Launch the program itself and select our flash drive.
2.
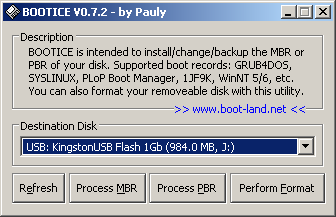
Now we must prepare the flash drive for installation. We create a partition and make it bootable. To do this, you can use two utilities Bootice And RMPrepUSB.
For example, let's use Bootice. Click on the button Bootice and choose Perform Format.
3. In the next window you need to select USB-HDD mode (Single Partion) and press Next Step.
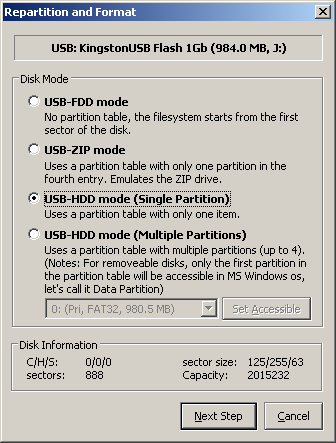
4. Here we select the disk label and file NTFS system. and format the flash drive to NTFS. This will slightly increase the speed of reading files in text installation mode (for some flash, the opposite effect of slowing down the work is possible).

5. Click OK, the program will issue a warning that the flash drive will be formatted.

6.
Next, we confirm the program’s actions several times. Click on OK.
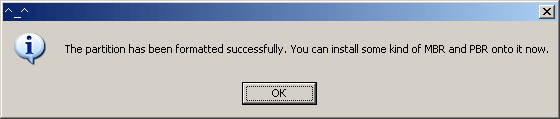
7. After creating the partitions, close the Bootice window and return to the main program window.
We put the flag opposite Windows 2000/XP/2003 Setup and select the place where the installation packages are unpacked Windows files XP. Having an ISO image of Windows XP, you can easily unpack it with WinRar.
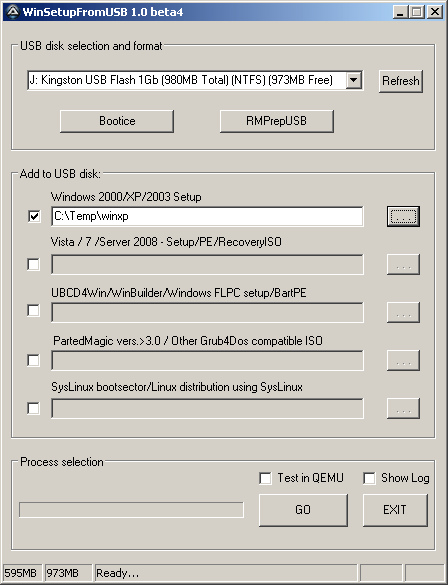
8.
Click on the button GO(before starting you can check the flag Show Log and observe in a separate window all the actions performed by the program).
Upon completion of the work, the utility will display Job done.
After booting from the flash drive, the Grub4Dos boot menu will appear, in which you select
Windows 2000/XP/2003 Setup, and after First part of Windows XP Professional SP3 setup from partion 0.
After the first stage of installation and reboot, you need to boot from flash again and now select Second part of 2000/XP/2003 setup / Boot first internal hard disk
If we do not do this, the installer will lose the location of the installation files on the flash and the installation will end with an error.
Congratulations, you have created a bootable USB flash drive using the WinSetupFromUSB program!


