The time has come when one hard drive in the computer is no longer enough. More and more users decide to connect a second HDD to their PC, but not everyone knows how to do it correctly themselves to avoid mistakes. In fact, the procedure for adding a second disk is simple and does not require special skills. It is not even necessary to mount the hard drive - it can be connected as external device, if there is a free USB port.
Connecting a second HDD to a PC or laptop
Connection options second hard disk are as simple as possible:
- Connecting the HDD to the computer system unit. Suitable for owners of regular desktop PCs who do not want to have external connected devices.
- Connecting a hard drive as an external drive. The easiest way to connect a HDD, and the only one possible for a laptop owner.
Option 1. Installation in the system unit
HDD type determination
Before connecting, you need to determine the type of interface the hard drive works with - SATA or IDE. Almost all modern computers are equipped with a SATA interface, so it is best if hard drive will be of the same type. The IDE bus is considered obsolete and may simply not be available on motherboard. Therefore, connecting such a drive may cause some difficulties.
The easiest way to recognize the standard is by contacts. This is what they look like on SATA drives:

And this is how the IDE does it:

Connecting a second SATA drive in the system unit
The process of connecting a disk is very easy and takes place in several stages:

Boot priority for SATA drives
The motherboard usually has 4 connectors for connecting SATA drives. They are designated as SATA0 - the first, SATA1 - the second, etc. The priority of the hard drive is directly related to the numbering of the connector. If you need to manually set the priority, you will need to go into the BIOS. Depending on the BIOS type, the interface and controls will be different.
In older versions, go to the Advanced BIOS Features section and work with the First Boot Device and Second Boot Device parameters. In new BIOS versions look for the Boot or Boot Sequence section and the 1st/2nd Boot Priority parameter.
Connecting a second IDE drive
In rare cases, there is a need to install a disk with an outdated IDE interface. In this case, the connection process will be slightly different.

Connecting a second IDE drive to the first SATA drive
When you need to connect an IDE drive to an already working SATA HDD, use a special IDE-SATA adapter.

The connection diagram is as follows:
- The jumper on the adapter is set to Master mode.
- The IDE plug connects to the hard drive itself.
- The red SATA cable is connected with one side to the adapter, and the other to the motherboard.
- The power cable is connected on one side to the adapter, and the other to the power supply.
You may need to purchase a 4-pin to SATA adapter.
Initializing the disk in the OS
In both cases, after connecting, the system may not see the connected disk. This does not mean that you did something wrong; on the contrary, it is normal when the new HDD is not visible in the system. The hard drive must be initialized before it can be used. Read about how this is done in our other article.
Read more: Why the computer does not see the hard drive
Option 2. Connecting an external hard drive
Often users choose to connect external HDD. This is much simpler and more convenient if some files stored on the disk are sometimes needed outside the home. And in the situation with laptops, this method will be especially relevant, since there is no separate slot for a second HDD.
An external hard drive is connected via USB in exactly the same way as another device with the same interface (flash drive, mouse, keyboard).

Hard drive designed to be installed in system unit, can also be connected via USB. To do this, you need to use either an adapter/adapter or a special external case for the hard drive. The essence of the operation of such devices is similar - the required voltage is supplied to the HDD through the adapter, and the connection to the PC is made via USB. Hard drives of different form factors have their own cables, so when purchasing you should always pay attention to the standard that specifies the overall dimensions of your HDD.


If you decide to connect the drive using the second method, then literally follow 2 rules: do not neglect safe removal devices and do not disconnect the disk while working with the PC to avoid errors.
We talked about ways to connect a second hard drive to a computer or laptop. As you can see, there is nothing complicated in this procedure and it is absolutely not necessary to use the services of computer specialists.
We are glad that we were able to help you solve the problem.
Poll: did this article help you?
Not reallylumpics.ru
How to connect a second hard drive
Even a large disk space can run out if you work on a computer for a long time. You can delete files and programs to free up some space, but this is a temporary solution. You can replace the hard drive, then you will have to reinstall the OS and configure the computer. It's easier to connect a second drive, which will significantly increase disk space for photos, games and movies.
Buy a hard drive of sufficient capacity and a SATA data cable to connect it from a computer hardware store. The disk capacity depends on the user's desire, but it is better not to save money and purchase a disk of at least a terabyte, so that you do not have to think about increasing the memory again soon. The hard drive of a modern computer is most often connected using a SATA interface. The IDE format was used on computers until 2000. To be sure that the drive and motherboard are compatible, consult your dealer or read the instructions for your computer.

Completely turn off the computer and everything additional devices from the power source. Place the system unit on its side and remove it sidebar. Consider the motherboard. Modern boards can have several SATA controllers, up to 6 pieces. The IDE connector may be missing or used to connect a CD/DVD drive. Looking for the necessary controllers A computer board diagram will help you.

Place the new hard drive in a special basket at a sufficient distance from the other so that they do not touch and do not overheat. If the case has three “slots” for the hard drive, then place them in 1 and 3, and 2 between them for ventilation. Secure the drive with four screws. Connect one end of the SATA cable (it doesn't matter which) to hard drive, and the second - to the found SATA controller on the motherboard. The second hard drive is connected.

If the power supply does not have a SATA connector, then you need to buy an IDE-SATA adapter. Connect the new hard drive to the power supply: among several wires of the power supply, find the SATA wire. It is impossible to confuse it, since only it will fit the hard drive, or install an IDE-SATA adapter. Connect it to the connector of the new device. Now second hard The disk is fully installed.

If the RAM bar prevents you from installing a second hard drive in a special basket and you removed it, then put it in place. Secure the side wall of the system unit with the mounting screws. Turn on your computer and all peripheral devices.

Wait full load operating system. It will automatically detect the new device external memory and will offer to format the disk in NTFS format. If this does not happen, open the “Computer” folder in Explorer, click on the new drive right click mouse and select the “Format” command from the menu. If new local disk does not appear, then find it using the “Control Panel” section of the “Main Menu”, which opens with the “Start” button.

Elevated temperatures can cause rapid wear on the surface of the hard drive. If it is not possible to separate the hard drives by space, then there is one way out - install a second fan to cool the drives. If everything SATA controllers are busy on the board, then buy a PCI controller with SATA connectors to connect a second drive.
SovetClub.ru
Connecting the main and additional hard drive
 Modern hard drives are distinguished by their capacity, sufficient to meet the needs of almost any user. However system requirements programs and games grow along with disk volumes, so sometimes there is a problem of lack of space. If you can't delete anything, you can connect a second hard drive.
Connecting equipment
First, let's figure out how to connect a hard drive to a computer.
Modern hard drives for computers have a 3.5-inch format. They are connected using the SATA interface, which replaced the outdated IDE connector.
Look at your hard drive - it should have two connectors. One is short, designed to transfer data from the motherboard. The second one is long, it is needed to connect to the power supply and obtain energy for the hard drive to work.
SATA plugs can look different: straight, snap-on, L-shaped, etc. However, this does not matter - no matter how hard you try, you will not be able to connect the hard drive incorrectly.
Install one end of the SATA cable into the appropriate connector on the hard drive. Then connect the hard drive to the power supply. If the power supply is old, you may have to use a special Molex to SATA adapter to connect the devices, which can be purchased at any computer store.
The connected hard drive looks like this:
The second end of the SATA cable is installed into the corresponding port on the motherboard. These ports are usually painted blue or red, so you can easily spot them. Naturally, in this case, it is necessary to follow the main rule for connecting any equipment - “red to red, blue to blue, etc.”
If there are no SATA connectors or they are all occupied, you can purchase a special PCI controller. If you know how to connect network card, then you won’t have any problems installing this controller; The main thing is that there is a free slot on the motherboard.
Don't forget to secure the hard drive with screws!
After turning on the computer, the new disk should appear in the system. If this does not happen, perform the initialization procedure.
Right-click on “My Computer” and select “Manage.” 
Go to Disk Management.  The initialization wizard should appear on the screen. Click "OK" to run it and finish installing hard disk.
Second disc
Connecting a second hard drive is done in the same way. The main thing here is to maintain a distance between the hard drives so that they do not overheat.
Install the hard drive only in a special basket. Under no circumstances does it leave it hanging.
When you turn on the computer, a new disk is detected automatically. All you have to do is format it in NTFS system. If formatting does not start automatically:

After formatting is completed, you can work with the new hard drive.
Since you've set out to improve functionality your computer, try connecting USB, increasing the number of available ports. You can also connect a video card to your computer if your old one doesn't suit your visual needs.
Old hard drives
If you are the proud owner of two vintage hard drives with an IDE interface and want to install them in one computer, then you will have to perform several additional steps to ensure that the equipment works correctly.
- Connect the hard drive first hard drive to motherboard and power supply.
- Connect the second hard drive to the remaining connector on the cable.
Now you need to manually set the configuration of the hard drive operating modes. For this, a special jumper is used.
- On the hard drive that will be the main one, it should be set to the “Master” position.
- The second hard drive is set to “Slave” mode.
The mode diagram should be indicated on the hard drive itself.
Finally, you need to check that Device BIOS were identified correctly. Go to the Basic I/O system and make sure that the home page interface, the leading disk is marked in the “Primary IDE Master” column, and the slave disk is marked in the “Primary IDE Slave” column. Subsequent setup hard drives is done in the same way as when connecting hard drives via SATA interface.
mysettings.ru
How to properly connect a second hard drive to your computer
When you purchase a new HDD, the question arises of how to connect a second hard drive to your computer. This is not difficult to do, but before you get started, you need to make sure that your system unit is not under warranty. The fact is that in order to install a second hard drive, you need to remove the side cover of the computer. This will break the seal and therefore void the warranty. To avoid such a situation, you should contact a service center.

Connecting an additional hard drive
If the warranty has expired or is missing, feel free to remove the side wall. It is secured with two screws on the back of the PC. Be sure to turn off your computer and unplug it. An additional hard drive can only be installed when the system unit is turned off. This is not a flash drive, and the HDD may simply fail.
You need to inspect the motherboard and the place where the hard drive is already installed. Majority modern computers has SATA connections. Trace where the cable of the existing HDD is connected to the motherboard. There should be at least one more similar one next to this connector. This will depend on the type of motherboard you have. Large ones have up to 5-6 connectors, small ones can only have 2.
If you are the owner standard type motherboard, then you just need to select the socket to connect. If you have a combo (that is, a small one), then slight difficulties may arise. The fact is that the first hard drive and optical drive may already be connected to the slots. And it may turn out that there is simply no other place to connect an additional hard drive. These are budget motherboards, and sometimes they do not provide the ability to connect multiple hard drives. How to install two hard drives in this case? You'll just have to unplug the DVD-ROM to free up the port.
If you have an old computer with an IDE connection type and only one slot left, you have the opportunity to install two equipment on one cable. This can be either 2 HDDs or a hard drive with an optical drive. When connecting on one loop, it is advisable to follow the sequence in which the master connector will be connected system disk, and for slave - additional. Master is the outermost connector on the cable, slave is in the middle. The instructions for the HDD should indicate in what position the jumpers should be set for a particular mode.
After we have figured out where to connect the second hard drive to the computer so that it recognizes it, we move on to the next point. This powers the device with electricity. Take a close look at the wires that come from the power supply. In older system units the connection type is IDE, in new ones it is SATA. Some PCs have both types at the same time. If the hard drive has a SATA port, and only IDE is left free in the power supply, do not worry. You need to purchase an adapter from one connection type to another.
We found out which connectors the second hard drive is connected to. Now it needs to be installed and secured. Find where the first hard drive is located. Depending on the size of your case, there may be one to three drive slots nearby. If there is a lot of space, it is advisable to connect two HDDs so that they are located further away from each other. Hard drives can get very hot during operation and require ventilation. The more free space around them, the better ventilation will occur.
In a small case, installing a second hard drive will mean that both hard drives will get very hot. Especially in the hot season. Therefore, it is advisable to purchase a cooling system for them. When connecting a second drive, do not forget that it must be screwed to the case. Unlike solid-state drives, HDDs have mechanical parts that can be easily damaged. During transportation, the hard drive may fall out of the slot, and this will damage not only it, but also, possibly, the motherboard.
Second hard drive on a laptop
Hard drives on laptop computers do not have the same large capacity, as on stationary ones. And sometimes users want to increase space, but the laptop does not have a slot for an additional hard drive. How to connect a second hard drive to a laptop in this case? This can be done by installing an HDD instead of an optical drive.
There are special adapters for this. Without them, you won’t be able to connect another hard drive, since the DVD-ROM and HDD connectors are different. The first thing you need to do is figure out the thickness of your drive. On different laptops it may differ. The most common are 12.7 mm and 9.5 mm. You can find out this way:
Use a program to diagnose equipment like Everest or AIDA. View the optical drive model and find the specifications on the Internet. The exact dimensions must be indicated on the manufacturer's website. Unscrew the drive and take measurements manually.
After purchasing the adapter, you can begin installing the hard drive. Unplug your computer and turn it off. It can only be untwisted when not in use. Pull out the optical drive. In most cases, it is secured with 2-4 screws.
Take the adapter and remove the stop, which is located on the opposite edge from the connectors. Some people try to turn on the second drive by connecting it to the adapter at an acute angle. This can break the contacts. The support is removable and is needed to fix the hard drive. Then press the hard drive firmly against the contacts. Sometimes this requires effort.
After installation and fixation with the stop, tighten the bolts for a more rigid connection of the adapter to the disk. So as not to spoil appearance laptop, you need to remove the front panel from the optical drive and attach it to the hard drive adapter. Carefully insert the device into the laptop and put all the covers back. If everything was done correctly, the BIOS will display new hard disk.
Disk system settings
You learned how to install a second hard drive in a PC. But this is not enough to fully work with it. Now you need to configure it so that the system recognizes it. After all, if the disk is new, it does not have marked areas and will not be displayed operating system. If you have Windows installed, this can be done by going to Disk Management. You can get to this menu by right-clicking on the “My Computer” icon and selecting “Manage”.
All connected drives and their capacity will be displayed in the lower central part. The new disk will be labeled "Unallocated". You need to right-click on this area and click “Create simple volume”. The “Setup Wizard” will appear, following the instructions of which you will determine the space of the future disk, file system and assign a letter to it. Remember that two partitions cannot be assigned the same letters. To avoid having to deal with OS freezes and process failures, close all unnecessary programs. At the end of the procedure, the new hard drive will be displayed in the system.
We looked in detail at how to connect an additional hard drive to a computer. By watching the video below or above in the text, you will be able to understand and consider in more detail incomprehensible points.
Comments powered by HyperComments
HDDiq.ru
Connecting a second hard drive to a computer
Computer equipment has long ceased to be a curiosity; almost everyone has it in stock. The only difference is the nature of use: some users actively use the equipment, downloading movies, games and music onto it, while others use an electronic computer when they want to view the latest news world wide web or do some homework.

At certain times it is necessary to replace outdated components
In this regard, the load level of the hard drive also differs. If there is very little free space left, then you should not expect normal performance from your PC at all. Given these circumstances, many owners decide to purchase a second “screw”, thereby increasing disk space. However, it is very important to first find out how to connect the hard drive to the computer.
PC connection
Finding information on the Internet on how to connect a hard drive to a computer is not difficult. It is only important to carefully read all the recommendations, and then no problems will arise if the user independently installs an additional hard drive, while leaving the old one in the same place.
An old hard drive must be removed only if it has become completely unusable and cannot be restored. By installing a second hard drive along with the old one, the user receives expanded space, thanks to which all actions will be performed faster.
Installation in a PC case
Connecting a hard drive to a computer begins with the step where the user must initially place it in the case and securely fasten it.
To ensure that the “screw” is inserted correctly, you should first remove the cover from the system unit case. In the front part you can easily find special compartments designed for drives and hard drives. The drives are located at the top, and the second hard drive should be located at the bottom of such bays.

The hard drive is inserted into any free compartment, but preferably on a short distance from what is already available. This is very important, since during operation they both heat up, which will adversely affect the performance of the PC.

Then the second hard drive is inserted strictly along the guides so that the connectors are directed towards the inside of the system unit to ensure its comfortable connection in the future. When the new hard drive has taken its correct position, it should be securely fastened by tightening the screws on both sides, ensuring a tight connection with the compartment.

After fastening, you should check the strength by trying to loosen it. If the hard drive does not wobble, it means that all actions were performed correctly.
Connection using cables
Once you have successfully connected the second hard drive to your computer, you can move on to the second part of these important steps. At this stage, you should connect the second hard drive directly to the motherboard, and also ensure that power is supplied to it.
To do this, you will need to purchase additional cables. By the way, it is advisable to note that the connectors through which the hard drive is directly connected may differ, depending on the year of manufacture of the PC.

Old computer is equipped with IDE connectors, while the new one already has SATA connectors, which are characterized by amazing performance. Previously, users were instructed to pay attention to the connectors when making a purchase and to purchase only a hard drive with the desired type. Currently, finding a hard drive with an IDE connector on sale is problematic, but this does not mean that there is no hope of installing a second drive. It’s just that in this case the user is required to additionally purchase special adapters.

By connecting the second hard drive using SATA connectors and adapters, the owner of a smart machine not only ensures system performance, but also facilitates the installation process.
When installing an old hard drive with an IDE connector a few years ago, it was necessary to manually configure the operating mode of the “screws,” which involved installing jumpers in certain positions.

Connecting using SATA connectors is much easier. All connectors on new technology are equipped with special partitions, so it is a priori impossible to connect the second hard drive incorrectly.

USB connection
There is another one alternative way, providing absolutely easy connection of new disk space, while completely eliminating the need to disassemble the system unit case.
In this regard, many people want to know how to connect an additional hard drive to a computer without experiencing any additional difficulties. The answer is obvious, the second hard “screw” can be connected to an electronic computer at USB help-devices.

Such hard drives receive power through the USB connector to which it is directly connected. However, this is typical only for disks measuring 1.8 or 2.5 inches. More powerful ones, for example, starting from 3.5 inches, already require an additional power source.
External devices are very easy to connect, so they are preferred a large number users.
Detecting devices in BIOS
Having provided correct connection hard drive, you should make sure that it is displayed correctly in the BIOS, otherwise it would be simply stupid to dream of quality work.
To produce correct settings in the BIOS, you should also understand how to connect the old hard drive to the computer, how to connect the new hard drive, how to ensure correct operation these two disks.
The user understands that the operating system is installed on one of the disk spaces; in most cases, the old hard drive is the place where the operating system was once loaded.
In this regard, in BIOS settings The user must set boot priority from the old hard drive. Setting the priority incorrectly will prevent the system from booting. In the BIOS, determining the priority is quite simple, since SATA with an assigned number will be written next to the existing hard drives. It is the number that indicates priority. The hard drive with the operating system must be set to SATA 1.

If any hard drive does not appear in the BIOS, you should double-check that it is connected correctly, otherwise use the installed one. disk space will be impossible.
So, installing an additional hard drive is a predictable act, accompanied by actions that can easily be performed by any user if he makes an effort and shows increased attention.
Good day.
For many users, one disk is often not enough for everyday work on a laptop. There are, of course, different options for solving the problem: buy external hard disk, flash drive, etc. media (we will not consider this option in the article).
Or you can install a second hard drive (or SSD (solid state)) instead of the optical drive. For example, I use it very rarely (I’ve used it a couple of times over the last year, and if I didn’t have it, I probably wouldn’t remember about it).
In this article I want to look at the main questions that may arise when connecting a second drive to a laptop. So…
1. Selecting the required “adapter” (which is installed instead of the drive)
This is the first question and the most important! The fact is that many people do not suspect that thickness The disk drives in different laptops may be different! The most common thicknesses are 12.7 mm and 9.5 mm.
To find out the thickness of your drive, there are 2 ways:
1. Open some utility, such as AIDA ( free utilities:), then find out the exact model of the drive, and then find its characteristics on the manufacturer’s website and look at the dimensions there.
2. Measure the thickness of the drive by removing it from the laptop (this is a 100% option, I recommend it so as not to make a mistake). This option is discussed further down in the article.
By the way, please note that this “adapter” is correctly called a little differently: “Caddy for Laptop Notebook” (see Fig. 1).

Rice. 1. Adapter for a laptop for installing a second disk. 12.7mm SATA to SATA 2nd Aluminum Hard Disk Drive HDD Caddy for Laptop Notebook)
2. How to remove the disk drive from a laptop
This is done quite simply. Important! If your laptop is under warranty, such an operation may cause a refusal warranty service. Whatever you do next, do it at your own peril and risk.
1) Turn off the laptop, disconnect all wires from it (power, mice, headphones, etc.).
2) Turn it over and remove the battery. Usually its fastening is a simple latch (sometimes there can be 2 of them).
3) To remove the drive, as a rule, it is enough to unscrew 1 screw that holds it. In a typical laptop design, this screw is located approximately in the center. When you unscrew it, it will be enough to lightly pull the drive housing (see Fig. 2) and it should easily “move out” of the laptop.
I emphasize that proceed carefully; as a rule, the drive comes out of the case very easily (without any effort).

Rice. 2. Laptop: disk drive mount.
4) It is advisable to measure the thickness using a caliper rod. If it is not there, you can use a ruler (as in Fig. 3). In principle, to distinguish 9.5 mm from 12.7, a ruler is more than enough.

Rice. 3. Measuring the thickness of the drive: it is clearly visible that the drive is about 9 mm thick.
Connecting a second drive to a laptop (step by step)
To begin with, I want to draw your attention to 2 nuances:
Many users complain that the laptop loses its appearance somewhat after installing such an adapter. But in most cases, the old drive socket can be carefully removed (sometimes small screws can hold it in place) and installed on the adapter (red arrow in Fig. 4);
Before installing the disk, remove the stop (green arrow in Fig. 4). Some people push the disk “from above” at an angle without removing the stop. This often leads to damage to the contacts of the disk or adapter.

As a rule, the disk fits into the adapter slot quite easily and there are no problems with installing the disk into the adapter itself (see Fig. 5).

Rice. 5. Installed SSD drive into the adapter
Problems often arise when users try to install an adapter in place of the optical drive in a laptop. Most often the problems are as follows:
The adapter was chosen incorrectly; for example, it turned out to be thicker than needed. Forcing the adapter into the laptop can cause damage! In general, the adapter itself should “ride” into the laptop as if on rails, without the slightest effort;
On such adapters you can often find compensator screws. In my opinion, there is no benefit from them, I recommend removing them immediately. By the way, it often happens that it is they that rest against the laptop body, preventing the adapter from being installed in the laptop (see Fig. 6).

If everything is done carefully, the laptop will have its original appearance after installing the second disk. Everyone will “think” that the laptop has an optical drive, but in fact there is another HDD or SSD (see Fig. 7) ...

Rice. 7. The adapter along with the disk is installed in the laptop
I recommend that after installing the second disk, go to Laptop BIOS and check if the disk is detected there. In most cases (if the installed disk is working and there were no previous problems with the drive), the BIOS correctly detects the disk.
How to enter BIOS (keys to to different manufacturers devices):

To summarize, I want to say that the installation itself is a simple matter, anyone can do it. The main thing is to take your time and act carefully. Often problems arise due to haste: first they didn’t measure the drive, then they bought the wrong adapter, then they started installing it “by force” - as a result, they took the laptop for repair...
That's all for me, I tried to sort out all the pitfalls that may exist when installing a second disk.
We live in amazing times. Technological innovations are moving humanity forward, forcing more and more people to think about the future. The computer industry has long ago crossed all possible thresholds and now its development can hardly be stopped or redirected in another direction. But, as often happens, development undergoes a period of uneven distribution of efforts - the speed of development of certain areas leaves much to be desired.
One example of this phenomenon is computer memory. Every year, programs and games for desktop machines become more resource-intensive, and while video adapters, controllers and monitors are being actively modernized, permanent memory is still represented by a hard drive, invented more than 50 years ago. Many users ask themselves in advance the question “How to connect a second hard drive to a computer?”
How to connect a second hard drive to your computer
A user who wants to increase the available space for saving new data will sooner or later be faced with the question: what to do next? Of course you can buy solid state drive SSD, but their active service life still does not exceed 5 years, so the best solution will connect a second hard drive to the computer. We explain in detail how to do this in Russian in this article.
Before you begin installation
Before you start upgrading your computer, it would be useful to figure out how ready the computer is for it. If a new hard drive has already been purchased or at least selected specific model, then you need to clarify which connector should be used to connect to the computer’s motherboard.
Among a number of interfaces for connecting hard drives to a computer, the main ones can be identified:
IDE - on at the moment The connector is outdated and almost never used. At one time it allowed you to connect two drives at once via one cable.
SATA is the most popular connector installed in most computers. His distinctive feature is the serial transfer of data between the carrier and the receiving device (computer).
FireWire (IEEE 1394) is one of the options for connecting 2 hard drives to a computer. Most often used to connect to external storage media and is designed for maximum speed data transfer is about 300 Mbit/s.
Next, you need to find out which interfaces are supported by your computer’s motherboard. In order to do this, you need to open the “Device Manager”, copy the motherboard model and search for the copied phrase on the Internet. Among the characteristics there will be the line we need - “Interface for connecting storage media”. If everything is in order, then you can move on to the next step. If there is a discrepancy between the interface of the board and the disk itself, then you should take care of purchasing an adapter in a specialized store.
Installing a Hard Drive
When installing a second hard drive in your computer, you should start by preparing all the necessary tools and parts for replacement. We will need:
Small Phillips screwdriver (often included with new drives)
Wires for connecting the hard drive to the motherboard and power supply
The drive itself, freed from its original packaging
If necessary, use the adapter purchased in the previous step.
First you need to remove the cover of the system unit case and familiarize yourself with the location of the first hard drive. Practice shows that it is most convenient to install elements of the same purpose next to each other, so it’s good if next to already installed disk there is a free slot.
When the location for installing the drive has been chosen, you need to try on the connecting wires - they must not be too short to prevent the device from being disconnected during operation and data loss. Such forethought is quite justified, because losing data during a sudden power outage is as easy as shelling pears.
The next step is to mount the drive to the computer case. This is done using the screws included with the hard drive and a small Phillips screwdriver. You need to carefully ensure that during the installation process not a single wire that is already inside the case is pinched between the wall of the system unit and hard shell disk. After the second drive is screwed in, you need to connect the new connecting wires first to it, and then to the motherboard and power supply. After this, you can assemble the wires together using an electrical clamp - this eliminates the possibility of them being damaged and getting into the fan blades when the computer is running. The final stage will be assembling the computer. This step is usually easy even for novice users.
Checking the second hard drive
Computer equipment specialists advise checking the speed of writing and reading data from the disk immediately after installing new media. “This allows us to identify manufacturing defects and fakes,” they say. Therefore, after turning on the computer with the second hard drive installed, it is advisable to visit the website of the manufacturer of this equipment and find on it special software for working with the purchased model or series of models.
The interface of such software solutions is most often not replete with functions, but they are still able to provide basic data, such as the actual capacity of the media, the speed of reading and writing to the disk. If the actual data transfer speed differs greatly from that declared by the manufacturer, then you need to once again check the quality of the connecting wires and the contact between the disk itself and the wire leading to the motherboard.
Conclusions
Installing a second hard drive in your computer is easy, just follow brief instructions. When working on the inside of your computer, you should always unplug it from the electrical outlet to avoid injury. electric shock. In addition, when working with magnetic disks It is necessary to exclude the influence of powerful electromagnetic fields on the computer case, and also to ensure that static electricity is removed from the drive itself.
Articles in the same category
I’ll share with you how I solved a problem related to my hardware. I worked and worked... and there wasn’t enough space. Have you thought about how to install a hard drive on your Acer AX3910 computer? There are not enough connectors for it.
I’ve been using this computer for several years now and I’ll tell you honestly, it’s never let me down, it works super reliably, quickly, and the most important thing I like about it is its noiselessness. Works like a laptop. It's on the table and you can't even hear it.
Installing a second hard drive on an Acer AX3910 computer.
Before this model, I used the same desktop computers, of the same brand, only less powerful and with a smaller hard drive. As they were used, the need for a faster processor and a larger hard drive arose. I have been using this model for more than two years and have no plans to change yet. Except that there wasn't enough space on the hard drive.
Computer settings:
For additional storage space, I have been using an external hard drive “WD Elements” for a year now. The brand is not known to me, it is made in Thailand. 
This HDD has a USB3 connector, the data transfer speed is very high that I didn’t even need to increase the built-in hard drive.
And I wouldn’t worry if at one point he didn’t start working slowly. The time it takes to load files into my programs from this external drive has increased dramatically. And energy-intensive programs - Adobe Premier Pro, Adobe Muse. The brake became concrete.
And there was concern. When checking Windows disk declares a system error on the disk, but cannot fix it. And “my whole life” is on it! Archival photos, work over many, many months. It became creepy to even think, if suddenly... I don’t even want to say this word! I handle it very carefully, blowing off the dust.
How to install a second hard drive
What to do? I decide to urgently install an additional 1 TB hard drive, leaving the original drive of the same manufacturer under the system, without reinstalling the system or changing anything. Bought for 3820 rubles. And knowing that in this compact case there is no free space, I decide to install it instead of a CD/ROM, and use an external CD/ROM, connected via a USB connector. It's not needed that often these days. And on the motherboard there are only two SATA connectors for disks.
I disassemble the case, it's easy

unscrew the CD/ROM 

Connecting a second hard drive
How to install a second hard drive programmatically. I connect the connectors to it from the CD/ROM and assemble it. I just swap the connectors of the native HDD and CD/ROM. This is done so that the new HDD does not act as the root disk. If you don't reset the connector, the computer simply won't boot the system. Tried it in setup Switching the drives didn't work, so I had to re-wire the wires. This is done quickly and is not difficult. 
Next, connect all the wires, turn it on and press on the keyboard Del. This is necessary in order to get out setup and just in case, set the boot priority from our native hard drive. 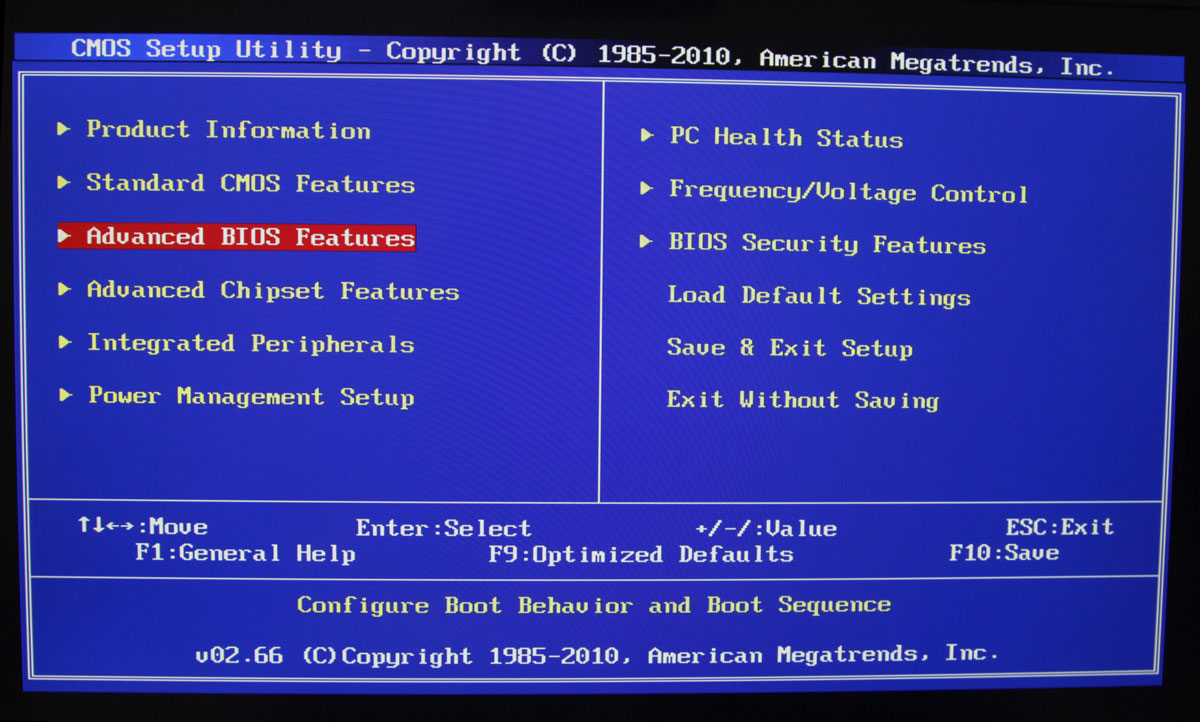

 Exit, saving the settings.
Windows will boot, but when you open Explorer, you will not find the new disk. To do this, we will make the following assumptions:
We go out to Control Panel-Administrative Tools-Computer Management-Disk Management
.
Point the mouse at this disk 
and right-click to call up a pop-up menu in which we create a simple volume.
The Creation Wizard window will appear. simple volume, which will guide you through setting up this disk. 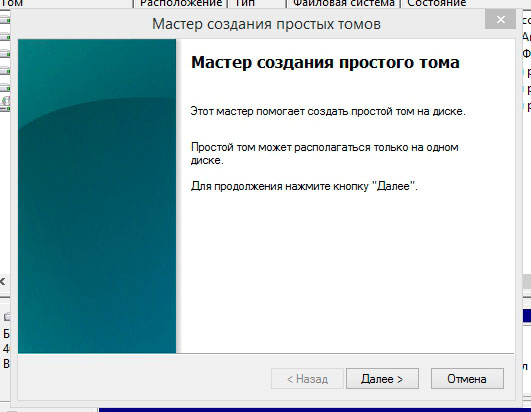
During the creation process, we assign a drive letter and you can come up with a name for it. Let's format it. And a second hard drive appears on our computer. This operation is simple and intuitive. 
Thus, the computer gained new storage, essentially tripling its memory capacity. It remains to add RAM up to 16 GB. And you can still use it for two years.
Good day!
There is never too much disk space!
This truth has been more relevant than ever for the last 30 years. Despite the development of the IT sector (the emergence of cloud disks, network storage, high speed internet) - anyway, we are faced with a lack of free space on the HDD.
The obvious solution to this problem is to buy and connect another drive. But, as with any issue, this has its own nuances... Actually, in this article I decided to consider this issue in more detail (so that the article would be understandable to most inexperienced readers).
So, let's start to figure it out...
Note! Please note that disk space may be wasted due to non-optimal Windows settings(for example, paging and hibernation files are “bloated”), or a large accumulation of garbage. I recommend clearing all garbage and optimizing the OS ( ), before buying a new disk (perhaps the freed up space will be enough for all your tasks).
Option 1: installing a classic HDD in a PC system unit
A few words about choosing a new disk
In general, the choice new hard disk is a separate big topic. Here I want to focus on one important detail - interface. Nowadays the most common ones are IDE (obsolete) and SATA. Before buying a disk, I recommend checking your PC (especially if you have an old one) and find out what interface is supported (otherwise, in addition to the disk, you will have to purchase adapters/adapters - and additional problems often arise with them...) .

SATA III and IDE - comparison (as an example. The photo shows 2 hard drives)
About installation:

Addition (if the PC does not see the new disk)!
After you turn on the computer (with the second disk installed *), it is not at all a fact that you will immediately see this drive in “My Computer” or “Explorer”. The fact is that new disks often come unformatted (and such a drive cannot always be seen by Windows).
Therefore, after turning on and Windows boot, I recommend immediately (This system utility on Windows) or use special ones to format the drive and start working with it fully.
Option 2: connecting the drive to the USB port (external drives)
If you don't want to "climb" through the insides of the system unit (and many novice users ask to suggest exactly this option so as not to do this), or you simply have no warranty on your PC (and you don’t want to open the unit and risk it once again) - that is, a way out...
The fact is that now there are hundreds of different specials on sale. boxes: they are a collapsible box (see screenshot below), inside which you can install a classic hard drive (both 2.5 and 3.5 inches (i.e. drive from both a laptop and a PC)) and then connect it to the USB port. Moreover, you can connect not only to a computer, but also to a small netbook, for example.
Working with such a disk is no different from a regular disk (which is inside the system unit): you can also store music, movies, documents, games, etc. on it (plus, it’s easy to carry and connect it to other devices).
The only negative: there may be problems with installing Windows OS on it (therefore, use external drive as a systemic one, it’s not worth it. For everything else, it’s a pretty good option).

By the way, there are now not only boxes on sale (for classic HDDs), but also full-fledged external hard drives. There is quite a wide variety of them now; they differ not only in volume, but also in connection interface, dimensions, speed, etc.
Help! How to choose an external hard drive (HDD) - 7 important points -

Stationary external hard drive - connects to a 220 V network via a power supply
Help!
Option 3: if you have a laptop...
When many people use the word “computer” they often mean a laptop. That is why in this article I will also consider this case...
In general, the laptop is difficult to upgrade. If you can “stuff” several hard drives into a regular system unit (for example, 5-6 pieces), then many classic laptops have only 1 HDD slot (provided by the manufacturer). And, as a rule, it is already occupied by the current disk - i.e. There is no slot for a second drive.
However, do not rush to despair, there are solutions:

That's all for now, additions on the topic are welcome.
Good luck!