Print (Ctrl+P)
Configuring web servers to work with 1C:Enterprise
1. General information
This article describes the mechanism for configuring web servers to work with a web client and Web services, as well as setting up support for OpenID authentication. Once published, the published components will be accessed as follows:
● Access to the web client. To launch the web client, you must use an address that is formed according to the following rules: <Имя хоста веб-сервера>/<Имя виртуального каталога>
. If the name of the virtual directory is DemoCfg , then to start the web client you should type the following URL (to access from the local machine): http://localhost/DemoCfg.
● Contacting a Web service. To gain access to the Web service, you must use an address that is formed as follows:
<Web server hostname>/<Имя виртуального каталога>/ws/<Имя Web-сервиса>
or <Имя хоста веб-сервера>/<Имя виртуального каталога>/ws/<Адрес Web-сервиса>
.
So, if the virtual directory has the name DemoWS, the name of the Web service in the configurator is specified as DemonstrationWorkWS, and DemoWorkWS is specified as the address, then the Web service can be accessed simultaneously at two addresses (to gain access from the local machine):
http://localhost/DemoWS/ws/Demonstration of WS or http://localhost/DemoWS/ws/DemoWorkWS.
Read more about Web services.
● Calling an HTTP service. To gain access to the HTTP service, you must use an address that is formed as follows:
<Имя хоста веб-сервера>/<Имя виртуального каталога>/hs/<путь к ресурсу>.
For more information about HTTP services, see here.
● OpenID authentication is performed automatically by the system.
Web servers of the Internet Information Services (hereinafter referred to as IIS) family are supplied with the operating system, and to make it easier to understand which web server you are using, here is a table of correspondence between the web server version and operating system:
IIS version Operating system version
IIS 5.1 Windows XP Professional
IIS 6.0 Windows Server 2003 or Windows XP Professional x64 Edition
IIS 7.0 Windows Vista or Windows Server 2008
IIS 7.5 Windows 7 or Windows Server 2008 R2
IIS 8.0 Windows 8 or Windows Server 2012
IIS 8.5 Windows 8.1 or Windows Server 2012 R2
IIS 10.0 Windows 10
Distribution Apache web server(for both Windows and Linux OS) can be obtained from the project website: http://httpd.apache.org/download.
2. General requirements
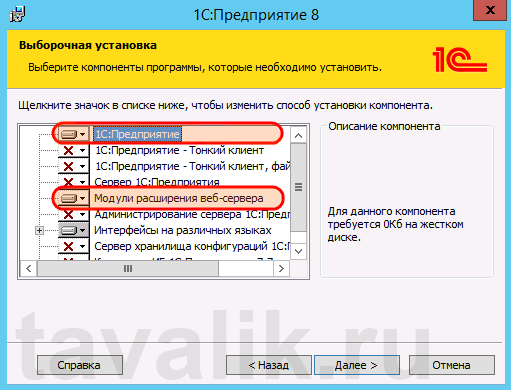
The computer on which you publish must have a supported web server installed and configured. To install the Internet Information Services web server, you may need a distribution package for the operating system you are using. When installing a web server, you must install support for ISAPI extensions. Installing a web server requires administrative privileges on the computer on which the desired web server will be installed. Publishing can be done in two ways:
● Using the publishing dialog on a web server, if the computer with the web server has the ability to launch the configurator of the required bit depth.
● Using the webinst utility. (Call the webinst utility from the bin directory of the 32-bit version of 1C:Enterprise)
To publish to web servers, you must have administrative privileges on the computer where you are publishing:
● For Windows Vista and older, to publish, you must launch the configurator using the item Run as administrator context menu of an application or launcher. If publishing is performed using the webinst utility, then either the utility itself or the interpreter must be run as administrator command line Windows.
● For Linux OS, to publish, you must become a superuser (root user) using the su command or run the application that publishes using the sudo command.
When you try to publish, the system checks to see if you have the necessary privileges to perform the operation. If the current user's privileges are not sufficient to perform the publication, then:
● When publishing from the configurator, the user is asked whether to continue publishing. The dialogue indicates the reason for the occurrence (of the dialogue) and contains recommendations on how to obtain the necessary privileges.
● When publishing using the webinst utility, the user receives a diagnostic message, but publishing continues.
Publishing is possible only if 1C:Enterprise is located on a computer with a web server.
For web IIS server 7.x and older does not support publishing if the Directory property (or the dir parameter of the webinst utility) points to a directory %SYSTEMDRIVE%\Inetpub\wwwroot.
NOTE. To work with the configuration via the web server, the configuration must not be empty.
3. Types of publication
3.1. General publication scheme
The general publication scheme is as follows:
● the request processing module (web server extension module) corresponding to the web server is registered;
● a virtual application is registered on the web server;
● a virtual application directory is created, and the default.vrd file is placed in it and configured;
● users are assigned rights to the directory with the database file (only for the file option).
To publish a web client, you should use the version of 1C:Enterprise that is used to work with the infobase that you plan to access using the web client. If two versions are installed on your computer, for example, 8.3.3.100 and 8.3.3.150, and the 1C:Enterprise server version 8.3.3.150 is running, then for publishing you should use the configurator or webinst utility of exactly the same version.
When publishing, remember that the bitness of the registered web server extension must match the bitness of the web server itself.
When publishing to an IIS web server, be aware that:
● Publishing is always performed to the Default Web Site;
● Publishing is always performed for the default application pool (DefaultAppPool);
● For the application pool used to run 1C:Enterprise, support for the .NET environment must be disabled. To do this, set the .NET Framework Versions application pool property to No managed code.
To publish from the configurator, you must use the publishing dialog ( Administration – Publishing to web server…).
Rice. 1. Publishing on a web server
Then you should do the following:
● Enter the name of the virtual directory in the Name field; the name of the virtual directory can only consist of Latin characters.
● In the Web server field, specify the type of web server for which you are publishing.
● In the Directory field, specify the physical location of the directory in which the files describing the virtual directory will be located. When using the Apache web server, the directory name must contain only Latin characters.
● Select the checkboxes depending on the need Publish thin and web client and Publish Web services.
● For the IIS web server, you can specify whether to authenticate to the web server using the OS.
● If necessary, select the Web services that you want to publish. The Address column can be changed. This column specifies the synonym for the Web service. You can access a Web service either by name or by synonym.
● If necessary, configure other publishing parameters.
● Clicking the Publish button starts the publishing process. Clicking the Disable button removes the publication from the selected web server.
After publishing, you will be prompted to restart the web server in the following cases:
● the version of “1C:Enterprise” has changed;
● the path to the web server extension module has changed;
● a new publication has been made for the Apache web server;
● publishing has been disabled.
When using anonymous authentication and a file infobase, when publishing, the user on whose behalf anonymous access has access rights to the infobase directory is checked. If the user does not have the necessary rights, a warning is issued about the impossibility of working with this infobase through the web server. It is recommended to either grant rights to the directory with the infobase, or check the Use operating system authentication on the web server checkbox.
If publishing from the configurator is not available (for example, when using a 64-bit Windows OS), publishing can be done using
webinst command line utility, which is available on Windows and Linux in both bit sizes. The publishing dialog will be described in detail below.
command line switches for the webinst utility.
3.2. Publishing dialog
The publish dialog is used to create a publication or prepare a template file for publication using the webinst utility (using the -descriptor command line parameter).
All parameters that can be edited when creating a publication are located on two tabs. Let's take a closer look at them.
3.2.1. Dialogue buttons
The Publish button publishes to the web server. When publishing, a directory is created on disk and the specified web server is configured to work with 1C:Enterprise. Remember that publishing to the IIS web server is always done for the default website (Default Web Site) and the default application pool (DefaultAppPool).
Under Linux OS the following actions are performed:
● For the directory in which the default.vrd file is located, the owner group is set to the group of the user on whose behalf the web server runs;
● The default.vrd file is set to read access for the group that includes the user on whose behalf the web server is running.
In the case of publishing a file infobase, for the directory with the infobase file, the owner group is set to the group of the user on whose behalf the web server operates, and inheritance of the owner group is configured to ensure work with the infobase.
 Rice. 2. Publishing on a web server
 The Disable button removes the application from the web server and publishing directory, if necessary.
The Save button saves the parameters specified in the publishing dialog on the web server to a file. When saving, the system requests the name and location of the file into which the save will be performed. Saving will be done in the default.vrd file format. Using this command, you can create template files that will be used as the -descriptor parameter of the webinst utility. The values of the ib and base attributes of the point element will contain the parameters of the infobase from which the file is saved.
The Load button allows you to load an arbitrary default.vrd file for editing. When loading, the ib and base attributes of the point element of the loaded file are ignored.
The Close button closes the dialog.
The Help button opens a window with help information about the publish dialog.
3.2.2. “Basic” tab
3.2.2.1. General Settings
 Rice. 3. Publishing on a web server. Basic
 On this tab you can set basic publishing parameters.
Name. Specifies the name of the publication. When publishing using the webinst utility, it is described by the -wsdir parameter. In the default.vrd file, corresponds to the base attribute of the point element.
Web server. Indicates which web server is being published to. Apache web servers are added to the list if they are detected on the computer. When publishing using the webinst utility, the web server used is specified by one of the parameters iis, apache2, apache22, or apache24. When running on Linux, publishing is only possible for the Apache web server.
If the system could not unambiguously determine the version of the Apache web server installed on the computer (2.2 or 2.4), both versions of the web server will be present in the list. It should be taken into account that for the Apache web server versions 2.2 and 2.4 the changes made in the web server configuration file differ. Therefore, incorrectly specifying the web server version will result in the publication not working.
Catalog Specifies the physical directory on disk where the default.vrd file will be located and where the web server virtual directory will be mapped. The directory must exist. When publishing using the webinst utility, it is described by the -dir parameter.
Publish thin and web client. Responsible for the ability to work with the published information base using a thin and web client. If the checkbox is checked, it is possible to work with the published infobase using a thin and web client. In the default.vrd file, corresponds to the enable attribute of the point element.
Publish standard OData interface. Responsible for the ability to gain access to the standard OData interface of the application solution. The mechanism of the standard OData interface is described in more detail in the book 1C:Enterprise 8.3. “Developer's Guide”. In the default.vrd file, corresponds to the enableStandardOData attribute of the point element.
Publish distribution. Determines whether a client application can be obtained and installed if the versions of the client application and the server do not match. A zip archive is used as a distribution, full name which is specified as the value of the Published Distribution Location property. In the default.vrd file, these properties correspond to the pubds t attribute of the point element. The archive should
the distribution kit of the client application is located. The installation will use the installation parameters specified in the 1cestart.cfg file (same as a normal client application installation).
Use operating system authentication. Allows the system to set the OS authentication capability to the IIS web server.
Transition address when the web client ends allows you to specify the URL to which the transition will be made after finishing work web client. In the default.vr file, d corresponds to the exitURL element.
3.2.2.2. Web services tab
 Rice. 4. Publishing Web services
 Publish Web Services. Selecting this checkbox will cause the Web services created in the configuration and listed in the table below the checkbox to be published. In the default.vrd file, corresponds to the enabl e attribute of the ws element. If the flag is cleared, this is equivalent to either not having a ws element in the default.vrd file, or having a ws element with the enable attribute set to true.
Publish Web Services by Default. Responsible for the possibility of use in this information base Web services that are published without explicit permission for use. In the default.vrd file, corresponds to the pointEnableCommon attribute of the ws element.
Table below checkbox Publish Web Services contains a list of published Web services and allows you to manage the publication of each Web service. The first column controls the publication of a specific Web service. If the checkbox is cleared, this Web service will be prohibited from use (it cannot be called). In the default.vrd file, corresponds to the enable attribute of the point element.
The second column (named Name) contains the name of the Web service, as it was specified during creation. A description of Web services is given in the book 1C:Enterprise 8.3. “Developer's Guide”. In the default.vrd file, corresponds to the name attribute of the point element.
The last column of the table (named Address) contains an alias for the name of the published Web service. You can access a Web service either by name or by alias. The Web service alias can be edited in the publish window. In the default.vrd file, it corresponds to the alias attribute of the point element.
Web services that are located in connected extensions are not displayed in this table and can only be published by manually editing the default.vrd file.
Publish extension Web services by default. Responsible for the ability to use Web services that are supplied in configuration extensions. In the default.vrd file, corresponds to the publishExtensionsByDefault attribute of the ws element.
3.2.2.3. HTTP services tab
The HTTP services tab is designed to control the ability to access application solution using HTTP services.
 Rice. 5. Publishing HTTP services
 Selecting this checkbox will cause the HTTP services created in the configuration and listed in the table below the checkbox to be published. In the default.vrd file, corresponds to the publishByDefault attribute of the httpServices element. If the flag is cleared, then this is equivalent to the absence of an httpServices element in the default.vrd file or the presence of an httpServices element with
with the publishByDefault attribute set to false .
Table below checkbox Publish HTTP services by default contains a list of published HTTP services and allows you to manage the publication of each HTTP service. The first column controls the publication of a specific HTTP service. If the checkbox is cleared, this HTTP service will be prohibited from use (it cannot be called). In the default.vrd file, corresponds to the enable attribute of the service element.
The second column (named Name) contains the name of the HTTP service as it was specified during creation. A description of HTTP services is given in the book 1C:Enterprise 8.3. “Developer's Guide”. In the default.vrd file, corresponds to the name attribute of the service element.
HTTP services that are located in connected extensions are not displayed in this table and can only be published by manually editing the default.vrd file.
Publish extension HTTP services by default. Responsible for the ability to use HTTP services that are supplied in configuration extensions. In the default.vrd file, corresponds to the publishExtensionsByDefaul t attribute of the httpServices element
3.2.3. “Other” tab
 Rice. 6. Other publishing options on a web server
 On this tab you can change auxiliary publishing parameters.
Temporary files directory. Allows you to specify the directory of temporary files for running the web server extension or file version of the infobase. In the default.vrd file, corresponds to the temp attribute of the point element.
Connection pool group. Describes the pool element of the default.vrd file. Read more here. Also, the parameters of this group control the operation of the connection loss tracking system.
Debugging group. Describes the debug element of the default.vrd file.
OpenI D group. Describes the openid element of the default.vrd file.
Data separation. Describes the zones element of the default.vrd file. Let's take a closer look at the structure of a table with delimiters.
The table includes all independent delimiters that exist in the configuration or loaded file. The first column (without a name) determines whether to create a zone element for the selected separator. It should be remembered that element matching is performed not by the name of the separator, but by its ordinal position in the list. If the first separator is disabled, then it makes sense to disable all the others, since the parameters of the zones element will be applied by the system to other separators.
The Name column contains the name of the separator, as specified in the properties general details. The checkbox in the next column determines whether the separator value in the zone element will be set or not. If the checkbox is checked, then the value from the Value column will be used as the value of the value attribute.
The checkboxes in the Specify and Safe columns are responsible for the safe and specify attributes (respectively) of the zone element of the default.vrd file.
Background jobs option file version describes the possibility of using background jobs in the file version of the infobase (the allowexecutescheduledjobs attribute of the root point element).
Starting with version 1C platform 8.3, it became possible to publish information bases on web servers. This decision very convenient, because by clicking on the link in the browser, you can fully work in 1C. Please note that work is only possible in “Enterprise” mode. The configurator can only be used on a thick client.
Of course, the 1C company announced its list of requirements for the operating system and browsers from which the connection will be made via a web server to 1C. But in practice there are many more possibilities. For example, you can work in 1C through a regular browser from a mobile phone.
In this article we will take a step-by-step look at publishing the 1C 8.3 infobase on a web server using Apache. The settings described below, which we will make in 1C itself, are no different from publishing on the IIS web server.
The only difference is that a server running IIS is more “picky” about settings, so most often the choice falls on Apache.
Installing and configuring Apache 2.4
The first step is to download Apache itself, for example, from the official website. Current on at the moment version 2.4. There is nothing complicated during the installation process, just follow the assistant.
When a window with server information appears in front of you during installation, enter “localhost” in the first two fields. This will mean that our computer will be the server on which 1C is located.
Also note that we will use port 80 (switch at the bottom of the form). It is important that it is not occupied by other applications.
After successful installation of the program, a special Apache icon will appear in the tray. With its help, you can both start and stop the web server.

Publication of information base 1C 8.3
After installing Apache, you can proceed directly to publishing the infobase on the web server. To do this, go to the desired database in configurator mode. All necessary actions will be carried out here. At the same time, as mentioned above, you can use these instructions in the case of using IIS.
Select "Publish to Web Server" from the "Administration" menu. In the window that opens, we will leave all the default settings, changing only a small part of them.
As a web server, we will select Apache 2.2, which we installed earlier. You can specify an arbitrary value as the name. We publish 1C: Document Flow, so we’ll just call it “doc”. In the directory field, select the empty folder we also created, which can be located anywhere.

After entering all the necessary data, click on the “Publish” button and restart the Apache web server.
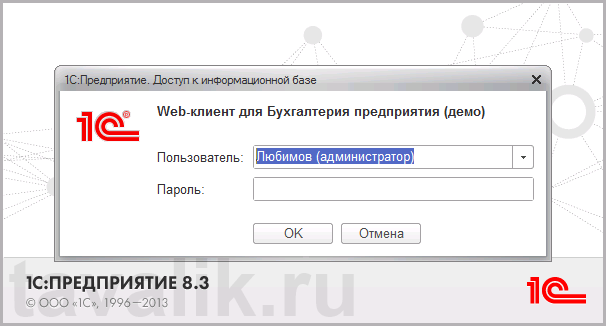
Now in address bar browser, enter “localhost/doc”. An authorization window in 1C appeared in front of us.

After entering a login with a password and authentication, the familiar 1C will open before us.

In this article I will describe in detail the process of organizing web access to 1C:Enterprise databases8.3 on the IIS (Internet Information Server) web server included in the delivery Microsoft Windows Server. For older versions of 1C:Enterprise (8.1 And 8.2 ) the algorithm for publishing databases is generally similar. The algorithm for setting up IIS for 1C:Enterprise will be discussed, and the process of publishing databases on a web server will also be described for both32-bit, and for 64-bitweb server extension module.
- What you will need
- Installing IIS Web Server
- Installing 1C:Enterprise components
- Setting up the operating system
- Publishing a database to a web server
- Configuring IIS to use the 32-bit Web Server Extension Plug-in
- Configuring IIS to use the 64-bit Web Server Extension Plug-in
- Connecting to a published infobase via a web browser
- Connecting to a published infobase via the 1C:Enterprise client
- Virtual Directory Configuration Files
- File default.vrd
- web.config file
1. What you will need
- A computer that meets the minimum system requirements to run a web server running one of the operating systems:
- Microsoft Windows Server 2012 (R2)
- Microsoft Windows Server 2008 (R2)
- Local administrator rights on this computer.
- Distribution kit for installing 1C:Enterprise components. To configure a 64-bit web server extension module, a distribution kit for installing a 64-bit 1C:Enterprise server. IN in this example version used 8.3.4.389 . For older versions of 1C:Enterprise ( 8.1 And 8.2 ) the algorithm for publishing databases is generally similar.
2. Installing the IIS web server
We install the Internet Information Server web server, which is included by default with Microsoft Windows Server. When installing, be sure to select the components:
- Common HTTP Features
- Static Content
- Default Document
- Directory Browsing
- HTTP Errors
- Application Development
- ASP.NET 3.5
- .NET Extensibility 3.5
- ISAPI Extensions
- ISAPI Filters
- Health and Diagnostics
- HTTP Logging
- Request Monitor
- Management Tools
- IIS Management Console
I wrote in detail about the process of deploying an IIS web server:
- In Microsoft Windows Server 2012 (R2) - here. IIS version 8, after installation you should see a Default Web Site page like:

- In Microsoft Windows Server 2008 (R2) - here. IIS version 7, after installation you should see a Default Web Site page like:

3. Installation of 1C:Enterprise components
On the same server where the IIS web server is deployed, we install 1C:Enterprise (32-bit components), making sure to select the following components during installation:
- 1C:Enterprise
- Web server extension modules
If you plan to configure a 64-bit web server extension module, you must additionally run the 64-bit server installation program from the corresponding 1C:Enterprise package and install the component:
- Web server extension module

4. Setting up the operating system
Now you need to set the necessary rights to the key folders used when using web access to 1C:Enterprise databases. For the storage directory for website files published on the web server (default C:inetpubwwwroot) you need to give full rights to the group " Users"(Users). In principle, you can skip this step, but then to publish or change the publication of the database you will need to run 1C:Enterprise as an administrator. To configure the security of this directory, click on it right click mouse and context menu select " Properties"(Properties).

In the properties window that opens, go to the “ Safety" (Security) and press the button " Change» (Edit...), to change existing permissions. The permissions window for this directory will appear. In the list of Groups or user names, select the group “ Users" (Users) and in the list of permissions for the selected group set the flag " Full access"(Full control). Then click " Apply" (Apply) to record changes and close all windows using the button " OK».

Next, you need to give full rights to the directory with installed files"1C:Enterprise" (default C:Program Files (x86)1cv8 for 32-bit expansion module and C:Program Files1cv8 for 64-bit) group IIS_IUSRS. To do this, we perform actions similar to those described above, with the only difference that in order for the required group to appear in the list “ Groups or users" (Groups or user names) you must click the button located under the list " Add"(Add..), and in the window for selecting groups or users, click " Additionally"(Advanced...).

Then click the button on the right “ Search"(Find Now), then select the required group IIS_IUSRS in the search results table and click “ OK».

Group IIS_IUSRS appears in the list of groups or users. We give it full rights to the selected directory and click “ Apply» (Apply) to save changes.

And finally, if publishing is performed for a file database, you must also give the group IIS_IUSRS full rights to the directory containing the files of this infobase.

5. Publishing the database on a web server
Let's move on to directly publishing the database on the web server. To do this, launch 1C:Enterprise in Configurator mode for the database that you want to publish. Then select “ Administration» - « Publishing to a web server...»

The window for setting up publishing properties on the web server will open. The main fields required for publication are already filled in by default:
- Virtual directory name - the name by which the database on the web server will be accessed. Can only consist of characters of the Latin alphabet.
- Web server - selected from the list of web servers found on the current computer. In our case, this is Internet Information Services.
- Catalog - physical location the directory in which the virtual application files will be located.
- Using the corresponding flags, you can specify the types of clients to publish, as well as indicate the possibility of publishing Web services. In the table below you can edit the list of Web services that will be published, as well as in the column “ Address» change the synonym by which this Web service will be accessed.
- It is also possible for the IIS web server to indicate the need to perform authentication on the web server using OS means by setting the appropriate flag.
Having selected the necessary publishing settings, click “ Publish».

If the publication went through without errors, we will see a corresponding message.

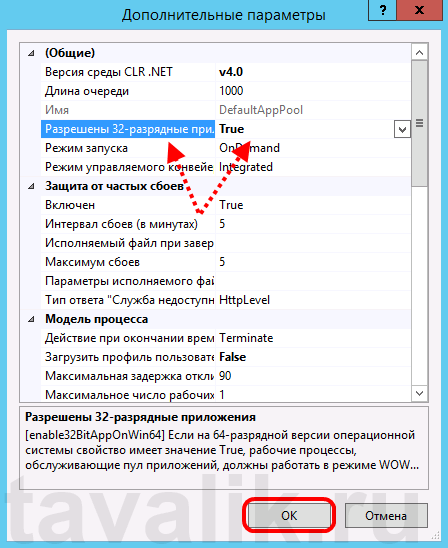
Publishing to the IIS web server is always done for the default website and the default application pool. It is worth keeping in mind that when publishing from the configurator, the 32-bit web server extension module will be registered, and the default application pool will be DefaultAppPool- Without configuration, it only works with 64-bit applications. Accordingly, further actions depend on the bitness of the web server extension module that you plan to use. For a 32-bit web server extension, you must enable the application pool to use 32-bit applications, or register a 64-bit web server extension. This will be discussed below
6. Configure IIS to use the 32-bit Web Server Extension Plug-in
Means" (Tools) - " Internet Information Services Manager

Default Web Site- a virtual directory transformed into an application appeared with the name that we specified when publishing the database. The only thing left to complete publishing is to enable 32-bit applications for the default application pool. To do this, go to the “ tab in the connection tree Application Pools"(Application Pools).

In the list of application pools we find a pool with the name DefaultAppPool. Right-click on it and select “ Additional options"(Advanced Settings).

In the application pool settings window that opens, in the group “ General"(General) find the item " 32-bit applications allowed» (Enable 32-Bit Applications) and set the parameter value to True. Then save the changes by clicking " OK».
7. Configure IIS to use the 64-bit Web Server Extension Plug-in
You can register the 64-bit web server extension module using the utility webinst.exe the corresponding version located in the directory bin, catalog with installed program"1C:Enterprise", or use the method below.
Let's launch Internet Information Services (IIS) Manager. This can be done from the Server Manager by selecting the “ Means" (Tools) - " Internet Information Services Manager» (Internet Information Services (IIS) Manager).
Here, expanding the tree in the connections window, we will see that for the default website - Default Web Site- a virtual directory converted into an application appeared with the name we specified when publishing the database. To complete the publication, all that remains is to indicate this application use a 64-bit request processor. To do this, open the handler mapping settings page for this virtual directory by selecting “ Handler Mapping» (Handler Mappings) on home page applications.

In the table of handler comparisons we find the handler "1C Web-service Extension". Let's open this handler by double-clicking on the corresponding row in the table.

Let's edit the handler by replacing the path to the executable dll of the 32-bit web server extension module that is currently selected with the path to the 64-bit version of the library. In this example, we change the path from " C:Program Files (x86)1cv88.3.4.389binwsisapi.dll" to " C:Program Files1cv88.3.4.389binwsisapi.dll» using the selection button. After changing the path, click " OK» to save changes.

8. Connect to a published infobase via a web browser
Well, that seems to be all. To connect to a newly published database, run Internet Explorer, and in the address bar enter a path like http://localhost/<Имя публикации информационной базы> . In this example it is http://localhost/DemoAccounting/.

You can also connect to this information base from any computer on the network by accessing the web server via its internal one (or if the port is forwarded 80 , by external) IP address.
In this case, for correct operation“1C:Enterprise”, the domain name being accessed (or IP address) must be added to trusted Internet Explorer sites, and pop-up windows must be allowed for it. Read more about Internet setup Explorer for working with the 1C:Enterprise web client, read here.

9. Connecting to a published information base through the 1C:Enterprise client
You can also connect to an infobase published on a web server using thin client"1C:Enterprise". To connect, open the “1C:Enterprise” launch window and click the “ Add» to add an information base.

In the window for adding an infobase/group, set the switch to “ Adding an existing infobase to the list" and click " Next».

Enter the name of the database as it will be displayed in the list of infobases (must be unique for this list), select the location type " On the web server" and click " Next».

Enter the address line to connect to the infobase (without the /ru_RU/ prefix). Here you can also specify the proxy server parameters (if any) and the authentication method on the web server. Having specified the necessary settings, click “ Next».

Specify the launch parameters for the infobase and click “ Ready» to complete the wizard.
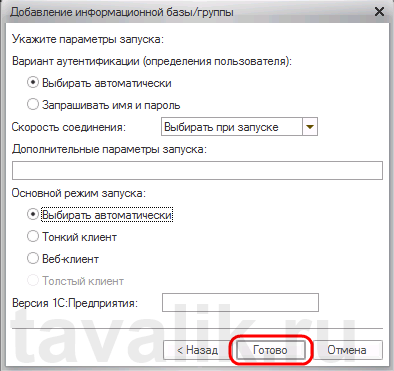
After which this information base will appear in the list of databases in the 1C:Enterprise launch window. Please note that the Configurator launch mode is not available for of this type connections. Click " 1C:Enterprise» to connect to the information base.

10. Virtual directory configuration files
Let's take a closer look at the structure of the files that were created during the publishing process. If web access to a published infobase does not work for some reason, the configuration files can be edited manually to achieve the desired result (the configuration files from this article for the 64-bit web server extension module can be downloaded here).
Let's go to the directory that we specified when publishing the database. We will see two files in it:
- default.vrd
- web.config

Both files are available for viewing and editing using any text editor, for example the Notepad program. Let's take a closer look at the structure of these files.
10.1. File default.vrd
In file default.vrd describes published Web services (element
Ib="File="C:1C_BASEDemoAccounting";"
As you can see from the example, if the connection string contains characters that are illegal according to the XML standard (http://www.w3.org/TR/xml11/), they must be replaced accordingly.

In the connection line you can specify the user's login and password. In this case, the connection to the infobase will be performed on behalf of the specified user. For example, to connect as the user Seller, the connection string will be as follows:
Ib="File="C:1C_BASEDemoAccounting";Usr=Seller;Pwd=123;"
For a server infobase, the connection string will look like:
Ib="Srvr="WIN2012;Ref=Accounting;"
Where WIN2012- name of the 1C:Enterprise server cluster, and Accounting- name of the database in the cluster.

More about the structure this file can be read in the book "Administrator's Guide" 2nd edition, Appendix 2, chapter 3.12.
10.2. web.config file
File web.config is a file that defines parameters for an ASP.NET web application. Every web application must have a file web.config, located in its root directory. Our virtual directory is no exception. The current file contains data about the 1C Web-service Extension handler that processes requests to this application. The handler is configured in such a way that all requests are passed to the library wsisapi.dll located in the directory bin, directory with 1C:Enterprise files. In the case of using server information bases, the version of the library must correspond to the version of the 1C:Enterprise server cluster.

This handler can be found (or added if it does not exist) in IIS Manager. To do this, select the tab with the current application and in the properties window select “ Handler mappings» (Handler Mappings).
In the table of handler comparisons we will see our handler "1C Web-service Extension". If such a handler is not in the list, you should add it by selecting it in the “ Actions" (Actions) item " Adding a script match with wildcards» (Add Wildcard Script Map…).

When adding, enter the name of the handler and indicate the path to the file wsisapi.dll. These parameters can also be changed for the current handler by selecting “ Change…"(Edit...) in the action list window.

You must also make sure that the flag " is set for the handler Execution» (Execute) in the function permission changes window. You can call this window by selecting “ Changing function permissions..." (Edit Feature Permissions...) in the window " Actions"(Actions).

Web client is one of the client applications of the 1C:Enterprise 8 system. Unlike "usual" client applications (thick client and thin client), it does not need to be previously installed on the user's computer. The web client does not have an executable file. You will not find the web client either in the menu or among the executable files. That's why it is a web client, because it doesn't need to have any files on the user's computer to start working.
Working in an Internet browser without installing the system on the user's computer
To work in web client mode, you need a web server configured to work with 1C:Enterprise 8. The client browser interacts with the web server using the HTTP or HTTPS protocol. The web server, in turn, interacts with 1C:Enterprise 8 in a file or client-server mode of operation.
Apache or IIS is used as the web server.
OpenID Connect authentication
The web client supports OpenID Connect providers. To authenticate in 1C:Enterprise, in addition to the available methods, users can use their credentials on other sites that support OpenID Connect authentication.
Working on iPad
Browsers running on mobile devices, have a number of limitations and specific requirements. Therefore, especially for comfortable work on
Step-by-step instructions on how to set up web access to 1C databases. I wrote it for myself as an instruction so as not to forget in the future. Maybe it will be useful to someone else.
Setting up client-server access to 1C via WEB interface
This article provides instructions on how to organize work with the 1C configuration via an Internet browser.For the article, the 1C setting was used to work with the MS database SQL Server and Internet Information Services included in the delivery of the operating system was used as a web server.
Before starting the installation, 1C with the application server, SQL Server 2005 and higher must be installed, and Internet Information Services must be running.
The following software versions were used as an example to describe the article:
All the steps described can work both on older releases of programs and on younger ones. Minimum Requirements listed on the 1C website - http://v8.1c.ru/requirements/
Before starting the settings, the products listed above in the table must be installed on your computer. In this case, the 1C server and the SQL server may be located on different physically or virtual computers. It is desirable that Server 1C and Internet Information Services be located on the same physical and logical server (this will reduce problems with settings).
The entire setup process is divided into 5 steps:
1 - Registration of configuration and database on 1C and SQL servers
2 - Setting up IIS on the server to publish the configuration
3 - Publishing a WEB application from 1C
4 - Configuring libraries to work in a 64-bit OS
5 - Setting folder access rights and Windows Firewall
In addition, the article contains information on how to access the published site.
As well as information about the resources used
7. Resources used
1. Registering the database on 1C and SQL servers
1.1. Launch Server 1C
After installing 1C, you need to make sure that the 1C server is running. The author usually starts the server manually. But if you are sure that the 1C server is running, then you do not need to do this step.1.2. Register a 1C cluster
Launch the 1C server administration utility:
In the window that opens, register a new central 1C server of the enterprise:

In the window that appears, enter network name computer on which 1C Server is running (or its IP address):

1.3. Register 1C database on SQL server
To start registering the database, you need to launch the 1C application. In the “Launch 1C:Enterprise” window that appears, register a new database by clicking on the “add” button:
Select "Create a new infobase":

In the window that appears, you have the opportunity to create a database from a template, or create a new empty database (later you can load the database, load the configuration, or create your own configuration):


 It should be noted that the field " Database name" - these are the names of the database on the SQL server. And the field " Infobase name" - name of the database on the 1C server.
Then select the authentication option in 1C (Select automatically) and click the “Finish” button:

1.4. Download or create 1C configuration
Launch the configurator with the database:
Load the previously downloaded information base:

2. Setting up IIS on the server
For this point, information was taken from the article: http://infostart.ru/public/71480/2.1. Checking installed IIS components
To operate the 1C:Enterprise web client, IIS services are required, which were not installed by default when Windows installation 8.1 x64.To install them, go to "Start - Control Panel - Programs and Features - Turn it on or off Windows components". In the tree that appears, in the branch "IIS Services - Internet Services - Application Development Components" select all components, as shown in the figure. Then click the "Ok" button:

2.2. Allowing 32-bit applications in the application pool
Web client 1C:Enterprise 8.3 is a 32-bit application. Therefore, for a 64-bit OS, you must allow them to run in the application pool of the IIS server. To do this, go to "Start - Control Panel - Administrative Tools - Internet Information Services Manager". In the Service Manager, select "Application Pools - DefaultAppPool - Advanced Settings". In the list of additional parameters of the variable "Allowed 32-bit applications" set the value to "True":
Set "Allow 32-bit applications" to True:

2.3. Setting the application pool identity as an anonymous user identity
By default, the anonymous user is set to the IUSR user, who is not in the system. To avoid creating one, you can simply enable the application pool identity as an anonymous user identity. To do this, go to "Start - Control Panel - Administrative Tools - Internet Information Services Manager". In Service Manager, go to "Authentication:
At the "Anonymous authentication" item, call the "edit" context menu:

In the dialog that opens, select “Application pool identity”. Close the dialog by clicking the "OK" button.

3. Publishing a WEB application from 1C
To publish an application, you must have full access to the IIS projects folder. There are 2 ways to publish an application from 1C. 1 - first create the necessary folder in the directory "C:inetpubwwwroot" in our case it is a folder called "Base1C" and give the current user rights to full access to this folder. 2nd way to log into 1C as an administrator and then give the necessary rights to the folder of the already published application. This article describes the second way.3.1. To publish the configuration on the IIS server, you need to run 1C as an administrator:
Call the context menu on the 1C shortcut and select "Run as administrator"
Select the database and launch 1C in configurator mode:

3.2. Start publishing on a web server
To start publishing, go to the menu "Administration - Publishing on a web server":
In the window that appears, specify the name of the publication, specify the web server and specify the path on the web server.
1C allows you to publish to any available web server on the network using the webinst utility. The article used an example of publishing to a local computer:

More detailed information The items in the publication window can be obtained from the 1C configurator by pressing the F1 button.
4. Configuring libraries to work in a 64-bit OS
After publishing on a web server from the configurator, if you are using a 64-bit operating system on a computer that is used as an IIS server, you need to configure work with 1C libraries. This is done every time after publishing to the web server.To configure libraries, you must complete the following steps.
Open via Control Panel - Administration IIS Services Manager.
In the window that opens, expand the “Sites” group and our site (in the example, Base1C).
Click on "" in the group IIS:

In the window that opens, look for the line named "ISAPI-dll" and click the menu item in the actions "Add script mapping..."

IN open window"Adding a script mapping" in the "Request Path" field, enter the symbol * (asterisk, i.e. all). In the "Executable file" field, select the wsisapi.dll library from the directory of the installed 32-bit version of 1C. In the "Name" field you can specify any name (in the example Name = 1C):

Some experts in other articles indicate that you need to disable the query matching restriction. The author did not find any dependence on the operation of this mark for the 1C program. This information It is given informatively, someone may need it.
You can configure query limits by clicking the Query Limit button in the Add Script Mapping window. In the window that opens, uncheck “Call the handler only when matching a request with:”:

Click the Ok button.
Answer “Yes” to the question that appears:

Then you need to restart the IIS service. To do this, go to the root of the "Connections" panel (to the name of the server) and select "Restart" in the action menu on the right:

Then we can check whether the connected library works. To do this, go to “ISAPI and CGI Restrictions”:


Once again, it should be noted that this procedure for setting up libraries should be done every time after publishing an application from 1C.
5. Setting folder access rights and Windows Firewall
5.1. Configuring folder access
For proper operation All users, not just administrators, with published web applications need to configure some folder rights.To set up permissions for pakpi, you need to Windows Explorer call the context menu for the required folder and select the item " Properties" and go to the bookmark " Safety"
In this case we're talking about about rights to 3 folders:
1. "C:Program Files (x86)1cv88.3.5.1088bin"(the wsisapi.dll library is located in this folder) (the release number "8.3.5.1088" may be different)
2. C:inetpubwwwrootBase1C(this is the folder we created that will be used for access from the Internet)
3. CatalogBases(this is a 1C database, if used file type database), in our example the database is stored on a SQL server, so there is no database directory and there is no need to give access to it.
For all folders (Items: 1,2,3) required for the user IIS_IUSRS set access " Full access":

For the folder with our database (Point 3) user data Users, set access " Change".
5.2. Configuring port access in Windows Firewall
If you plan to use web access not only locally, then you need to configure Windows Firewall for access from external resources, specifying access port 80. The author did not use the firewall settings, but simply disabled it:


