Synchronizing your laptop and TV will allow you to view content on the big screen. Connecting a regular laptop running Windows OS to a TV is not difficult. However we're talking about about the device from Apple. Therefore, the synchronization process will be significantly different. Few users know how to connect a MacBook to a TV.
Now let’s analyze the specifics of connecting Apple laptops to TV. The proposed options are suitable for MacBook Air and devices of other models. Follow the instructions carefully to ensure the image appears on a large screen. Many users encounter certain problems - we will analyze them and also suggest effective ways solutions.
Options for connecting a MacBook to a TV
Conventionally, all existing methods can be divided into two groups - wireless and wired. The necessary cords and adapters are not included in the basic package of TVs and laptops. Therefore, they will have to be purchased separately. How to connect Mac to TV? The user must decide for himself. Much depends on how exactly and in what mode the TV will be used.
Note that the TV model is not of fundamental importance. Connecting a MacBook to a Samsung or Sony TV will be absolutely no different. All available options allow you to use your TV as a large monitor. This means that the laptop acts as a projector.

MacBooks are designed to synchronize with another Apple technology. Therefore, if you do not plan to use devices from other manufacturers, then you will need to perform a few additional steps to avoid compatibility issues. Let's get down to business. First, let's look at how to connect a MacBook to a TV via an HDMI interface.
Via HDMI cable
Absolutely all modern TV models are equipped with an HDMI interface. Therefore, this method of synchronizing equipment can be called a priority. Creating a connection will not pose any particular difficulties. Since the whole process comes down to connecting the cable plugs to the appropriate connectors.
If you have never connected any devices to your laptop before, then start by looking at the video signal ports. The layout of the interfaces may vary according to MacBook model. To set up your iMac with HDMI, plug the cable into the connector on the back of the device. Video output to MacBook Pro located on the left, and on the MacBook Air on the right. The Mini-Display port, into which the HDMI adapter is inserted, looks slightly different.

When all the necessary cables and adapters are prepared, it’s time to move on to connecting the MacBook to the TV. To do this, follow these simple step-by-step instructions:
- Insert the HDMI adapter into the video output port on your Mac laptop.
- Connect the HDMI cable plug to the adapter.
- The second end of the cord must be inserted into the corresponding connector on the TV, which is located on the side or on the back panel.
- If the laptop was turned off, then turn it on.
- Take the remote control remote control TV and select “HDMI” as the signal source.
The laptop will automatically detect the new connection. The desktop will be configured to display high definition. If the picture does not appear on the big screen, it means that the user inserted the cable into the wrong connectors. It is possible that the signal source was selected incorrectly.
Modern TV models are equipped with 5-6 HDMI interfaces. Analyze them. Select the port that allows you to transmit audio and video signals. Synchronization will be considered complete when the laptop desktop appears on the big screen. Now you know how to connect your MacBook to your TV.

If you are satisfied with the default settings, then you can proceed to play the content. However, keep in mind that at this stage the TV is used as external display. To view content through applications, you need to perform a few additional steps. As a result, the functionality of the device will increase significantly.
We should also talk about sound reproduction. By default, the audio signal is not transmitted to the TV. Therefore, the sound is played through the laptop speakers. This is very inconvenient. Therefore, it is better to carry out an in-depth setup so that the sound is played through more powerful TV speakers.
As noted earlier, the MacBook initially uses the TV as an external display. The laptop desktop is displayed on a large screen. This good option for those users who need a large external monitor. However, if you want to watch TV shows, various videos and movies, or play video games, then it makes sense to think about setting up mirroring.
Instructions for setting up mirroring:

This setting is ideal if you are using a TV designed to play 720p content. To watch video in high definition format (1080p.), you need to reduce the resolution or use external screen as the main one. Otherwise, the symmetry of the picture will be broken.
Instructions for changing the main display parameters:
- Connect your laptop to your TV using the HDMI interface.
- Open system settings on your laptop.
- Select section "Display".
- Switch to tab "Options".
- Move the white line from the small display (laptop) to the large one external monitor(TV).
This is how the TV turns into the main screen.

The configuration system proposed above will significantly modify the device configuration. The computer screen will be used as a desktop. The TV will become the main desktop on which menus and all kinds of applications are displayed.
We've sorted out the video setup. It's time to talk about sound. If a powerful audio system or speakers with excellent sound are not connected to the laptop, then it is better for the audio signal to be played on the TV. The built-in speakers in the MacBook are not capable of providing clear and natural sound.
If the TV and laptop are synchronized via HDMI, then the sound must be adjusted manually. When the cable is inserted into the appropriate connectors, and the laptop desktop is displayed on the large screen, you need to do the following:
The output tab mainly always displays the number and series of the TV model. Not every user knows exactly what the technology they use is called. Therefore, it is wiser to focus specifically on the “HDMI” inscription, and not on a little-known combination of Latin letters and numbers.
Once the user switches the audio output, he will lose the ability to change volume settings through the laptop operating system services. To increase or decrease the volume, you need to use the TV remote control.
Via Wi-Fi
WITH wireless connection TV and laptop everything is much more complicated. To display an image on a TV via Wi-Fi, in the “Screen Mirroring” mode, you need to use a branded Apple TV set-top box. Instructions:

Connecting your TV via Apple TV will allow you to stream video from Safari browser and Quick Time player. You can also use the TV as a monitor, as is the case with an HDMI connection. Please note that in order to perform wireless synchronization, the laptop must be updated to MacOS versions 10.8 or higher.
What to do if there is no Apple console? There are alternative ways synchronization using special software. The idea is to create a DLNA server for subsequent wireless transmission content from a laptop to a large TV screen.
There are many various programs. Users who do not want to get confused in a large number of parameters, but simply want to broadcast photos and videos to the TV screen, should download the PS3 utility Media Server. Instructions for creating a DLNA server:
- Go to the Navigation/Sharing tab.
- In the field located at the very bottom, indicate the path to the directory containing films, music, and TV series. You can specify multiple folders.
- Save the settings and simply run the desired file.

The DLNA server will stop working as soon as the laptop goes into sleep mode. Open command line, and then enter "pmset noidle". This command will prevent the laptop from going into sleep mode.
There is nothing complicated about this setup. You just need to follow the instructions.
Possible problems
What should I do if the output image is too small or there are black bars? The best option– screen scaling. Not all content stretches to fill the entire screen automatically. Therefore, after setting up the connection, the user will be faced with the fact that a black frame appears on the sides.
Similar problems appear during the streaming of various movies and TV series. The image quality will also be unsatisfactory. This is due to the low resolution. If you use VLC or Quick Time players, then everything can be solved by playing content in 1.5x or 2x resolution. Therefore, you can do without screen scaling, if such functions are available to you.

First, you should activate the screen scaling option, if you have not done so first:
- Open the laptop operating system settings.
- Go to the "Accessibility" section.
- Switch to the "Zoom" tab.
- Activate zoom features.
- Save your changes.
Be sure to check the box next to “Smooth image”. This allows you to reduce pixelation parameters during upscaling. However, this may cause the picture to become excessively blurry. Therefore, it is also better to avoid significant scaling. Otherwise, the image will lose its naturalness.
To start playing content, launch the player. Move the mouse cursor to the center of the video. You can now use the zoom feature to minimize the black bars on the sides, as well as the top and bottom. This work can also be done with gestures. Swipe the “Control” key, and then change the picture by lifting two fingers up or down – zoom in and out, respectively.

More and more users are interested in questions about how to properly connect Apple TV to a TV and configure the set-top box. Although in reality it turns out to be not so difficult to synchronize these two devices. The products of the American company Apple are convenient and intuitive. user interfaces, which allow you to quickly connect and configure equipment. These characteristics also apply to Apple TV.
This is a universal gadget from the Apple corporation that expands the capabilities of the TV. With it you can:
- create home multimedia center by connecting all the available gadgets of this company to one network;
- use all the features of the iTunes media player developed by Apple;
- access high-quality, high-resolution video content from your TV screen, which is located on special resources;
- access music tracks, trailers, video games, podcasts;
- watch online sports broadcasts;
- display information from your gadgets and devices running on the Mac OS and Windows operating systems on the TV screen.
Today, four generations of multimedia player are available to usersApple TV. In the first generation, the device was produced with an operating room adapted for it Mac system OS X Tige. Starting from the second version, the device runs on the iOS OS.

Owners of second and third generation consoles can play content only in streaming mode. The fact is that these devices are not equipped with a capacious storage device. The Apple A5 processor and 8 GB of flash memory can only be used as intermediate storage for streaming data. But thanks to this, Apple capabilities TV is quite good - the player allows you to play videos from the iTunes multimedia collection with HD and Full HD resolution and multi-channel sound without delay. Latest version The device already has 32 and 64 GB of internal memory, depending on the model. In addition, the fourth generation Apple TV has access to applications fromApp Store and support for interactive voice control (Siri).
An Apple TV media player with built-in connected to the TV makes it possible to expand Smart functionality.
To have access to the multimedia library of your iPhone, tablet or PC via your TV screen, just install on them software and synchronize with TV. Control is carried out through the remote control included with Apple TV or through gadgets running on iOS 7.

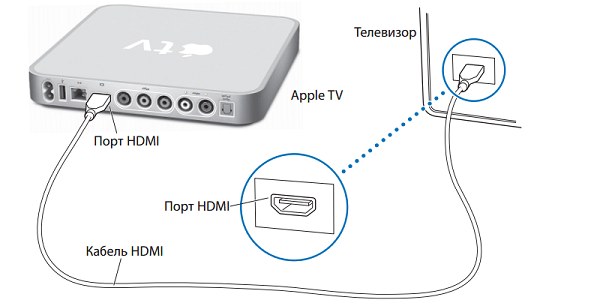
How to connect the set-top box to the TV
ConnectApple TVcan only be connected to a TV that has a connector forHDMI-cable or . In the absence of such capabilities, it will not be possible to connect the set-top box to the TV. To have access to all the features of the gadget, it is best to use a wired connection. If connected via Wi-Fi, the user will not have the iTunes function.
To connect you will need:
- set with Apple TV device;
- TV with HDMI connector;
- HDMI cable (sold separately);
- personal Internet connection (router).
Using an HDMI cable, the Apple TV set-top box is connected to the TV. If the connection to the router will be made throughEthernet-cable, then it is also inserted into the devices. This completes the connection stage. Now all that remains is to configure the equipment.

Apple TV setup instructions
- The power of the set-top box and TV is turned on. If the wired connection has been made correctly, settings window new equipment.
- The Apple TV remote control is connected. To do this, just click on touchpad (simulating a mouse click).
- Through the connected control panel, the initial setup is carried out: the language and region are set, the Siri function is activated if necessary (in the fourth generation set-top box), and the Wi-Fi password is entered.
- Once connected to the Internet, you can activate your accounts on services such as iTunes.
This is the connection Apple devices TV to TV and equipment setup is completed. Now the user can download and view multimedia content from their devices and through available services right on the TV screen. Fans of Apple products may also need information, or - all gadgets are quite easily synchronized with TV. You can also easily watch videos from your phone on a big screen, you just need to know.
If you are the owner of one of the iMacs, you have a great opportunity to get a lot of pleasure from “widescreen” watching videos or playing games on the big screen. To do this, just connect your gadget to the TV. We'll show you how to do this using an HDMI connection.
To connect your iMac to your TV using HDMI, make sure the former has one of the following ports – Mini-DVI, Thunderbolt, or Mini-DisplayPort. The TV also needs a corresponding HDMI input (they are available in almost all modern models). In addition, you will need an adapter (Mini DisplayPort/Thunderbolt to HDMI with audio support) and an HDMI cable (for greater convenience, it is better to take a longer one). Let's start the process by connecting one end of the adapter to the video output port (Thunderbolt or Mini-DisplayPort) of your iMac, and the other end to an HDMI cable. The latter, in turn, is connected to the corresponding TV port.


One of the main reasons that may prompt a user to buy a set-top box is the ability to quickly iPhone connections, iPad or Mac (MacBook, iMac, etc.) to your TV. What is this for? Of course, in order to display photos, videos, music, applications, games and other content from the above-mentioned devices on the big TV screen.
How to Connect an iPhone, iPad or iPod Touch to Apple TV
Apple TV allows you to display images from any iDevice on the TV screen. The main condition is that the set-top box and iOS device must be connected to the same Wi-Fi networks. To do this, just go to Control Center (swipe up from the bottom of the screen), select “ Screen repeat" and in the list of devices that appears, indicate Apple TV. Naturally, the prefix must be .

After this, the TV display will display everything that happens on iPhone screen or iPad - games, movies, music, etc. Additionally, Apple TV integration can be activated in some apps, such as YouTube.
By analogy with iOS devices, you can connect a computer or laptop to Apple TV. In this case, Windows PC owners will be forced to use special utilities, while Mac users will find the familiar AirPlay icon in the top menu bar, clicking on which will allow you to stream video and sound from your Mac to your TV.

This is quite convenient for playing content from iTunes,

watching videos from YouTube, photo albums, etc.

Connecting your MacBook to Apple's Thunderbolt Display doesn't have to be difficult, you just need to get the appropriate cable. What to do if you decide to connect your Mac and TV? In this tip we will tell you about this.
One of the options, and the simplest, is to use a special Apple TV set-top box. But there are other connection methods that have certain advantages.
We're talking about hdmi cable. This best tool to display images from the display of a MacBook, iMac or even Mac mini on the TV screen. This method quite cheap and also capable of providing high quality transmitted image, whereas AirPlay is entirely dependent on your internet connection.
Many Apple computers come with HDMI port, so the procedure for connecting a device is no more complicated than via Thunderbolt. But the same MacBook Air or older models of Apple laptops do not have this port on board, so we will tell you several alternative methods.

For this we need:
Mac computer with a Mini-Display, Mini-DVI, or Thunderbolt port
. Mini-DisplayPort/Thunderbolt to HDMI adapter with audio support
. HDMI cable
. TV with HDMI port
This is what an adapter from Thunderbolt to HDMI looks like:

After we have all the equipment listed above in stock, it’s time to move directly to connecting the computer to the TV. There is a certain sequence of actions here that is highly recommended not to be violated.
Connecting a Thunderbolt to HDMI adapter to your Mac
. Then we connect the HDMI cable to it, and connect the other side to the TV
. Turn on the computer
. Turn on the TV and select HDMI as the image transmission interface (usually using the button on the remote control)
Your Mac will become friends with the TV, and after all the above operations it will look something like this:

By default, your Mac detects your TV as an external display, so it streams to both screens. But if you, for example, watch movies or play games, you simply don’t need a second screen (on a computer). To do this, you need to go to system settings, select the “Monitors” tab and disable video mirroring.

To configure audio output via HDMI, you need to select the “Sound” section in system settings and go to the "Output" tab.

OS X provides hotkeys for zooming in on the screen. This list is very useful when watching movies, and you can study it in the “Universal Access” section of the system settings.

Be sure to get a good video player, especially for watching Blu-ray movies. Not every application is able to cope with a file whose size exceeds 50 gigabytes.