Now solid-state drives, or SSDs, are actively taking over the market and are replacing the good old HDD drives. They gradually fall in price, and their volume is constantly increasing. But it's not that simple. These drives have their drawbacks. The fact is that the service life of memory cells is limited, and it is greatly influenced by the number of rewrites. That is why the correct configuration of an SSD drive under Windows 7 directly affects the service life of this device. Let's look at all this in more detail.
SSD Lifespan
This disk is a regular flash memory, i.e. microcircuits. There are no mechanical, moving parts. This flash memory consists of cells, and they tend to wear out. The more information you write to the disk, the more they wear out. Therefore, setting up an SSD drive is very important. If the disk is being read, then this does not affect its wear.
There are various utilities that can be used to obtain information about the operation and status of the drive. One of them is CrystalDiskInfo. With its help, you can find out many characteristics and performance indicators of the disk. For example, firmware, serial number, total number of operating hours, number of starts, rotation speed (if we are talking about HDD), etc. We will be interested in the field showing the number of host records. The disk controller counts the total amount of data written to memory during its entire operation. This is due to the way flash memory works. Therefore, the figure shown here in gigabytes will exceed the capacity of your disk.
Setting up an SSD under Windows 7
Modern flash memory (MLC) is designed for a fairly large number of rewrite cycles, for example 1000, 2000, etc. This means that you can completely rewrite the disk, for example, a thousand times. If you have 128 GB, then you multiply this value by a thousand and get the final result - the total amount of data that you can write to the drive over its entire service life. This indicator appears in the “Total host records” column. It indicates the amount of data written to the disk since it began operating. For comparison, it must be said that 128 GB SSD drives are designed to record 40-70 TB of information. With very active use of the disk, on average, about 10 TB of information is accumulated per year. Thus, its service life will be about 4-7 years.
With moderate use of an SSD drive, the amount of data written to the disk will be two or even three times less, and its service life will be correspondingly longer. That is why they are recommended for But first you need to achieve the correct SSD settings. Installing and configuring an SSD under Windows 7 will not take much time. But that is not all. In order to achieve the best results, another process is performed. This is a Windows 7 setup for optimal performance with an SSD drive.
How the system is configured
Above we learned how flash memory works and what its resource is. Now let's look at how to configure and optimize Windows 7 for proper operation of the SSD drive. It does not require deep knowledge of computer science or deep knowledge of the system. Even a novice user can do this. You will need to complete eight steps to optimize Windows to use an SSD drive. Myths and reality are closely related to each other, and some may get a little confused. We will tell you step by step where to click and what commands to set.
Disabling System Restore
We need to disable Next - "System and Security", then - "System". Then you need to open "Advanced system settings". In the "System Protection" tab, click on "Configure". There are several options here: “Enable protection” and “Disable protection”. We can also configure the number of gigabytes that we allocate for system protection.
This refers to the automatic creation of a copy of the system, the so-called recovery point, and how much disk space is allocated for this. The default is from 2.5 GB to 10 GB. Accordingly, if we disable system recovery, the specified number of gigabytes will be freed on the disk. This setting makes sense to increase the free space of the SSD drive and at the same time reduce the amount of data written to the SSD. However, system protection is a very useful feature, and whether to disable it or not is up to you. If your SSD storage capacity is large enough, then you can leave everything as is. If not, or you do not use protection, you can disable it.
Turning off data indexing
This point has a more practical meaning, which directly affects the speed of your SSD drive and its durability. In the “My Computer” tab, find “System Disk” and go to “Properties”.
Below, by default, the option to allow indexing of files on disk is enabled. This function was developed to optimize the performance of HDD media. This was due to the specific operation of their magnetic plates and heads. There is no such need for SSD drives, so we uncheck this function. This will eliminate unnecessary writes to the SSD disk. If an error suddenly occurs, it will be related to the swap file. You will need to disable it, reboot the system and repeat disabling the above option again.
Disabling the page file
By default, Windows creates a special file on the system disk - this is the paging file. It is used to write some information from RAM to an area on the system disk. This is used in resource-intensive applications such as Photoshop. Some information is unloaded from RAM onto the hard drive, and when necessary, it is loaded back. If you have enough RAM (8 GB or more), then this page file can be safely disabled. This will reduce the number of writes to the system disk. If your RAM is small and the applications you use are quite powerful, then disabling this file may cause system instability. Here you need to look individually.
To disable the file, follow the following path: “Control Panel”, then “System and Security”, then “System”, then “Advanced Settings”, then “Advanced”, then “System Performance”, “Settings”, then “Advanced” , "Change". By default it is enabled, you need to uncheck the box and then click “No paging file”.
Turning off hibernation
Hibernation is a special sleep mode with a new feature. It was developed for Windows Vista. In this mode, data from RAM is rewritten to the system partition, and we can turn off the computer from the network. After switching on, all information is restored, automatically read from the system media into RAM. This way, all open programs are back on the desktop. Data will not be restored in normal sleep mode. If you do not use hibernation, you can disable it. This will reduce the number of writes to the SSD and free up additional space.

Go to the command line: Start menu, enter “cmd” in the search, run it as administrator. Enter the following phrase there: “powercfg-hoff”, and then press Enter. After this, restart the computer. If in the future you want to return everything back, you will need to enter “powercfg-hon” in the command line and then restart the computer.
Disabling Prefetch (Files in RAM)
This feature loads some data into RAM if you access it frequently. The operating system itself monitors these files and anticipates this possibility. For example, you often use the Word text editor. Some files are already loaded into RAM, and this program launches faster.

For an SSD drive you will not get any noticeable increase in speed, since it works faster than an ordinary HDD, so you can turn off this function. Most often, the operating system itself disables this function when installing Windows on an SSD drive.
How can you check if this option is enabled and how can you disable it? This is done using the system registry. You need to open the system registry editor. Go to the “Start” menu, enter “Run” in the search bar and open the “Run” window in the results. Enter the word regedit there and click OK. The system registry editor window opens. Here we go to the HKEY_LOCAL_MACHINE directory, then to the SYSTEM tab, then CurrentControlSet, then Control, then SessionManager, MemoryManagement and PrefetchParameters. Click EnablePrefetcher, select “Change” and replace the number 3 with 0. Click OK, reboot, and the function will be disabled.
Disable SuperFetch (disabled by default) and Windows Search
This function can be disabled more easily, without the system registry. Go to: “Control Panel”, then “System and Security”, then “Administration”, then “Services” and look for Superfetch in them. Click the mouse and select "Properties". Then click "Startup Type" and then "Disabled". Next, click “Apply”, OK. After a reboot, the changes will take effect.
If you wish, you can turn off the Windows Search service. It helps you search for files on your computer. Accordingly, turning it off will be at your discretion. If you still decide to do this, then in the “Services” described above you need to find Windows Search, then “Properties”, then “Startup Type”, then “Disabled”, OK. In principle, this is not necessary.
Turn off clearing Windows cache
This step will not have a positive impact on performance for all drives. For example, on Intel SSD drives, the company itself does not recommend disabling this option.
Select: “My Computer”, “System Disk”, “Properties”, “Hardware”, the desired SSD, “Properties”, “General”, “Change Settings”, “Policy”. Check the box "Disable cache buffer clearing...". If after these steps the performance of your disk has dropped, it is recommended to uncheck this box.
Disabling ClearPageFileAtShutdown and LargeSystemCache (disabled by default)
The ClearPageFileAtShutdown option allows you to clear the page file when the computer boots, and the LargeSystemCache option is the size of the file system cache memory. By default, when installing an operating system on an SSD, these options should be disabled. Windows 7 disables them itself. In order to check this, you need to go into the system registry.
We also go to the system registry editor (see how to do this above). In the branch, go to the following folder: "HKEY_LOCAL_MACHINE/SYSTEM/CurrentControlSet/Control/SessionManager/MemoryManagement". In the right field we find the file LargeSystemCache. Click on "Change". If the field is 0, then it is disabled. We immediately find and also check the file ClearPageFileAtShutdown. If the field contains 3, then you need to change it to 0, then click OK and restart the computer. You will learn further how to set up an SSD drive for Windows.
conclusions
That's basically it. The basic settings have been touched upon here. It is definitely necessary to disable the ClearPageFileAtShutdown and LargeSystemCache, SuperFetch and Prefetch, data indexing options. If desired, if RAM allows, you can turn off the paging file. System Restore and Windows Search are also disabled at will. To clear the cache, you need to look at the performance of your drive.
Setting up an SSD drive for Windows 7
Now let's talk about how to configure an SSD drive so that it optimally uses the resource stored in it. What steps and points must be followed in order for the disk to work as quickly as possible and its memory cells to remain operational for a sufficient amount of time? Setting up an SSD under Windows 7 does not require much time and is quite simple.

There are two modes of operation of the SATA controller. The first is the IDE, and it is usually enabled by default in the BIOS. The second mode is AHCI. It is this that will allow us to use NCQ and TRIM technologies, which will increase the speed of random writing and reading from an SSD drive. The TRIM command is sent by the system and allows disk cells to be freed from physically deleted data, thus increasing its performance.
Enabling AHCI Controller Mode
If you have not yet installed Windows, then you can change the mode from IDE to AHCI without any problems in the BIOS. After this, Windows 7 is installed and configured on the SSD drive, and everything works. If you have already installed the system, the procedure will be described below.

We need to go to the registry editor, finding the file regedit.exe. How to do this was discussed above. In the system registry editor you need to open a branch according to the following scheme. SSD configuration under Windows 7 occurs in the HKEY_LOCAL_MACHINE\SYSTEM\CurrentControlSet\services\msahci directory. Here we need to find the ErrorControl parameter. Click and select "Change". The default value will be 3. You need to replace it with 0, then OK. Just below we find the Start parameter. We also change the value from 3 to 0 and click OK. Next, reboot the computer and go into the BIOS. Now we change the controller mode from SATA to AHCI, save the BIOS and load the operating system.

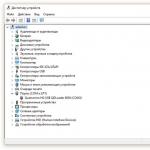
Now we need to check whether changes have occurred in the system. To do this, go to “My Computer”, then “Properties”, then “Device Manager” and find the IDEATA item here. It needs to be opened, and if you have the line “Standard PCIIDE controller,” then nothing has changed. If you have AHCI in this place, then everything is in order, setting up the SSD under Windows 7 was successful. These steps can be carried out before making changes to the registry and BIOS. You may already have AHCI mode enabled.

Now we have the TRIM command, which will allow the disk to function faster when littered with data, and NCQ technology is available, which allows you to increase the speed of random reading and writing of information.
Thus, the optimization of the SSD operation under Windows 7 was successful. The tips given above should help you in setting up the system for the SSD. All this will make your computer work as efficiently as possible.
.
Regular hard drives ( HDD) is the slowest component of a modern computer. Solid State Drives ( SSD) significantly exceed them in read-write speed, and after cheaper translation of the operating system ( OS) on an SSD is not that expensive.
To do this, an interface is required on the motherboard SATA(on almost all boards no older than 4 years), better than older versions SATA II or SATA III. The transition makes sense if you have Windows 7 or, in extreme cases, XP.
To begin with, let me remind you once again a sacred rule for every computer owner: data must be stored separately from the operating system, on another physical or virtual disk. Except multiple increases in data security You will save on the capacity of the required SSD drive and get the ability to quickly backup the OS drive.
From the current offers - summer 2012 - pay attention to the new, inexpensive and high-speed model OCZ Vertex 4. Its speed characteristics will not be fully revealed, if you do not have SATA III, and you are not planning to replace the motherboard, you can save money by purchasing OCZ Agility 4.
What need to do? Sixteen simple steps.
I hope I have convinced you that the increase in system boot speed and subtle increase speed of general daily work not worth such effort.
It remains to advise you to take a closer look at what is written in order to configure the system specifically for the program that you want to speed up. For me it was Adobe Photoshop CS5, in the settings of which I specified the paths to the temporary files of the RAW converter and Scratch disks for storing temporary files. For some reason, the Internet connection speed did not increase (smile).
Upd: In addition, I would like to recommend the SSD Mini Tweaker program for x32 and x64 versions, but I would not recommend thoughtlessly using all possible checkboxes, for example, disabling defragmentation of all disks. Above I described how to do this only for SSD. I found it later and used it for convenient control of the work done, which does not underestimate its usefulness.
Good luck always!
Today, many users know how to make a boot disk from a USB SSD and install the Windows 10 operating system from it. This topic will be developed in this article. It will contain instructions for turning a standard SSD into a multi-boot hard drive and loading Windows 10, 7 and 8.1 operating systems from it using the AOMEI Partition Assistant Standard Edition 5.6 utility and WinSetupFromUSB 1.5.
How can you turn an SSD into a multiboot and load Windows 10, 7 and 8.1 operating systems from it?
It should be noted that it is very convenient to have a multi-boot disk. After all, there is no need to constantly use a flash drive to download files. In addition, it is much more convenient to purchase a hard drive with a size of one terabyte and allocate a large partition on it, which will have a capacity of thirty-two gigabytes. It can contain images of the latest versions of Windows operating systems. They can be loaded there using the WinSetupFromUSB 1.5 utility. As a result, each user will be able to use a device in any situation, on which all the necessary information and several operating system images can be easily placed.
The process of creating such a hard drive is not difficult. You can easily verify this.
First you need to connect the user’s existing SSD via the USB slot that is available on the laptop. In order to increase the speed of completing all assigned tasks, it is recommended to connect the drive to a USB 3.0 port, if available on the device.
It should be noted that when working with a hard drive, all files will remain safe and sound. However, it is recommended to copy them before starting work. After all, anything can happen.
First, you need to go to the disk control section on your computer.
A page will appear where you can find your hard drive and the partitions with files that are on it.
Creating a separate 32 gigabyte FAT 32 partition on your hard drive
Initially, you need to run the AOMEI Partition Assistant Standard Edition utility. It can be downloaded absolutely free. You need to use the left mouse button to select a department and select resize there.
The limiter must be moved using the mouse button in the right direction until it stops at thirty-two gigabytes. After completing this procedure, you should confirm your action by clicking on ok.
After the work has been done, click on the allocated space and select create a new partition.
There you need to select the file system type. In this case, FAT 32 is preferred and Ok is pressed.
In this program for creating a partition, all actions are performed in deferred operation mode.
Therefore, in the new window you need to click on apply and on the next page you should select go.
The process of working with a new section may take several minutes at once. It can reach a five-minute interval.
After this, you just need to confirm your action by clicking on ok.
This completes the first stage of work. A new partition of thirty-two gigabytes in size with a FAT 32 file system type appeared on the hard drive.
Creating a portable multiboot hard drive using the WinSetupFromUSB-1-6-beta2 program and placing files on it to install the latest versions of Windows operating systems
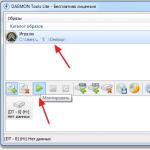
Initially, a professional version of the Windows 10 operating system will appear on your hard drive. First, you need to connect the operating system image to the virtual drive.
You need to select all the files that are required to install the operating system and copy them to the previously created portable SSD partition.
Now the mobile hard drive section contains all the files for downloading Windows 10 to another device.
In order to add to the list of operating systems on this hard drive, you need to use a utility called WinSetupFromUSB-1-6-beta2.

First you need to add the Windows 8.1 Pro version. To do this, open the above program. In the new window, it is recommended to select the created thirty-two gigabyte hard disk partition.
In a new window, select the image of the corresponding version of the operating system and use the mouse to open it.
After this, click on go.
The creation of a multiboot hard drive begins immediately, on which the new operating system will appear in the list of files.
After completing this procedure, you must confirm your actions by clicking on ok.
All this is just the initial step towards getting a multi-boot hard drive that you can take with you anywhere instead of a flash drive. If you insert it into a computer device, two operating systems to choose from will appear in the menu.
It is not uncommon for users to use Windows 8.1 Single language as an alternative version of Windows on their laptop instead of the one that was previously installed on it.
So, in the window that appears after running the WinSetupFromUSB-1-6-beta2 program on the thirty-two gigabyte space allocated on your hard drive, click on the right side to open the Explorer window.
There you need to add an image of the version of the Windows operating system. In our case it will be Windows 8.1 Single language. After that, you just need to click on go. Then you should select yes.
At this stage, this utility will require you to enter a name for the operating system being added to the disk. You can simply call it Windows 8.1 Single language. Next, just click on ok.
It should be noted that the user, at his discretion, may not use a specific name for the added OS image, but in the end it will have a default name installed after some time. You need to be extremely careful, because later on the disk there may be several operating systems with identical names.
Now there is another OS on the disk that we added. It is completely ready for installation on another device.
Now you just need to click on ok.
In exactly the same way, it is necessary to add other operating system images that the user wants to have on his portable hard drive.
Add different types of LiveCD to your portable hard drive
The procedure for adding different types of Live CD to your hard drive is different from adding different versions of Windows to it. First you need to run the WinSetupFromUSB utility. In it you need to select the section below Linux ISO/Other Grub4dos compatible ISO and click on Explorer. Its designation is on the right side.
In the new section, you need to select absolutely any Live CD and click on it to open.
Then yes and ok.
These are all just examples of what can be added to a multiboot portable hard drive. Now the time has come when you can use it to download files to another computer device from it.
Greetings, dear friends, acquaintances, readers, passers-by and other personalities. Today we will raise the topic of optimizing the system for working with SSD drives (I wrote about what an SSD is), namely, we will talk about how to properly configure it so that the interaction is most effective.
As many, I hope, remember, solid-state drives have a limited number of rewrite cycles, and therefore, after a certain number of them, the drive simply ends its service and retires. Globally, I personally believe that there are two ways: try to save the life of the disk by turning off unnecessary things and, on the contrary, use it to its fullest, but part with it relatively quickly. We will look at both of these paths. Which one is closer is up to you to choose.
Go.
How to increase the lifespan of an SSD. Windows setup.
Let's start with the first of these ways, namely, by trying to save the disk for as long as possible, minimizing as much as possible the amount of information written and rewritten to it. I’ll say right away that I personally don’t like this one, because I don’t understand why buy a high-speed drive if you don’t use it fully and take care of it in every possible way, reducing performance but increasing its lifespan. However, aside from the lyrics:
- Disabling or moving the swap file.
One of the key points, according to many, is transferring the swap file to a regular hard drive. This is done as follows: " Start - Settings - Control Panel - System - Advanced system settings - Advanced - Performance - Settings" (in the control panel to see the "System" category):
There " Advanced - Edit":
Then disable the swap file on the SSD disk and transfer it to a regular HDD. You can read about paging file sizes. If you have a large amount of RAM, then you can disable the page file altogether, which will significantly optimize the system. - Disabling or postponing System Restore.
System protection follows an almost similar path "" Start - Settings - Control Panel - System - System Protection- Configure ":
Here, similarly to the paging file, either disable system protection altogether, or transfer it to a regular hard drive. See for yourself, but, personally, I turn it off. - Disable hibernation.
It’s most likely not worth doing this on laptops (and it’s still extremely rare for them to have an SSD), but on desktop computers I would probably recommend it. But it’s worth thinking about, because if you still need it... Then, of course, leave it. It is disabled as follows: Start - Run - cmd":
If there is a problem executing the command, you should run the console as an administrator (right mouse button - " Run as administrator"). - Transferring TMP and TEMP folders.
During operation, the system uses the above-mentioned directories for caching, temporary files and other differences. The contents of archives are usually written there when they are unpacked, some installer files, etc. It goes without saying that this creates a large number of rewrite cycles, so it is recommended to transfer the folders, again, to the hard drive. This is done as follows. To begin, in “My Computer” go to the drive where we want to make the transfer and create two folders “TMP” and “TEMP” on it:
Next we follow the path: " Start - Settings - Control Panel - System - Advanced system settings - Advanced - Environment variables", where we indicate the full paths to new folders, instead of old ones (top button "Change"):

After making changes, you must restart your computer. The same as after all the changes above, and indeed those described in this article. After the reboot, the contents of the folders at the old path can be deleted. - Disabling Prefetch.
There is an opinion on the Internet that it is necessary to disable the Prefetch function. According to Microsoft itself, Prefetch actually is the following:Every time you turn on your computer, Windows keeps track of how it starts and the applications that are usually opened. This information is saved by Windows in the Prefetch folder as small files. The next time you turn on your computer, Windows accesses these files to speed up the startup process.
The Prefetch folder is nested in the Windows system folder and is self-maintained, so there is no need to delete it or clear its contents. If you clear this folder, it will take longer to boot Windows and launch applications next time.
Which, in theory, also gives rise to a large number of rewrite cycles. To disable follow the path " Start - Run - regedit - OK". In the registry editor that appears, go to the branch (folder)" HKEY_LOCAL_MACHINE\SYSTEM\CurrentControlSet\Control\Session Manager\Memory Management\PrefetchParameters":

Where on the right we double-click on the EnablePrefetcher line and assign this parameter the value 0. We do exactly the same thing with the parameter below, namely “EnableSuperfetch”.
- Disabling indexing, as well as scheduled defragmentation.
I already talked about this in the article about optimizing the operation of hard drives in general, i.e. I will repeat it in this material. Open my computer, right-click on the disk, open the “Properties” item from the drop-down menu, where we uncheck “ Allow the contents of files on this drive to be indexed in addition to file properties” and click on the “Apply” button: When a request appears to confirm changing attributes, you will need to select “To drive C:\ (or whatever letter you specified) and to all subfolders and files” and click the “OK” button. Next you will need to wait for the attributes to be applied. If a window suddenly appears notifying you that Administrator rights are needed, then click the “Continue” button. If a window appears about the impossibility of applying attributes, then click the “Skip All” button.
It’s right there, but on the “Service” tab, click on the button “ Run defragmentation", after which the defragmentation setting will appear. Click on the button " Set up a schedule"and, in the next window, uncheck " Run as scheduled (recommended)". - Transfer of program cache.
Here is everything related to programs caching their own paging files. This mainly applies to browsers, Photoshop and everything that has caching. More details about the transfer will be in separate articles. - Installing programs, games and other things on the HDD.
I think this point needs no comment.
In a nutshell, something like this.
How to speed up everything on an SSD. Windows setup.
Do not do all of the above and load the SSD to the maximum by installing everything under the sun there, including the swap file, programs, etc.
Afterword.
I hope that this article was useful to someone and really came in handy. The above described for many, I think, is not new, and yet, some might be partially unknown.
As always, if you have something to say on the topic, then welcome to comment on this post.
Based on the size of SSD drives, they can be divided into two unequal groups: 2.5" and 3.5". 3.5-inch ones are practically never found in stores (only hybrid solutions). You can additionally purchase a special container for installation in the case of the computer system unit, or simply place it carefully inside and secure it with 2-sided tape wherever you want: the SSD does not heat up, does not vibrate, and the working position does not matter for it. You will also need a SATA interface cable to connect the device to the motherboard. To power an SSD drive, a standard flat connector on the power supply (SATA Power Connector) is usually used. Description of power supply connectors.
A method for transferring an operating system (OS) from an old HDD to a new one is described. The link to the article also discusses our option: transferring the OS from an IDE or SATA drive to an SSD drive using the special program Paragon Drive Copy 11 Professional and the included Paragon Migrate OS to SSD 2.0 (there is a link to the program), it is necessary, since most backup utilities save the clone in accordance with the old sector logic (the next paragraph discusses preparing an SSD drive for OS transfer in an alternative way if you do not want to use Paragon Drive Copy 11). After transferring the system to the SSD, you will only need to change the boot sequence in the BIOS. We set the SSD as the second device, and the CD/DVD as the first. After this, the operating system should boot. If you plan to install the operating system from scratch, then you will not need to transfer the OS.
Preparing the SSD for OS migration (alternative method)
Acronis Disk Director - this program will help you perform any hard disk operations described below. (Attention! A small feature of this program is that you must click the “perform operation” button after changing the disk settings [marked with a finishing flag]).
First, you need to initialize the SSD to create the MBR (Master Boot Record). You can do this using the above program. Next, you need to partition the SSD disk and create an active partition on it. In Windows 7, the active boot partition can be as small as 100 MB. So we'll use the section you just created. In the next step, you will need to reduce the original partition size to 100 MB (and not a byte less). This will be quite difficult to do using Disk Management, so I again recommend Acronis Disk Director 11.
In the free space of the hard drive, you need to create a partition C on which the operating system will be located. This partition should not be active and should not be the primary partition (because the previously created 100 MB partition already includes the operating system bootloader). After this, create drive C from the remaining disk space. It can be a simple logical partition. Also, your old HDD may have more than one partition, but several, which imposes certain restrictions due to inconsistencies in free disk space. Some information, including the factory reset section, can simply be burned to DVD.
After all the preparatory procedures are completed, you can proceed directly to copying the operating system. Next we will work with the hard disk image (system image). There are many imaging programs available (choose ) or you can use the standard Windows 7 tools (pretty easy, but a little more time consuming). Control Panel\All Control Panel Items\Backup and Restore - Create a system image (in the left column).
Now you need to copy the system image to an external hard drive (you will probably have to assign a drive letter to the 100MB partition so that the program can identify it), and then to the SSD drive (using a bootable disk image program). Restore this way, section by section. Thus, you will have to perform recovery for the 100 MB partition and drive C.
Attention! Most free imaging programs do not know how to reduce the size of the source partition in order to rewrite it to the allocated space on an SSD, which has a very limited data capacity, even if the amount of recorded data corresponds to the allocated space. In this case, drive C on the HDD must be reduced to the appropriate size. For this work, I again recommend Acronis Disk Director, since it is more difficult to achieve the same effect using only seven.
The amount of data on your HDD on drive C should not exceed the capacity of the created drive C on the SSD. If the source partition contains a lot of user data, then you can simply try to move it to another partition of the hard drive or even write it to optical drives. When the system is written to the SSD, right-click on the user folders on the disk and include them in the appropriate library. With this approach, you won't be required to copy your folders later.
Now change the boot sequence in the BIOS (Boot section). We set the SSD as the second device, and the CD/DVD as the first, or vice versa. After this, the operating system should boot.
Attention! Before booting the operating system from the SSD, it is recommended to set the BIOS to AHCI mode. It is better to do this before you change the boot sequence of devices, and then set the appropriate settings in Windows 7.
Defragmenting partitions on SSDs makes no sense and, moreover, is very harmful. In the case of a laptop, go to Services, find Disk Defragmentation in the list, right-click on the entry, and the Properties window will open. Just disable this service.
In the case of a desktop computer, you can disable defragmentation only for the SSD drive, so that the HDDs running in the system do not lose performance.
While the defragmentation service is disabled, you will not be able to resize the partition. This process requires the operation of this service.
Hibernation Mode – Most of us do not use hibernation mode but prefer standby mode. However, the file still takes up precious space on your SSD, and its size depends on the amount of RAM in your computer. To get rid of this misunderstanding, enter the following at the command prompt:
powercfg –h off
If you need to return everything to its original state, then enter:
powercfg - h on
Copying user folders to your hard drive
This process is very simple. Create a partition on the HDD. Create appropriate folders on it (Documents, Music, Photos, and so on). The name can be anything, the system will rename them anyway.
Open Explorer and right-click on, for example, the My Documents folder on the left. Go to properties and click on the Location tab. Click Move and select the folder on the HDD in which you would like to store your documents.
Attention! You need to select a folder directly on the partition. You cannot select the root directory, otherwise there will be confusion.