“The disk is write-protected”, “You need permission to perform this operation”, “The disk is full” - such “happy” notifications sometimes end in attempts to save a file to a flash drive. The remaining functions - opening, deleting, copying data to another medium - work properly.
Let's figure out why such “tricks” happen and how to remove write protection from a flash drive when different options this problem.
Why did the flash drive stop saving data?
The reasons may be:
- Switch to the recording prohibition mode using the lever on the device body. The function is used to protect against viruses and worms that copy themselves to portable drives from infected computers. In fact, this is not a problem, and to remove the lock, just move the lever in the other direction. There are few flash drives equipped with such protection today. They are mainly found among inexpensive, nameless devices from the Middle Kingdom. And since their quality matches the price, the levers break quite quickly. If the lever shift is normal position did not help, try carefully removing the device from the case, connecting it to the PC and checking if the problem is solved. If not, something else may be causing the problem in your case.

- Operating system security policy and the operation of security programs. A ban on copying data onto portable drives exists in many enterprises; its purpose is to prevent leakage corporate information. If your flash drive functions normally on all computers except one, for example, a work one, then this is the reason. If you have enough rights to manage OS settings, then I will tell you how to fix them.
- Viral infection. The following speaks in favor of this version: notifications about the inability to save data to a removable disk due to its fullness (although free space enough); the appearance on it of files that came from nowhere, including those with the name autorun.inf; hiding on a removable drive user files and folders; the occurrence of the same symptoms on other flash drives after connecting to the same computer (the source of the virus); other signs of PC infection.
- Incorrect security settings for users and groups that have access to the drive. This manifests itself in the fact that when you try to save a file on a flash drive, the system reports that you do not have the rights to do so.
- Changing the volume attributes to read-only.
- File system errors.
- Damage to the firmware and hardware failure of the device.
Unblocking the recording
Checking security software settings and editing OS security policies
Incorrectly configured antivirus programs and programs designed to protect removable media can prevent data from being written to flash drives.
To check this version, boot your computer into safe mode– autorun of security programs is disabled in it, so they will not interfere with saving files on a USB device. If the problem goes away in Safe Mode, carefully review the settings of the antivirus and security utilities you use and correct them.
If the problem persists, let's start editing the operating system's security policies.
Attention! Administrator rights are required to access the Registry and Group Policy Editor.
Let's start by checking the local group policy OS via snap-in Gpedit. If you are a user of one of the home Windows versions, skip this step as your OS does not have this application. Proceed immediately to editing the registry.
- So, to launch the local group policy editor, press Win + R on the keyboard and enter in the “Open” field gpedit.msc and click OK.

- Let's go along the path " User Configuration» -> « Administrative Templates» -> « System" And " Access to removable storage devices».
- In the right half of the window we will find the line “ Removable drives: write prohibited" and see what state is assigned to this parameter. If " Included", click on the line 2 times and set " Not specified" or " Disabled».
- Click “OK” to save the changes.
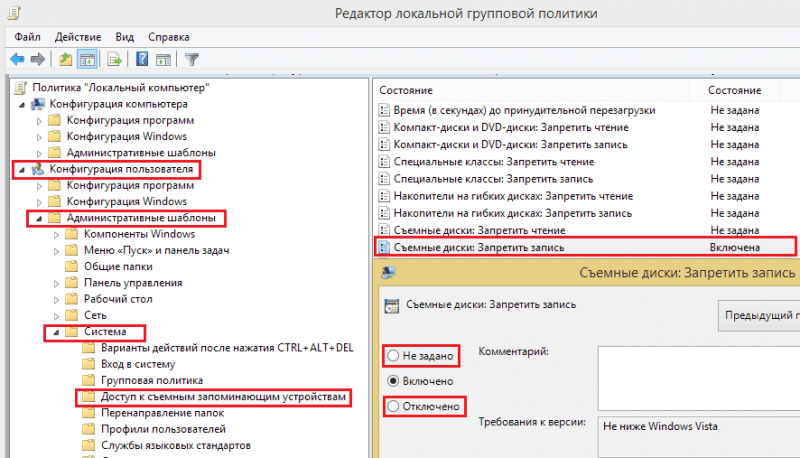
Next, let's go to the section " Computer configuration» -> « Administrative Templates» -> « System"And we'll check the same thing there.
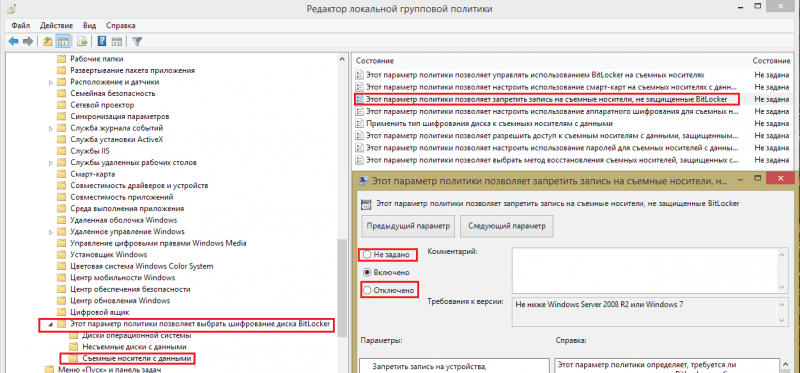
When BitLocker encryption is used on a computer, the lock can only be set on flash drives that are not protected by this system. To check if this option is enabled for you, and at the same time fix it, let’s go to “ Computer configuration» -> « Administrative Templates» -> « Windows components" Let's go down to the very bottom of the list and open the section " This option allows you to configure Bitlocker encryption" Let's select " Removable data media" In the other half of the window, we’ll see what status is assigned to the item “ This option allows you to disable writing to removable media that is not Bitlocker protected." If it is on, turn it off.
After this we will exit the editor local politics and look at the registry.
- Press Win+R again and execute the command regedit.

- Moving through the folders of the left half of the window, open the branch HKEY_LOCAL_MACHINE\System\CurrentControlSet\Control\StorageDevicePolicies. If you don't have it, skip this point and move on to checking the next branch.
- On the right side of the program window we will find the parameter WriteProtect. It can be assigned the value 1 or 0. One prohibits writing data to removable drives, zero allows it, so we need to correct the one to 0. How to do this:
- Right-click on the WriteProtect line and select the command “ Change».
- In the field " Meaning» enter a zero and save the setting.

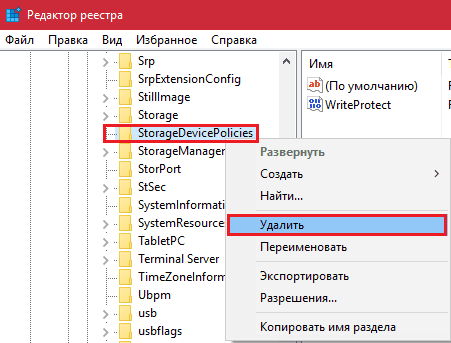
By the way, if the machine does not use portable drive protection policies, you can delete the StorageDevicePolicies section completely. To do this, right-click on it and click on the command “ Delete».
- Next we will perform the same operations with the branch HKEY_CURRENT_USER\System\CurrentControlSet\Control\StorageDevicePolicies. It, like the previous one, may not exist either, but if the policy is set, at least one of these branches must be present.
- If you are using Windows XP, check out the thread HKEY_LOCAL_MACHINE\SYSTEM\CurrentControlSet\Services\USBSTOR: The WriteProtect parameter described above can be found here. Set it to 0.
Those of you who don't like to dig into the registry with your hands can reconfigure these settings automatically - using a reg file or a batch of commands.
Reg-file:
Windows Registry Editor Version 5.00
;empty string
"WriteProtect"=dword:00000000
"WriteProtect"=dword:00000000
"WriteProtect"=dword:00000000
Transfer these lines to notepad and save the document under any name. When saving, add the extension to the file name .reg and specify the type “All files”.
After saving, click on it 2 times and agree to make changes to the registry.
Plastic bagteams:
@echo off
reg add "HKEY_LOCAL_MACHINE\System\CurrentControlSet\Control\StorageDevicePolicies" /v WriteProtect /t REG_DWORD /d 0 /f
reg add "HKEY_CURRENT_USER\System\CurrentControlSet\Control\StorageDevicePolicies" /v WriteProtect /t REG_DWORD /d 0 /f
reg add "HKEY_LOCAL_MACHINE\SYSTEM\CurrentControlSet\Services\USBSTOR" /v WriteProtect /t REG_DWORD /d 0 /f
Also copy this into notepad, save it, adding the extension to the file name .bat, and specify the type “All files”.
To execute a batch of commands, click on the file right click mouse and run as administrator.

After this, restart your computer.
Cleaning the system and removable drives from viruses
If you suspect an infection, this must be done first, otherwise manipulations with the registry and the Group Policy Editor will not help you: the active virus will again change them the way it needs.
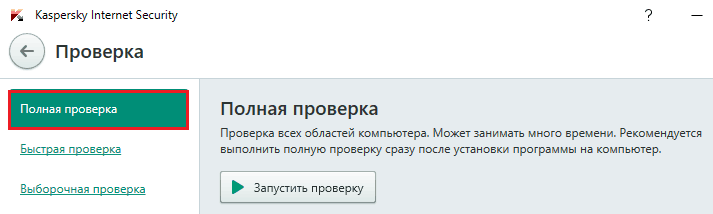
To scan, use any antivirus product with the latest databases. Check not only flash drives, but everything hard drives computer.
Correcting access rights settings
Open the properties of the problematic drive and go to the “ Safety" See if recording is enabled for the group you are a part of. In my example, it is disabled for everyone.

To fix this, click the " Change" and in the next window, check the box next to " Record» label « Allow».

Save the setting by pressing " OK" It takes effect immediately - without restarting the computer.
Removing the read-only volume attribute
Change the attributes of volumes and entire disks - most often the result of viruses or errors when working with programs like . If you set the Read Only attribute, the operating system will not allow you to write anything to this drive, you will only be able to view it.
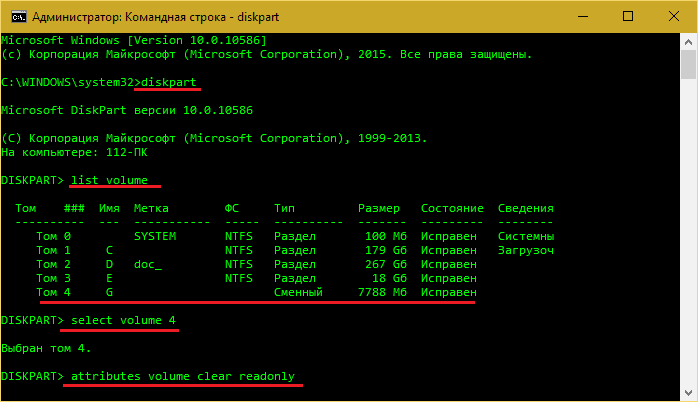
To reset the attribute, we use the built-in disk utility Windows - Diskpart. Let's run it on the command line with administrator rights.
Below I will give a list of commands that we have to execute one by one:
Diskpart(start the utility).
After the DISKPART> line appears:
List volume(displays a list of all storage volumes on this computer).
Selectvolume #(selecting a flash drive: instead of #, indicate the volume serial number).
Attributesvolumeclearreadonly(disables the read-only attribute for the selected volume).
Exit(shutdown Diskpart).
If the problem lay in setting the wrong attribute, it will be resolved successfully.
Troubleshooting file system errors
Errors in the file system of flash drives are a consequence of overheating, wear, abrupt disconnection from the USB port, especially when data is being exchanged, driver failure, etc. Another command line will also help us deal with them Windows utility – CHKDSK(checkdisk).
So, let's launch the command line (as an administrator or a user - it doesn't matter) and enter the instructions into it chkdsk X: /f /r, Where X:– flash drive letter, parameter / f means “look for errors and fix them automatically”, and the parameter / r– “restore the contents of damaged areas.” Press Enter.

The result of the check will be displayed in the console window after CHKDSK completes.
Format the flash drive
In cases where the scanner finds problems but cannot fix them, . Sometimes - only low-level, with erasing and overwriting of service areas, including those where security information is stored. I will show you how to perform the second operation in the utility for low level formatting disk devices of various types.
- Transfer data from USB drive to PC.
- Run the program with administrator rights. To use it without paying, click " Continue for free».

- Select the problematic device from the list and click “ Continue"(continue).
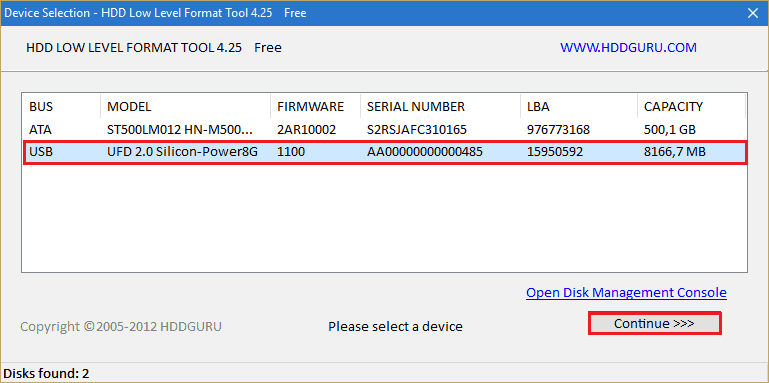
- Open the page " Low-level format " and click the " Format this device».

Do not disconnect the flash drive from the computer while formatting is in progress. Wait for it to complete and check the result.
What to do if the firmware is damaged or the flash drive is physically faulty
the site has already told, with the help proprietary utilities, collected on a specialized resource or downloaded from the websites of their manufacturers. At home, this is the last opportunity to get the device to work as expected.
It only makes sense to restore a physically damaged flash drive if the defects are minor. Complicated repairs are unlikely to be worth the amount it will cost you. And it’s unlikely that anyone will take it up. It’s easier and cheaper to throw away the problematic device and buy a new one. After all, by today's standards they are quite inexpensive.
Also on the site:
How to remove write protection from a flash drive updated: March 19, 2016 by: Johnny Mnemonic
The era of floppy disks is long gone, but sometimes when trying to write to a flash drive, the user may encounter a situation known since the days of using floppy media - it is blocked and cannot be used.
We will look at how to solve this problem in detail in our article today.
So, you need to write some information to a flash drive, you insert it and receive a message like “The disk is write-protected, remove the protection or use another one.”
This problem can be solved quite quickly, and we will talk about this a little later, but now we should say a few words about the purpose of installing protection from downloading on .
Pay attention! This operation is performed for only one purpose - which can spontaneously be copied to removable media without the user’s knowledge.
Methods for removing write protection from a flash drive
There are 2 key ways to remove protection from a flash drive: hardware and software.
The hardware solution is to install a lock switch, which is present in some drive models, as well as SD cards.
Most often, the toggle switch is located on the side edge of the drive.
Carefully inspect your existing drive and look for an open/closed lock icon or the word Lock on it.
Pay attention! Removing the lock is very simple - just move the lock lever in the opposite direction. That's it. Insert the media into the appropriate slot and repeat the file writing operation again.
The software solution involves the interaction of a flash drive controller, which is responsible for the ability to record information.
You can remove write protection using this method using the command line of the Registry Editor or Local Group Policy.
Learn more about all of the above methods.
Removing protection using regedit
1. Click “Start” and enter - in the search field. Right-click (RMB) on the program and in context menu go to the “Run as administrator” item.

2. Go to the StorageDevicePolicies section:
HKEY_LOCAL_MACHINE\SYSTEM\CurrentControlSet\Control\StorageDevicePolicies
Important! Important! If there is no such thing, you will have to create it. To do this, click on the section Control - New - Section. We call it “StorageDevicePolicies” without quotes. If there is no such section, you need to create it.

Create (RMB in the right column of the registry) a DWORD parameter (32 bits) in the created branch. For convenience, let's call the element WriteProtect.

3. Make sure that the WriteProtect value is 0. Right-click on WriteProtect and select “Change”. If the value is “1” you need to change it to “0” and click “Ok”.

4. Close the registry editor, remove the media and restart the computer. Insert the flash drive. Now the flash drive works in normal mode, allowing you to write files.
Removing protection using Diskpart
If we were unable to unlock using regedit, let's try to do it using the Diskpart command interpreter, which allows you to manage the commands that the user enters into the command line when working with partitions and disks.
1. “Start”, enter the name - cmd - in the search field. Right-click in the program and select “Run as administrator” in the context menu.

2. Now you should enter the commands: diskpart and list disk, and after entering each of them, press the Enter key.
3. In the list above, determine what serial number in the name the flash drive has.
This can be done based on the specified size, in our case an 8 GB flash drive, presented in the table as “Disk 1” with a capacity of 7441 MB.
4. Select the disk with the “select” command, clear the attributes that allow only reading “attributes disk clear readonly”.
If, you should enter the following commands: “clean”, create a partition “create partition primary”, format it in NTFS “format fs = ntfs” or FAT “format fs = fat”.

Flash cards are considered the most convenient portable storage devices, replacing outdated floppy disks and disks. A small flash drive can fit in the smallest pocket, while its capacity can be many times greater than the amount of stored data of any other mobile digital media. Unfortunately, flash drive users often encounter situations where the card does not work or is unable to save necessary information. In this case, we have to talk about the presence of write protection. What is the reason for the inability to write information to a flash card? How to remove write protection from a flash drive? What methods of removing protection are there?
Reasons for the error
A flash card can be write-protected and generate an error for a variety of reasons - software or hardware. Flash drive protection can be triggered at the level of the media itself (for example, a password) or a computer device (protection against copying information to removable media etc.) Among the most common causes of this error:
- data encryption;
- mechanical record lock;
- software prohibition on recording, set by operating system settings;
- prohibition of recording to USB due to computer hardware settings;
- flash card memory full;
- Incorrect operation of the USB port;
- file system errors;
- failure in the microcontroller program;
- overheating of the card as a result of strong thermal exposure;
- unstable power supply to a computer device (voltage surges);
- result of work malware(viruses) and many others. etc.

Obviously, such a wide variety of causes requires the application of the most appropriate method of eliminating them in each individual case.
Mechanically removing write protection from a flash drive
Practice shows that the most common cause When the write protection function of a flash drive is triggered, the special lever is in the “protect” position.

Such a mechanism can be found on flash drives of the most different models, and it is intended to save information located on the storage medium (protection against accidental erasure or overwriting). Fixing the problem in this case is quite simple: you just need to switch the lever to a different position.

Removing protection using the command line
If this method eliminating the error is not applicable, all that remains is to look for the software or hardware cause of its occurrence. One of the most suitable methods for this is to remove protection from a flash drive using command line(cmd) and the diskpart command by completely formatting the flash drive (deleting all information on it). The sequence of actions in this case should be as follows:
- Go to the Start menu.
- Select the “Command Line” application.
- We launch it with administrator rights.

- Enter the command Disk part, followed by list disk (this will display all available disks).
- We find required disk(flash drive) and write the command attributes disk clear readonly. It will clear all attributes.
- When completely formatting the drive, you must enter sequentially clean (cleaning), create partition primary (creating a partition) and format fs = ntfs (formatting the flash drive in NTFS format).
- Exit command - we close the command line.

How to remove write protection from a flash drive using the registry?
Another reliable way Removing write protection from a flash drive - using the registry. You can call the desired panel by pressing Win + R, after which you need to enter the regedit command.

Next, go to the StorageDevicePolicies section (path: HKEY_LOCAL_MACHINE\SYSTEM\CurrentControlSet\Control\StorageDevicePolicies). If it doesn’t exist, create a section of the same name: click “Control”, select “Create”, click “Partition” and call it StorageDevicePolicies.

Then we create a DWORD value (32 bits) and call it WriteProtect.

Then we make sure that the value of this parameter is zero (if necessary, change it to “0” and save the changes).

Now all we have to do is exit the registry, remove the flash drive from the USB port and reboot computer device. As soon as the computer has entered operating mode, we try to write some information to the flash drive. The protection has been removed, so the error should no longer appear.
Software methods for removing write protection from a flash drive
The method of removing write protection from a flash card or disk through the registry is called software. These also include a number of other methods to eliminate the problem. Thus, a common reason for blocking may be a ban on writing information to removable devices by the file system group policy. You can check this using the same registry:
- We go into the editor with administrator rights.
- Specify gpedit.msc (call “Local Group Policy Editor”).
- Click “Computer Configuration - Administrative Templates - System - Access to Removable Storage Devices”.
- Check the “Removable drives: Deny writing” option. To remove protection, it must be unset or disabled. To do this, you need to double-click on the option, select “Disable” and OK. Next, all that remains is to restart the computer and check the operation of the flash drive.
If you do not dare to format the drive yourself, you can resort to using utilities that are developed specifically for removing write protection of flash cards. Such programs are freely available and can be downloaded to your PC directly from the official websites of the developers. Among the most popular applications:
- Kingston Format Utility (manufacturer: Kingston),
- JetFlash Recovery (Transcend),
- USB Flash Drive Recovery (Silicon Power),
- USB Flash Drive Online Recovery (Adata) etc.
The interface of such utilities is quite simple and understandable, so users of any level of training can work with them.
Very often when using USB flash drives or memory cards, a window pops up in Windows with the message: “The disk is write-protected. Remove protection or use another disk" (The disk is write-protected). How to remove protection from a flash drive and write files to it?
There are several reasons for the error to appear.
- The file system was damaged due to improper operation (unsafe removal of the drive after finishing working with it), turning off the electricity while working with the flash drive.
- Virus infection.
- The presence of a switch on a USB flash drive or card reader.
- Physical damage to the flash drive (mechanical or electrical).
- Out of order USB port on a computer (laptop).
Ways to eliminate the error and remove protection from a flash drive.
- Deep format the flash drive and check for file system errors.
- Scan antivirus programs and “treat” the flash drive
- The simplest method is to move a mechanical switch from the “Lock” position to “locked.”
- Using specialized programs. For a certain brand of flash drive there is a recovery program: HP USB Disk Storage Format Tool– universal; JetFlash Recovery Tool— for JetFlash, A-DATA and Transcend; Apacer Repair – for Apacer, AlcorMP is one of the best.
- Sometimes it is enough to change the USB port on the computer and the problem will go away.
Important! For programs to work properly, run them as an administrator.
For advanced users, you can use the Registry Editor.
To launch it you can click Windows keys+ R on your keyboard and type regedit, then press Enter.
Go to the registry branch - HKEY_LOCAL_MACHINE\SYSTEM\CurrentControlSet\Control\StorageDevicePolicies, then look at the parameter named WriteProtect. If the parameter value = 1, then this may cause the “Disk is write-protected” error. Double-click on it and enter “0” (zero) in the “Value” field. Then save the changes, close the registry editor, remove the USB flash drive and restart the computer.
If there is no such section (StorageDevicePolicies), then right-click on the section located one level higher (Control) and select “Create Section”. Name it StorageDevicePolicies and select it.

Then right-click in the empty area on the right and select “DWOR(32-bit)/QWOR(64-bit) Option, depending on the bit depth of your system. Name it WriteProtect and leave the value equal to 0. Just as in the previous case, close the registry editor, remove the USB drive and restart the computer.
Removing protection from a flash drive using the command line.
- Run Command Prompt as Administrator.
- At the command prompt, type Diskpart and press Enter. Then enter the command list disk and find your flash drive in the list of disks, you will need its number. Enter the following commands in order, pressing Enter after each one.
- select disk N(where N is the number of the flash drive from the previous step).
- attributes disk clear readonly.
- exit.
Close the command line and try again to perform any actions on the flash drive, for example, format it or write a file, to check if the error disappears.
Hello! Today we will look at the question of how to remove write protection from a flash drive? When this problem occurs, a window pops up with the following message: “Remove protection or use another disk” or “The disk is write-protected, remove protection or use another disk.” This feature allows you to protect data on a removable drive without changing it. The problem is that it is impossible to write other information to such a drive. Fortunately, there are many ways to disable protection using the advanced settings of your personal computer.
Some models of removable devices are equipped with special levers for write protection. To remove protection from a disk, you first need to check it for the presence of a physical switch. If there is one, then you need to make sure that the lock on the USB device is removed. If the lever is broken, you will have to purchase a new drive.
Why is the flash drive write protected? You need to check whether the disk is filled to capacity with information. A write error message may appear in cases where the free space on the flash drive is exhausted. To see the amount of free space, just go to the standard file manager"My computer." Even in cases where the disk is not completely full, an error may occur because the file is too large to copy.
How to remove write protection? It is advisable to check the file properties. Sometimes it happens that the copied information is protected from being written to a flash drive, and not the removable disk. To change file attributes in Windows environment, you need to right-click on it and select “Properties”. Uncheck the box next to “Read Only” and click “Apply”. On Mac systems hold down Control, click on the file, then select “Get Info”. Go to “Sharing & Permissions” and in the “Privilege” column set the value “Read & Write” for your username.
To scan drives, you can use a utility called UsbFix. This is an open source program source code, designed to find problems related to removable drives and USB drivers in a Windows environment. You can download this application for free. After starting the program, you need to click on the “Research” button. When the scanning process is completed, click on “Clean”. After this, the removable disk can work as expected.
Scanning with antivirus
Write protection on a flash drive may be associated with infection of the device. The surest sign is a strange file extension on a removable device. It is necessary to check the drive for viruses and malware. You need to scan the flash drive every time it is connected to any other computer. Many virus scanners can be configured to automatic check removable drives immediately after connection. If there is no such function, then you can right-click on the flash drive and select “Scan with antivirus”.
The next step is to scan your computer for viruses and other malware. If every removable drive you insert into your computer automatically becomes write-protected, then this is a sure sign of infection. In this case, you need to run an anti-virus scan of the entire computer as quickly as possible using a program specially designed for this. For example, you can use Malwarebytes Anti-Malware or Dr.Web Cureit! , protecting from the majority known viruses. These programs are available for free download. I use the latter (does not require installation and after checking the computer and removing viruses, it can be removed painlessly).
Disabling protection via the command line
If all of the above methods did not help solve the problem and the flash drive says “The disk is write protected,” then you need to move on to more advanced settings. You must run the command prompt as an administrator. If a protected flash drive operates in Read-Only mode, this can be fixed:
To do this, click on “Start”, “All Programs”, “Accessories”.
Right-click on “Command Prompt” and select “Run as administrator.”
Now enter “.diskpart” and press Enter.
This will launch the DiskPart utility in a separate command line window. All windows must be left open.
Type “.list disk” and press Enter. This command will display a list of drives connected to the computer.
We find it in the list USB drive. All connected partitions (including internal hard drives) are displayed here. There are also several columns of information that you can use to identify your external drive.
The "Ltr" column displays the corresponding drive letter for each partition. Not all sections will have letters. If you previously assigned a name to the removable drive, it will be indicated in the “Label” column. In the “Type” column you need to look for “Removable”. The "Size" column helps distinguish 2 similar drives if they have different amounts of memory.
You need to enter the command “.select disk X”. In this case, we replace “X” with a number from 1 column, which corresponds to the removable disk. For example, if the flash drive corresponds to the value “Disk 5”, then enter “.select disk 5”. Now you need to type “.attributes disk clear readonly” and press Enter. This will change the properties of the removable disk, making it non-read-only.
Now all that remains is to enter “.exit”, press Enter and check the flash drive again. After DiskPart closes, you can try burning something to the removable disk. You may have to remove and then reinsert the drive to get it to work.
If the command prompt window did not help solve the problem, then remove the write protection using the following method.
Disabling protection using the registry
Open the registry editor. If DiskPart commands didn't fix it external drive or it is read-only when connected, then you may need to change Windows registry. He controls operating system, so changes must be made with extreme caution. To open the registry editor, you will need the Win + R key combination, after which you need to enter the “regedit” command. If you are not an administrator, you will need to enter a password.
How to remove protection from a flash drive? We use the navigation tree on the left to open the desired location. To do this, you need to expand and collapse the items on the left to get to the following location: HKEY_LOCAL_MACHINE\SYSTEM\CurrentControlSet\Control\StorageDevicePolicies. If you do not have a "StorageDevicePolicies" folder in the "Control" directory, then you need to right-click anywhere, select "New" and "Key". Let's call it "StorageDevicePolicies" and open it.
Double-click on the “.WriteProtect” entry. This will open an editing window. If you don't have a ".WriteProtect" entry because "StorageDevicePolicies" was created, you need to right-click inside the folder and select New, DWORD (32-bit). Let's call it “WriteProtect” and save it. Now you need to double-click on it to open the editing window. Change the “Value data” entry to “.0”. This will disable write protection on all removable drives. Close the registry editor and restart the computer. From this moment the flash drive should be unlocked.
Disabling protection using formatting
If all of the above methods did not help, and write protection of the flash drive is still a problem, then it’s time to move on to the most radical actions and format the removable drive. This will delete all data on the flash drive, but may make it work again. Reboot the computer in safe mode. It is impossible to format the drive correctly while in normal operating system mode. You need to have time to press the F8 key before the computer starts loading Windows. Select “Safe Mode with Networking” from the list of boot options.
After downloading, go to “My Computer”. This window displays all hard drives and USB flash drives connected to the computer. It can also be opened through the Start button menu or using the Win + E key combination. Right-click on the removable drive and select “Format”. As a result, the corresponding window will open.
In the “File System” menu, select FAT32. When formatted, this will make the drive compatible with most computers and other devices. If the disk capacity exceeds 32 GB, then you need to select exFAT. File NTFS system Only suitable for PC with Windows system and is not used on other devices.
Uncheck the box next to “Quick Format” and click the “Start” button. Windows will begin the process, which may take some time. Once complete, you can check the flash memory. If the problem is still not resolved, then we can conclude that the flash drive is physically damaged and cannot be restored.
Disabling protection on OS X
On a computer running OS X, the problem can be resolved in another way. To do this, open Disk Utility. The permissions for your drives may be corrupted, but this can be fixed. Disk Utility is located in the Utilities folder. On the left, select a write-protected device (the Disk Utility window should list hard drives, CD drives, and all connected drives). Click on the “First Aid” button. Once confirmed, OS X will begin scanning the drive and attempt to fix any problems it finds. This may take some time. If you are using earlier versions of OS X, then you need to go to the “First Aid” tab and click the “Repair Permissions” button.
If the flash drive still does not work, you can try formatting it. The NTFS file system is not suitable for OS X. Formatting will erase all data on the drive, but may restore it to normal operation. Open the Disk Utility application in the “Utilities” folder and select the write-protected flash drive (it will be displayed in the left frame). Select the one you need file system and press the “Erase” button to start formatting. Video on the topic of removing write protection from a flash drive.


