Mail Outlook client so popular that it is used both at home and at work. On the one hand, this is good, since you have to deal with one program. On the other hand, this causes some difficulties. One of these difficulties is the transfer of contact book information. This problem is especially acute for those users who send work emails from home.
However, there is a solution to this problem and we will discuss exactly how to solve it in this article.
Actually, the solution is quite simple. First, you need to upload all contacts to a file from one program and load them from the same file into another. Moreover, in a similar way you can transfer contacts between different versions Outlook.
We have already written about how to export a contact book earlier, so today we’ll talk about importing.

Now click on the “Import and Export” button and go to the Data Import/Export Wizard.

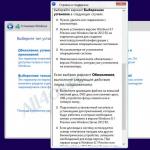
By default, the “Import from another program or file” option is selected here, which is what we need. Therefore, without changing anything, click “Next” and move on to the next step.

Now you need to select the file type from which the data will be imported.
If you saved all the information in CSV format, then you need to select the “Comma Separated Values” option. If all information is stored in a PST file, then the appropriate item.
Select the appropriate item and move on to the next step.

Here you need to select the file itself, as well as select an action for duplicates.
In order to indicate to the wizard in which file the data is stored, click the “Browse...” button.
Using the switch, select the appropriate action for recurring contacts and click “Next”.
Now all you have to do is wait for Outlook to finish importing the data. This way you can synchronize your contacts both in Outlook at work and at home.
When exporting contacts from Outlook their copy saved as a CSV or other file type, the contents of which can then be imported into another application.
- Comma separated values.
In Outlook on your computer, select Commands File > Setting up accounts > Setting up accounts.
Select the account you want to delete and click the button Delete.
Click the button Close.
Open Outlook on your computer and go to the File.
If there is no element on the ribbon File in the top left corner, you don't have Outlook on your computer. In this case, you can find export instructions for your version of Outlook in the article What version of Outlook do I have.
Select teams Open and export > Import and export.

Select an item Export to file.

THIS ACTION IS THE MOST IMPORTANT, especially if you are using a friend's computer. Scroll the list if necessary Select a folder to export up and select the folder in your account section Contacts. Click the button Next.

Click the button Review, give the file a name and click the button OK.

Check which folder the files will be saved in and click the button Next.
Ready Import and export disappears.

Locate the new .csv file on your computer and open it in Excel to verify that your contacts have been exported. Most likely, there will be a lot of empty cells. This is fine.

If you're using Outlook on a friend's computer, you can now delete your account from his version of Outlook. Here's how to do it.
You can now import contacts copied to a CSV file to another computer running Outlook for Windows or to another email service.
Select version
The instructions vary slightly depending on whether you're using classic or new version of Outlook on the web. Select your version of Outlook on the web to see the appropriate instructions.
Note: If the organization has placed a logo on the toolbar, the interface may differ from the above.
Instructions for the new version of Outlook on the web
Instructions for classic Outlook on the web
- Options.

-

Click the button OK.
In the dialog box Export to file click the button Next.
To start exporting contacts, click the button Ready. Upon completion Outlook export does not display messages, but the field Import and export disappears.
When the export is complete, click the button OK to close the Outlook Options window.
Open the folder where you saved your contact list (for example, the Documents folder).

If you exported your contacts to a .csv file, view it in Excel to see what was exported from Outlook. Most likely, there will be a lot of empty cells. This is fine.
It is generally recommended to close the file without saving changes. Otherwise, the file formatting may be broken and you will not be able to use it for import. If this happens, you can always export again and create a new file.
You can use Excel to update the data in a CSV file. For tips on working with your contact list in Excel, see Create and edit CSV files.
At the top of the Outlook 2010 ribbon, open the File.
If there is no element on the ribbon File, you do not have Outlook 2010. In this case, you can find import instructions for your version of Outlook in the article What version of Outlook do I have?

In the Outlook Options window, select Additionally.

In the section Export select Export.
In the window Import and Export Wizard select Export to file and press Next.
Select the desired export type in the field Create the following file type. The most commonly used format Comma Separated Values (Windows), also called a CSV file. Then click the button Next.

If you are going to use the exported contacts in another copies of Outlook, select Outlook Data File (.pst).
In the section Select a folder to exportscroll up the list, if required, and then select the folder containing the contacts you want to export. Once completed, click the button Next.
Note: If you don't choose to export to an Outlook data file (.pst file), you can only export one folder at a time.

For information about importing contacts into Outlook 2016, see
Business relies on connections. Lost contact information means a lost deal. You won't have clients if you don't know how to reach them. At Microsoft Outlook list Contacts are placed as close to the email as possible.
If you know how to handle your MS Outlook contact list, you can do a lot. You can exchange them with other email users and send group messages. Use the power of Outlook to organize your work.
In this tutorial, you will learn how to add contacts in Outlook and how to create a contact group in Outlook. Let's consider useful features, such as creating a contact group in Outlook. Let's get started.
The importance of your contacts from Microsoft Outlook
Contacts in MS Outlook are either private or business. For ongoing communication, Outlook lets you save addresses right inside your email.
Every entry in your email address book is a contact. It is more convenient for a businessman and anyone who uses email to have address books on the Internet. Then you definitely won't lose them.
To search in Outlook, click the icon Address Book(in the form of an open book) to the right of the tab Home. In the dialog box Address Book: Contact s basic information about the contact will appear:
Contact information in the window Address Book: Contacts.
Your default address book is Contacts –, but you can create additional address books.
To find more detailed information about a contact, double-click his name to open the contact card:
Detailed information in the MS Outlook contact card.As you can see, the card contains more than just your contact's email address. In addition to the ability to store up to three addresses, there are fields for entering the following information:
- Place of work
- Web page address
- IM addresses
- Telephone numbers(work, home, fax, mobile and others)
- Addresses (up to three physical addresses per contact)
You can attach an image to a contact card if you have one. In addition, there is a field Notes for more information.
Address book Outlook allows you to not only store and find contact information, but also use it to send collective emails using contact groups. Read more about Microsoft Outlook read in the manuals:
Before we talk about working in MS Outlook, don't forget Subscribe to the Tuts + Business newsletter and receive our free eBook: The Ultimate Guide to Inbox Zero Mastery. The book describes the principles of organizing incoming messages and gives tips on managing them.
Now let's move on to creating contacts and contact groups in MS Outlook:
1. Adding a new contact to MS Outlook
Realizing the importance of the Outlook Address Book, you're ready to organize your contact list. There are two main methods for adding contacts in Outlook:
- from the address book
- from email
Let's look at each of them.
Step 1. How to Add Contacts to Outlook from Address Book
This method is convenient if you want to add business cards to your contacts in MS Outlook. Have neatly organized contact information in mailbox much more convenient than storing stacks of cards that could be accidentally lost.
To begin, open your address book in MS Outlook and click right click mouse anywhere. A pop-up menu will appear:
Selecting an option New Entry. Dialog box New Entry:
Select an option New Contact and press OK. You will see a blank card Contact Card:
Fill out each contact field with the appropriate information.
By clicking on the arrow on the right, you can add information. In the example below, there are three types of addresses that you can add to a contact card:
After filling in the fields, select Save & New save the contact and continue filling out your address book. Or by choosing Save & Delete come back to Address Book:Contacts.
Step 2. How to Add Contacts to Outlook from Email
Having received a letter from a new contact, information about him can be easily saved in the MS Outlook address book. Start with a message that contains contact information:
By right-clicking on the sender's address, a pop-up menu appears:
Select Add to Outlook Contacts. A contact card opens with the sender's name and address already filled in. If you have additional information about this contact, add it to the card.
Once completed, click Save & Close or Save & New to save the contact in your address book.
Step 3. How to add an image
If you want, you can add an image or logo. Open the contact card of the person whose picture you want to add. Click the icon Add Contact Picture to the right of the username. A browser window will open:
Browse to the file containing the image you want to add. Point to it and click OK. Now the selected image will appear on the contact card:
Step 4. How to delete a contact
Sometimes you need to delete a contact. Either the information is outdated or you no longer need it.
Luckily, Outlook makes this easy. Open the window Address Book: Contacts. Select the name of the contact you want to delete. Then right click anywhere. A pop-up menu will appear:
Select a contact name in your address book and press Delete.Select Delete. The system will ask for confirmation:
After clicking Yes the contact will be deleted from the MS Outlook address book.
3. Create a contact group
If you need to send a message to multiple people, a contact group will save you the time of sending an email to everyone in your group. By using a contact group, you can be sure that everyone receives the same information. You eliminate the risk of forgetting to send an email by sending it to everyone individually.
(Note:
This option is known as the Distribution List in earlier versions of Outlook.)
Let's take a closer look at this possibility.
Step 1. How to Create a Contact Group in Outlook
Open the window People. Click on the three dots in the lower left corner of MS Outlook. A pop-up menu will appear Navigation Options:
From the pop-up menu, select People. Window People contains the entire list of your contacts:
Click New Contact Group V Ribbon. will appear empty window Contact Group:
Enter in the field Name name for the group you want to create. Now that you have created new group contacts, you can start adding addresses.
Step 2: How to Add Addresses to an Outlook Contact Group
IN open window Contact Group click icon Add Member on the tape. A pop-up menu will appear:
You can select addresses from existing Outlook contacts, from your address book, or from your email.
When pressed From Outlook Contacts or From Address Book, the window will appear Select Members: Contacts. You can select a contact name.
For example, let's take the option New Email Contact. A dialog box appears instead of the full contact card Add New Member:
Add New Member window to add a contact to an Outlook group.Enter the name and address of the contact you want to add to the group. Please note that the default is checked Add to Contacts. If you remove it, the contact will be added to your new contact group, but not to your address book. This can be useful if you need to communicate with this person only as part of a group.
After entering the information, click OK. A contact has been added to the group. Add as many contacts to the group as needed.
When finished, click the icon Save & Close in the upper left corner of the window Contact Group.
Step 3. How to use a contact group
To send a message to members of your contact group, enter their name in the field To. Click the button Send. The message will be sent to everyone on the list:
Step 4: How to rename a group
You can change the contact group name. For example, after finishing one project and moving on to another, you can rename your contact group.
To do this, open the drop-down window Navigation and select People:
A window will appear Contacts:
The group name appears at the top of your contacts list (next to the people icon). Click there to select. Double-click on the contact group and open the window Contact Group:
Write the new name in the field Name. When finished, click on the icon Update Now. To save changes and exit, click Save & Close.
Step 5. How to change addresses in a MS Outlook contact group
Address lists often require changes. Electronic Outlook mail will help you keep up with the times.
The composition of the contact group members changes in the window Contact Group
. You can specify new addresses or delete unnecessary. Open Contact Group window:
Let's start by adding a new member. Double-click the icon Add Members V tape. You can add a participant from your Outlook contacts list, address book, or enter a new email contact. When finished, click on the icon Update Now V Ribbon.
To remove a member from a contact group, click their name. Then click the icon Remove Member V Ribbon. The member's information is removed from the contact group. (Not from your Outlook email contact list, however.)
After making changes and exiting the window, click the icon Save & Close left in Ribbon.
Step 6. How to delete a contact group
From time to time it is necessary to completely remove a contact group. You may no longer need to contact its members.
To delete a group from MS Outlook email, open the window Contacts. Group names appear at the top of the list.
Click the name of the group you want to delete. Click the icon Delete(looks like X) in Ribbon. Your contact group has been deleted.
OneNote is a note-taking app with Microsoft Office. To learn more about OneNote, check out this tutorial:
Step 1: How to send contact information to OneNote
Open the window Contacts. Select the address and click on the icon OneNote V Ribbon. A dialog will appear Select Location in OneNote:
Expand option My Notebook and select a OneNote notebook to save the address. Click OK. Your information is added to OneNote in the notebook you selected:
Note. You can share Outlook contact card information with OneNote.
Step 2. How to send a contact or group of contacts in Outlook
If someone needed your contact information or even your contact group, you can do it quickly and easily through Outlook email.
Open the window Contacts. Click on the Outlook item to select. This can be a contact group or an individual address. In this example, I show how to split a contact group in Outlook.
Click Forward Contact on tape to open the pop-up menu:
You can forward an Outlook address or group information to anyone.Note.
Contact groups can only be sent as an Outlook contact. Individual addresses can be forwarded as either an Outlook contact or a business card.
Select an item format option. A window will open Compose with a contact element already attached:
Enter the address of the person you want to send the information to. It is also a good idea to write the body of the message so that your message does not end up in the spam folder. When everything is ready, press the button Send.
Practice using your contact groups
Once you've added your contacts to Outlook and organized them into groups, you'll find that there are many uses for them in Outlook. Here are just a few ideas:
- Project news. If you need to send information to all participants, contact groups - great tool. Make sure all team members are listed on the correct page.
- Meetings. Along with other methods, sending a meeting notification via email through a contact group allows you to add attachments and other details.
- Announcements. If your job requires you to make company-wide announcements, a group email sent using your contact list will be read.
- Notices and warnings. If you need to alert customers about an update software or others system changes, a contact list ensures that your message reaches the right people.
- Social events. Contact groups help in organizing social events: parties, meetings, sports tournaments.
Using a group to send a message to multiple people is practical and efficient. Once you learn how to use contact groups, you can think about your own unique goals.
Organize your email with Inbox Management
Conclusion
Now that you know how to add contacts in Outlook and how to organize them into groups, you are ready to take full advantage of MS Outlook in your business and personal life. Get started today by creating a contact group in Outlook.
How do you use Outlook contacts in your business? Do you use MS Outlook contact groups? Share your thoughts (or tips) in the comments below.
Business and personal email correspondence is an integral part of the life of a modern person. Fast shipping mail messages allows you to effectively solve many problems and keep abreast of all important events.
![]()
In the window that appears, you can easily find the “Import contacts” option. All that remains is to comply with all the requirements that the application will put forward.
Initially, you need to indicate the location where the file with the csv extension is saved, then simply click on the “Open” button that appears. After this, an automatic process will start, successfully downloading all the contacts to your iPhone. This completes the process of importing all contacts that are important to you.
Thanks to such actions you can have important contacts always with you, in your mobile gadget. Simultaneous storage email addresses on the computer and mobile devices allows you to be sure that irretrievable loss of data is excluded.
And I already wanted to start the installation. But at the last moment, the user warned me that, to check and send mail, he uses the Outlook email client, where a very large list is stored Email addresses, which needs to be saved. This is exactly what I will tell you about now
I have already described the lesson earlier. For example, I, given mail client I have been using it regularly for a long time. Every day my “Address Book” was filled with addresses of friends and acquaintances. This contact list saved me a lot of time. Firstly, it was difficult to remember all the contacts, and secondly, I could select the address I needed in 2 clicks, rather than entering it manually. But how to save a list of addresses in Outlook, if you suddenly need to reinstall Microsoft Office, or in general operating system? I will talk about this in detail below.
Saving Contacts in Outlook
So, having opened Outlook, go to the section “ Contacts" Our " Address books", and on the right their contents.
To save contacts in Outlook, click on “ File" and select " Open" A list of actions will appear on the right in which we need the item “ Import».

In the window that opens, go down to the very bottom and mark “ Export to file" and click " Next»

The next step will be to select the type of file to be created. I recommend using " Comma Separated Values (Windows) ", the file will be saved in .csv format, which means that we can use it not only in Outlook.


Specify the name and path to the address book storage location. To do this, use the button " Review", by clicking it, a folder selection window will appear; in my case, to save Outlook contacts, I selected " Desk" and named the file " Address book».

Before starting the saving process, a list of actions will appear that will be performed after clicking the " Ready" If you are saving only contacts, your window should look something like the one shown below.

After finishing saving, a .csv file appeared on my desktop with the name “Address Book”, which I will later use to restore the contact list after rearranging the operating system.

Recover contacts in Outlook using a .csv file
To call the contact recovery menu, click “File” -> “Open” -> “Import”.

The same window will appear as when saving, although this time we need to select the item “ Import from another program or file».

In the next window, in the file to import field, indicate the storage location of our file; to do this, you can use the “Browse” button. Menu " Options» – here you need to indicate what action to take when duplicates occur. We are asked to replace, allow duplicates, and ignore duplicates. Having indicated the path, mark the item that you like ( I use duplicate creation), click " Next».

Select the folder where the imported contact list will be placed.

In the window of completed actions, click on “Finish”, which will start the process of restoring contacts in Outlook.

Now all your addresses will be saved in the Contacts menu.

Saving and restoring contacts in Outlook is very similar, just a few things change, so remembering these steps is very easy. And which is very convenient when reinstalling Windows.