Regardless of your operating system (Windows XP, Windows 7, Windows 8), go to Computer (My Computer, This Computer) click on the drive you want to check right click mouse, select " Properties".
In the properties window, go to the " Service"and press the button" Run a check".

Check both boxes
Automatically fix system errors.
Scan and repair system sectors.
and press " launch".

If you check the system volume (the drive on which the operating system is installed, usually drive C) you will see the message " Windows cannot check the hard drive that is in this moment used", press " Disk check schedule".

Then restart your computer / laptop, during the download, the process of checking and correcting errors on the disk will start. It will last from several minutes to an hour (depending on the size of the partition and the physical characteristics hard drive). When finished, the operating system will boot.

Checking the hard drive using the chkdsk utility.
CHKDSK (short for English check disk - disk check) - standard application v operating systems DOS and Microsoft Windows, which checks HDD or diskette for errors file system(for example, the same sector is marked as belonging to two different files). CHKDSK can also fix found file system errors. (from Wikipedia)
In order to run the chkdsk utility, you need to run a command prompt with administrator rights, for this:
V Windows XP click - "Command line"
V Windows 7 click "Start" - "All Programs" - "Accessories" "Command line" and select "Run as administrator".
V Windows 8.1 right click on "Start" - "Command Prompt (Admin)".
As a result, the command line console will open.
First of all, let's learn the syntax of the chkdsk utility:
CHKDSK [volume[[path]filename]] ]
Volume Specifies the mount point, volume name, or letter of the drive being checked, followed by a colon.
File name Files checked for fragmentation (FAT/FAT32 only).
/F Fix disk errors.
/V For FAT/FAT32: Display the full path and name of each file on the disk. For NTFS: Display cleanup messages (if any).
/R Search for bad sectors and restore the surviving content (requires /F).
/L:size For NTFS only: Set the size of the log file (in KB). If the size is not specified, the current value of the size is displayed.
/X Disable the volume first (if necessary). All open handles to this volume will be invalidated (requires /F).
/I NTFS only: Less stringent checking of index entries.
/C NTFS only: Skip checking for cycles within the folder structure.
/B NTFS only: Re-evaluate bad clusters on disk (requires /R)
The /I or /C options reduce Chkdsk execution time by skipping some volume checks.
Of all the command attributes, two are most often used to check the disk for errors: /f and /r. The final command looks like this:
chkdsk C:/F/R
With this command, we will check partition C, fix errors on the disk and recover information from bad sectors (if any).
After entering this command, you will be prompted to check the volume the next time the system is rebooted, click Y and key Enter.

Now you need to reboot the system, when loading you will see a window offering a check, do not click anything, just wait 10 seconds.

Checking for hard drive errors with Victoria.
The Victoria program is designed to check for errors on hard drives with IDE and Serial ATA interfaces. The program is a complete solution for a comprehensive, deep, and at the same time the fastest possible assessment of the real technical condition of the HDD.
First of all, download ISO image programs from official site . Unzip the downloaded archive and burn it to CD/ DVD disc how to do this is described in the article How to burn to CD/DVD . After that, boot from the burned disc, how to do this is described step by step in the article. How to boot from CD/DVD disc or USB flash drive .
After booting from the disk within 10 seconds, select the program for your device (Victoria for the computer will be loaded by default).

The program interface will launch. Press the F2 key in order for the program to find the disk itself, if this does not happen, you must do it manually. To do this, press the "P" key. The same will have to be done if there are several hard drives and you have to choose one of them. If you have hard drives With SATA interface, then in the menu that appears Select HDD port, select - " Ext. PCI ATA/SATA". Moving is carried out with the cursor keys "up", "down", and the choice is made with the "Enter" key.


Next, to check the surface of the disk, press the F4 key. In the HDD scan menu: window, select the necessary scan options. By default, it is proposed to scan the entire disk from the beginning "Start LBA: 0" to the end "End LBA: 20971520". I recommend leaving these defaults. The next menu item - I recommend leaving "Linear reading", since it is intended for the fastest and most accurate diagnosis of the surface condition. In the fourth paragraph, I recommend choosing the mode BB = Advanced REMAP, since this mode checks the disk with the highest quality and corrects errors on it without deleting information.

After that, a check for hard disk errors will start with the correction of bad areas. This procedure can take from several tens of minutes to several hours. Depends on the volume and spindle speed.

When finished, remove the disc from the drive and restart your computer.
Video of checking the hard drive using the Victoria utility. Troubleshooting - Missing DRSC+DRDY or screw does not remove BUSY
One of important factors system health is the health of such a basic component as hard drives. It is especially important that there are no problems with the drive on which the system is installed. Otherwise, problems such as the inability to access individual folders or files, regular crashes from the system, “ blue screen death" (BSOD), up to the inability to start the computer at all. We will learn how to check the hard drive for errors on Windows 7.
If you have a situation that you can’t even log into the system, then in order to check if the problems on the hard drive are to blame for this, you should connect the disk to another computer or boot the system using a Live CD. This is also recommended if you are going to check the drive where the system is installed.
Verification methods are divided into options using exclusively internal Windows tools(utility Check Disk) and on variants using a third-party software. In this case, the errors themselves can also be divided into two groups:
- logical errors (file system corruption);
- physical (hardware) problems.
In the first case, many programs for studying a hard drive can not only find errors, but also correct them. In the second case, using the application, it will not be possible to completely eliminate the problem, but only mark the bad sector as unreadable so that no more recording is made there. Complete hardware failure hard drive can only be repaired or replaced.
Method 1: CrystalDiskInfo
Let's start with an analysis of options using third party programs. One of the most popular ways to check the HDD for errors is to use a well-known utility, the main purpose of which is precisely to solve the problem under study.


If several physical HDDs are connected to the computer at once, then to switch between them for information, click in the menu "Disk", and then select the desired media from the list.

The advantages of this method with using CrystalDiskInfo lies in the simplicity and speed of the study. But at the same time, with its help, unfortunately, it will not be possible to eliminate problems if they are detected. In addition, it must be recognized that the search for problems in this way is rather superficial.
Method 2: HDDlife Pro
The next program that will help evaluate the condition of the drive used under Windows 7 is.


To update the data, in the main window of HDDlife Pro, click "File" and then choose "Check disks now!".

The main disadvantage of this method is that the full functionality of HDDlife Pro is paid.
Method 3: HDDScan
The next program with which you can check the HDD is free utility HDDScan.
- Activate HDDScan. In field "Select Drive" the name of the HDD to be manipulated is displayed. If multiple HDDs are connected to the computer, clicking this field, you can choose between them.
- Click the button to start scanning. "New Task", which is located to the right of the drive selection area. Select from the dropdown list Surface Test.
- This will open the test type selection window. There are four options to choose from. Swapping a radio button between them:
- read(default);
- Verify;
- Butterfly Read;
- Erase.
The latter option also involves the complete cleaning of all sectors of the scanned disk from information. Therefore, it should be used only if you consciously want to clear the drive, otherwise it will simply be lost. necessary information. So this feature should be handled very carefully. The first three items on the list are testing using various reading methods. But there is no fundamental difference between them. Therefore, you can use any option, although it is still preferable to use the one that is installed by default, that is, Read.
In the fields Start LBA and "End LBA" you can specify the sector to start and end the scan. In field block size indicates the size of the cluster. In most cases, these settings do not need to be changed. In this way, you will scan the entire drive, and not some part of it.
Once the settings are set, click "Add test".
- At the bottom of the program test manager, according to the previously entered parameters, a testing task will be generated. To run the test, simply double-click on its name.
- The testing procedure starts, the progress of which can be observed using the graph.
- After the test is completed, in the tab map you can view the results. On a healthy HDD, there should be no bad clusters marked in blue and clusters with a response exceeding 50 ms marked in red. In addition, it is desirable that the number of clusters marked in yellow (response range from 150 to 500 ms) be relatively small. Thus, the more clusters with minimum time response, the better HDD condition is considered.


Method 4: Checking with the Check Disk utility through the properties of the drive
But you can check the HDD for errors, as well as fix some of them, using the built-in Windows utilities 7, which is called Check Disk. It can be launched different ways. One of these methods involves launching through the properties window of the drive.
- Click "Start". Next select from the menu "Computer".
- A window will open with a list of connected drives. Right-click ( PKM) by the name of the drive you want to check for errors. From the context menu select "Properties".
- In the properties window that appears, move to the tab "Service".
- In the block "Check disk" click "Perform check".
- The HDD check window is launched. In addition to, in fact, the study by checking and unchecking the corresponding items, you can turn on or off two additional functions:
- Scan and repair bad sectors(off by default);
- Automatically fix system errors(enabled by default).
To activate the scan, after setting the above parameters, press "Launch".
- If the settings option was selected with the restoration of bad sectors, then a new window will appear Announcement, indicating that Windows cannot start checking the HDD that is in use. To run it, you will be prompted to disable the volume. To do this, click on the button "Disable".
- After that, the scan should start. If you want to check the system drive on which Windows is installed with the fix, then in this case you will not be able to disable it. A window will appear where you should click "Disk Check Schedule". In this case, the scan will be scheduled the next time you restart your computer.
- If you unchecked the checkbox "Check and repair bad sectors", then scanning will start immediately after step 5 of this instruction is completed. The procedure for examining the selected drive is performed.
- After the procedure is completed, a message will appear indicating that the HDD has been successfully tested. If problems are found and corrected, this will also be reported in this window. To exit it, press "Close".


Method 5: "Command line"
You can also run the Check Disk utility from "Command line".


If the user wants not only to carry out research, but also to automatically correct the errors found in the process, then in this case the following command should be entered:
Press to activate Enter.

If you want to check the drive for not only logical, but also physical errors (damage), and also try to fix bad sectors, then the following command is used in this case:

When checking not the entire hard drive, but a specific logical drive, you need to enter its name. For example, in order to scan only a partition D, such an expression should be entered in "Command line":

Accordingly, if you need to scan another disk, then you need to enter exactly its name.
Attributes "/f" and "/r" are basic when running the command chkdsk across "Command line", but there are a number of additional attributes:
- /x– disables the specified drive for a more detailed check (most often used simultaneously with the attribute "/f");
- /v- indicates the cause of the problem (the ability to apply only in the NTFS file system);
- /c– Skip scanning in structural folders (this reduces the quality of the scan, but increases its speed);
- /i– quick check without detailing;
- /b– re-evaluation of damaged elements after attempting to repair them (used exclusively in conjunction with the attribute "/r");
- /spotfix– point error correction (only works with NTFS);
- /freeorphanedchains– instead of restoring content, clears clusters (only works with FAT/FAT32/exFAT file systems);
- /l:size– indicates the size of the log file in case of an emergency exit (without specifying the size, the current value remains);
- /offlinescanandfix– offline scanning with disconnection of the specified HDD;
- /scan– proactive scanning;
- /perf– increase the priority of scanning over other processes running in the system (applies only together with the attribute "/scan");
- /? – list call and attribute functions displayed through a window "Command line".

Most of the above attributes can be used not only individually, but also together. For example, entering the following command:
chkdsk C: /f /r /i
will allow you to quickly check the partition C without detailing with the correction of logical errors and bad sectors.

If you are trying to perform a repair check on the drive where Windows is located, then you will not be able to perform this procedure right away. This is due to the fact that this process requires an exclusive right, and the operation of the OS will prevent this condition from being met. In that case, in "Command line" a message appears stating that the operation cannot be performed immediately, but it is suggested that this be done the next time the operating system is rebooted. If you agree with this proposal, then you should press on the keyboard "Y", which symbolizes "Yes" ("Yes"). If you change your mind about the procedure, then press "N", which symbolizes "No" ("No"). After entering the command, press Enter.

Method 6: Windows PowerShell
Another option to run the media error scan procedure is to use the built-in Windows PowerShell tool.
- Click to access this tool. "Start". Then "Control Panel".
- Sign in "System and safety".
- Next select "Administration".
- A list of various system tools appears. Find Windows PowerShell Modules and click on it PKM. In the list, select "Run as administrator".
- A PowerShell window appears. To start a partition scan D enter the expression:
Repair-Volume -DriveLetter D
At the end of this expression "D"- this is the name of the partition to be checked, if you want to check another logical drive, then enter its name in this case. Unlike "Command line", the media name is entered without a colon.
After entering the command, press Enter.

If the results show a value "NoErrors Found", it means that no errors were found.
If you want to perform an offline media check D with the disk disconnected, then in this case the command will be:
Repair-Volume -DriveLetter D –OfflineScanAndFix
Again, if necessary, you can replace the partition letter in given expression to any other. After entering, press Enter.


As you can see, you can check the hard drive for errors in Windows 7, both with the help of a number of third-party programs, and using the built-in utility Check Disk by launching it in various ways. Error checking involves not only scanning media, but also the possibility of subsequent correction of problems. True, it should be noted that it is better not to use such utilities too often. They can be applied when one of the problems that were described at the beginning of the article appears. For the purposes of prevention, it is recommended to run programs for checking the drive no more than once every six months.
A computer or laptop is associated precisely with errors and malfunctions in the hard drive. In this article, we will figure out how to check the health of a hard drive using Windows Tools and programs specially designed for this.
Check for errors by standard means
This method is equally effective for Windows XP, Vista, 7, 8 and 10. You must:
If a notification appears "Windows cannot check the drive that is currently in use", You should click "Check Schedule".
So, now we are doing a reboot, and when the system boots, the health test through the BIOS and the media error corrections will start. Its duration can be from 2-3 minutes to an hour, depending on the characteristics of the hard drive and its capacity.
Check hard drive for errors via command line
To start the scan, you must perform the following steps: go to "Start / All Programs / Accessories / Command Prompt". Right-click and click "Run as administrator".


In the window that appears, execute the command "chkdsk disk_partition: check_parameters". It should be taken into account that this method works exclusively with drives that have been formatted in FAT32 or NTFS.
An example command would be "chkdsk C: /F /R". Its essence is as follows:
- Section C will be checked for errors;
- Found problems will be automatically fixed (parameter F is responsible for this);
- Bad sectors will be checked and information restored (parameter R);
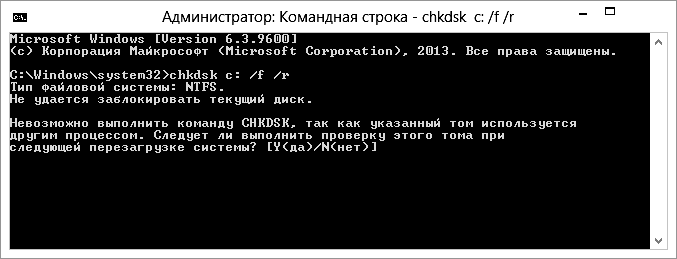

If you want to diagnose the drive currently used by the system, you will see a special notification. You will be prompted to run the scan the next time you boot your computer. To agree with this, press Y, to refuse - N. Based on the results of the check, information about the verified data, the number of bad sectors and the errors found will become available to you.
To obtain full list options, run chkdsk with a question mark as an option. But if you need a simple check for errors and sectors, then the above information will be enough for you.

It happens that the errors found during the scan are not always immediately correctable, it is likely that this is due to the program running at that time. In this situation, an offline scan of the drive is required: it is disconnected from operation, diagnostics are carried out, and then it is connected back. To do this, you need to enter “chkdsk C: / f / offlinescanandfix” at the command line (C: is the disk partition). If it is not possible to disable it, then the check will be performed at the next reboot.

If necessary, after the check, you have the opportunity to examine the check log. For this you need:
- Go to Windows Logs / Applications;
- Right-click on Application / Search;
- Search for the word Chkdsk;


Program check
Of course, the above method is not always effective. Therefore, we will consider a number of programs such as Victoria. They will allow you to conduct the most thorough analysis of the state of the hard drive on a computer or laptop.
Victoria


A utility for diagnosing and testing a hard drive. It will help you not only to detect problems in its operation, but also to eliminate them.
The program has a number of advantages and useful functions:
- Reads the hard drive passport and provides detailed information;
- 5 diagnostic modes;
- Eliminates crashes;
- Displays unstable areas;
- Hides defects;
- Estimates media performance.
It is one of the best to date. It is able to solve problems with bad sectors and quickly bring any type of hard drive into working condition.
HDD Regenerator

One of the most effective programs for assessing the status and troubleshooting drives. It makes it possible to obtain information about the current SMART status of the selected device and full control over it.
Among the main possibilities are:
- Simple and clear interface;
- Complete security;
- Support for NTFS and FAT;
- Pre-scan mode;
Real-time HDD monitoring;
That is, with the help of the regenerator, you can test the hard drive as efficiently as possible.
Test Disk
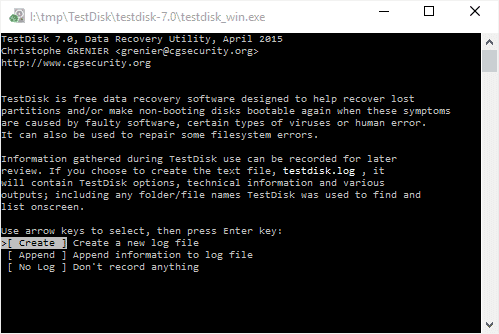

Designed to determine the status and test drives. In addition to simple diagnostics, it also detects bad sectors and fixes any errors found. Its main features include:
- Perform an analysis of the current state of the hard drive;
- Search for bad sectors;
- Recovery of deleted partitions;
- MFT fix;
Checking external hard drives;
In addition, the utility has a number of other functions that are associated with the recovery of deleted files.
Hitachi Drive Fitness Test


An excellent program designed to find and fix problems on drives. It is universal, since any drive can be diagnosed. With its help, you can very quickly find out the current position of the hard drive, as well as get information about it. Additional information.
Includes:
- A quick but thorough check;
- Support for all components;
- Monitoring;
- data statistics;
This utility is suitable for all devices and can be used even on a netbook.
Seagate Seatools for Windows

Used to check and test the status of the hard drive. She finds any problems and failures.
- The utility is able to fix:
- Hardware incompatibility;
- Violations of the HDD file system;
- Errors in installed drivers;
- Viruses and malware that infect the file system;
In addition, it provides complete information about the media and all related indicators. According to the developers, this utility is incredibly effective at self-correction of minor problems, SSD and HDD errors, and is able to fully restore their performance.
So now you have complete information Learn how to determine if your hard drive is working properly and how to troubleshoot hard drive problems yourself. Choose the most suitable or the option you like and act!
Video: checking hard with standard tools
Often, users are faced with situations where Windows starts to work incorrectly. Loading slowly, giving strange messages. Slow to respond to actions. Files suddenly disappear. All this can be the result of errors in the disk file system and physical damage to the surface. The appearance of poorly readable and bad blocks of sectors. Bad (unreadable) blocks are also called Badblocks. To eliminate such manifestations, you need to check the disks for errors. There is a utility in the Microsoft Windows Maintenance Tools arsenal Check disk, designed just to check and fix errors on disks. Sometimes the Windows system, when it detects problems on a disk or when a new disk (for example, a flash drive) is connected, starts Check Disk itself when it boots. Some uninformed users get scared when they see a blue screen with a disk check utility running Check disk. Some confuse running Check Disk with a blue screen of death BSOD. If Check Disk has started, you need to let it work, if you do not want it to

started at every Windows boot. If you want to check disks, first of all you need to check the system disk, usually it is the “C” drive, but not necessarily. For check system disk the error correction utility cannot be run under the Windows operating system. You can only assign a task to check the disk, which will be performed at the next boot in DOS mode. If error correction is not specified during the check, then the system disk will be checked, and the results can be viewed by going to the control panel, administration, event viewer, application. The rest of the disks can be checked when the Windows operating system is loaded. You can set up a check or run Check disk with several
ways.
 The first way (normal, with a graphical interface):

After checking the system disk in DOS mode, a report is displayed. If there are no errors, then the view will be as in the presented photo. If errors are found, records about them and their correction will be added. Sometimes there are quite a few entries. This indicates that the condition of your disk is not good. Perhaps he, as the system engineers say, “began to crumble”, and a more thorough check should be done using special programs.

Second way (in DOS mode):

Third method (in command line mode)

If you add the / f parameter to the chkdsk command, as in the previous method, you will receive a warning about the impossibility of verification and a suggestion to set the verification at the next Windows boot.
List of parameters of the Check Disk utility:
Many experts do not recommend using the Check Disk utility too often due to the risk of system and data damage. I am personally behind the utility of such sins when working with file NTFS system did not observe. It happened only on FAT32, and the negative comes rather from here. Frequent checks, in general, are not needed. Once every six months and in case of malfunctions will be enough.
Note: In Vista and Windows 7 operating systems, there is no "Run" command in the Start menu by default. To make it appear, do the following:
- Right-click on the "Start" button on the desktop and select "Properties" from the list.
- In the window that opens, on the Start Menu tab, click Customize.
- In the list of the next window, find the "Run" command and check the box next to it.
- Click "OK" to close the windows.
Regardless of your operating system (Windows XP, Windows 7, Windows 8), go to Computer (My Computer, This Computer) right-click on the drive you want to check, select " Properties".
In the properties window, go to the " Service"and press the button" Run a check".
Check both boxes
Automatically fix system errors.
Scan and repair system sectors.
and press " launch".
If you check the system volume (the drive on which the operating system is installed, usually drive C) you will see the message " Windows cannot check the hard drive that is currently in use", press " Disk check schedule".
Then restart your computer / laptop, during the download, the process of checking and correcting errors on the disk will start. It will last from several minutes to an hour (depending on the size of the partition and the physical characteristics of the hard drive). When finished, the operating system will boot.
Checking the hard drive using the chkdsk utility.
CHKDSK (short for check disk) is a standard application in DOS and Microsoft Windows operating systems that checks a hard disk or floppy disk for file system errors (for example, the same sector is marked as belonging to two different files). CHKDSK can also fix found file system errors. (from Wikipedia)
In order to run the chkdsk utility, you need to run a command prompt with administrator rights, for this:
V Windows XP click - "Command line"
V Windows 7 click "Start" - "All Programs" - "Accessories" "Command line" and select "Run as administrator".
V Windows 8.1 right click on "Start" - "Command Prompt (Admin)".
As a result, the command line console will open.
First of all, let's learn the syntax of the chkdsk utility:
CHKDSK [volume[[path]filename]] ]
Volume Specifies the mount point, volume name, or letter of the drive being checked, followed by a colon.
File name Files checked for fragmentation (FAT/FAT32 only).
/F Fix disk errors.
/V For FAT/FAT32: Display the full path and name of each file on the disk. For NTFS: Display cleanup messages (if any).
/R Search for bad sectors and restore the surviving content (requires /F).
/L:size For NTFS only: Set the size of the log file (in KB). If the size is not specified, the current value of the size is displayed.
/X Disable the volume first (if necessary). All open handles to this volume will be invalidated (requires /F).
/I NTFS only: Less stringent checking of index entries.
/C NTFS only: Skip checking for cycles within the folder structure.
/B NTFS only: Re-evaluate bad clusters on disk (requires /R)
The /I or /C options reduce Chkdsk execution time by skipping some volume checks.
Of all the command attributes, two are most often used to check the disk for errors: /f and /r. The final command looks like this:
chkdsk C:/F/R
With this command, we will check partition C, fix errors on the disk and recover information from bad sectors (if any).
After entering this command, you will be prompted to check the volume the next time the system is rebooted, click Y and key Enter.
Now you need to reboot the system, when loading you will see a window offering a check, do not click anything, just wait 10 seconds.
Checking for hard drive errors with Victoria.
The Victoria program is designed to check for errors on hard drives with IDE and Serial ATA interfaces. The program is a complete solution for a comprehensive, deep, and at the same time the fastest possible assessment of the real technical condition of the HDD.
First of all, download the ISO image of the program from official site . Unzip the downloaded archive and burn it to a CD / DVD, as described in the article How to burn to CD/DVD . After that, boot from the burned disc, how to do this is described step by step in the article. How to boot from CD/DVD disc or USB flash drive .
After booting from the disk within 10 seconds, select the program for your device (Victoria for the computer will be loaded by default).
The program interface will launch. Press the F2 key in order for the program to find the disk itself, if this does not happen, you must do it manually. To do this, press the "P" key. The same will have to be done if there are several hard drives in the system and you need to select one of them. If you have hard drives with a SATA interface, then in the menu that appears Select HDD port, select - " Ext. PCI ATA/SATA". Moving is carried out with the cursor keys "up", "down", and the choice is made with the "Enter" key.
Next, to check the surface of the disk, press the F4 key. In the HDD scan menu: window, select the necessary scan options. By default, it is proposed to scan the entire disk from the beginning "Start LBA: 0" to the end "End LBA: 20971520". I recommend leaving these defaults. The next menu item - I recommend leaving "Linear reading", since it is intended for the fastest and most accurate diagnosis of the surface condition. In the fourth paragraph, I recommend choosing the mode BB = Advanced REMAP, since this mode checks the disk with the highest quality and corrects errors on it without deleting information.
After that, a check for hard disk errors will start with the correction of bad areas. This procedure can take from several tens of minutes to several hours. Depends on the volume and spindle speed.
When finished, remove the disc from the drive and restart your computer.
Video of checking the hard drive using the Victoria utility. Troubleshooting - Missing DRSC+DRDY or screw does not remove BUSY