If, after turning on your computer, you have to wait a long time for the operating system to finally load, don’t put up with it! Some of my friends who bought a powerful laptop just two months ago thought that it was normal to wait five minutes before starting to work with it. I saw this by chance and immediately opened it. startup list and discovered a large number of applications that started with the system.
The fact is that many programs, after installation, are independently registered in startup, and then every time you turn on the computer they start along with operating system. This, of course, does not affect better side for a while Windows boot. To increase the system boot speed, you must exclude unnecessary applications from startup.
There are several ways to remove it from startup unnecessary programs:
The first way is . It stores shortcuts to programs that launch after successful user registration in the system. Shortcuts to this folder can be added by programs during installation, or by the user independently.
There are two startup folders:
General
– for all users of this PC. Found in the catalog Documents and Settings\All Users\Main Menu\Programs\Startup. Programs from this directory will run for everyone Windows users, no matter how many there are.
Individual – for the current user logged in under his/her account. Stored in the directory Documents and Settings\Username\Main Menu\Programs\Startup. Programs from this folder will be launched for the current user.
So, if you don't want the programs in these folders to run when Windows startup– just remove their shortcuts from these folders. You can also remove these shortcuts by going to “Start” - “All Programs” - “Startup”.
Second way - using the built-in System Setup utility. To call it, go to “Start” - “Run” - type msconfig and click “OK”. In the window that appears, go to the “Startup” tab. To remove unnecessary programs from startup, simply uncheck the boxes next to them and click “OK”, then restart your computer.  If you can’t figure out from the name in the first column which program is in startup, look at the “Command” column. Here is the path to the executable file, which will help you determine the folder and, accordingly, the name of the program.
Third way - in the registry editor. Go to “Start” – “Run” – type regedit and click “OK”. Information about startup is contained in two registry branches:
HKEY_LOCAL_MACHINE\SOFTWARE\Microsoft\Windows\CurrentVersion\Run
- is responsible for autoloading programs of all system users.
HKEY_CURRENT_USER\Software\Microsoft\Windows\CurrentVersion\Run
- is responsible for autoloading programs of the current user of the system.
To remove a program from startup, simply delete the corresponding key (right-click on the key - select “Delete” in the context menu):  Fourth method – autoload control using third party programs
. There are many utilities that allow you to disable autorun unnecessary applications. Among them are programs that have been repeatedly mentioned on the blog and.
Fourth method – autoload control using third party programs
. There are many utilities that allow you to disable autorun unnecessary applications. Among them are programs that have been repeatedly mentioned on the blog and.
IN CCleaner To manage autorun, you need to select the “Service” tab - “Startup” - find an application that does not need to load with the system - select it and click “Turn off”:  In the program Starter To do this, go to the “Startup” tab - find it in the list on the right the desired program and uncheck it. In the window that appears, click “Yes”.
 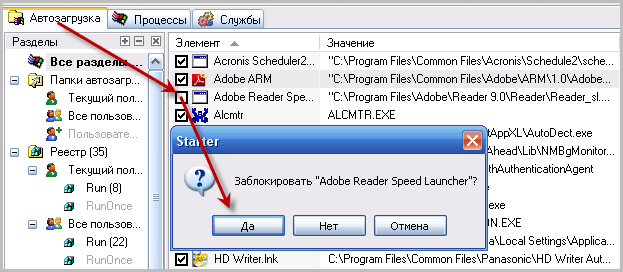 Another program for managing Windows startup, which I must tell you about, is called Autoruns. This is a small but very powerful utility with which you can see (and, if necessary, disable) all programs, services and drivers that start along with the operating system. Autoruns may be useful if a virus has entered your system's startup. I will tell you in more detail about how to work with this program in
Unnecessary programs interfere with the user every time the computer starts. You have to wait and waste time, and sometimes they are simply not needed at all. I will provide instructions on how to disable them. This will significantly reduce the boot time of your computer.
Attention! Some programs may return to startup when you turn them on ( for example, utorrent).
To avoid this, you need to check their settings and remove autoloading.
You can see all the methods not only in the article, but also in the video. Everything is clearly demonstrated there. However, the article has some nuances.
Disable via Start menu
There is a special folder that contains files that run every time you turn on the computer. Typically, programs are added there themselves during installation if they are configured to do so. They may not be here, but it’s still worth checking.
Go to Start >> All Programs >> Startup. And delete unnecessary ones by pressing right button mouse and delete.
IN in this example From this folder I only launch skype. Only the main programs located in this folder are displayed here. To disable others ( usually they are in the registry) it is better to use other methods.
Disabling startup in system configurations
All popular versions of Windows have a built-in utility for system management. Using it, you can simply disable autoloading by unchecking the boxes. Usually this is enough to solve this problem.
Need to open command line. Go to Start >> Run ( Win+R) and enter msconfig as in the image below.

Select the “Startup” tab and uncheck unnecessary programs. My program and antivirus automatically load.

After this, you will be prompted to restart your computer. This can be done later. There is no way to remove absolutely everything. Only the most basic ones. If this is not enough for you, then see the following methods.
Disabling in CCleaner
Unlike the methods above, here you can disable autoloading for applications. First download free program CCleaner, install and run. Select the "Tools" category and the startup tab. Turn off or remove unnecessary programs as shown in the image below. I left only the antivirus.

Disabling makes the startup task inactive, and deleting it completely removes it. However, programs can still add a task themselves even after using delete.
Disabling in the registry
Everything here is done by hand. If you don’t want to do it by hand, then move on to the next method. There it is done much easier.
In the execution line write regedit and navigate to the directory:
- HKEY_LOCAL_MACHINE\SOFTWARE\Microsoft\Windows\CurrentVersion\Run
Then a list of startup tasks will appear. Each line will refer to a separate program. Remove the unnecessary ones as in the image below.

Take a closer look at the path:
- HKEY_LOCAL_MACHINE - branch for all users.
- HKEY_CURRENT_USER—The branch for the user you are on.
If this is not enough, then the following method should help.
Disabling using the autorun utility
The utility allows you to conveniently work with the registry and disable startup in just 1 click. Its capabilities include disabling not only programs, but also various dll libraries, system services, device drivers and generally everything that loads automatically. Download it and. No installation required.
Run the autoruns or autoruns64 file depending on your system version and accept license agreement. Other files run it in the execution line.

Now its interface will appear in front of you. Here, select the “Everything” tab and simply uncheck unnecessary programs. All possible startup objects will be shown here.

Remove only what you know! Disabling important system libraries or services may cause your computer to become unstable.
After that, simply close the utility. There is no need to save anything. It will correct the values in the registry itself immediately after adding or removing a checkmark. You won't have to do anything manually.
It also highlights lines in different colors:
- Yellow - present in startup tasks, but no files were found. They will not be able to start automatically.
- Red - files without description and without author. It could be viruses ( but that's not always the case).
Information about the file is displayed below. Weight, location and more. Individual tabs indicate the location of objects. You can tinker and turn off a lot of unnecessary and unnecessary things ( everyone is different). The main thing is to read about what you are disabling.
How many programs do you have in startup?
Many owners of computer equipment have repeatedly wondered why it loaded quickly enough upon purchase, and after a short period, loading Windows became longer. Experienced PC owners know that when installing new software products, the availability of which is seen as an urgent need, execution files are simultaneously included in the startup registry. As a result, these applications begin to automatically launch in background along with Windows. Of course, due to this, additional information increases, and therefore its loading time also increases.
Considering that most often the user does not need all these daily installed applications, a completely reasonable question arises: how to remove the program from startup.
A large list of startup programs can affect the performance of the operating system.
Before you start learning about how to disable startup Windows programs, it is important to understand why this is all being done.
Why remove programs from startup?
If only a small part of the installed applications starts at the same time as the operating system, this is unlikely to cause irritation to the PC owner; in some cases, their startup will remain completely invisible to him.
If the number of such programs increases, then the boot time of Windows increases proportionally with them. And this already causes negativity on the part of the PC owner. Unfortunately, many software product developers even without urgent need include the autoload function in it. As a result, after installation it starts up along with the OS.

Now it’s quite easy to figure out how to disable startup programs. The green checkmark next to unnecessary applications is removed. Once all actions are completed, the system will prompt you to reboot. It is best to do this right away, then the result of all actions will be immediately obvious. But you can refuse an immediate reboot, then the changes will take effect after the scheduled system reboot.
Removal using programs
It is also useful to know an alternative way to remove a program from startup. It is carried out thanks to special software products that can be downloaded from various resources, installed and immediately begin implementing your plans.
One such software product that allows you to easily disable everything unnecessary from automatic download, is CCleaner. It is good because it is compact, easy to use and highly efficient.

After launching CCleaner, the user should go to the Startup tab, where it will also be presented full list software products that are loaded with the operating system.
The user, wanting to delete a specific application, must click on it, the line will turn blue. Now all that remains is to press two buttons in sequence: “Turn off” and “Ok”. Having performed such simple manipulations, the user will undoubtedly be able to disable unnecessary applications.
There is another successful program, Autoruns, that acts as an effective assistant if there is a need to remove something from an automatic download. Despite the fact that Autoruns is not Russified, the interface is quite clear, so it does not raise questions even for beginners. To remove a software product from automatic download, you just need to uncheck the box next to it.
Qualified specialists, as well as those who have sufficient practical skills, prevent the installation of programs with the activated function automatic start, turning it off either at the installation stage, or immediately after installation, going into the settings of the installed software application.
Removing unnecessary applications from automatic loading is a necessary measure, since with a significant number of them it is impossible to talk about the successful operation of the operating system.
The desire to save time is quite natural for both ordinary users and experienced programmers. Adding a program to autorun will help not only synchronize certain applications on your personal computer, but also get rid of routine tasks, for example, conducting hardware tests according to predefined parameters. This instruction will reveal the nuances of methods for setting up automatic launch of Windows programs.
Adding a program to startup using StartWindows 7
Step 1. Expand the Start menu and go to the All Programs subdirectory.

Step 2. In the expanded list, you need to find the “Startup” folder, and by calling the context menu, click on the “Open” link.

Step 3. When the Windows 7 automatic loading window opens, you will be able to edit its contents - just drag the shortcut of the program you need into the window, and it will launch when you log into the operating system.

Important! This is the easiest way to add programs to the auto-download list, but not the best. Many programs that actually run with the system do not appear in the directory
Windows 10
Step 1. To enter the MSconfig environment in Windows 10, you need to expand the context menu of the Start button using the right mouse button.

Right-click on “Start”
Step 2.

Step 3. In the window that pops up, in the query input box, you need to enter the command “msconfig”.

Step 4. IN software interface switch to the “Startup” tab.

Step 6. In the appropriate tab, select the line with the name of the program or application that should be launched together with the operating system, and use the “Enable” button.

Note! You can launch the task manager in another way - by calling the taskbar context menu and going to the required link. After entering the utility, switch to the bookmark and follow step 6.
Adding a program to startup using MSconfig inWindows 7
Step 1. To enter the MSconfig environment in Windows 7, you need to expand the Start menu, in search bar run “MSconfig” and run it as administrator.

Step 2. After launch, in the software interface, switch to the “Startup” tab.

Step 3. Set automatic download permissions for the required items. To allow all programs, use the “Enable All” button.
Note! This shell interacts with the registryWindows, and collects data from it. That is why this utility displays many more startup keys than in the Startup directory. Displaying all elements will allow you to work more closely with program launch parameters when loading the operating system.
Adding a program to startup using the registry inWindows 10
Step 1. To enter the registry editing environment in Windows 10, you need to expand the context menu of the Start button using the right mouse button.

Step 2. Start the "Run" procedure.

Step 3. In the window that appears in the query input box, you need to enter the command “regedit” and launch the editor control console.

Step 4. In the console interface, follow the list one by one to the “Run” directory.
- LOCAL MACHINE (for local station), or CURRENT USER (for your user);
- SOFTWARE (the folder stores settings software);
- Microsoft (corporation product settings);
- Windows (operating system settings);
- CurrentVersion (current version settings);
- Run (settings for automatic program launch).

Step 5. To add a program, use the “Edit” menu and use it to select the command to create a new string parameter.

Step 6. Specify the parameter name.

Step 7 Expand the line parameters and write down the path to the executable file. After specifying the path, save the settings.

Important! When changing registry settings, be careful - careless handling of entries can disrupt the normal operation of the software and operating system.
Adding a program to startup using an additional application
To change the software startup mode in Windows system You can use CCleaner software. It is completely free and provided "as is".
Step 1. Launch the software product.
Note! When choosing a program you can download full version(requires installation) or portable (works without installation).

Step 2. Expand the “Service” list located in the left frame of the interface.

Step 3. Go to the Startup list. To deposit additional element part of the automatic download, select it with a mouse click and use the “Enable” button.

Important! Please note that the program uses direct access to the registry, just like the utilityMSconfig. BecauseCCleaner is third party software product, attackers can use it for their own purposes. Install only proven versions of the software package.
Video - How to add a program to startup
Conclusion
We looked at ways to edit the list of automatic downloads of programs in Windows, taking into account the version of the operating system. Remember that standard means may change slightly appearance depending on installed updates, or completely absent, depending on the OS edition. One of the described methods is not standard and therefore may pose a threat information security To your computer. The assessment of each described method, according to our website, is given in the summary table.
| Details/Name | Registry Editor | MSconfig utility | CCleaner | |
|---|---|---|---|---|
| License | Delivered with Windows | Delivered with Windows | Free | Supplied with Windows (not available on Windows 10) |
| Russian language | Depending on Windows versions | Depending on software version | Depending on Windows version | |
| Display all autorun items | Yes | Yes | Yes | No |
| Interface convenience (from 1 to 5) | 3 | 5 | 5 | 5 |
I can assume that among Windows users there are many who like autorun of disks, flash drives and external hard drives not really needed and even boring. Moreover, in some cases, this can even be dangerous, for example, this is how viruses appear on a flash drive (or, rather, viruses spreading through them).
In this article I will describe in detail how to disable autorun external drives, first I’ll show you how to do this in the local editor group policy, then using the registry editor (this is suitable for all versions of the OS where these tools are available), and I will also show how to disable Autoplay in Windows 7 through the control panel and the method for Windows 8 and 8.1, by changing computer settings in the new interface.
There are two types of “autorun” in Windows - AutoPlay ( auto play) and AutoRun (autorun). The first is responsible for determining the type of drive and playing (or starting specific program) content, that is, if you insert a DVD with a movie, you will be prompted to play the movie. And Autorun is a slightly different type of autorun that came from previous versions of Windows. It implies that the system searches for the autorun.inf file on the connected drive and carries out the instructions written in it - changes the drive icon, launches the installation window, or, which is also possible, writes viruses to computers, replaces items context menu and so on. It is this option that can pose a danger.
How to disable Autorun and Autoplay in the Local Group Policy Editor
In order to disable autorun of disks and flash drives using the local group policy editor, launch it by pressing the Win + R keys on your keyboard and enter gpedit.msc.

In the editor, go to the section “Computer Configuration” - “Administrative Templates” - “ Windows components" - "Autostart policies"

Double-click on the “Turn off AutoPlay” item and switch the state to “Enabled”, also make sure that “All devices” is set in the “Options” panel. Apply the settings and restart your computer. Done, the autoboot function is disabled for all disks, flash drives and other external drives.
How to disable autorun using Registry Editor
If your version of Windows does not have a Local Group Policy Editor, you can use the Registry Editor. To do this, launch the registry editor by pressing the Win+R keys on your keyboard and entering regedit(after that, press Ok or Enter).
You will need two registry keys:
HKEY_LOCAL_MACHINE\Software\Microsoft\Windows\CurrentVersion\Policies\Explorer\
HKEY_CURRENT_USER\Software\Microsoft\Windows\CurrentVersion\policies\Explorer\

You must create a new DWORD value (32 bit) in these sections NoDriveTypeAutorun and assign it to him hexadecimal value 000000FF.
Restart your computer. The option we set is to disable autorun for all drives in Windows and other external devices.
Disabling disk autorun in Windows 7
To begin with, I’ll let you know that this method is suitable not only for Windows 7, but also for eight, just in latest Windows many settings made in the control panel are also duplicated in the new interface, in the “Changing computer settings” item; there, for example, it is more convenient to change parameters using touch screen. However, most methods for Windows 7 continue to work, including the method to disable disk autorun.

Go to the panel Windows management, switch to the “Icons” view if you had the category view enabled and select “AutoPlay”.

After that, uncheck “Use autorun for all media and devices”, and also set “Do not perform any actions” for all media types. Save your changes. Now when you connect new drive to the computer, it will not attempt to automatically play it.
Autoplay in Windows 8 and 8.1
The same thing that was done using the control panel in the section above can also be done by changing Windows settings 8, to do this, open the right panel, select “Settings” - “Change computer settings”.

Thank you for your attention, I hope I helped.


