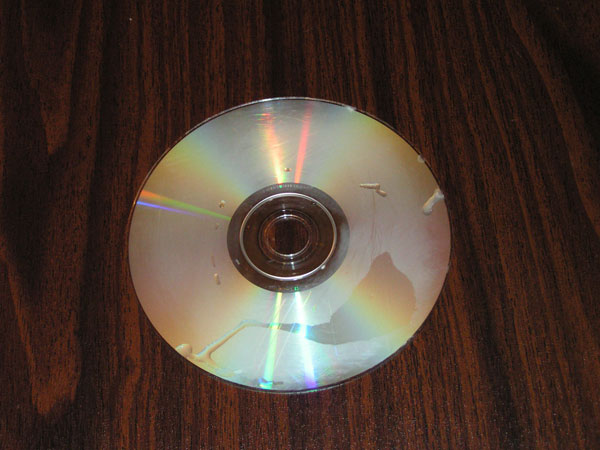
Problem: scratched disc
If you've ever dealt with a scratched disc, you know that scratches cause significant damage to the contents of the disc. Where do scratches come from? There are several reasons why scratches appear on a disk:
- Frequent use of the disc (the CD-Rom itself may scratch the disc);
- careless handling of the disc (for example, the disc is stored without packaging);
- accidental drops of the disc on the floor;
- other influences.
The result of scratches is sectors on the disk that the laser cannot read. Why is this happening? Because the grooves on the disc, i.e. scratches bend the laser path. And, although the information under the scratches itself is preserved, the laser cannot reach it. Thus, scratches block access to information on the disk and make its use inconvenient or impossible. For example, if a movie is recorded on a disc, then when the film approaches a scratched place on the disc, the image may begin to “jump” and stop completely. This greatly spoils the impression of the film, and sometimes makes it impossible to watch. And if the disk contains important text documents, then there is no need to say that unreadable sectors are completely unnecessary there! What to do?
Is it even possible to extract information from a scratched disk?
After studying information on the Internet, we realized that this issue is the subject of controversy. Some believe that it is possible to recover data from a scratched disk, others disagree with this, and still others doubt it. We wondered if there was even an answer to this question? We did not find any special experiments on the Internet, and the materials we found turned out to be dubious. Therefore, we decided to conduct our own independent experiment.
Data Extraction Methods
We know that there are two possible approaches to retrieving data from a damaged drive, namely the software method and the mechanical method. Software method is to recover data using special programs(such as “Trust Copy”, etc.). It allows you to read damaged files by skipping unreadable places, i.e. extract everything that can be extracted. Mechanical method based on mechanical polishing of the disc surface. This method allows you to increase the availability of data reading.
Independent experiment
We want to explore the mechanical method in practice, because... We want to recover data that may seem lost. We also use the program because... standard means copying will not allow us to extract data from a file that is even slightly damaged ( standard program will immediately display a file reading error and stop working). And we want to try to extract all available information from the disk.
Let's assume that polishing the scratched surface of a disc allows you to erase the scratches completely and/or make them less deep. Thus, the problem of laser path curvature can be eliminated completely or partially and the information on the disk will be read. Let this be our hypothesis. Based on this hypothesis, we conducted an independent experiment. And now we illustrate here the step-by-step process of the procedure and present the results obtained. We hope that you will be interested in reading this information and that you will find something useful for yourself.
The task The experiment is to find answers to the following questions:
- Is retrieving data from a scratched disk a solvable problem?
- What does the disc polishing method do? Is polishing a real data recovery due to better data availability to the laser?
Restoring a scratched disk using improvised means
Stages of the experiment:
- We took it completely intact new disk(without scratches) and checked its readability using the Reliable Copy disk reading program.
- We scratched the new disc thoroughly using a sharp-edged seashell and a piece of granite.
- We checked the readability of the damaged disk using the Reliable Copy disk reading program and compared it with the original unscratched copy using the Sync Last Files Professional program to find different files.
- We sanded and polished the disc for 30 minutes using a regular toothpaste as an abrasive material. In this case, we sanded for 10 minutes using a medium-hard toothbrush and toothpaste, and polished for 20 minutes using a rag, toothpaste and water.
- We tested the readability of the sanded and polished disc using the Reliable Copy disc reader program and compared it with the original unscratched copy using the Sync Last Files Professional program.
- Next, we polished the disc for another 60 minutes using a rag, toothpaste and water.
- And then we again checked the readability of the polished disk using the "Trust Copy" disk reading program and compared it with the original unscratched copy using the "Sync Last Files Professional" program.
At the end of the experiment you can see its results ( conclusions).
Stage 1. Checking the readability of an undamaged disc.
Photos 1 and 2. We took a completely undamaged disc (no scratches).
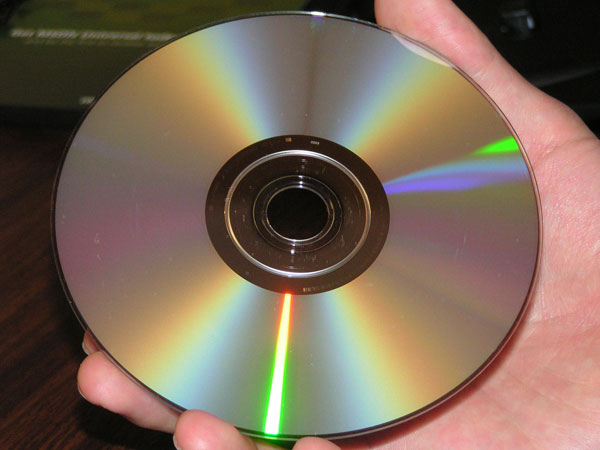
Photo 3. We inserted this disk into the drive and launched the "Reliable Copy" disk reading program to make a master copy of the disk.

Screenshot 1. Here you can see that we are prepared for copying: we want to copy the disk in order to use it as a master copy in the future. As the disk becomes damaged, we will compare it with the reference copy in order to understand whether we were able to recover the data. The right column contains the source for copying files, i.e. the disk itself. In the left column there is a blank directory in which we will store the original, i.e. an undamaged copy of the disk.

Screenshot 2. Disk analysis in progress.

Screenshot 3. Files are being copied from an undamaged disk.

Screenshot 4. No error notifications appeared. All files were copied successfully. 
Stage 2. Scratching a good disc.
Photo 4. We prepared tools to damage the surface of the disk: a sea shell with sharp edges and a piece of granite.

Photo 5. Applying scratches. To complicate the restoration task, we deliberately inflicted scratches of different thicknesses and types: transverse and longitudinal lines and zigzags, which are the most dangerous for disk data:
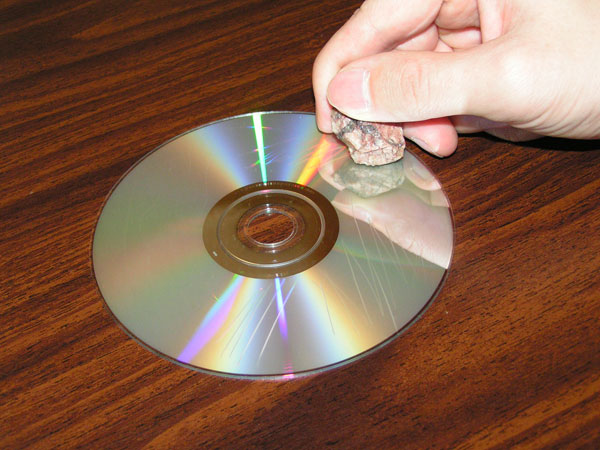
Photo 6. We thoroughly scratched the disc. The scratches were deep, but not so deep as to damage the information layer itself (they did not scratch the disk right through).

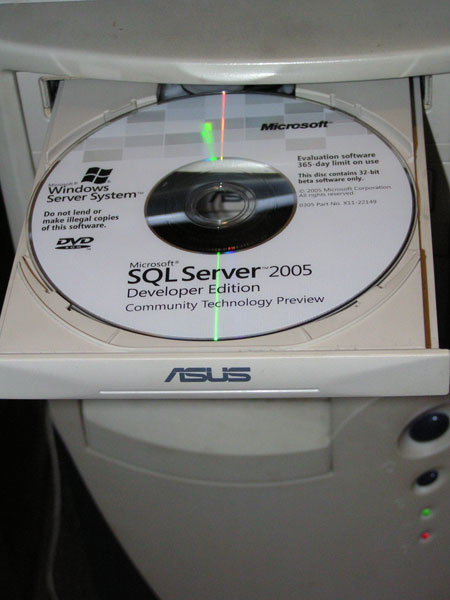
Stage 3. Checking the readability of a damaged disk.
Photo 7. We inserted the scratched disc into the drive and launched the Reliable Copy disc reading program. We are wondering if this program will be able to extract the data and check the number of files being read.
Screenshot 5. The copying program is trying to read our scratched disk. It can be seen that some files cannot be read at all, others only partially. 
Screenshot 6. The scratched disc has been copied. As can be seen from the table, only 142 files ( 5% ) were copied successfully, 2560 files were only partially read, and 8 files were not read at all.

The fact that the files were copied does not mean that they are intact. Let's perform a byte-by-byte comparison of the copied data with the reference copy using the Sync Last Files Professional program.
Screenshot 7. The Sync Last Files Professional program shows the result of the comparison. 
Screenshot 8. Close-up comparison result. 2568 different files were identified. 
As you can see from the table, there is a difference in the total number of elements shown by Sync Last Files Professional and Reliable Copy. There are several reasons for this:
- Sync Last Files Professional counts both files and directories. For example, there are 469 directories on our disk.
- "Sync Last Files Professional" excludes identical files and directories from the results, as it is designed to synchronize different files and directories.
- "Sync Last Files Professional" will synchronize when there is a file in one of the compared directories, but not in the other.
This means that Sync Last Files Professional should have found 2568 different files. 2562 different files were identified, which is less than expected. Why? This could happen due to the fact that some of the files copied at the first stage contained empty data (for example, there was a large picture in BMP format, the damage of which occurred in an empty space). But the main thing here is that damaged files no more than what the Durable Copy program considers damaged.
Stage 4. Grinding and polishing the scratched disc (first stage).
Photo 8. We prepared tools for polishing a scratched disc: a medium-hard toothbrush and toothpaste as an abrasive material.

Photo 9. We applied toothpaste to the brush and began sanding the disc.

Photo 10. The sanding process with a brush lasted only 10 minutes, after which we took a rag.

Photo 11. We abandoned the brush and took a rag instead. We applied toothpaste to the disc and polished vigorously for another 20 minutes, periodically wetting the disc with water. The change from a toothbrush to a rag was due to the fact that the rag was softer and more delicate than a brush, which itself left scratches, although it was soft. We hope that the abrasive force of the toothpaste and rag will be enough to polish.
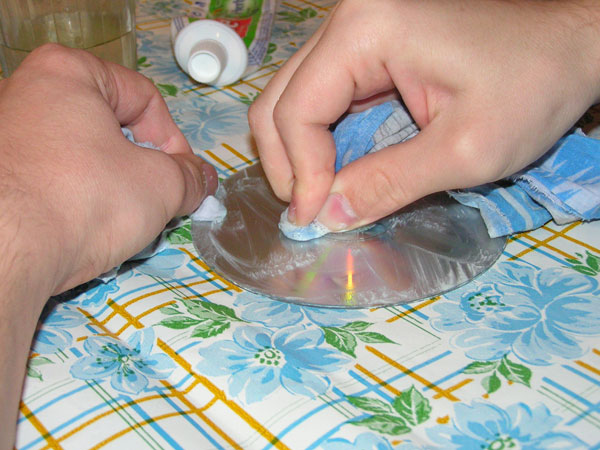
Photo 12. After that we washed the disc. As you can see in the photo, the surface of the disc is no longer shiny: it has become matte due to polishing. Our scratches are visible through the matte surface, which are no longer as deep as at the beginning.
Stage 5. Checking the readability of a polished disc.
Photo 13. We wiped the disk dry, inserted it into the drive and launched the “Reliable Copy” disk reading program.

Screenshot 9. 694 files successfully copied ( 26%
). Partially copied 2016 files. 0 files were not copied. 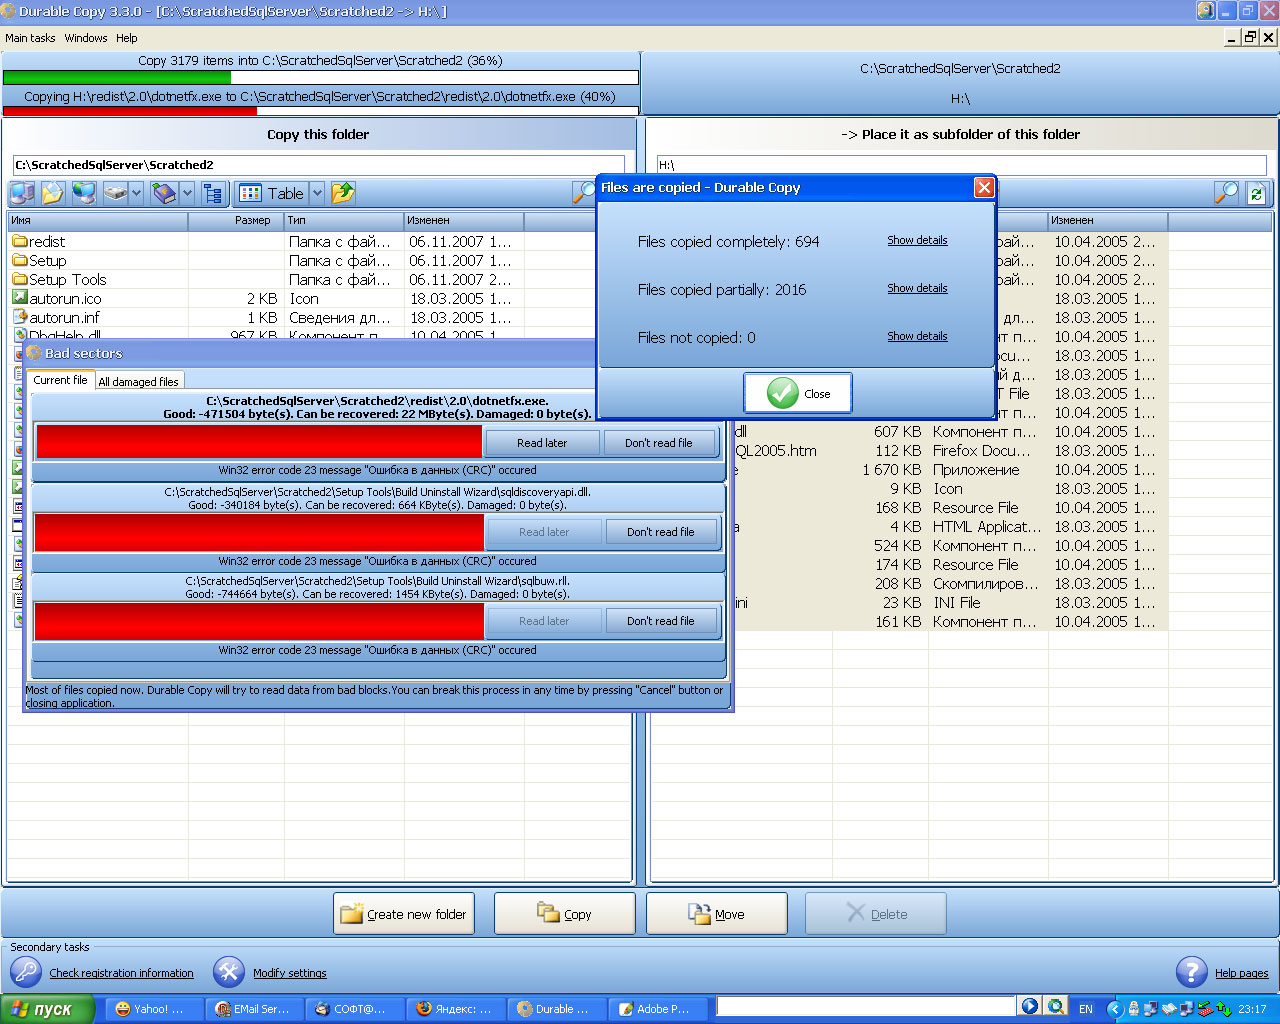
Screenshot 10. Result of comparison using the Sync Last Files Professional program.

Screenshot 11. Close-up comparison result.

Comparison of the resulting copy with the standard using the Sync Last Files Professional program in byte-by-byte comparison mode also showed positive dynamics. Different 2016 files. This means not only that we have improved the laser readability of the data, but also that the data itself really preserved under the scratched surface of the disc.
Stage 6. Polishing a scratched disc (second stage).
Photo 14. Inspired by our initial success, we again applied toothpaste to the rag and began to polish the disc with force. From time to time we wet the disc with water and continued polishing. The polishing process lasted 60 minutes.

Photo 15. We then washed the disc thoroughly with warm water.

Photo 16. We wiped the disc dry and saw the final result of our efforts: after polishing, our scratches became less deep, although we were not able to polish the disc completely. But we still see progress in polishing a disc using this method.
We inserted the disc into the drive and launched the Trusted Copy disc reading program.

Stage 7. Final check of the readability of a polished disc using the Reliable Copy disc reading program.
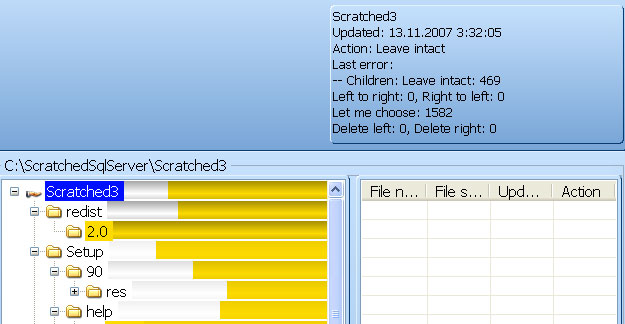
Screenshot 12. The program copies data from a polished disk.

Screenshot 13. Entire 1099 files copied ( 41%
). 1606 files were partially copied. 5 files were not copied. 
Screenshot 14. The Sync Last Files Professional program found 1582 different files using a byte-by-byte comparison.

Screenshot 15. Close-up result of comparison using the Sync Last Files Professional program.
And again we see positive dynamics: after extensive polishing, we were able to read an additional 405 files, while after the first iteration we were able to read an additional 552 files. At the same time, although the overall dynamics are positive, we see the beginning of progressive destruction of files by long-term polishing: after the first polishing, 0 files were unreadable, and after the second polishing, there were already 5 files.
Conclusions:
- Our experiment shows that retrieving data from a scratched disk is a solvable problem;
- Polishing the disc does result in data recovery due to better data accessibility to the laser;
- In 1.5 hours of polishing, we were able to extract 967 files from 2568 that were initially damaged, which was confirmed by byte-by-byte comparison of the files with the reference copy;
- Moderate polishing improves data accessibility to the laser, but prolonged polishing may result in data loss;
- Polishing works well on small scratches, but does not cope with deep ones;
- Polishing by hand is a labor-intensive and time-consuming process.
Xbox consoles read information from the surface of the disks using a laser. If the disc is scratched, the laser will be refracted, causing the disc to be unreadable or read incorrectly. However, you can try to repair a scratched Xbox disc using scratch fillers. For example, you can use toothpaste or lip balm. Read this article and you will learn how to repair a scratched Xbox game disc.
Steps
Part 1
Using toothpaste- However, you will not be able to change the situation if the disc is delaminated or cracked. Cracked disks have damaged structure, and delaminated disks deteriorate due to delamination of the substrate and polycarbonate base with data.
-
Wipe the disc with a soft cloth. Use a microfiber or other soft cloth to wipe the disc after you rinse it. Wipe the disc from the center to the edge. Avoid circular movements. This will prevent any more scratches from appearing.
Buy regular white toothpaste. You will need the appropriate toothpaste to repair a scratched disc. The toothpaste will act as a grinding tool, which will remove the thin top layer along with the scratches. To get the desired effect, you will need regular white toothpaste containing baking soda.
- Do not use gel toothpaste or one that contains whitening agents.
-
Squeeze some toothpaste onto the scratch on the disc. Apply a small amount of paste directly to the scratched area.
Use a cotton swab to spread the toothpaste evenly over the surface of the disc. Take a small cotton swab and rub the surface of the disc in a circular motion. Do this exactly as if you were waxing a car. Treat the entire length of the scratch.
- There is no need to put in a lot of force. Do this gently in a circular motion.
-
Continue sanding the disc until the scratch is completely gone or barely noticeable. New thin scratches from the toothpaste may appear, but the underlying deep scratches will disappear completely.
If this method doesn't work the first time, try the toothpaste option again before trying another method.
Wash the disc and dry it. Once you have removed all scratches, rinse the disc under running water and wipe it dry with a soft cloth.
Try starting the disk. After you remove the scratch with lip balm, try running the disc. Before installing the disc into the Xbox, you need to wipe off almost all the wax from it. A disc coated with a layer of wax may damage your Xbox console.
Rinse the disc. Before using toothpaste, rinse the disc to remove dirt and dust. You can rinse the disc with warm water over the sink.
Part 3
Usage " Magic eraser»Buy the Magic Eraser. To quickly remove deep scratches, try using a dry Magic Eraser. This is a special cleaning sponge designed to remove stains and scratches from various surfaces. You can purchase this product at a hardware store. Cheap versions of this product are also quite effective. The secret of this eraser is a material called melamine foam.
Use an eraser to remove scratches. Wipe the surface of the disc, starting from the center to the edges. Use enough force to remove the scratch. However, do not overdo it so as not to remove the entire surface layer of the disc.
Rinse and dry the disc. After you remove scratches with the Magic Eraser, rinse the disc under running tap water and wipe it with a soft cloth. Wipe the disc dry. Do this from the center outwards.
Try starting the disk. After you remove the scratch and rinse the disc, try starting it again. If it still doesn't work, you can try repeating the above process or try another method.
Part 4
Using the Disk Recovery ToolPurchase a tool to remove scratches from your disc. This tool can be ordered online or purchased at an electronics store. A device called SkipDr is designed to restore the readability of optical discs during their natural wear, in particular when the working surface of the disc wears out. Although you can also use other similar tools.
Rinse the disc with water and wipe it dry before using the tool to remove scratches from the disc. Rinse the disc with warm water to remove dust and debris, then wipe it with a microfiber cloth. As a rule, such soft fabric is already included in the kit.
Spray polishing liquid onto the working side of the disc. Before starting work, you need to treat the disc with a special liquid using the spray included in the kit. Apply the liquid in an even layer over the entire working side of the disc.
Insert the disk into the slot of the device designed for recovering damaged disks. Depending on the type of device you will be using, the disc loading process may vary. Make sure that the working side of the disc is facing the sanding attachment. Follow the instructions in the instructions so that you can insert the disc correctly.
Turn on the device designed to recover damaged disks. Press the button or turn the handle so that the disc begins to rotate. During the rotation process, the working side of the disk will be polished with special pads. You will likely have to repeat the process several times to remove deep scratches.
Hi all! It's a shame when necessary files cannot be read from the disk, but they are not on the computer! How can this be? It won’t help here, only the physical will help here disk recovery, and then software. There are many devices for polishing a disc, but what if you don’t have them at hand? That's why today we'll look at how to repair a scratched CD/DVD disc .
How to repair a scratched disk
For the sake of experiment, I took a scratched one dvd disk.

To recover cd or dvd disk You need to dilute the toothpaste with plain water in a 50-50 ratio. We mix well. I have green pasta with herbs, it’s expensive, but what can I do)))

Now take a napkin (preferably made of soft fabric, of course) and polish the disc from the center to the edge.

ATTENTION! The movements are as in the figure from the inside to the outside.

You cannot polish using circular movements! You can make the disk even worse. Polish the disc for about 20 minutes, dipping a napkin in water, thereby restoring cd disk. Apply pressure as if you were erasing a pencil from a sheet of paper. Watch carefully to ensure no new dents appear.

Over time, we try to put less pressure on the disk and check that the data on our disk is read. This is how you can restore a completely destroyed disk within two hours. To avoid this in the future, use special bags and bags so that you don’t remember the procedure again disk recovery! Well, then, it’s up to the programs, it’s not a fact that the disk has been completely restored, so read on!
How to restore a disc from scratches using the program
Of all the programs, I chose CD Recovery Toolbox. This program is free and simple. Download:

Launch it, select the dvd-rom containing the disc and click next.

We choose where we will save the files from the scratched disk.

Select the files or folders you want to restore. And click save.

The recovery process will begin. We wait until all files are restored to the selected folder.

When all files have been restored, the folder to which the files were restored will open. And the program will display a recovery log, which will contain a video showing which files were recovered and which were not.

Now we look at which files were recovered and which were not. If something was not restored, then we repeat the process from the beginning, only this time restoring unrecovered files. This is how you can restore a scratched disk.
You can also try to restore a scratched disk using a more rigorous method:
This will rather be a story with elements of a guide to recovering a disk from your own experience.
So, recently a friend of mine bought himself Xbox 360 along with the bundle Gears Of War 2, and for our outback this is a very worthy and difficult to find game. Therefore, I immediately suggested to him that I would give him 3 of my games, and he would give me his Gears Of War 2. Everything came to an excellent agreement. The next day I decided to call him, but his answer did not make me happy at all, namely, he decided to play it yesterday, but without playing it, he pulled out the disc an hour later and it turned out to be scratched in two places. I already knew that there are such cases with such a bundle and that we are not the first such, I was partially disappointed, because. got it, one might say, so difficult to reach and popular game and here it is.
Therefore, knowing that in M-Video You can’t prove anything that it’s not our fault, but the arguments that it’s not the first, and that there are such problems with this bundle won’t give them anything, because Our M-Video is poorly developed in terms of consoles, because... with the same purchase Xbox 360, sometimes you have to tell them what goes where in the package.
So to the point, we have Gears Of War 2 Bundle Copy, by the way, who doesn’t know what this version is, here you go:

As you can see Microsoft I even decided to save on paint =). IN at the moment I can’t show you the scratches because... I’m writing this article after restoration, but visually they looked like average-depth scratches in two zones of the disk, and there were several scratches in each zone. The zones were located on the last tracks of the disc, i.e. not near the center.
When inserting a disc into Xbox 360, he could not immediately recognize the disk, i.e. Xbox 360 diligently drove the head for 15 seconds, and it was loud, it was even alarming, after which the Reading inscription changed to the Start game inscription, but without the game icon, and from that moment I began to overclock the disk, as is usually the case at startup, but in As a result, it again slowed down and stopped completely; when you pressed Start game, the screen went out, but soon a window immediately popped up with the message something like, wipe the disk with a cloth, etc.
As a result, we have a completely unreadable and unrecognizable disk. Let's start treating!
Many of you have many ways, from the most delusional ones, to support it in the cold, or to press it down with a lot of weight, also to lubricate it with glycerin, etc., but there is another option, the so-called grandfather’s one, which is to polish it with toothpaste, and I am now ready to confirm , this is not a joke, toothpaste is the best and most effective method of restoration at home, no matter what kind of toothpaste.
What causes the disc to become unreadable is damage to the transparent layer of the disc, i.e. its structure is disrupted, and accordingly the laser passes through it. i.e. the beam gets lost due to the unevenness of the surface, so we need to make it as smooth and reflective as possible.
What you will need: any toothpaste (in my case, domestic 32 Norma, there was no other, don’t take it as an advertisement =)), and two rags, not hard (I just used 2 handkerchiefs).
Now let's go to the bathroom, closer to the tap, I mean. We put something very soft on some flat surface, maybe even some kind of towel or rag, BUT it must be clean, i.e. without any hard crumbs, sand, etc. small but solid particles. And we put our disk on it, picture down, scratches up, and apply a little toothpaste on top.

Then we begin to rub it in a circular motion with another clean rag (handkerchief),
after rubbing for a minute, your toothpaste will begin to dry out, but we don’t need this because... Drying will only make things worse.

Therefore, we take the disk and rinse it completely under hot water, or simply moisten it slightly with water, and then repeat the entire procedure.

The first time I did it, I spent 10 minutes on all this, after which I dried it and decided to try, but the disc was still not readable, ALTHOUGH it was determined faster, i.e. I reached the Start game point, then I decided to try again and already did the procedures for 20-30 minutes.
And from that moment on I made the most important mistake. I was in a hurry and didn’t check the rag, whether it was already covered in dried paste or whatever had fallen on it, as a result there were solid particles on it, and then you probably already understood what happened, it’s comparable to taking a little sand, throwing it on the hood of a car and starting wipe the car with a rag, as a result of which the reverse MOST IMPORTANT AND BEARING SIDE OF THE DISC with the picture was covered with several small scratches, RIGHT ALL THE WAY, i.e. transparent, it was already 100% known that the disk was completely damaged, but I only found out about it after I finished this procedure. :"(

But in the end, the disc was immediately obvious to the eye that it turned out cleaner, those scratches are now much less visible, and as if nothing had happened, although now the disc has become covered with very small but everywhere scratches, but they are not scary;), I’ll even add that as a result the disc began to have a painfully pleasant smell of mint =). At that moment, I already knew that everything was useless, but I still decided to insert it into the Xbox 360, when I inserted the Xbox 360 IMMEDIATELY identified it, I decided to try (there was nothing to do and in order to completely finish myself off) copy it to the hard drive, the disk accelerated as if only just from the assembly line, but I knew that soon it would suddenly stand up, and so it happened, it suddenly stood up at 43%, and gave a message that the disk was damaged.
Therefore, be careful and don’t be too lazy to rinse the rag again or change it.
But if somehow this happens to you, or the disc cannot be read, BUT it is still determined which game, i.e. there is a way out.
We just need to find the same game somewhere, from a friend or someone else, literally for an hour, take another one, insert it into our Xbox 360 and install it on the hard drive, then give this disc to the owner, and insert our scratched one, and indicate that the game from the hard drive, because When copying, Xbox 360 does not copy the disc ID, it serial number etc., it turns out that it does not compare at startup, but whether it was the same disk that was copied to the hard drive. This is how I play Gears Of War 2 now.
That's all, good luck!
CD/DVDs are an important means of storing data. You can store your favorite movies, songs, or even some important work projects on them. Discs must be stored in special packaging, and not in bulk in any box. But even if you handle the discs with the utmost care and in an appropriate manner, scratches cannot be ruled out on the surface of the discs.
This article will tell you about some simple ways get rid of scratches on CD. There are even special devices for polishing and “repairing” a scratched disc, however, these devices are quite expensive, so we will make do with “folk” remedies available in everyday life.
First you need to thoroughly clean the disk. This is necessary because sometimes dust and other contaminants can prevent the disk from reading data properly. In order to clean a CD from contaminants, you need to wash it in warm water and soap. You can also clean it with liquid soap, detergents or even alcohol.
Disk required clean away from the center of the disc to the periphery (i.e. to the edges of the disk). Necessary use a soft, lint-free cloth. After you wash the disc, you need to dry it. Do not dry the disc in the sun or under a lamp or use a towel.

If the CD does not work properly even after cleaning, then try turning it on in another player or drive. Often the cause of the problem is as much the disk as the laser of the “low” power of the player or drive.
If you begin to notice problems with reading data from a disk, and you value the data recorded on it, then you urgently need to make a copy of it or save its contents on your computer.
Please note How are the scratches located on the disc?. Their location directly affects the degree of disk damage. Scratches that are located perpendicular to the center of the disc have a much lesser impact on the functionality of the CD/DVD than scratches that are located spirally on the disc.
In a proven and reliable way Improving the quality of playback of a scratched disc is its polishing. For this you can use such means, like soda, toothpaste, alcohol, “anti-freeze” (window cleaning liquid). These products must be applied to the surface of the scratched disc and rubbed in a circular motion. As a doormat You must use a soft, lint-free cloth or wipes to wipe your glasses. The CD should then be washed and allowed to dry.
For polishing a disc you can also use polish for a car or neutral shoe polish.
After polishing a CD, check its surface. If you notice that the surface of the CD has become much shinier (although some small scratches may still remain on the surface), then this means that the polishing has given a positive result. If you do not notice any difference, even after polishing the disc, then the scratches on its surface are large and deep, and in this case ordinary polishing will no longer help.
If everything worked out for you, then you can safely turn on your favorite CD player and go to


