Hello dear blog readers. In this article I would like to consider in detail the issue of independent installing 1C software products on your computer using the example of the 1C ZUP configuration. Most regional 1C representatives, selling to clients software products, promise free installation, which will be included in the price of the purchased program. However, recently, purchasing 1C programs via the Internet with delivery to your region has become widespread. At the same time, the savings are significant. For example, one well-known online store offers to purchase basic versions of 1C ZUP for only 2,550 rubles. (versus 4,600 rubles from regional representatives of 1C - saving 45%) and 1C BUKH for only 2,599 rubles. (vs. 3,300 rub. – savings more than 20%). The only thing that may cause difficulty in this regard is installing the program. However, I assure you, and you will soon see this, that in installing the 1C program there is nothing supernatural and everyone can implement it on their own.
The installation of any 1C software product can be divided into three stages:
- Installation of the 1C platform– the platform is the foundation on which various 1C programs are built, be it payroll, accounting, trade and others;
- Setting up 1C configuration– the actual installation of the program itself or the configuration, as it is called in the documentation for 1C (ZUP, ACCOUNTING, Commerce, etc.);
- Creating a Database– if you start 1C, the first thing that will open is a window for selecting a database from the list. There may be more than one database in this list if you use 1C ZUP and ACCOUNTING, or keep records of several organizations in different information bases oh, and if you are a programmer or 1C consultant, then this list, as a rule, is a complete mess and chaos.
✅
✅
1C comes in the form of a box, which is why 1C is called a boxed product. This box contains an installation disk, an ITS (Information Technology Support) disk, and 1C books (usually 1 book about the configuration itself and several for 1C administration). To install the platform, you need to place the installation disk in the computer drive; a window will open where you need to select the installation of the platform. If the disk does not spin itself up and the window does not appear, then open “My Computer”, find the disk shortcut and go into it. On the disk you need to find either the autostart.exe file - to start the disk, or setup.exe - to start the installation. A welcome window will open, where you need to click “Next”.
Click “Install”. After this, the installation process will begin, after which you will be prompted to install the security driver.
After the installation of the platform is completed, a 1C shortcut should appear on the desktop, launching which we will see an empty list of infobases.

Setting up 1C configuration
✅ Seminar “Lifehacks for 1C ZUP 3.1”
Analysis of 15 life hacks for accounting in 1C ZUP 3.1:
✅ CHECKLIST for checking payroll calculations in 1C ZUP 3.1
VIDEO - monthly self-check of accounting:
✅ Payroll calculation in 1C ZUP 3.1
Step by step instructions for beginners:
Installing a configuration means installing 1C configuration templates, from which it will then be possible to create information bases for accounting. So, in order to do this, you need to reactivate the initial window that opens during promotion installation disk. In this window you must select a configuration setting. A welcome window will open, where we click “Next”.

Click the “Add” button. In the window that opens, select “Create a new information base” and click “Next”.
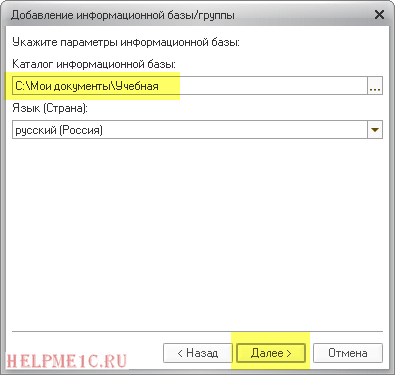
In the next window, enter the name of the database to be created. For example, Alpha ZUP LLC. Click “Next”.
The next window is final. It has a lot of settings, but it's better to leave everything as default. Click “Finish”.
Now you can launch the infobase. However, if you have 1C software protection (currently in the vast majority of cases), then when you first start the program you will have to obtain a license. To do this, your computer must have an Internet connection. Of course, there are ways to activate the program without the Internet, but this is not very fast or convenient. Select “Get a license”.

You must enter the “Set number” and “PIN code”. This data is in one of the envelopes that can be found in the box.

Actually, after entering this data, you can open the created information base and start keeping records.
That's all for today! I will be glad to see you again on my blog. New interesting materials will be coming soon.
To be the first to know about new publications, subscribe to my blog updates:
Login to the site as a student
Exercises on the internal programming language 1C 8.3: installing 1C
If you have not read the introduction to the exercises, please read it: .
Installation 1C
To perform the exercises we will need 1C 8.3 (not lower 8.3.13.1644 ) .
If you have 1C version 8.3 installed, use it. If not, download and install the educational version, which 1C produces specifically for educational purposes.
Exercise No. 1: download and install the educational version of 1C 8.3.
After completing Exercise No. 1, the following shortcut should appear on your desktop:
Exercise #2: write a program in 1C 8.3 language that, when launched, displays the phrase “Hello, World!” on the screen.
Instructions to follow:
1. Start 1C.
2. A list of 1C databases has opened in front of you. As you can see, it is empty. Let's create training base, in which we will program. Click " Add".

3. Select " Creating a new information base" and click the " button Next".

4. Select " Creating an infobase without configuration..." and click the " button Next".

5. Specify " Educational" and click the " button Next".

6. Specify any empty folder as the base directory (in this case it is the “Training” folder in my documents). Click the "Next" button.
7. Specify the authentication option " Select automatically", startup mode" Fat client". Do not specify anything as the 1C:Enterprise version, click the "Finish" button.

8. As you can see, the first database that we just created ourselves has finally appeared in the list. Let's start writing code. Click " Configurator".

9. In the window that opens, select from the menu " Configuration"->"Open configuration".

10. In the panel that opens on the left, click right click mouse on the word " Configuration" and select from the list " Open a managed application module".

11. A window with the editor has opened.

12. Write the following code:
| Report("Hello, World!"); |

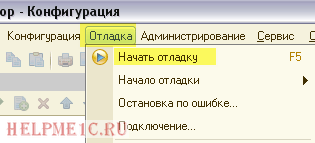
13. Great! The program code is ready. Run it. Through the menu " Debugging"->"Start debugging" (or key F5).
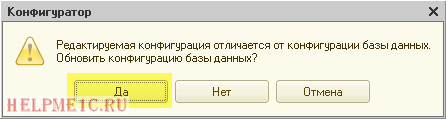
14. Answer the question in the affirmative.
15. After a second or two, 1C will start and the message “Hello, World!” will appear in the window below.

You will have to do the following exercises yourself.
For students
Second module - the most difficult at school. If you haven't programmed before, get ready for the fact that you won't be able to solve some of the problems the first time and without prompting.
Therefore, stop in time and ask the teacher if something is not clear even with hints.
As a last resort, go through all the remaining modules of the school, and then return with renewed vigor to solving the problems of the second module.
Login to the site as a student
Login as a student to access school materials
schastliviy
Installing and updating the 1C 8.2/8.3 platform for file version work.
In order to install/update the 1C 8.2 platform for the operating system Microsoft Windows we need its distribution. Let's consider the most common installation option for 1C Enterprise. For example, let's take the software product platform 1C Enterprise 8.2.19.106. Other versions of the platform are installed in a similar way.
Installing/updating the platform distribution kit version 1C 8.3 is similar to version 8.2 therefore this instruction suitable for her too.
Before you begin, you need to download the installation files for the 1C Enterprise platform distribution. If you have a subscription to ITS (Information Technology Support), everything is simple, go to the website users.v8.1c.ru and download what you need. For basic versions configurations, ITS subscription is not required. Detailed instructions for downloading the distribution from the users website.
It is also possible to install the distribution from the “ITS Add-on” disk. If you choose this installation option, you should pay attention to the date of its release, since the platform must be up-to-date, otherwise the configuration of a newer release simply will not start, giving an error. Detailed instructions for installing the distribution from disk.
So, the distribution kit has been downloaded, open the folder with the distribution kit and see the following picture:
Run the installer file named “setup.exe” highlighted in the figure above.
After starting the installation program, a welcome window opens, click the “Next” button

A window for selecting components opens, and the path to the platform files is also specified. It is advisable to select the first three points. Also, if, on a computer, you plan to use remote access to the bases, through thin client, or a web browser, you need to add a “web server extension module” (Works only with managed applications).

Next, a window for selecting the interface language opens. If you have a Russian speaking operating system Leave the default “System settings”, or choose at your discretion: 
Next, the installer reports that it is ready. Click “Install”: 
The program installs the components we have selected. We are waiting for the process to finish. 
Next, the installer asks whether we need a hardware key protection driver? If you use the “Hardware protection key” (USB device blue), then you need to leave the checkbox. If the licenses are software (Envelope with PIN codes), you can uncheck the box. In any case, you can install/uninstall the driver later, you can read about it. Click “Next”:

Next, if everything went well, we see the corresponding window. Click “Finish” and install the configurations: 
If you decide to start studying the 1C program, then good option 1C will be studied using video lessons. But at the same time, you cannot do without 1C installed on your computer. At the end of the article there is a visual video lesson ““. In general, the 1C installation process can be divided into two stages:
- Installation of the 1C Enterprise platform
- Setting up 1C configuration ( standard solution, eg. Accounting for Ukraine, Trade for Ukraine, etc.)
Let's look at how to install 1C Enterprise (platform)
To install 1C (platform) on your computer, you will need the distribution kit of the platform itself. There are at least three options where you can get the platform distribution:
- On the disks that are included with the 1C program
- On ITS disks (information technology support)
- If you have a subscription to ITS, then you can download these files from the website users.v8.1c.ru
We will consider installing 1C using platform version 8.3 as an example. Installing version 1C platform 8.2 is no different from 8.3, so these instructions are also suitable for it.
The distribution installation files look something like this:
To start the installation, open the setup.exe file and click “Next” in the window that appears:

In the next window we can select the platform components and the installation folder. In most cases, the composition of the components does not need to be changed; it is also recommended to install 1C in the default folder. Click “Next”:

In the next window, select the installation language and click “Next”:

Almost everything, finally click “Install”:

Waiting for the installation to complete:

Next, we are asked to install the protection driver. Driver installation is only necessary if you are using hardware protection, i.e. USB key. If you have software license those. without USB HASP key protection, then uncheck the box.

The installation program is complete. Click “Finish”:

The installation of the 1C Enterprise platform is complete. In the next lesson we will look at the topic: ““.
And here is the promised video:
Almost all users sooner or later wonder self-installation software 1C. Using the example of the “1C: Accounting 8” configuration, we suggest looking at how to install 1C on a computer or laptop. This is not only easy, but also cost-effective: independent initial installation or reinstallation will save both time and money.
Where to start?
Installation of a 1C software product, regardless of its accounting focus, consists of three key stages:
- Installation of a platform - an engine or foundation, which is the basis for the operation of any 1C program.
- Installation of the configuration part - direct installation user program accounting (1C: Accounting, 1C: ZUP, 1C: Trade Management, etc.).
- The final stage will be to create a new or connect an existing information database, which will be displayed in the program launch window when you click the shortcut. There can be several or even quite a few databases; displaying them in the form of a tree allows you to somewhat organize the list.
Let's look at each stage in detail.
Installation of the 1C platform
Boxed 1C software products are supplied in cardboard packaging, which includes:
- installation disk with distribution kits for installing the platform and supplied configuration;
- ITS disk;
- printed documentation in several books: usually a user manual and an administration manual.
The installation of 1C begins with the installation disk placed in the computer’s DVD drive, and the installation wizard starts, in the window of which you should select the “Installing a technology platform” item. If autorun of CDs and DVDs is disabled (no movement occurs on the screen when inserting discs), you should go to the “My Computer” shortcut to required disk and run either the autostart.exe file (to start the disk) or setup.exe (to start the installation). In the welcome window that opens, click “Next”.
In the next “Custom Installation” window, without delving into technological details, you can leave the default methods for installing components and click the “Next” button to go to the following screen:

In the next window, select the interface language:


1C provides two options for protecting the licensing of the product used:
- a physical USB key, which is becoming less and less popular;
- software protection using a PIN code.
Installing the security driver in the next window is only necessary for the USB version.

This completes the installation of the platform. A recognizable 1C icon will appear on the desktop, when launched it will open empty window list of user databases.
Setting up 1C configuration
This step boils down to deploying configuration templates from which you can create any number of databases for accounting. In the initial window of the installation wizard, select the “Configuration installation” item, move to the next screen by clicking “Next”:

In the next step, the user can leave the default directory or create a custom path where configuration template files will be stored. For 1C: Accounting 8, the Accounting folder will be created along this path:

The template is installed in the specified directory, and the installation of the configuration is considered complete:

Creating a new 1C database
When you launch the 1C shortcut that appears on the desktop, a window for a list of installed infobases opens, but it is still empty:

Click the “Add” button to select the first option; move to each next step using the “Next” button:

Selecting the first of the options in the next window will display a list of available second-stage templates from which the base can be deployed. Here you just need to select the appropriate one:

You should create a name for the database - as a rule, this is the name of the organization for which records will be kept:

The following screen allows you to select the physical storage path for the database on your computer disk:

The next window will be the last. It offers several settings that you can leave as default. By clicking the “Finish” button, the information base will be created:

Its creation will be recorded with a new line in the list of infobases:

In case of delivery with software protection When you first start the database, you will be asked to enter the kit registration number and PIN code from the sealed envelope included in the box.
If you have an Internet connection, click “Get a license” and in a couple of minutes you can start working.
Submitted detailed instructions“How to install 1C” shows that there is nothing tricky in this process: for attentive users who perform competent actions, everything will take no more than 20 minutes. We wish you good luck!