close
Computer prices
Today, consumers are less likely to buy a ready-made personal computer (system unit), to which it is necessary to subsequently connect a monitor, keyboard and mouse. Increasingly, the choice is being made in favor of laptops and monoblocks (all-in-one systems). If the user wants to get something special, then most likely he will prefer to assemble a computer from individual components on his own. However, this does not mean that traditional systems are already completely dying out, there are still quite a lot of them on sale and, if desired, you can choose a very good system for yourself at an affordable cost without wasting time on assembly.
The choice of a personal computer depends on what exactly you need it for. This will directly affect the cost - an inexpensive system for solving everyday tasks will cost much less than a high-performance monster that can easily run the most modern games. Therefore, the choice of a personal computer should begin with determining what exactly it will be used for.
By the way, recently the so-called. nettops - systems that are very compact in size and low performance. Their undoubted advantage is their small size, such a computer can even be hung behind the monitor, freeing up a lot of space on the desktop. In most cases, having bought a nettop, the user only needs to connect a monitor, keyboard, mouse to it and start working.
The disadvantages of nettops are no less obvious - there is practically no possibility of upgrading, at best, the user can only increase the amount of storage and RAM (by the way, this problem is also characteristic of monoblocks). However, systems with low performance become obsolete more slowly, and given the low cost, it will be possible in a few years to simply replace an outdated computer with a new one.
As for monoblocks, these systems will reduce the number of wires on the table to a minimum, especially if you use a wireless keyboard and mouse. When choosing here, special attention should be paid to the diagonal of the monitor and its resolution. After all, if you make a mistake in these criteria, then you can fix it later only by buying another computer, just changing the monitor is impossible here.
The existing system unit may not always suit the buyer. Therefore, we offer the online PC assembly function using the configurator. This mechanism will not limit you in anything, offering dozens of possible configurations for a stationary machine.
The process is a selection of different components, which are conveniently sorted into groups of devices from the processor and video card to the power supply and hard drive. Here, everyone determines for himself what hardware he needs, depending on the tasks that the computer must perform. Someone is assembling a gaming machine, which should have a powerful video card. Others require a processor and high performance to run graphics programs. All these checks are possible using our virtual PC builder on the site.
The functionality has a component compatibility check. When you select one component, those with which it will not work are immediately cut off, which will simplify the assembly task. After the assembly process is completed, the configuration will be available for purchase in the basket with a demonstration of the final cost of the assembled system unit. Our specialists will assemble a computer that was ordered via the Internet and test the system's performance.
You can pick up your system unit from our store in Moscow or arrange delivery to the desired region using a transport company. We work quickly, professionally and set fair prices for computers and components.
- Build for games average budget processor → six-core i5-8400, i5-9400F, Ryzen 5 2600. AMD's option is more suitable for streaming games.
- Assembly for games average budget video card → for FHD GTX1660, GTX1660Ti, RTX 2060 will take out 2K (1440r). For budget assemblies, we can recommend a video card from AMD RX 570 8GB, but RX 580 and RX 590 are not profitable to buy against the backdrop of fresh GTX1660.
- Pre-top assembly processor → i7-8700, i7-8700K , i7-9700K, Ryzen 5 2600X, Ryzen 7 2700. Eighth generation coffee pots with hyperthreading are better than their refreshes and are cheaper. The i7-9700K can only be recommended for gaming builds. Ryzens are better in multi-threaded tasks.
- Pre-top video card assembly → for 2K QHD RTX 2070, AMD RX Vega 64. NVIDIA video cards are more energy efficient and generally faster, so it makes sense to look at Vega only if these video cards are heavily discounted.
- Top build processor → i9-9900K , i7-8700K, i7-9700K, Ryzen 5 2700X. In the most top-end gaming builds, it makes sense to buy an eight-core, sixteen-thread i9-9900K processor.
- Top graphics card build → RTX 2080 Ti , RTX 2080, . For games in 4K UHD, the uncontested choice is the Nvidia RTX 2080 Ti graphics card.
Which computer to choose in 2018?
Due to the current difficult situation with the video card market and exorbitantly high prices, it is not necessary to talk about buying a budget computer in 2018. Players might be advised to switch to consoles - for example, the Playstation 4 Pro/1TB is now worth as much as the average GTX 1060 graphics card.
The rest of the pack boyars have to moderate their graphical appetites and choose a video card one level lower. They wanted to take the GTX 1080, now, God forbid, scrape together on the GTX 1070. Thanks to the gentlemen of the miners and a small cartel conspiracy of video card manufacturers, who, in turn, kick at the manufacturers of RAM, allegedly the latter exorbitantly inflate the prices of their products and, on top of that, disrupt the supply of GDDR5 chips so necessary for the production of video cards.
So all the same, how to build the best computer in 2018? Which processor and motherboard to choose for it, how to choose a video card and optimal RAM - read below!
Top computer (enthusiast), budget from 100 thousand rubles
gaming computer
We prefer the latest generation Intel processors Coffee Lake. The most expensive in the coffee line is the i7 8700K. The motherboard on the older Z370 chipset is suitable for the processor. The Z370 will allow you to overclock the processor and increase the frequency of the RAM in case the performance in the stock is not enough.
Memory for a gaming PC is enough 16 gigabytes. It is advisable to buy a 2x8 GB kit for memory operation in dual-channel mode. The performance of the system as a whole directly depends on the frequency of the RAM, so it is advisable to choose DDR4 sticks with a rating of ~ 2666-3000 MHz. Also pay attention to timings. Memory with low latency CL14/15 is more expensive than a typical CL16. By the way, the profit from low timings is more noticeable on Intel processors, on AMD Ryzen, the high operating frequency of the RAM will be of great benefit.
The main thing in a powerful gaming computer, of course, is the video card. The top models of the Nvidia GTX 1080 Ti are best suited for gaming builds. However, video cards now cost an indecent amount even for wealthy gamers. Therefore, we can advise you to pay attention to video cards of the GTX 1070 Ti, RX Vega 56/64 level. Wealthy gentlemen choose monsters like the Titan V, although it is more difficult to buy the latter than the iphone x on the day of the start of sales. According to the latest insiders, you should not expect price reductions with the release of the two thousandth series of jeeforces, unless of course you are ready to wait forever. For comfortable gaming in 4K, one 1080 Ti with ultra graphics settings will not be enough, if finances allow - get two GTX 1080 Ti video cards.
Installing an SSD drive will help reduce the boot time of the system and games. For optimal performance, it is worth spending on two disks - allocate one disk for the operating system with a paging file, and install games and applications on the second.
Hard drives are selected based on needs. Models up to 14 TB are currently on the market. If you do not work with huge amounts of information, it is quite possible to do without classic HDDs. However, remember that in the event of a failure, it is quite difficult, and most likely impossible, to recover information from a solid state drive. So regularly back up important data to an external HDD.
Computer for work
For work tasks (programming, rendering, editing, modeling, photo processing, and more), both the presence of fast cores and their number are important.
We recommend paying attention to the top-end Ryzen 7 1700 on the AM4 platform, as the most budget eight-core processor. The desktop Ryzen 7 uses the AM4 platform, so you can easily upgrade an existing PC that uses an AMD Ryzen processor. By the way, AMD will support the AM4 socket for another 2-3 years, so you won't have any problems with a future upgrade.
For the serious guys, the Intel LGA2066 platform is the way to go, with a wide range of processors ranging from the ultra top 18-core i9-7980XE to more affordable octa-cores like the i7-7820x. For Skylake-X processors, rather expensive motherboards based on the X299 chipset are suitable. The chipset supports quad-channel memory, has a large number of free PCIe lanes, which allows you to connect several fast devices (video cards, nvma drives).
It is also worth considering assembling productive systems based on AMD Ryzen-ThreadRipper processors. Only three processors are available in this line: the eight-core 1900x, the twelve-core 1920x and the older 1950x ripper are equipped with sixteen cores. Threadrippers require a motherboard with a TR4 socket based on the X399 chipset. The characteristics are similar to the X299 platform from Intel, but AMD costs a third less. The only downside is non-standard mounts for the cooling system and a small assortment of TR4 motherboards.
Pretop computer, budget 80 - 90 thousand rubles
Great computer for work and play. On this system, you can equally comfortably play a popular game, or render a project in Premiere or Blender. Note that Intel processors are more suitable for building gaming systems, and the eight-core Ryzen for workstations.
Medium - mainstream computer, budget 60 - 70 thousand rubles
Optimal PC for gaming at FHD 1080p, also great for office applications. Recommended graphics card is nvidia GTX 1060 with 6 GB of memory. The price tag on the RX 580 is now too high.
In this category, Intel fans have some problems - in particular, Intel has not yet given birth to budget motherboards for the 1151v2 socket (B360, H370, H310 chipsets), so you will have to buy an expensive motherboard based on the Z370 chipset. AMD has no such problems - for the popular Ryzen 5 1600 processor, you can choose any motherboard on socket AM4 (A320, B350, X370). The mid-budget motherboard based on the B350 has overclocking features and has everything you need to build a high-performance computer, while the price tag for such motherboards is half that of the similar Z370 from Intel.
Budget option 35 - 40 thousand rubles
RAM: 8-16 GB 2400-2666 MHz
For a gaming system without a graphics card, we recommend AMD Ryzen 5 2400G with a built-in Vega video core, which delivers GT1030/RX550 performance. The computing power of the R5-2400G processor is comparable to the R5-1500X, which makes it possible to upgrade in the future - you just need to buy a powerful video card without changing the processor. It is worth noting that the Ryzen 5 2400G out of the box is guaranteed to work with memory at a frequency of 2933 MHz (instead of 2400 MHz for desktop ryzens).
Ultra-budget assemblies up to 20 thousand rubles
Such assemblies are suitable for mining farms or media centers.
The cheapest processor is taken, for example Celeron G3930, equipped with an integrated Intel UHD 610 video core. This budget processor is capable of playing online video with 4K resolution.
4 GB of DDR4 RAM is enough for a media center. Any frequency is suitable, starting from the standard for DDR4 2133 MHz. We recommend taking the cheapest "green" chips from Samsung, this RAM is quite reliable and at the same time it accelerates well.
A discrete video card in the ultra-budget segment is not considered.
Popular Builds - Good PCs 2018
3DNews has a large and diverse audience. The resource is visited by both seasoned enthusiasts who have assembled far from one PC, and readers who are just starting to delve into all the intricacies of computer technology. The test lab elegantly overclocks them to serious frequencies, to study the durability of drives, in modern games and to purchase unusual hardware abroad, but at the same time, it does not forget about inexperienced users. So the heading "" appeared, which offers a variety of configurations of system units. After reading the comments and personal communication with the readers of the site, it became clear to me that it was time to tell in detail and show newcomers how to assemble the components proposed in the article into a single whole. This is what this article is about.
⇡ Selection and compatibility of components
Sometimes it’s harder to decide on a set of components that will make up your PC than to assemble a system unit at home with your own hands. On sale you can find a huge number of processors, motherboards and video cards. You can argue for a long time about which brand is preferable, as well as discussing whose graphics are faster - the main thing is that when you finalize the configuration, all hardware is fully compatible with each other. By the way, it is precisely such systems that I offer in "". Subject to this rule, the assembly of the system unit is not much different from the game of constructor, in which all the parts fit together. Component sizes, mounting hole parameters and connectors - all computer elements are strictly regulated, and therefore, for example, it cannot be that DDR3 RAM suddenly works on a motherboard with DIMM slots designed to install exclusively DDR4 modules. You simply cannot install them in the appropriate slots.
For the full functioning of the system unit, you must purchase the following devices: motherboard, central processor, cooler, RAM, hard drive or solid state drive, video card (if the CPU or motherboard does not have an integrated graphics core), power supply and case. Additional components include an optical drive, as well as all kinds of discrete devices: network and sound cards, additional cooling.

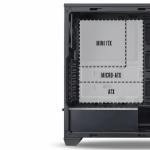
The motherboard is the backbone of any computer. It depends on it which processors will be used, how many RAM modules, video cards and drives can be installed. Motherboard dimensions also play an important role in case selection. At the moment, among motherboards, solutions of the form factors E-ATX (305 × 330 mm), ATX (305 × 244, 305 × 225 or 305 × 199 mm), mATX (244 × 244, 244 × 225 or 191 × 188 mm) and mini-ITX (170 × 170 mm), although there are much more standard sizes of such devices. The form factor is always listed in the chassis specifications.
The “home” for components itself is also divided into types depending on the size and shape. As a rule, the larger the computer case, the more powerful hardware we can install in it, while ensuring high-quality cooling of all system components. Dependence, however, is non-linear - practice shows that it is quite possible to assemble a powerful gaming PC in compact cases with a volume of 7-10 liters. You just have to carefully select all the components first.
Among PC cases, four types of models are most popular: Midi-Tower (examples - and), Full Tower (), Mini-Tower () and Slim Desktop (). Naturally, the smaller the device, the fewer seats it has for installing discrete video cards, drives, and case fans. For example, the Node 202 with a capacity of 10 liters can only install 2.5-inch hard drives and SSDs. A conscientious manufacturer indicates all these features in the technical characteristics of the device.
When choosing components, pay attention to other limitations that any computer case has:
- maximum height of the CPU cooler;
- maximum length of the video card;
- maximum length of the power supply.
Before buying equipment, be sure to make sure that all devices are compatible with each other, do not conflict and fit exactly in the computer case. The simplest logical chain that will not allow you to purchase components that do not match each other is as follows:
- We determine the model of the central processor.
- We select a motherboard with a suitable socket for this CPU.
- We study the list of compatible motherboard hardware on the official website and select a set of RAM.
- Choose drives that are compatible with the motherboard.
- We select a video card, power supply, processor cooling and a case that will fit all the components.
Again, the above sequence is by no means an axiom. Since building a PC is always a creative process, the sequence of choosing hardware can change. For example, you liked a certain case and want to assemble your dream system only in it. Or do you already have some components on hand, and you need to buy everything else.

If the system unit will use an unattended water cooling system for a processor or video card, then it is additionally necessary to find out the sizes of supported radiators, as well as the places where they can be installed. It is obvious that the seats for installing the SVO coincide with the places where the fans are attached. Single-section radiators are usually installed on the rear wall, two-section and three-section - on the top and / or front.

To write this material, based on the above sequence for selecting components, I used the following set of devices:
- AMD Ryzen 7 1700 CPU, socket AM4, 3.0 (3.7) GHz;
- MSI X370 GAMING PRO CARBON motherboard, socket AM4, X370 chipset;
- RAM Kingston HyperX Fury (HX426C16FR2K4 / 32), 4 × 8 GB, DDR4-2666;
- solid state drive;
- video card;
- power supply Cooler Master MasterWatt, 500 W;
- case Cooler Master MasterBox 5 MSI Edition;
- processor cooling Cooler Master MasterLiquid 120.
As you can see, in preparing this material, the most common form factors are used - ATX for the motherboard and Midi-Tower for the case. Similar options are offered in the "Computer of the Month" - because this size is the most versatile and most popular. True, I cannot say that the assembly process in Mini-Tower and Slim Desktop cases is fundamentally different. It's just that the requirements for the selection of iron compatible with each other turn out to be much higher.
In addition, I note that when selecting devices, all modern trends are taken into account. The main drive is the Kingston HyperX Predator model with a PCI Express interface. And the choice in favor of Cooler Master MasterBox 5 MSI Edition was made because of the possibility of installing a power supply unit in the lower part of the chassis, as well as the presence of a mount for drives on the barrier wall. Plus, maintenance-free liquid cooling systems are very popular. Cooler Master MasterLiquid 120 is a bright representative of one-section dropsies, which are ready to work out of the box. The remaining components are selected in such a way that in the end we get a productive system unit for work and entertainment. The optical drive has not been used. In my opinion, in 2017 there is no need for it, and the Cooler Master MasterBox 5 MSI Edition (as well as many other new cases of this format) lacks seats for installing devices in 5.25-inch bays.

To assemble the system unit, you will definitely need two Phillips screwdrivers with different slot diameters, nylon ties and wire cutters. Pliers may come in handy - in cheap cases, threads are cut by eye, as well as double-sided adhesive tape, degreasing liquid and cotton swabs. In order not to scratch the case and not damage the motherboard, I put all the components on a rubber mat. An anti-static wrist strap or gloves are also useful for beginners, but, to be honest, more to give self-confidence. Since assembling a PC includes connecting small connectors to the motherboard, you definitely cannot do without good lighting or a flashlight at hand.
⇡ Step #1. Installing the processor and RAM
The motherboard user manual always contains a description of the installation of all major components and connectors. Beginners, keep this book with you. The sequence of steps for assembling the system unit may vary depending on the type of components. For example, sometimes it is better to install a processor cooler immediately, and sometimes - in the penultimate or last place. Even before fixing the motherboard in the case, you must install the CPU and RAM in the appropriate slots.

You probably know that AMD and Intel processors are structurally very different from each other. So, for AMD chips, the protruding contacts, called “legs” by the iron workers, are located directly on the textolite substrate. But Intel chips do not have such elements - for these CPUs, the contacts are placed directly in the motherboard socket.
AMD chips are installed very simply: raise the lever, put the processor on a plastic substrate, lower the lever.

As for Intel solutions for LGA115X platforms, a similar technique is used here: together with the lever, we raise the clamping frame, install the processor, lower the lever and the clamping frame.

In the case of the Intel LGA2011 and LGA2011-v3 platforms, two levers must be released from the locking slots to raise the clamping frame.
|
|
|


Please note that all CPUs and motherboards are equipped with pointers and so-called foolproofing. In principle, you will not be able to install the chip into the socket in any other way, so NEVER use force when assembling a computer. All elements in the system unit are equipped with protection against incorrect connection. In addition to the CPU, you will not be able to connect power supply cables, case connectors, fans, discrete devices, drives and RAM in any other way. More precisely, you can, but this will require maximum effort. I think it's not worth talking about the consequences of improper installation of PC components.

After the CPU, I install RAM into the DIMM slots, usually located on the right side of the CPU. MSI X370 GAMING PRO CARBON supports DDR4 RAM, four ports are soldered on the printed circuit board at once. In some motherboards, there may be only two of them (most often these are either the cheapest devices, or mini-ITX form factor solutions, or), in models for the LGA2011 and LGA2011-v3 platforms, eight. Usually on PCB all DIMM slots are marked.
Most modern AMD and Intel processors have dual-channel RAM controllers. Therefore, motherboards use either two or four DIMM slots. Therefore, the installation of either two or four RAM modules is considered optimal. In the first case, RAM is installed through one connector. Some motherboards have special pointers. For example, in the MSI X370 GAMING PRO CARBON, modules are installed in the DIMMA2 and DIMMB2 slots - in this case, the RAM will work in dual-channel mode. In other motherboards, there are inscriptions like - in such cases, to ensure the operation of the dual-channel mode, the modules must be installed in the DDR4_A1 / DDR4_B1, DIMM_A1 / DIMM_B1 and DDR4_1 / DDR4_2 slots, respectively.

"Fool-proof" in RAM
I have already said that it will not work to insert the RAM incorrectly, since a jumper is used in the design of the DIMM connectors. It is also used to prevent the user from "squeezing" modules of another standard into a motherboard that supports DDR4.
RAM boards are fixed using latches located along the edges of the DIMM slots. On some motherboards, these latches are located on only one side of the connectors. This is done so that the user can freely change RAM modules without removing, for example, a video card.

After installing the CPU and RAM, you can immediately install a CPU cooler, but only if its design uses a small heatsink. The use of an overall cooling system will make it difficult to install the motherboard, as well as the subsequent connection of wires. The photo above shows examples of installing boxed coolers - the so-called COs that are sold together with processors. Coolers for AMD AM3+ and FM2+ platforms are attached using plastic "ears" - a special metal bracket with lugs clings to them. Boxed cooling for Ryzen chips is installed differently, here you have to work with a screwdriver: first remove the plastic mount, and then screw the heatsink to the backplate. The cooler for Intel processors is attached using plastic clips: install the heatsink on the CPU and press the latch until you hear a characteristic click. In general, in the case of installing boxed cooling systems, even beginners should not have problems.
Some coolers already have thermal paste on the soleplate - its use significantly increases the efficiency of heat removal from the CPU. In any case, thermal paste is always included with the CPU cooler. For example, Cooler Master MasterLiquid 120 came with a small tube, which, nevertheless, should be enough for 3-4 times. Please remember to remove the protective film before installing the cooling system, if any, on the base of the device. The process of applying thermal paste is described in paragraph number five.
But the installation of other coolers is carried out on an individual basis, since each manufacturer uses a fixing kit of his own design. Therefore, immediately take out the instructions from the packaging from the CO. Most devices are equipped with universal mounting mechanisms that are suitable for both AMD and Intel processors. True, the mating part of the mount, which must be pre-fixed on the board, is different for different platforms. The list of supported equipment, as well as the dimensions of the cooler, are always indicated in the technical specifications. And yet, there are enough models on sale that are compatible with only one specific platform.

Once again: if the device is large or, as in my case, a maintenance-free liquid cooling system is used, then at the first stage it is enough to fix the back plate and frames on the board, which will hold the cooler radiator. We will install the radiator itself in the penultimate turn, after all the cables are connected to the motherboard. Yes, in cases of the Cooler Master MasterBox 5 MSI Edition level, the barrier wall has a window for accessing the cooler's backplate, but it is far from always convenient to use it.

If we talk about air processor coolers, then the tower-type coolers are considered the most popular. Depending on the platform used and on the specific model, the CO radiator can be installed in two positions. In the first case, the cooler fan will blow air through the back wall of the case, in the second case, through the top. The correct installation option determines the shape of the enclosure used. So, in the case of models of Full-, Midi- and Mini-Tower formats, it is better to use the first option. It is important that the CO used does not overlap the expansion slots, and also does not rest against the cooling elements of the motherboard power subsystem. For example, MSI X370 GAMING PRO CARBON does not conflict with even the largest cooling towers. Also, a wide CPU cooler can interfere with the installation of RAM modules with tall heatsinks. Therefore, it is better to use compact RAM kits, such as the Kingston HyperX Fury for example, or make 100% sure that CPU cooling and memory will not conflict with each other.
Our build uses the maintenance-free Cooler Master MasterLiquid 120 liquid cooling system, so it will be installed last but one (step #5).

Cooler and case fans are connected to the motherboard using 3- and 4-pin connectors. The MSI X370 GAMING PRO CARBON has six such elements soldered at once, which is very convenient. The number of such ports is not regulated in any way, but at least two connectors must be present on the board: for connecting a CPU cooler fan and for a system (case) impeller. All connectors are marked accordingly: CPU_FAN, SYS_FAN (or CHA_FAN). Sometimes a 4-pin connector designed for a processor cooler is highlighted in a different color (most often white). And in the boards of the middle and high price ranges, you can find the PUMP_FAN connector. It is designed to connect the rotor of a water cooling pump, but at the same time it is suitable for any other fans. It's just that a larger current is transmitted through this port.
The connector with three pins does not allow you to adjust the speed of the fan connected to it. But the 4-pin port has such an opportunity, and modern motherboards can control the speed of the “turntables” both with pulse-width modulation (fans with four pins) and without it (fans with three pins).
With a shortage of connectors for connecting case fans, all kinds of adapters will help. This can be an ordinary splitter that allows you to connect several impellers to one 3- or 4-pin port at once. Or a cable connected to the MOLEX or SATA connector. And there are devices such as, although their popularity has never been high. However, they are initially equipped with simple (most often three-position) controllers that control the fan speed by lowering the voltage from 12 to 7 or 5 V.
In the case of our PC, there is no need for additional adapters and splitters, since only two CBO fans and one case impeller need to be connected to the motherboard.
⇡ Step #2. Installing the Motherboard and Connecting the Case Connectors
Now that the CPU and RAM are connected to the motherboard, it's time to start working on the case.

For a long time, in tower cases, the power supply is installed mainly from below. This was done both for aesthetic reasons (it is more convenient and easier to lay wires), and for the sake of increasing the cooling efficiency, primarily of the PSU itself. However, on sale there are models of cases with other options for installing a power supply unit.

Seats for installing the power supply, 2.5- and 3.5-inch drives
The Cooler Master MasterBox 5 MSI Edition is designed with a small sled cage that holds two 3.5-inch hard drives. More compact 2.5-inch drives are mounted on a barrier wall.

Installing the motherboard begins with securing the I/O panel blank in the rectangular hole provided for this purpose. You won't have any difficulties. The plug is always included with the motherboard.

Mounting accessories are always supplied with the housing. Along with the Cooler Master MasterBox 5 MSI Edition, I found three types of screws, as well as plastic clips for installing additional fans. Other housings may have more mounting options. On some models, the standoff screws needed to mount the motherboard are already screwed into the corresponding threaded holes on the barrier wall. In the case of Cooler Master MasterBox 5 MSI Edition, you will have to do this procedure yourself.

So, the case supports the installation of mini-ITX, mATX, ATX and even E-ATX form factor motherboards. There are symbols on the wall (a similar memo is used in many models). Since the assembly uses an ATX form factor board, it is necessary to screw all eight stand screws into the threaded holes marked with the letter "A". However, not all motherboards related to this size correspond to the length and width parameters of 305 × 244 mm. For example, the MSI X370 GAMING PRO CARBON is already 19 mm, so it cannot be fixed in the case along the right edge. Therefore, when connecting wires from the power supply or mounting memory modules in DIMM slots, the PCB will sag. Install these items carefully in such cases.

After the motherboard is fixed, I personally immediately connect the controls and connectors of the front panel of the case. On the front wall of the Cooler Master MasterBox 5 MSI Edition, there are two USB 3.0 A-type ports, two 3.5 mm mini-jacks for headphones and a microphone, as well as system power and forced reboot keys. Difficulties can arise only when connecting controls - this is a bundle of wires with Power LED- and Power LED + connectors (transfer information to the computer status indicator), Power SW (responsible for the operation of the power key), HDD LED- and HDD LED + (transmit information to the drive activity indicator ), as well as Reset SW (responsible for the operation of the forced reboot button). Some elements may not be on the “face” of the case, since not all devices are equipped, for example, with a Reset key or LED indicators. However, in all cases, these connectors are connected in a certain sequence, as shown in the table below. It's just that motherboard manufacturers use their own designations for essentially the same pad: JFP1 in MSI motherboards; PANEL at ASUS; PANEL1 on ASRock and F_PANEL on GIGABYTE.
| Power LED+ | Power LED- | Power SW | Power SW |
| HDD LED+ | HDD LED- | Reset SW | Reset SW |
In addition, among the internal connectors on the motherboard, there may be contact pads for connecting USB 3.1 and USB 2.0 ports, RGB strips, a TPM module, FP audio, and a speaker.
PC Configurator is an easy way to assemble a computer online with checking the physical compatibility of components.
Let's start compiling. We add the first element - the central processing unit (CPU). When selecting components, the appearance of the installed nodes is visualized. The price is calculated automatically online, consistently forming the cost of the finished PC. The constructor program in a couple of clicks helps to assemble and buy a system unit from scratch, assigns an assembly identification number, saves a link. If necessary, print the saved configuration. There is an option to get the opinion of an expert using the feedback form.
Assembling a computer is an exciting process. Available - top-end GEFORCE RTX video cards, latest generation Intel processors, RAM with passive radiator cooling and RGB backlight, high-speed SSD drives, plus capacious HDD drives. Choose Asus Msi Gigabyte motherboards, spacious cases on aluminum chassis, Corsair, Thermaltake, Seasonic power supplies. Our designer knows how to solve difficult problems. Allows you to collect gaming computer, a productive graphics station, a machine for professional audio and video digitization.
When you have configured the PC, click the "Checkout" button. Fill out the standard form, then you will receive an email with confirmation and order details. Managers of the Edelweiss store will contact you, answer your questions and agree on the time and terms of delivery or pickup. The sales department will configure the selected PC, deploy licensed software (if you choose an OS), install the necessary drivers and utilities. Be sure to update the BIOS to the latest available version. PCs are tested with specialized software at full load for 4 hours.
Additional bonuses for clients
- discuss the benefits of assembly with an engineer using the code
- the ability to quickly select a computer at a price online
- product customization
- information support, characteristics and descriptions of used nodes
- free delivery in Moscow, fast delivery throughout Russia