Many users who have been accustomed to the graphical interface of Windows XP for many years, working in the Windows 7 operating system, face a number of problems, which are primarily related to the new look of the interface.
Some users attribute this problem primarily to the lack of classic buttons on the Windows Explorer Toolbar, such as Cut, Copy, Paste, Delete, etc. As you know, Windows Vista and 7 Explorer does not contain these buttons and users must use keyboard shortcuts or context menu commands to access these commands.
Others face another problem - the redesigned look of the classic Start menu. In Windows 7, the Start Menu looks a little different than the classic version in XP.
Today I will review one free utility that can bring back the Classic Start Menu in Windows 7, as well as easily add the Classic Toolbar to the Windows Vista and 7 folder interface.
"Classic Shell" is a small free utility that allows you to:
- Bring back the Classic Start Menu in Windows 7
- Install Classic Toolbar Buttons (Cut, Copy, Paste, etc.) in Windows Vista and 7 folders
- Bring back the classic menu view in Internet Explorer 9 (page title and page loading indicator in the status bar)
Download Classic Shell:
Version: Version 3.1.0
OS: Windows Vista/7
The following is a brief description of each of the Classic Shell elements and screenshots of them.
Classic Windows 7 Start Menu
plugin Classic Start Menu recreates the original look of the classic Windows 7 Start Menu found in all versions of Windows from 95 to Vista. In addition, this element has a number of additional functions:
- With a simple drag and drop you can arrange all your applications
- Additional options allow you to display Favorites, Control Panel and many other folders in the Start menu
- Displays a folder with recently opened documents. There is also an option to adjust the number of documents displayed
- Multilingual interface (supports 35 languages), includes right-to-left text display support for Arabic and Hebrew
- Does not disable the standard Windows 7 Start menu. You can access it by holding the Shift key and clicking the Start button
- Right-clicking on any shortcut in the Start menu opens a context menu with commands Delete, Rename, Sort, etc.
- The search bar in the Start menu has been replaced with a similar item, just like in the standard Windows XP Start menu
- Supports 32 and 64-bit versions of operating systems
- Built-in support for skins, including skins from third-party creators
- Fully customizable and feature rich interface
- Support Microsoft Active Accessibility
- Converts the All Programs button on the Windows Start menu to a cascading menu
- Last but not least, the program is completely free.
Windows 7 start menu skins included in the plugin Classic Shell:


Click on the picture to enlarge

Click on the picture to enlarge

Click on the picture to enlarge
Choose from 8 standard skins, the one you like. If there is none, you can download other skins from the Internet or make your own! Check out the Skinning Guide.
Classic View of Windows 7 Explorer Toolbar
Classic Explorer is an add-on for standard Windows Explorer that allows you to:
- Add Toolbar to Explorer to access some system commands and operations (Move to Root Folder, Cut, Copy, Paste, Delete, Properties, Email). The toolbar is fully customizable.
- Replace window interface copying in Vista and Windows 7 operating systems to a more user-friendly "classic" option, similar to that used in Windows XP
- Using the Alt+Enter key combination while a folder is selected, in Windows Explorer, launches the Folder Options dialog box
- Ability to customize the Folder Panel to look exactly like it does in Windows XP
- Function to display free disk space and total file size in the status bar
- Ability to disable a series of links separated by arrows in the Address bar
- Fixed a list of features that are not in Windows 7 - no option to create a shared folder, pinning folders in the navigation bar, no sorting of titles in list view, etc.
Windows Explorer in Vista does not have the toolbar that Windows XP does. If you want to go up one level, you will need to use a series of links separated by arrows in the Address bar. If you want to copy or delete a file using the mouse, you will need to right-click and select Delete. A right-click brings up a context menu, which is sometimes quite large due to the commands built into its shell, and sometimes finding the right command can be very difficult.
Windows Explorer toolbar
To solve this problem, I advise you to use the Classic Explorer plugin, which adds a new panel:

Hold key control(Ctrl) while pressing the button Up(on the Explorer panel) to open the root folder in a new Explorer window.
Hold key Shift, while pressing the button Delete(on the Explorer panel), in order to delete the file once and for all bypassing the trash.
Additional Up button(go up one level)
Some users are wondering if it's possible to make a Back Up button and place it next to the Back/Forward buttons in the top bar of File Explorer. If the Up button is the only button you need, this will save you a lot of panel space:

Right click on the Up button brings up the Classic Explorer menu items
In Vista, while copying files, sometimes the following window may appear:Copy window interface

What's new in it?
First, the appearance of the window has changed - now it takes up most of the screen, and also contains several lines of text that you need to read before pressing any specific button.
Also, at first it is not clear which elements of the window are active and which are not. To do this, you must move the mouse pointer over all elements of the window.
Finally, for those who prefer to use the keyboard keys to respond to a query, this process becomes a truly complex and lengthy ordeal. So for example, to answer a system request "Yes, I want to replace all files" You must press Alt+D, Up, Up, Up, Space! Very long and not convenient.
The Classic Explorer plugin aims to help remedy this situation by replacing the interface of the Windows Vista copy dialog box with the standard Windows XP window:

Here it is immediately clear which button is active at the moment (hint - buttons at the bottom of the window), easy navigation using the keyboard (press Y for "Yes", A to copy all files), and you can also see which file was created earlier and which larger in volume.
And just like in Windows XP, you can hold down the Shift key while pressing the button "Not" will mean the command "No to All" (or you can just press the combination Shift + N).
Important note: only the interface of the window is replaced, this does not affect the copying process itself.
Alt+Enter shortcut in Windows Vista/7 Navigation Bar
Alt+Enter is a universal keyboard shortcut in Windows XP for quick access to the Folder Options window. But in Vista and Windows 7 in the left pane which shows the list of folders - it doesn't work, but it works fine in the right pane of the Explorer window which lists the files in the selected folder. In new versions of Windows, this is not possible, let me remind you that in Windows XP this Alt + Enter key combination worked everywhere.
Display the page title in the title bar of the Browser - so you can now see the full title of the page
Show security zone in status bar
Display page loading progress in the status bar

Start menu in Windows 7
Let's start fixing the shortcomings of the new Windows 7 interface. First of all, we'll cut out the monstrous Start menu and return it to the familiar XP look. Unfortunately, this is not done by regular means, updates or any other official means. However, there are several separate third-party programs that allow you to return the compact look of the Start menu. Each of these programs has its pros and cons, so the final choice is yours.
Commercial program with a 30-day trial period. No registration solutions for the latest version have been found yet, but you can catch the release of the previous version on the Internet. The program converts the Start menu to a more compact form, but still very far from ideal, the transparency effect is supported. Exclusively for an amateur.

. A free version of the previous program, but the installer has several advertising toolbars for the browser built in, which can and should be disabled during installation, and during operation CSMenu constantly wants to get into the Internet. It requires the .NET Framework to be installed. During the installation process, it copies program icons from the Start menu to some kind of internal cache, then folders and icons are added automatically when programs are installed. The documentation says that some kind of configurator comes with the program, but it was not possible to find it in the distribution kit, and through the system tray icon you can only switch the interface language. The appearance of the menu is not bad, but the lack of settings is annoying, I will also add to the minuses the "stuck" backlight of the "Start" button after removing the cursor from it.


. In my opinion, the most successful solution of all tested. From offsite you can download versions of the program for 32-bit and 64-bit operating systems, as well as localized kits, including Russian. If desired, you can localize the interface yourself by editing the settings file as needed strings.xml. By right-clicking on the "Start" button, the program settings menu opens, where you can easily edit menu colors, gradients, and other visual effects. The program is absolutely free, the only negative is that you have to run it manually every time or, again, manually register it in startup. Everything else is just great.


Aston2 Menu. The second version of the once best replacement for the Windows desktop, and now turned into a shiny and blinking squalor with minimal functionality. Questions of charitability are solved by purchasing a program or a free search result on the Internet. After installing the main Aston2 files, you can download and install the Classic Menu or Classic Menu Windows 7 skin. The Start menu looks like this:


"A pitiful sight... A heartbreaking sight..." (C) For some reason, the developers of Aston or the author of the skin did not foresee the fact that the user can simply select and disable some items in the main menu. Although the menu itself turns out to be really more or less pretty.
UPD. The forces of the collective mind found two more similar programs.
Windows 7 Classic Start Menu is a free program that replaces the standard Windows 7 menu with the classic menu. It has a tiny size, less than 60 kilobytes. Managed via the system tray icon, supports AeroGlass mode.
If you want to change, make it more convenient according to your preferences, then launch the "Taskbar and Start Menu Properties" window. For this you need:
- right-click on the "Start" button,
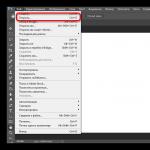
- the context menu of the Start button will open,
- in this menu, left-click on the link "Properties" (Fig. 1):
Rice. 1 Start menu properties
As a result, we get to the "Properties and Start Menu" window, in which we open the Start menu tab (Fig. 2):

Rice. 2 Taskbar and Start Menu Properties in Windows 7
On fig. Figure 2 shows that in Windows 7, the ability to set the classic look of the Start menu (in one column) has been removed, but a power button configuration tool has been added. The drop-down list "Action of the power button" (number 1 in Fig. 2) allows you to select what actions will be performed after pressing this button:
- user change,
- session end,
- hibernation,
- completion of work.
Here you can leave the action, that is, "Shutdown".
Setting Privacy for the Start Menu in Windows 7
Windows keeps track of the history of applications you launch and documents you open. You can refuse these functions by unchecking the following boxes in the "Privacy" section (number 2 in Fig. 2):
- "Store and display a list of recently opened programs in the Start menu." If you uncheck this box, then frequently used applications will no longer appear in the left column of the Start menu.
- “Store and display a list of recently opened items in the Start menu and taskbar”, for example, as in Figure 3 shows the last opened files for the Paint program:

Rice. 3 List of Recently Opened Items in the Start Menu for Paint
If you uncheck the box next to "Store and display a list of recently opened items in the Start menu and on the taskbar", then the display of frequently used and recent documents in the jump list will be turned off, for example, in Paint, in Word, etc. Then in fig. 3, there will NOT be a small triangle in front of the name Paint for the Paint program, and certainly no right panel "Recent" in fig. 3.
By the way, before you overhaul the Windows 7 Start menu, I recommend using the help button “How do you customize the Start menu?”, Labeled number 3 in Fig. 2 (this is still the primary source of information).
Features of the “Customize” button in the “Taskbar and Start Menu Properties” window
The "Settings" button (number 4 in Fig. 2) opens the window for setting the parameters of the "Start" menu. The upper part of this window contains a fairly large list of settings, as evidenced by the presence of a slider (number 3 in Fig. 4). Most settings enable or disable the display of individual menu components in the Start menu:

Rice. 4 Customizing the Start Menu in Windows 7
In the "Customize the Start Menu" window (Fig. 4), two types of display are offered:
- “Display as a menu” (number 1 in Fig. 5) means that when you hover over such an element, its content will be displayed in the form of a multi-level menu, without switching to a separate window (for example, the content of the “Control Panel” will be displayed).
- “Display as a link” (number 2 in Fig. 5) - this means that only the name of the element will be displayed (for example, “Devices and Printers”), and it will open in a separate window after clicking on it (for example, on labeled "Devices and Printers").

Rice. 5 Display as Menu and Display as Link in Windows Start Menu
"Don't show this item" means that the item will NOT be shown in the Start menu.
Other parameters of this window (Fig. 4) have the following purpose:
1. "Highlight recently installed programs." Shortcuts to recently installed apps will be highlighted for easy retrieval. If the checkbox is unchecked, then the labels will NOT be different from other labels.
2. "Search in other files and libraries." This is the setting of search options in libraries using the search form in the Start menu. Options available:
- "Search in general". The search takes place in the public directories and in the user's personal folders.
- "Don't search." Libraries will not be searched.
- "Do not search in shared folders." The search is carried out only in the user's personal folders.
3. "Search for Programs and Features in the Control Panel." When you enter text in the Search bar, the system will search for those items and programs that are in the Control Panel.
4. "Large icons". If you uncheck this box, small icons will be used to display actively used applications.
5. "Control Panel". I recommend checking the box next to "Display as menu" (then it will be the same as in Fig. 5). This is convenient, because by hovering the mouse over the Control Panel, you can immediately select the desired item, rather than opening a window.
6. "Allow context menus and dragging objects." This checkbox is checked by default, so it's best to leave it.
7. "Open the menu when the mouse pointer is hovered." If the checkbox is checked, the menu will automatically open when the cursor is held, and you can not click the mouse.
8. Sort "All Programs" by name. By default, this checkbox is checked, and all items in this menu are sorted by name.
9. “Devices and Printers” - if you have it connected, then I recommend checking the box here to have access to the printer from the Start menu.
How do I adjust the number of programs shown in the start menu and the number of recently used documents?
The “Show in the jump list the number of recently used items” option (number 4 in Fig. 4) corresponds to the number of open files in Fig. 4. 3. Specifically, in fig. 4, 8 elements are specified and, accordingly, in fig. 3 exactly 8 files are open - just like in a pharmacy.
The maximum number of programs that can be set for the item “Display recently used programs in quantity” (number 5 in Fig. 4) is 30.
The maximum number of documents for the item "Display recently used items in the jump list in quantity" (number 4 in Fig. 4) is 60.
If there are no special preferences, then for novice users, all Start menu settings can be left by default, that is, as they were set by Windows 7 programmers.
How to pin a program to the start menu?
By default, in the left column of the Windows 7 Start menu, the list of programs displays the most recently running programs on your computer. You can pin frequently used programs to the Start menu for quick access.
To do this, select the appropriate program in the Start menu by clicking on the link at the end of the All Programs menu. Having found the program, right-click on it and in the menu that appears, click on the option "Pin to the Start menu" (Fig. 6):

Rice. 6 How to pin a program to the Windows 7 Start menu?
The pinned program will appear at the top of the Start menu, separated by a bar from the list of recently opened programs.
How to remove a program from the start menu?
I draw your attention to the fact that we are only talking about removing the link to the program from the Start menu, while the program itself remains on the computer.
To remove a program from the Start menu, click on the name of the program in the Start menu, in the window that appears, click on the “Remove from Start Menu” option.
Get up-to-date articles on computer literacy directly to your inbox.
Already more 3.000 subscribers
Windows 7 has a wide range of functionality to personalize, change the style of the appearance of most controls. Many users, especially those who switched to the seven from XP recently, are still tormented by nostalgia for a well-known interface. I especially want to change the Start panel.
Installing the classic theme
Windows 7 has several pre-installed themes. Among them there are basic ones that can radically change the graphical display of the interface of the entire OS. Including return the "Start" panel to the classic look. Also, the use of simplified themes can significantly save the power of the processor, video card and RAM. To change the OS theme to classic, you need to do the following:
- Start menu.
- Select "Control Panel".
- Here we find the item "Personalization".
You can also get here in another way. Directly from your desktop. This way of navigating is much faster and takes place via the right-click submenu.
- Click on the desktop with the right button.
- Select the bottom item "Personalization".
- In the "Change the sound and image on your computer" window, go to "Basic (simplified) themes".
- Clicking on the Classic theme icon will activate it.
After that, the graphical display of all elements of the Windows 7 interface will become classic. Including the Start panel. You can change the theme to the previous one by clicking on its mouse icon (left button).
Setting up everything in detail
We've managed to bring the Start panel back to its classic look. But still, the desired result may not be entirely satisfactory. Therefore, we will configure this panel in detail. To do this, you need to do the following:
- Right-click anywhere on the Start panel and go to Properties.
- Go to "Taskbar and Start Menu Properties".
- Go to the "Start Menu" tab.
- Here you can set the action of the Shut Down button in Windows 7.
- To change the display and behavior of each of the groups of elements, go to the "Customize Start Menu" dialog box through the "Customize" button.
- Here you can also set the number of items to display in the menu.
Customize with Classic Shell
If there are not enough opportunities and such fine-tuning of the “Start” in Windows 7, then you need a small Classic Shell utility. With its help, you can customize the display of not only the start menu, but also the explorer, return the classic look of IE 9. It is completely free. And its Russified version can be downloaded from the developer's website. Need to do.