Unauthorized replacement or deletion of system fonts is rarely encountered, but if this happens, further using Windows becomes impossible, since the text of most dialog boxes becomes completely unreadable. Instead of normal letters, squares, curls, circles, or strange symbols reminiscent of Chinese characters are displayed.
Most often, the cause of such a failure is incorrect installation or uninstalling applications. In the first case, the program installer replaces one or more system fonts with its own; in the second case, the uninstaller “captures” and deletes system fonts along with the program files and fonts. Well, okay, we already know the reasons for the failure, and now we’ll find out how to restore normal display of native Windows fonts.
First of all, we advise you to check the status of the folder C:/Windows/Fonts. If there are only two or three fonts in it, go straight to the second method, otherwise, first try resetting the fonts to initial state using Windows itself.
Reset settings
Right there in the Fonts folder, select the option

And then in the window that opens, click the button.

In this case, they will be deleted from the system all third party fonts . This may help with a simple font settings failure, but if they were physically removed or replaced, the only way to solve the problem is to reinstall them.
Restoring fonts manually
The simplest and effective way to restore system fonts is to take the original files from another computer with the same OS version and copy them to a folder Fonts with replacement. This can be done better with file manager some “live” disk, for example, since the system will not allow you to replace the fonts used.


Second way more complex. If you don't have the extracted original fonts on hand, but have installation disk or ISO image with Windows, you can use it. The ISO image must be mounted first. To copy font files, we will use command line running with administrator rights.
First let's copy the file install.wim to a pre-created directory in any section hard drive. Let this folder be called DirWim. F V in this example- letter virtual drive with an ISO image of Windows mounted on it. Your letters, like your paths, may be different.
Copy-Item F:/sources/install.wim E:/DirWim

After copying the file, make sure that the checkbox is not checked in its properties

Otherwise, during further mounting you will receive an error.

Now let's manually create in the directory DirWim folder Wim and install it in it install.wim:
dism /mount-wim /wimfile:E:/DirWim/install.wim /index:1 /mountdir:E:/DirWim/Wim

Regarding the parameter /index:1, then it indicates the serial number of the OS version in the ISO image. If your ISO contains only one version of Windows, you don't need to change anything in the index setting. Everything is done, all that remains is to copy the fonts to the system Fonts directory:
Copy-Item -path E:/DirWim/Wim/Windows/Fonts -Destination C:/Windows -recurse –container –force

and unmount the mounted image:
dism /unmount-wim /mountdir:E:/DirWim/Wim /discard

During the copying process, the font files will be replaced with the original ones from the image install.wim with the exception of those in at the moment used by the system. The fact that the files have not been replaced will be indicated by errors in the Powershell console.
Inconvenience of the second method- not the only reason to search the Internet for a ready-made set of original system fonts. If all the fonts on your computer are deleted, you will get gibberish (or nothing at all) not only in dialog boxes, but also in paths and file names, which can make working with them hardly possible. Or it could be even worse, for example, in our case, after removing the Windows 8.1 system fonts, Explorer constantly restarted, preventing navigation and launching programs. By resorting to the help of a “live” disk, you can not only move freely around file system, but also download any files from the Internet, including fonts.
If you often have to look closely and squint to read something on the computer, it makes sense to try changing the size of the letters. They can be either reduced or increased.
There are two options. The first one changes the font size partially, in certain programs. For example, in an Internet program (browser) or in a text printing program ( Microsoft Word).
The second option is more significant - it will change the size everywhere. On the computer screen, in all programs, in the Start button, in folders and in many other places.
How to change letter size in certain programs (partially)
In many computer programs in which you can open and read some text, you can increase or decrease its size. In fact, this is a change in scale, and not an edit of the file itself. Roughly speaking, you can simply zoom in or, conversely, move away the text without changing it.
How to do it. The most common way is to find this function in a separate program. But this is not very convenient and not always easy. Therefore, there is an alternative "fast" option that works in most computer programs.
Click on one of CTRL keys on the keyboard and, without releasing it, scroll the wheel on the mouse. Each such scroll increases or decreases the text by 10-15%. If you turn the wheel towards you, the font size will decrease, and if you turn it away from you, it will increase.
Once you are happy with the size, release the CTRL button. Thus, you will consolidate the result and return the wheel on the mouse to its previous functions.
By the way, instead of the wheel, you can use the + button to increase and - to decrease. That is, hold down CTRL, then press and then release the + or - key on the keyboard. One such click changes the size by 10-15%.

Some examples. Let's say I often use the Internet to search for information - I read news and articles. The text size differs on different resources - it depends only on the site itself.
For the most part, I'm happy with the size of the letters and I don't feel uncomfortable reading them. But sometimes I come across sites where the font is too small for me - I have to lean close to the screen and squint. It's inconvenient and unhelpful.

In such cases, you can quickly increase the font. I hold down the Ctrl button on the keyboard and scroll the mouse wheel several times, thereby changing the text size.

This works in 90% of cases: on websites, in mail, in social networks. You can check for yourself by increasing the font size in the article you are currently reading.
By the way, to return to the original size, you need to hold down the Ctrl button on the keyboard and then press the key with the number 0 once. However, this “return” does not work in all programs, but only in browsers.
Another example. Let's say I'm printing a document in Microsoft program Word. The text in it should be a certain size, but for me it is too small. I can’t simply increase the font in the program itself - it would violate the design rules, and working with such small text is a pain.

By holding down the Ctrl button and turning the mouse wheel, I can zoom in on the document. By doing this, I will simply bring him closer to me, but NOT change him. The text will remain the same size, but I will see it enlarged.
The same applies to photographs and pictures that we open on the computer. In exactly the same way they can be “brought closer” or “farther away”.

Important! Some programs remember the size that was configured. That is, having opened something else in such a program, it will immediately be shown in a changed size.
Therefore, do not be alarmed if a document, book or Internet page opens at a non-standard size - too large or too small. Just change it in the same way (CTRL and mouse wheel).
How to change font size on computer (everywhere)
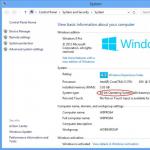
You can increase or decrease the font not only in individual programs, but throughout the entire computer at once. In this case, all inscriptions, icons, menus and much more will also change.
I'll show you with an example. Here standard screen computer:

And this is the same screen, but with an increased font size:

To achieve this look, you just need to change one setting in the system. If suddenly you don’t like the result, you can always return everything as it was in the same way.
IN different versions Windows performs this procedure differently. Therefore, I will give three instructions for popular systems: Windows 7, Windows 8 and XP.

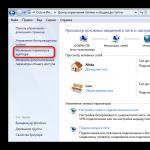
- Click on the Start button and open Control Panel.
- Click on "Appearance and Personalization".
- Click on the “Screen” inscription.
- Specify the desired font size (small, medium or large) and click on the “Apply” button.
- In the window that appears, click “Log out now.” Don't forget to save everything before doing this open files and close all open programs.
The system will restart, and after that the font will change everywhere on the computer.

- Open Start and select Control Panel.
- Find the Screen icon (usually at the bottom) and open it.
- Select the size you want (small, medium or large) and click the “Apply” button at the bottom right.
- In the small window, click “Log out now.” Don't forget to save all open files and close all programs before doing this.
The system will restart and the font will change everywhere on the computer.

- Click right click mouse over an empty space on the desktop.
- From the list, select “Properties”.
- Open the Appearance tab (top).
- At the bottom, in the part called “Font Size”, from the drop-down list, select the size you need - regular, large font, or huge font.
- Click on the “Apply” button and after a few seconds the system settings will change.
- Click on the “OK” button to close the window.
So, first, let's consider the option that new fonts were installed along with some program and everything went to hell. To fix this we need to do a couple of simple steps:
1) Open Control Panel - Design and Personalization - Fonts. In the left column, click on the “Font Options” link.
How to restore system fonts in Windows 10-01
Click Restore default font settings.

How to restore system fonts in Windows 10-02
The essence of this button is simple: it removes all third-party fonts and leaves only standard ones. This helps in systems where too many fonts are installed, as this leads to a significant drop in the performance of the entire system as a whole, as well as video and image editors. But this button will not solve the problem if you have removed or replaced the system font. In this case, you will have to restore the fonts manually. And for this we need to copy the fonts from another computer (or virtual machine) with the same operating system from C:\Windows\Fonts.
After downloading, you only need to unzip the file and copy the contents of the folder in the form of font files to C:\Windows\Fonts
Feb 7, 2015 15:26 Ivan Semin
pyatilistnik.org
Restoring Windows 8 system fonts
You can resort to the procedure for restoring standard fonts in Windows 8 if you accidentally replace/remove one or more system fonts. The problem with missing fonts can manifest itself as follows: in system (and not only) dialog boxes, instead of normal characters, something incomprehensible or generally unreadable characters are displayed (in our example, these were hieroglyphs and squares). This problem may be the result of uninstallation third party application, which along with itself removed a number of system fonts from the system (up to complete cleaning font directory C:\Windows\Fonts) . Also, a problem with fonts can occur when a certain program, during installation, replaces one of the font standards with its own.
In this article we will analyze a technique that allows you to restore standard system Windows fonts 8, to a clean system state.

First of all, you should try to restore standard Windows fonts using the built-in functionality. To do this: 
The whole magic of the Restore default font settings button is that it removes all third-party fonts from the system, and only standard Win 8 fonts should remain in the system. However, if the file of the desired font has been replaced or deleted, the reset function will not help. The only way to get the font you need back is to copy it manually.
The missing font files can be copied from any computer with the same OS version, or extracted from the installation Windows image 8. Let's consider the second case.
To do this, we need an installation disk with Windows 8 (physical or mounted virtual ISO), let's say it is assigned the drive letter D:
Let's open command line Powershell with administrative rights and copy the file D:\sources\install.wim to the C:\Distr\ directory
Copy-Item D:\sources\install.wim C:\Distr\
Mount the Windows 8 installation image file install.wim into the C:\Distr\wim directory.
Dism /mount-wim /wimfile:с:\Distr\install.wim /index:1 /mountdir:C:\Distr\wim
Advice. If the DISM command returns error Error: 0xc1510111 You do not have permissions to mount and modify this image, check that the Read-Only attribute is not set in the properties of the install.wim file.
Copy the original fonts from the C:\Distr\wim\Windows\Fonts directory to system folder C:\Windows\Fonts.
Copy-Item -path C:\Distr\wim\Windows\Fonts -Destination C:\Windows -recurse –container -force
The font files will be replaced with the original ones. Some of the system fonts that are currently in use cannot be replaced; this will be indicated by a number of errors in the console window.
Disable the image
Dism /unmount-wim /mountdir:C:\Distr\wim /discard
Restart the computer and check if the problem with the fonts has disappeared.
For those who don't have it on hand Windows distribution 8, you can copy the directory with original fonts from another computer with the same version of the OS, or use ready-made archives with fonts, which can be downloaded from the links below:
Download and extract the archive for your Windows versions 8 and copy its contents to the C:\Windows\Fonts directory, replacing the files.

winitpro.ru
Free fonts
2016-04-29 Many users need to restore standard fonts for Windows. To do this, you can use our link, download the archive with fonts, and install them on your computer. For information about installing fonts, read the article on how to install a font.
Brief instructions:
- Download the fonts from the link
- Download the registry key (if the file does not start downloading, right-click on the black screen and click “save as”).
- Unzip the font archive and copy the fonts to the C:/windows/fonts folder
- Run the downloaded fonts.reg file
- Restart your computer.
It happens that fonts in the system cease to be readable for one reason or another. To fix this problem, you will need to restore the default fonts. This will help restore the original font design in Windows. But this is not the only reason why fonts are usually reinstalled. Some people accumulate too many fonts in their system, those that have been used once or twice. And if there is no need to keep 300 unnecessary fonts, then it is better to delete them from your computer. In this case, before copying the downloaded fonts to the Fonts folder, delete all the contents of this folder. Microsoft has always cared about the quality of the fonts used in its operating system and in software. Starting with Windows 98, the list of standard fonts included dozens of the best and most modern typefaces at that time. The most famous and talented studios from all over the world were involved in the development of new styles. In addition to new developments, the standard set also included undeniable legends of typography, such as Arial and Times New Roman. New versions of the operating system never cease to delight with high-quality innovations in the field of font development. For example, in Windows 8 and 10, the Segoe UI font appeared, specially developed for Microsoft by the Monotype studio. It was originally called Segoe, and was developed by Monotype in 2000 for commercial distribution. After the font came into the possession of Microsoft, it was modernized specifically for the web, hence the prefix UI (user interface). Segoe UI is a sans serif font that has excellent readability and compactness. It fits perfectly into the minimalistic interface without overloading it. The font immediately became popular among designers and interface designers. In general, there are a lot of universal typefaces in standard fonts that do not get old and will always be popular. And the constant expansion and addition of new ones to the list beautiful fonts, - cannot but delight lovers of high-quality typography.
On our website, in addition to standard ones, you can find many original and branded fonts. Using our tools, you can select fonts online and also buy a special font at a low price.
ffont.ru
How can we restore default fonts in Windows OS
Many users who are accustomed and customized operating systems Windows replace and default fonts; custom fonts in an attempt to get a more original look. Unfortunately, the use of custom fonts on a Windows system can significantly increase system boot time, as well as the functioning of the Recycle Bin.
If you are using custom fonts on your Windows system and have noticed that it is starting to become quite difficult and responds to commands, the best thing would be to restore the system to default fonts and clear third-party fonts installed (of course, before you can try to clear in Startup, temporary files si registration system).
In Windows 7 si Windows 8 It's quite simple Resetting font settings to default (Assuming that system default fonts have not been removed - accidentally or intentionally)
- enter font settings in Start Menu or Start Screen and click on the result Change font settings
- Then in the Control Panel window that opens, click Restore font settings to default
If Windows default fonts have been removed, they can be restored using one of the following methods:
- or copy the folder cu fonts for Windows by default to another PC (Preferably personal computer who did not make changes to the system; It is also mandatory that you copy the default version of fonts to be the same version of the system you want to restore) directory C:\Windows\Fonts (where C:\ is the System partition)
- or use ISOs cu system settings files (or DVD installation or Bootable USB Stick) As follows:
- extract content ISO image(using 7zip)
- and then download and run the GImageX application
- select the mountain tab in the application
- create an empty server folder and then select this folder as the location to install (Mount Point) Applications (installation files will be extracted in this folder, make sure you have enough storage space in front of you)
- tap install.wim to Law Source and click on the mount button

- after system files will be installed (this process will take a few minutes), open Windows folder\Fonts and copy the fonts from it to C:\Windows\Fonts
If after you have restored default fonts you want to remove custom fonts installed on the server, you can use the Frenzy font application (DeFrenzy option).
STEALTH SETTINGS - How to restore default fonts in Windows
Download GImageX, Fun Downlosfd font, Restore default font settings, Restore default fonts in Windows, Default Windows fonts, Windows fonts, Windows settings, Windows Tips and Hacks Next: How we can display saved passwords in the browser with a simple click "" Old: "" Facebook will improve privacy settings for new users IT Tips - Windows, Mac OS X, Linux and Mobile - How we can recover default fonts in Windows OS
- Kara reset Windows XP font
- font for Windows hapus Carrie semua
- nama default font for Windows
- no puedo restoration fuente configuracion predeterminada
- mengembalikan transfer of KE font Awal
- mengembalikan wear sign di ke window flint 8
- varsayılan Yazi guys ayarlarını geri Install
- 7
- Kath Hoi Phuc font Lai Nhu Chu give Luc
- download windows default font 8.1
- If Win XP fonts
- Cara Mengembalikan found defauld window 8
- bawaan by default for Windows
- font mengembalikan wear Windows sign XP seperti
- Cara default font mengembalikan windosw 8 Habis di INSTAL
- Cara-di-default fonts mengembalika wind 8
- setingan download font
- Default 7 font lock for Windows
- ripristinare and carratteri in the Word
- Hoi Fuk Lai Bo XP font
www.stealthsettings.com
Restoring standard fonts in Windows 7
In this article I will share my solution to the problem with incorrect display of fonts in Windows 7, which requires restoring all standard fonts in Windows 7. The background to the question is this: I was recently looking for new original fonts to use in graphic editor, I downloaded a whole mountain of them, but then I noticed that when a new font is added to the system, if there is a match, the original font is replaced with a new one (instructions on how to install fonts in Windows 7 are here). As a result of this activity, it became impossible to work in half of the system panels and applications due to the fact that they spoke in languages unfamiliar to me :).

A quick google for the queries “restore system fonts in Windows 7” and “standard fonts for Win 7” did not give much results, the proposed solutions did not help fkb (naturally, reinstalling the system did not suit me). Therefore, I decided to go my own way and, to begin with, simply copied the original fonts from a known normal system (let me remind you that the fonts are stored in the %windir%\fonts directory) and replaced the fonts on my system with them. The solution only partially helped, it became possible to work in the system, my native Cyrillic characters appeared, but the font parameters left much to be desired. Firstly, the size of some fonts has changed, or their writing no longer corresponds to the original, or for some reason the font has become bold.
However, I managed to figure out how to overcome this problem. To do this, you need to reset the font settings in the registry, for which download the file attached below, which allows you to restore associations for standard fonts in Windows 7. You can download it here:
This file is the exported contents of the registry key HKEY_LOCAL_MACHINE\SOFTWARE\Microsoft\Windows NT\CurrentVersion\Fonts in Win 7. After applying this .reg file, the system needs to be rebooted, lo and behold! The problem with fonts should disappear!