If you are having problems connecting to the Internet in Windows 10, you need to determine what kind of problem you are facing. Most often, access to the network is terminated when problems arise from the provider.
To verify this, call technical support and ask to test the connection. If everything is ok on the part of the Internet provider, you need to look for the problem on the computer or Wi-Fi settings connections.
Yellow exclamation mark wi-fi and the inscription "protected".
Usually, the available connection also says - no Internet access. Sometimes this is due to the fact that the wrong IP / DNS address is specified in the settings or the settings of the router are lost. Almost always, the IP address should be dynamic, unless you order a static one from your provider yourself. To get rid of the protected status in Windows 10, do the following:
- Hover over the icon with a yellow exclamation mark and press RMB;
- Select the "Network and Sharing Center" section;
- In the window that opens, left-click on the blue inscription with the name of your Internet connection and select "Properties";
- In the list with the table of contents "checked components are in use ..." select TCP / IPv4;
- Check the boxes next to “get DNS / IP address automatically” and click “save”.
Now pull out network cable and plug into the socket again. If the problem was with the IP, the Internet should work. Also, this error can appear with a damaged network cable.
How to fix "no Internet access" status in Windows 10.
Such an error in the vast majority of cases is associated with incorrect configuration of the network connection or router. In order for the Internet to work, in the modem settings you need to specify the data that the provider provided to you.
To enter the settings, when the connection is activated with the status "without access to the Internet", type in address bar() and log in.
Most manufacturers by default set the word "admin" () as the login and password. If not, look for the authorization information on the box of the router.
In the settings, the problem is most often solved after replacing the WAN with a dynamic one and filling in the fields with the login and password (from the provider) in the PPPOE section. This information is provided by your internet provider when signing the contract. Usually this is the data by which you can log in to personal account on the provider's website. If you do not know the username and password, please contact technical support.
It is also worth checking out banal reasons, such as non-payment for the Internet. In some cases, if there is no payment when you try to enter any site, you will be redirected to a page with a corresponding notification, but sometimes the provider does not have this option. Therefore, you can confuse the usual lack of money in the account and problems with the Internet.
I hope the information in the article and video was at least a little useful for you. If the problem still cannot be solved, the problem with WiFi connection and the status "No access", write about it in the comments.
I have no doubt that many of you have seen the exclamation mark on the network connection icon. This picture can be observed on computers that do not have direct access to the Internet. To work within local network this, of course, does not affect in any way, but not everyone knows this, and when they see an exclamation mark on the network connection icon in the tray, they hypothesize that the network is inoperable. Well, in order to avoid such theories and unnecessary questions in the future, a plan arose in my head - how to remove this exclamation mark from the network connection icon.
To begin with, I propose to figure out why this very exclamation mark appears and what it means from the point of view of developers Windows... And the logic of the developers is as follows: you can say reinforced concrete, they believe that if a computer is connected to a network, then it must have access to the Internet. This conclusion I draw from how the system accepts to put an exclamation mark or not.

A bit of theory. To check the network connection, the system contacts a server on the network, if it is available, then the connection is correct. Per given type checks responds NCSI service... The check takes place in two stages: first, windows tries to reach the Microsoft web server ( www.msftncsi.com), at this stage a check is performed or not. The second check is done using a DNS request to the address ( dns.msftncsi.com), for verification are used 80 and 53 ports. If these conditions are met, then your network connection will be displayed without an exclamation mark.
Two ways how to get away with the exclamation mark on the network connection icon
- Disable by power of changes in the registry;
- Disconnection with group policies.
- Disable by force of changes in the registry
To do this, run the registry editor regedit in it we find the following branches.
“EnableActiveProbing” = dword: 00000000
"ActiveWebProbeHost" = "www.msftncsi.com"
"ActiveWebProbePath" = "ncsi.txt"
"ActiveWebProbeContent" = "Microsoft NCSI"
"ActiveDnsProbeHost" = "dns.msftncsi.com"
"ActiveDnsProbeContent" = "131.107.255.255"
Here you can change the conditions for connecting to the Internet.
We also chop off this one:
“NoActiveProbe” = dword: 00000001
- Disable using group policies.
Launching the Group Policy Editor gpedit. msc go to:
Local Group Policy Editor -> Local Computer-> Administrative Templates -> System -> Internet Communication Management -> Internet Communication Settings
Here we are looking for a parameter "Disable active probing for the network connection status indicator" and assign it the value "OFF"
Local Group Policy Editor -> Local Computer -> Administrative Templates -> Network -> Network Connection Status Indicator
Change values DNS servers and other settings can be found here.
"DNS server address of the organization, which is used for verification"
"Site name of the organization's DNS server that is used for verification"
By editing these settings in group policies, you can change them to those used in your network.
Having done these steps, one of these options only disabled the Internet connection check, now we will remove the exclamation mark from the network connection icon.
How to remove the exclamation mark from a network connection icon
There are also two ways to do this:
- By editing the corresponding registry branch.
“NC_DoNotShowLocalOnlyIcon” = dword: 00000001
If you do not have this parameter, you need to create it.
- Using group policies
Local Group Policy Editor -> Local Computer -> Administrative Templates -> Network -> Network Connections
Find the parameter "Do not show network icon only local access"
And we assign to it the value “ SWITCH OFF»
For all these changes to take effect, you must restart your computer.
Hello admin! I updated the factory on my laptopWindows 8.1 before Windows 10 and it so happened that after the update on the laptop stopped workingBluetooth (bluetooth), and there are no drivers for Windows 10 on the official website of the laptop manufacturer,automatic driver update does not help... I also can't install drivers on a discrete video card (there is a yellow triangle with an exclamation mark in the device manager), I downloaded the driver on the manufacturer's official website AMD graphics cards but it is not installed, an error is issued. With the help of your article I brought myself backWindows 8.1 and I'm thinking of staying on it, but the icon is annoying in the tray "Get Windows 10" ... In every way I tried to hide it, but after a few days it appears again.
The question I have for you is this, andis there an official way to rollback Windows 7, 8.1 upgrade to Windows versions 10 and remove the Get Windows 10 icon that appears on the taskbar?
An official way to cancel the upgrade from Windows 7, 8.1 to Windows 10 and remove the Get Windows 10 icon from the taskbar?
Hi friends! Until July 29, 2016, there is a promotion of obsolete operating Windows systems 7, 8.1 to the very new version Windows 10 and despite the fact that millions computer devices have already been successfully updated, some users decided not to update, and basically this is why: someone could not find drivers for Windows 10 for some devices, due to their complete absence at the office. manufacturer's website (n for example, a laptop manufacturer Samsung advised to postpone the transition to Windows 10, since not all manufactured devices are currently written compatible drivers). For some, the update process itself ended and they barely got back their previous Windows. Many are simply completely satisfied with the stable Windows 8.1 or even Windows 7 and, accordingly, the question arises, is there an official way to cancel the upgrade of Windows 7, 8.1 to Windows 10 and remove the Get Windows 10 icon that appears on the taskbar?
Yes, there are already friends like this!
For home versions of Windows 7 and Windows 8.1
(for professional versions of Windows 7, 8.1 there is also a method and it is described below)
Friends, if you have Windows 7 Home Basic or Windows 8.1 Single Language (for one language) installed, then you do not have Local Group Policy Editor (gpedit.msc). In this case, you need to open command line as administrator and enter the commands:
reg add "HKLM \ Software \ Policies \ Microsoft \ Windows \ Gwx" / f / v "DisableGWx" / t REG_DWORD / d "1"
Operation completed successfully
reg add "HKLM \ Software \ Policies \ Microsoft \ Windows \ WindowsUpdate" / f / v "DisableOSUpgrade" / t REG_DWORD / d "1"
The operation completed successfully.
REG ADD HKLM \ Software \ Microsoft \ Windows \ CurrentVersion \ WindowsUpdate \ OSUpgrade / v ReservationsAllowed / t REG_DWORD / d 0 / f
Operation completed successfully

These commands will create keys in the registry, required to disable the update Get Windows 10.

Then we left-click on the "Get Windows 10" icon located on the taskbar.
Click on the menu icon.

Left-click on the item "View confirmation"

Click on "Cancel Reservation"

"Cancel reservation"

Close

Left-click on the arrow next to the clock in the Taskbar and select "Configure"

We find the GWX icon and in its behavior select "Hide icon and notifications", then "OK", then scroll down the scroll arrow and make sure that there is no more GWX icon here.


For professional editions of Windows 7 and Windows 8.1
In this case, you do not need to open a command prompt and edit the registry, but you need to configure the Local Group Policy Editor.
Start-->Execute.
Enter the command in the input field:
gpedit.msc
and click "OK"

The Local Group Policy Editor will open and we need to configure it.
Computer configuration
Today we will talk about a common error that can appear in both old windows 7 and in new windows 10 when connecting a mouse, printer or phone -. What does this mean?! With this message operating system makes the user understand that it does not recognize the device that you connect via USB port to a computer or laptop. Why this is happening and what to do with this error - I want to tell you.
Attention! If, when trying to connect a USB device to a computer, the latter suddenly reboots, turns off, or reboots, or the system crashes into BSOD, immediately stop all attempts to reconnect the device, as this can lead to serious damage to computer components!
● Problems with the USB port
The most common reason Windows displays the " USB device not recognized ”is a failure or breakdown of the port to which you are trying to connect your iPhone, mouse or other gadget. For starters - just switch it to the adjacent connector and see the result!

The error is usually caused by poor contact due to the ingress of dust or other debris. There were also cases when users managed to physically damage the port and bend the contacts.
It can also fail USB controller on the motherboard computer or laptop. Go to the dispatcher Windows devices 10 and see if there is an exclamation mark or a red cross on one of the USB controllers.

If there is, I sympathize, but the controller will have to be repaired. Although most often this entails replacing the entire motherboard.
● Too many USB devices are connected
Problems with recognizing USB devices can also arise due to the fact that too many of them are connected to a computer or laptop - a USB disk, a phone in charging mode, a printer, a scanner, etc. As a result, either an interrupt conflict may occur when the operating system cannot allocate an interrupt to a new device. Or there is not enough power on the USB bus. Then, to solve the problem, you need to try in turn to disconnect the connected gadgets and see if the new device is recognized or not.
● Poor quality USB cable, extension cable or hub
The second most popular reason for the error The USB device is not recognized - it is the poor quality of the cables and extension cords. And even not only Chinese, but even expensive brands. As an example, I can give a USB cable for the iPhone from Apple.

At a price of several thousand rubles, it breaks down rather quickly. For the same reason, Windows often does not recognize printers and scanners. Replacing the cable - and everything works "like a clock". Another "evil" is USB hubs. I do not argue - this is an excellent and convenient invention, but again - provided that the device is made with high quality. You can’t expect reliable work from the cheapest Chinese hubs. It even happens that they turn out to be incompatible with a specific computer or laptop. And they are short-lived. Therefore, as soon as an error appears that the YUSB device is not recognized, immediately exclude hubs, adapters, extension cords and turn on the equipment directly to the PC, This will eliminate the likelihood of a hardware conflict.
● The device is not recognized because it is damaged
If the USB port was changed, the cable was checked - it's time to take on the connected gadget itself. To check, try to connect it to another computer - neighbors, friends or relatives and see if the "USB device not recognized" error appears.

If the same problem appears there, you will have to carry your iPhone, printer or USB flash drive to service center For checking. If a problem occurs periodically, then a poorly soldered YUSB connector can serve as its source: shake it - it works, shake it again - it does not work. In this case, you still have to disassemble and solder it.
● Problem with USB device driver
Another one possible reason, due to which the error "USB device not recognized" appears in Windows 10 - this is a problem with the drivers - the lack of a suitable one or a conflict of existing ones. If the OS doesn't find what you're looking for software, then usually in the device manager the connected device will be displayed as an unknown device (Unknown Device).
This is a new application for managing the built-in system antivirus Windows Defender and other security features in the Windows 10 Fall Creators Update and Windows 10 Creators Update. Microsoft has integrated various security features into the app, including device health checks, Windows Firewall, Controlled Folder Access, Exploit Protection, SmartScreen content filter management and parental controls.
general information
An old desktop application called Windows Defender is still on the system, but its legacy interface remains hidden most of the time.
Users of Windows 8 / 8.1 and older versions of Windows 10 (prior to 2017) should see the old Windows Defender setup guide.
The Windows Defender tab in the Update & Security section of the Settings app only displays the app version information and a button to launch the new Windows Defender Security Center. On older versions of Windows this page controlled most of the Windows Defender settings.
Windows Defender uses Center Windows updates to download and install new anti-virus definitions. New signature definitions are available multiple times a day, and system antivirus uses cloud-based protection to speed up and enhance detection.
If you encounter problems updating Windows Defender signatures, use the guide to troubleshoot problems with Windows Update
Using Windows Defender Security Center in Windows 10 Creators Update and higher
Open the menu Start Defender and select the link.

After that, a new antivirus interface will open. If one of the presented components has a red circle with a white cross or a yellow triangle with a black exclamation mark, it means that the detected problem needs to be corrected.

Note, Windows Defender Security Center also checks the status installed drivers... Some older devices may cause a yellow mark to be displayed in the “Device Health” section due to the lack of compatible drivers... In this case, you need to ignore the warning.
Configuring Virus & Threat Protection in Windows Defender Security Center
To configure the most important section of the application, click the button Virus and threat protection... Similar buttons are available on the left side of the Windows Defender Security Center window.

The first step is to enable the Real-time protection setting. If the switch for this function is disabled, then other parameters may not be available for editing (highlighted in gray).
Cloud protection is safe for most users. If you are very concerned about privacy, you can disable this component.
The Automatic sample submission option is similar to the previous settings, you should leave it enabled. This option affects the reliability of cloud protection.
If you are not experienced user leave the default exclusion settings. Change these parameters only if you clearly understand the consequences of the actions being performed.
The Alerts feature (formerly known as “Enhanced Alerts”) allows users to view recent scans and displays weekly activity summaries. When enabled, this option increases the number of notifications in the Action Center, so many users will want to disable it.

Keep in mind that Windows Defender will always warn you about malware infections and critical errors.

If on your Windows computer 10 Creators Update has a third-party antivirus installed, you can enable the periodic scan feature (known as “Limited periodic scanning”). After enabling this function, the Windows Defender icon will appear in the notification area of the taskbar (system tray), and during periods when you are not actively using your computer, a system scan will be carried out. The Action Center may remind you if you have still scanned - in this case, the system tray icon will have a yellow label.
This type of scan can be very useful if the third-party antivirus is not getting regular signature definitions.

To enable additional scanning, click the Virus & threat protection button on the main screen Windows Defender Security Center... Then open the Settings section antivirus software Windows Defender and turn on the Periodic check box.
You will still be able to manage Windows Defender settings, except for the Real-Time Protection setting when periodic scanning is enabled.
If you have previously installed a third-party antivirus (Avast, BitDefender, Norton / Symantec, McAfee, etc.), then in the Action Center you can see a notification: “Virus protection is disabled. Click or tap here to turn on Windows Defender. ” Just click on alerts, and all the required operations are performed in automatic mode... This is one of those rare times when you see a Windows Defender desktop app warning in the Windows 10 Creators Update.
Scan history and threats added to quarantine
By default, many infected objects are moved to Quarantine, a protected folder where threats cannot harm the system. Windows Defender automatically removes detected files from quarantine after three months.
Open the menu Start by pressing the keypad Windows combination+ S, enter Defender and select the link.
Click the button Virus and threat protection and then click Scan log.

If detected threats remain on the device, click the Start Actions button to add dangerous objects to the quarantine. Then click the link View full magazine.
Otherwise (if no threats were detected in the system), immediately click the View full log link.

Please note that Windows Defender Security Center always displays the message “No Threats” in all sections of the “Scan History” screen, even if the computer detects malware or, they were cleared. The only exception is when the detected threats have not yet been removed.

If you want to know which files were added to quarantine, you can click on an item in the list or use the Show details link. The Clear Log button applies to all sections of the Scan Log - it clears the list of quarantined threats and the list of allowed threats permanently.
How to change cloud protection settings
You can strengthen your cloud protection in Windows Defender System Antivirus by joining the Microsoft MAPS Community Program.
In the instructions below, we will walk you through the steps to change the level of protection against Windows Defender threats using local group policies and the system registry.
The section shows information about Windows Update, storage capacity, device drivers and battery status (only on laptops and tablets). After starting the device, the health scan may take some time, so the actual information may not be available immediately.

If errors are found in one of the diagnostic areas, the user can either open the Microsoft page with instructions on how to fix the problem, or click the link for a quick fix. All of these are presented in the form of recommendations.
As mentioned above, not all old components have drivers compatible with Windows 10 - in such cases, you should ignore the warning. Note that in this case the system tray icon will also have a yellow warning label.
Below on the Device Health page is the Start over section. This option is an automated version of the system reset function while saving personal files. Is not new function, but you can use Windows Defender Security Center to reinstall Windows with the preservation of personal data (in this case, you will lose installed programs and additionally installed drivers).
This function it is advisable if you received a new device with a large number applications preinstalled by the manufacturer.
If your computer has important desktop applications and drivers that you want to keep, try using a system recovery disc to reinstall Windows.
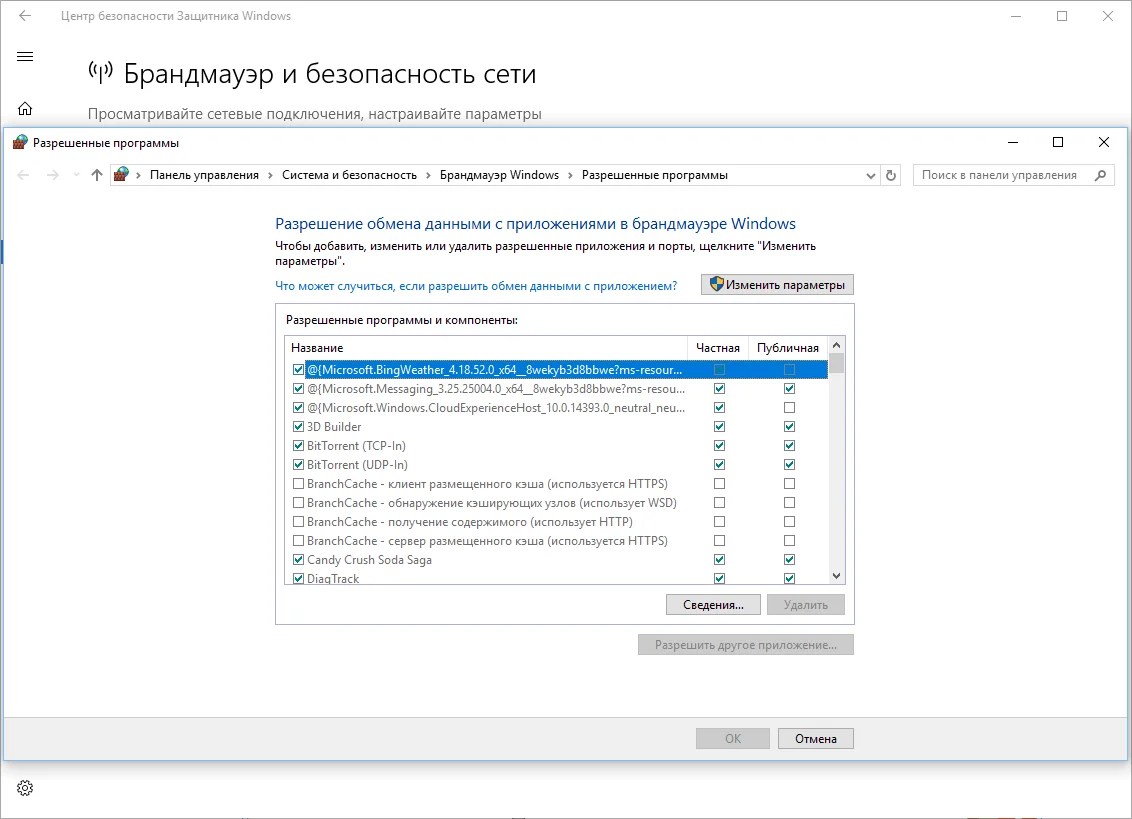
This section provides a brief summary of the status Windows Firewall and about the type network connections(Private or Public network).

By clicking on a specific network type, you can enable or disable the Firewall and block all incoming connections, including requests from allowed applications.
This section allows you to control the behavior of the Windows Defender module called SmartScreen.

Section Application and file management allows you to configure the processing of unrecognized applications and files from the Internet. By default, the Warn option is selected, which will be optimal for most users. For enhanced protection against 0-day threats, set the Block value.
SmartScreen section for Microsoft Edge lets you control the same content filter that we remember from Internet Explorer... This module protects your computer from malicious sites and downloads. The default value is Warn, but for enhanced protection it is recommended to select the Block option.
The SmartScreen section for Windows Store apps is designed to control the content validation feature that is used in Windows Store apps. There are only two options available here: Warn and Disable. If you are concerned about security, choose Warn.
This section of the Windows Defender Security Center contains just two links that lead to the Microsoft Account Management Web Console.

1. Option View options for family shows family members who were added to Windows 10. You can see the recent activity of children, their orders, time spent at the computer, the history of browser activity, statistics on the use of applications, games and multimedia content, and even determine the location of a person if his device supports this function.
To add a child's account (or temporarily block the current account) in Windows 10, open the Settings app, go to the Accounts section, select the Family and other people section, and click the Add Family Member button. You must add all children and other family members using one account Microsoft entry... Make sure that Accounts children have standard, not administrative rights.
2. Option View devices shows a list of all family devices - computers, laptops, tablets and smartphones. You can locate devices, see their recent locations, and delete old devices.
How to enable forced scanning of removable drives in Windows 10 Creators Update and above
For some unknown reason, Windows Defender in Windows 10 does not scan removable media such as USB flash drives or external drives... This can lead to malware infections or the launch of potentially unwanted programs.
To fix this problem, open the menu Start, enter powershell and click right click mouse on the link of classic applications “Windows PowerShell” and select the option “Run as administrator”.
Alternatively, you can use the Windows + X shortcut to open the shortcut menu (or right-click on the Start menu) and select the “Windows PowerShell (Administrator)” option.
In Windows PowerShell, paste the following command: Set-MpPreference -DisableRemovableDriveScanning $ False
Press Enter, then Windows Defender in Windows 10 will scan removable drives.
Configuring the Windows Defender Security Center icon in Windows 10 Creators Update and above
The Windows Defender Security Center icon appears in the notification area of the taskbar (system tray). In any version of Windows, you can customize the display of the icon so that it is visible at all times. Right click on free space on the taskbar and select the option “Taskbar options”. Scroll down to the "Notification area" section and click on the "Select icons displayed in the taskbar" link. Near point “ Windows Defender notification icon ”, turn the switch to the“ On ”position.

If the icon has a green circle with a white check mark, no action should be taken.
If the Windows Defender Security Center icon has a yellow triangle with a black exclamation mark, then something went wrong: either the Windows Defender setting is incorrect or it was potentially detected unwanted program... Missed drivers, full storage, or incorrect SmartScreen settings in Windows Defender or Microsoft Edge can also cause the yellow label to appear. Right click on the icon and click “Open” to fix the detected problem.
If the Windows Defender Security Center icon has a red circle with white crosses, then serious problems have been detected in the system, for example, malware has been found and user attention is required to clear the threat. Also, displaying a red label can cause Windows Defender or Firewall to be disabled. Typically, these events result in a separate alert displayed in the Action Center and a clickable toast in the system tray. Right click on the icon and click “Open” to fix the detected problem.
If malware infection messages persist, use third party solution for cleaning, for example, Malwarebytes.
If you see an error message "The Security Center service could not be started," then the service has most likely been disabled. click the "Close" button.
You need to boot into safe mode... After booting the system, type regedit, right click on the result and select “Run as administrator”.
Go to the registry key HKEY_LOCAL_MACHINE \ System \ CurrentControlSet \ Services and click on the directory WinDefend... Find the “Start” registry entry in the right pane. If the value is set to 0x00000004 (4), then the service has been disabled. Double click on the entry “Start”.

Enter the value “2” (make sure the hexadecimal system is set) and click OK. As a result, the Windows Defender service will start automatically.
Then repeat the same steps for the service WdNisSvc(Windows Defender Antivirus Network Inspection Service) and SecurityHealthService(Windows Defender Security Center Services). Make sure not to edit only the values you want. Registry Editor is very powerful tool which can lead to Windows boot problems.
Close Registry Editor and restart Registry Editor to verify that Windows Defender Security Center is now working correctly.
If Windows Defender or Windows Defender Security Center still won't launch, try performing a full system scan without rebooting using a specialized cleaning tool such as Malwarebytes.
Configuring a Scheduled Scan for Windows Defender in Windows 10 Creators Update and Above
Run Windows Defender Offline Scan on Windows 10 Creators Update and above
Scanning at booting Windows appeared back in Windows 10 Anniversary Update. This feature allows you to remove persistent malware, rootkits and hidden threats using bypass methods antivirus protection when Windows starts.
To run an offline scan in Windows 10 Creators Update, close all open documents and running programs... Then open the start menu by clicking keyboard shortcut Windows + S, enter Defender and select the "Windows Defender Security Center" link.
Open the "Protection against viruses and other threats" tab and click the "Advanced scan" link.
Select an option and click the Scan Now button.

Windows Defender will warn you that the offline scan will take some time and your device will restart. Make sure all documents are saved and click the Check button.
Windows will then warn you that the restart will take place within a minute. Click “Close” and wait for the device to reboot.
After restarting, Windows will download new files that are required for verification. Wait, this process may take a minute or so.

After that, Windows Defender will start an offline scan and automatically quarantine the detected objects. It will take 15-20 minutes to complete the scan. After completing the verification and cleaning process, the device will reboot again. Log in and make sure there is no malware.
Found a typo? Highlight and press Ctrl + Enter