- laptops Acer, Sony, Samsung, MSI, Toshiba, HP, ASUS...
- and how to use it!
- differs from booting from a disk drive on a desktop computer.
- on any computer, laptop, netbook.
- let's think about why we can't boot from a flash drive.
- or how to correctly configure two IDE hard drives on one cable.
- error when loading the computer, how to deal with it.
- How to reset BIOS settings to default.
- if you cannot enter the BIOS itself
When you turn on your computer, the first thing you do is test the equipment for functionality, in simple words it kind of tests itself, this is the so-called procedure (POST), then the baton is passed to a special program (MBR), which selects from which partition on the hard drive to boot operating system, so before this choice we must boot from a CD or from a flash drive, as in our article.
How to enter (BIOS)? If by some miracle you still have the instructions for the motherboard, then it will definitely be written about it, if not, then when you turn on the computer, we look at the inscription on the monitor, it may look like this: Press DEL to enter SETUP, that is, in order to enter ( BIOS) you need, while the inscription on the monitor is lit, press the key several times
The inscriptions may be different, there may not even be any inscriptions, this should not confuse you, in most cases these are the F2 or Delete keys, less often F1, even less often
Ami BIOS
Award BIOS

BIOS: Boot from Disk
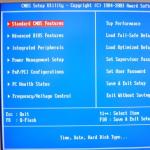
For many who will do this all for the first time, and do something wrong, important information will be given, if you have changed parameters unfamiliar to you, you need to go to the (Exit) tab, it is located from the (Boot) tab to the right after the (Tools) tab ) and is underlined in red in the photo. Next, you need to use the arrows on your keyboard to the item Load Setup Defaults, and press Enter, then go to the menu.

Load Setup Defaults will apply the default settings (BIOS), and they will be the same as they were before your experiments, select OK and the settings will be reset to default, remember this.

After all these necessary digressions, let's return to the main topic and the first photo. We need the Boot item, use the arrows on the keyboard to select it, press Enter and then go to the Boot Device Priority item.
Every user sooner or later faces the need to install an operating system. There is a myth that it is difficult to do this on your own, although in reality this is not the case. All you need is to have basic PC user skills and follow the simple instructions that will be discussed below.
Before installation
There are a number of points that you should take care of before starting the installation.
To do this correctly, first pay attention to the following:
- select the desired version of the operating system;
- decide on its capacity;
- prepare the hard drive for installation;
- take care of the drivers.
If you are reading this article, there will be no problems choosing the OS version - it will be Windows 7. But what about its bit capacity? How do you know which one is right for your PC?
You may encounter two types of systems:
- x86 (32bit);
- x64 (64bit).
What are their differences? 32-bit ones support up to 4 GB of RAM, and 64-bit ones support 4 GB or more. The performance of a 64-bit system is higher, so if the technical characteristics of your PC allow it, you should choose it. Determining the amount of RAM on your computer is very simple - just right-click on the “Computer” icon on the desktop and the necessary technical data will be displayed in the window that appears.
Important! It should be taken into account that after selecting one or another bit depth, subsequently installed programs must be optimized specifically for it.

Now you need to think about where exactly the new operating system will be installed. Most often, drive C is selected for this. However, you need to remember that all data on the disk (including the desktop!) will be permanently deleted. All important files should be moved to another drive or copied to a flash drive.
Another important point is the drivers. Most often, they come bundled with the equipment on special disks, but if not, download them from the Internet in advance. You can find the necessary drivers on the official websites of manufacturers of video cards, network cards and other PC components. Why do you need to take care of this in advance? Because after installation, without a driver for the network card, it will not be possible to do this.
Video: Installing Windows 7
Creating a Disc
To start the installation process, you need a disk with Windows 7. If you have it, you can safely move on to the next step. If it is missing, you will have to create it first. You will need an operating system image, as well as a recording program. It is best to give your preference to “pure” MSDN assemblies that have not been heavily modified. Recording from an image is no different from working with a regular disk. This can be done, for example, with the UltraISO program.
To do this you need:

Installing Windows 7 from disk via BIOS
Let's move on to the main process. It starts with working with the BIOS - the basic input/output system. It is the installation via BIOS that scares novice users so much, but there is nothing difficult in handling it. For our task, you only need to perform a few basic manipulations.
BIOS setup
First you need to get into the BIOS:

The process itself
After restarting, the system will launch the inserted disk and the installation process will begin:

Note! If you want to install Windows 7 from a formatted disk, then take care in advance of the safety of data that may be lost during this procedure.
The installation will begin, usually taking 15 minutes to half an hour. Upon completion, the system will prompt you to enter your username and password (optional), as well as set a hint phrase to restore them. Next you will be asked to enter the serial number, which is usually found in the box with a copy of the OS. If it is missing or the assembly does this automatically, skip this step.
There are still a few small steps ahead:
- indicate “recommended” security settings;
- your time zone;
- network type.
This completes the installation and the system is almost ready for use, all that remains is to configure it.
Video: Installation and configuration
System Setup
The first step is to activate the operating system (if this did not happen automatically during the installation process). Do not forget about this, because after 30 days, annoying reminders will begin to appear informing you that the registration period has expired.
How to check if Windows is activated:

Drivers and programs
The next most important step is to install the drivers. Their absence can lead to incorrect display of graphics, incorrect operation of the computer and the inability to connect to the Internet. How to determine which drivers the system needs?

Windows 7 will often install a driver for the video adapter, so it won't be listed as unrecognized. Despite this, a driver for the video card is still needed, because without it it will not work at full capacity (which can be noticeable by the not entirely correct display of icons on the desktop). We install it from the manufacturer’s disk or downloaded it in advance from the official website.
Important! Do not forget to install the driver for the network adapter, because without it it will be impossible to access the network.

It is worth noting that all such programs are quite effective and can protect your system. For maximum effectiveness, it is worth changing the antivirus you are using from time to time. Once installed, be sure to activate and update to ensure you have the latest databases to protect against newly discovered threats.
Now you can start installing the browser. Its choice also entirely depends on the user’s personal preferences. When a new search engine is installed, the first thing to do is update Flash Player, because without it it will be impossible to watch videos or listen to music on many resources. This can be done in a matter of seconds on the official website. 
Using a freshly installed browser, start filling the system with new programs that no system can do without:
- office applications (Microsoft Office, OpenOffice);
- archivers (WinRAR, 7-Zip);
- programs for listening to music and watching videos;
- useful utilities (CCleaner);
- communication applications (Skype, Mumble);
- other software you need.
Installing any operating system is a matter that requires a thorough and careful approach. Despite this, you should not be afraid of him. Just follow the simple instructions, and very soon your PC will be able to boast a new OS.
the site has prepared step-by-step instructions on how to reinstall Windows 7.
Proper reinstallation of the operating system consists of the following steps:
- Saving data to external media.
- Creating a boot disk.
- Formatting the hard drive (optional).
- System installation.
- Copying a working system using Acronis True Image.
The first and last points are required if you are afraid of losing important files when reinstalling.
Saving data
There are two options for reinstalling the system:
- The system is installed on top of the old one.
- Everything is removed and reinstalled.
In the first case, all data is saved (settings, passwords on sites, files, etc.), but glitches may also be saved. If you install on top, then this section about saving data is irrelevant for you.
Formatting a disk deletes all data. There are several ways to avoid losing the necessary files:
- Copy your personal information to another drive on your computer. Suitable if you have 2 hard drives.
- Dump the files to an external storage device (HDD, flash drive, memory card, smartphone).
- Save files in the cloud (Yandex Disk, Dropbox, Google Drive).
- Confidential files can be saved to a WinRar archive with a password and sent to yourself by email. After reinstalling Windows, the archive will remain in the mail.
What to copy from old Windows? Check out the following places:
- Desktop, My Documents, drive C.
- Bookmarks in the browser.
- Browser and torrent download folders.
- Save games.
- ICQ/Skype correspondence.
Additionally, you can take a screenshot of all installed programs (Start > Control Panel > Programs and Features) so that after installing a clean OS you can easily remember all your favorite programs. Upload the screenshot to VKontakte or Facebook, then it won’t be lost.
Creating a boot disk
If you have a licensed DVD with Windows, you do not need to create a boot disk (flash drive, memory card), you can skip this section.
More often than not, there is no disk, then you need to download a Windows 7 image from the Internet and correctly burn it to an external drive. We recommend looking for an image of Windows 7 Maximum (aka Ultimate); if you have more than 4 GB of RAM, then choose not the x86, but the x64 version.
Simply copying the image will not work; you need to make a bootable drive, for example, through UltraISO. To do this, you will need to download the program itself and find a drive with a capacity of 4 GB or more:

The device is ready, now you can reinstall Windows from it. Save it, it might come in handy later. By the way, you can use the drive after this - upload any files to the free space, the main thing is not to accidentally delete the “system” ones.
Video on burning an image to a flash drive via UltraISO:
It is not necessary to use a flash drive or a special memory card with a card reader. You can take a card from your phone as a memory card, and the phone itself will act as a card reader. Even the built-in memory of a mobile phone is suitable for a boot disk, if it is recognized as a drive in the system when connected via USB.
How to set boot via BIOS
Restart the computer, look carefully at the messages displayed, somewhere they will indicate which button to press during boot to get into the BIOS. This could be Del, F1, F2, Esc, Tab or another. As a last resort, use the “scientific poking” method.  The button to enter the BIOS is indicated when the computer restarts.
Bios are different. Something like the following will be waiting for you. In the first case, you need to go to the “Advanced BIOS Features” section. 
In the second “Boot”, control the arrows on the keyboard. 
In any case, this setting is somewhere nearby, you will find the boot order (may look like First/Second Boot Device), first select the drive where you installed the Win7 image. 
Look for the section where you exit Bios Setup Utility and save the settings. The computer will reboot and boot from the image, which will begin the installation of Windows 7. 
Operating system installation
As we have already said, reinstalling Windows 7 is possible in 2 options: over the previous copy of Win and by removing the old system. If you want to put it on top and save all the data on the disk where you install the OS, then do not format it.
Tip: If you have only one physical drive, but a fairly large one (200 GB or more), first copy important data, and then divide it into logical drives C and D. It is convenient to install Windows on C with formatting, and on D to permanently store files . This is also useful for Acronis True Image. You can partition the disk during the OS reinstallation process.
- You copied the important files, made a boot disk, set the boot in the BIOS, and rebooted the PC. The loading will be shown to you for about a minute.
- Then Windows will present you with a window, check your language settings, click “Next”.
- Accept the Microsoft license terms.
- Select your installation type. At the top is “install over the old OS or update”, at the bottom is “complete reinstallation of Windows 7”.
- Specify which disk to install the OS on. You can format it if you wish (do not format it if you want to save data on it), click “Next”. If it gives an error that it is impossible to install on this disk, then turn off the computer, disconnect all other disks and USB drives, and run the installation again. Also here you can divide a physical disk into logical ones, carefully - do not confuse which one you want to divide, when dividing, all information is deleted from it.
- 10-20 minutes of copying files. After this, the computer will restart. This means that the copying of files is completed, and further installation occurs from the hard drive. You need to disable booting from the image in the BIOS and set it back from the HDD. The flash drive is no longer needed, you can get it from USB. If you do not change the BIOS settings, then after a reboot, loading from the flash drive image and copying will begin again.
- After the reboot, a window will appear asking you to specify your username and password (it is not necessary to enter a password).
- If there is a key, enter it, if not, just click Next.
- Select update settings. The license is updated without problems; the pirated version may fail to activate. Postpone the decision until later if you don't know what to do. Many people disable updates.
- Specify your time zone.
- A little download and you're in Windows 7.


Video on reinstalling Windows 7:
- Disable hibernation mode (relevant for systems on SSD, it allows you to free up disk space).
- If the OS is on an SSD, move the page file, temporary files and browser files to the HDD.
- Disable updates (there will be no unnecessary traffic consumption, activation will not fail, and you will not have to wait several minutes for updates to install before turning off).
- Install drivers for your video card and sound card.
After installing all the applications and configuration, use Acronis True Image to make a “clone” of the local disk. In case of problems, you can restore an exact copy of the system and the entire C drive in 5 minutes, and you do not need to reinstall everything again.
After this, you are the happy owner of a customized, clean OS, and no experiments or failures are now scary. If something goes wrong – 5 minutes and everything is fine again!
In this article I will talk about how to independently install the Windows 7 operating system from a disk onto your computer or laptop.
I offer detailed and step-by-step instructions with a visual demonstration of screenshots of installing the Windows operating system.
If you think that installing an operating system is something complicated and incomprehensible that only a specialist can handle, then I will disappoint you: this is not true. Now you can see for yourself.
All you need to install Windows 7 (or Windows 8) is a computer or laptop, a disk with the operating system (since in this article we will install Windows from a disk), detailed instructions, which I will now provide you with, and, perhaps, attentiveness! Hopefully after installation you won't look like . 🙂
After installation, I recommend installing it immediately. You understand that in our time of electronic payments this is very important. Also now (yet) nowhere without Adobe Flash Player. What's his name Right install read . You may also be very interested in not bad. If you store it on your computer private information, create a .
Important: The majority of all possible problems that arise when installing Windows 7 are associated with an incorrectly prepared installation disk and (or) the quality of the “OS build” recorded on it. You can read the article on how to correctly burn an operating system image to disk.
Remember: if this disc is not out of the box, that is, purchased in a store, then you need to use only original images from Microsoft MSDN. It is the original image, which is just as accessible on the Internet as various assemblies, that is the key to the successful installation of Windows and its normal functioning.
Do not use assemblies of unknown origin. You install all third-party fixes, corrections, and homemade assemblies at your own peril and risk. The consequences may be irreversible.
Before installing Windows 7:
Remember two basic things to do before installing Windows.
First- this is to decide in advance on which partition of the hard drive the system will be installed. As a rule, in most cases this is the C:\ drive. You should remember (or create) the volume label and size.
Remember, your desktop is entirely located on the C:\ drive, or rather, here: C:\Documents and Settings\ Username\Desktop. Think in advance about the integrity and safety of files that are important to you, copy them from your desktop, that is, from drive C, to another drive or flash drive.
All programs installed on the C:\ drive will also be deleted, but this is not a reason to drag the entire folder with programs to other drives. It is much easier to reinstall these programs on a clean system. Don't be lazy, it's not every day that you reinstall Windows.
Second moment - these are drivers for your computer or laptop. They need to be taken care of in advance. Most laptops come with them included, but if they are not available (or need to be updated), look for them on the manufacturer’s official website and download them in advance.
I recommend reading everything you need to know about installing drivers in the article “Installing Drivers or Five Iron Rules,” which is located.
If you skip this important point, then after installing Windows, you may be left without the Internet, because it is not a fact that the Windows distribution will initially contain drivers for your network card.
Installing Windows 7 from disk:
Insert the disk with the Windows operating system into the drive and restart the computer. By the way, if you don’t have a disk drive, you can install the Windows operating system using a regular one.
Let's continue. Our task is to configure the computer to boot from a DVD. This can be done in 2 ways:
- 1. select the device (DVD) in a special boot menu;
- 2. change the boot priority in the BIOS (from HDD to DVD).
The first method, selecting a device in the boot menu, is simpler and more convenient. After installing Windows, there is no need to return booting from the HDD (hard drive). However, on older computers this function is not available and in this case you will have to go into the BIOS and change the boot priority.
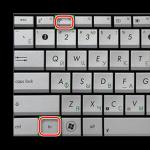
Start - reboot, wait until the screen goes dark and at the first sign of the system waking up (the logo appears), press and hold the Delete key on the keyboard. Why the Delete key? These can be the keys F1, F2, F3 + F2, F10, Ctrl + Alt + Esc, Ctrl + Alt + S, Esc.
There is no universal button for entering the boot menu or entering the BIOS, and it all depends on the computer manufacturer (motherboard). The surest way is to read the instructions from the computer or motherboard. The table below shows a clear example of such keys.
The boot menu looks something like this:
Press F10, agree and confirm the exit with saving (Save and Exit) by selecting “Ok”.
Phoenix Award
Let's consider the second interface option. To boot from disk, you need to change the priorities so that the first device is the DVD drive. Find the item “Advanced BIOS Features” and use the arrows to switch to the first device (First Boot Device), change to CDROM.
Press F10 and confirm Save and Exit.
If you have problems at this stage, I recommend watching this video.
Let's continue. If everything was done correctly, we will see the following window with the inscription: “Press any key to boot from CD or DVD.”
Here you need to press any key, for example, spacebar. This is only done 1 time and only at this stage of installation. We see the following window with the inscription “Windows is loading files”.
The files are being extracted, after which we will see the message "Starting Windows" and the Windows 7 installation window itself. Windows installation has begun!!
Select the desired language and click “Install”.
Next, we need to select the edition of Windows 7. Select the one for which you have a key or which you are going to activate. On laptops, it is usually indicated on a piece of paper with a key located on the bottom of the laptop. Entering the serial number itself will be a little later; it has been moved to the end of the installation.
A few words about the possibility of installing a 32-bit (x86) or 64-bit version of Windows. If you have more than 4 GB of RAM (also known as RAM, Memory), then install 64-bit, if not, then 32-bit (x86).
Let's read and agree to the license terms. Next, we need to select the installation type - select “Full installation”.
Now you need to select the partition on which Windows will be installed.
If you have this partition reserved by the system (note, it is still in megabytes (MB), not gigabytes), for example, as in the following screenshot, then select Disk 0 Partition 2.
To avoid such excruciating pain when choosing a partition, before installing Windows, look at how many gigabytes your C drive occupies.
If you have one partition on your hard drive and it is larger than 250 GB, then it would be more correct to create two local disks. One section is specifically for Windows (usually about 50-100 GB), and the other is for storing your personal information (how much will remain, XXX GB).
Note: The partitions you create should be named Disk 0 Partition 1, 2, 3..., not “Unallocated Disk Space”. Otherwise, the operating system simply will not see sections with such names.
If necessary, create a section or sections and click “Apply”:
Attention: At this stage, problems may arise - when Windows 7 asks for a driver for further installation or when the system does not see your hard drive to continue installation.
Or install (if prepared) hard disk controller drivers. If you already have two or more partitions on your hard drive, then you can skip the above point. So, we have selected the “System” section, and now we need to start formatting.
The installer warns that all our data will be deleted. This is what we need, because we are interested in a clean installation of Windows. We agree and wait. Usually the whole process takes a matter of seconds. After formatting, we see that there is more free space, calmly click “Next”.
And here is the beginning of the installation, the process has started. You can already exhale).
We're waiting... It usually takes 15–25 minutes. When our system is installed, it will prompt you to enter your username and computer name. Let's enter.
If you wish, you can enter a password and a hint. Next, Windows will prompt you to enter your serial number. Enter (if available). If not, then skip this step and uncheck the “Automatically activate when connected to the Internet” checkbox.

Every user sooner or later faces the need to install an operating system. There is a myth that it is difficult to do this on your own, although in reality this is not the case. All you need is to have basic PC user skills and follow the simple instructions that will be discussed below.
Before installation
There are a number of points that you should take care of before starting the installation.
To do this correctly, first pay attention to the following:
- select the desired version of the operating system;
- decide on its capacity;
- prepare the hard drive for installation;
- take care of the drivers.
If you are reading this article, there will be no problems choosing the OS version - it will be Windows 7. But what about its bit capacity? How do you know which one is right for your PC?
You may encounter two types of systems:
- x86 (32bit);
- x64 (64bit).
What are their differences? 32-bit ones support up to 4 GB of RAM, and 64-bit ones support 4 GB or more. The performance of a 64-bit system is higher, so if the technical characteristics of your PC allow it, you should choose it. Determining the amount of RAM on your computer is very simple - just right-click on the “Computer” icon on the desktop and the necessary technical data will be displayed in the window that appears.
Important! It should be taken into account that after selecting one or another bit depth, subsequently installed programs must be optimized specifically for it.

Now you need to think about where exactly the new operating system will be installed. Most often, drive C is selected for this. However, you need to remember that all data on the disk (including the desktop!) will be permanently deleted. All important files should be moved to another drive or copied to a flash drive.
Another important point is the drivers. Most often, they come bundled with the equipment on special disks, but if not, download them from the Internet in advance. You can find the necessary drivers on the official websites of manufacturers of video cards, network cards and other PC components. Why do you need to take care of this in advance? Because after installation, without a driver for the network card, it will not be possible to do this.
Video: Installing Windows 7
Creating a Disc
To start the installation process, you need a disk with Windows 7. If you have it, you can safely move on to the next step. If it is missing, you will have to create it first. You will need an operating system image, as well as a recording program. It is best to give your preference to “pure” MSDN assemblies that have not been heavily modified. Recording from an image is no different from working with a regular disk. This can be done, for example, with the UltraISO program.
To do this you need:

Installing Windows 7 from disk via BIOS
Let's move on to the main process. It starts with working with the BIOS - the basic input/output system. It is the installation via BIOS that scares novice users so much, but there is nothing difficult in handling it. For our task, you only need to perform a few basic manipulations.
BIOS setup
First you need to get into the BIOS:

The process itself
After restarting, the system will launch the inserted disk and the installation process will begin:

Note! If you want to install Windows 7 from a formatted disk, then take care in advance of the safety of data that may be lost during this procedure.
The installation will begin, usually taking 15 minutes to half an hour. Upon completion, the system will prompt you to enter your username and password (optional), as well as set a hint phrase to restore them. Next you will be asked to enter the serial number, which is usually found in the box with a copy of the OS. If it is missing or the assembly does this automatically, skip this step.
There are still a few small steps ahead:
- indicate “recommended” security settings;
- your time zone;
- network type.
This completes the installation and the system is almost ready for use, all that remains is to configure it.
Video: Installation and configuration
System Setup
The first step is to activate the operating system (if this did not happen automatically during the installation process). Do not forget about this, because after 30 days, annoying reminders will begin to appear informing you that the registration period has expired.
How to check if Windows is activated:

Drivers and programs
The next most important step is to install the drivers. Their absence can lead to incorrect display of graphics, incorrect operation of the computer and the inability to connect to the Internet. How to determine which drivers the system needs?

Windows 7 will often install a driver for the video adapter, so it won't be listed as unrecognized. Despite this, a driver for the video card is still needed, because without it it will not work at full capacity (which can be noticeable by the not entirely correct display of icons on the desktop). We install it from the manufacturer’s disk or downloaded it in advance from the official website.
Important! Do not forget to install the driver for the network adapter, because without it it will be impossible to access the network.

It is worth noting that all such programs are quite effective and can protect your system. For maximum effectiveness, it is worth changing the antivirus you are using from time to time. Once installed, be sure to activate and update to ensure you have the latest databases to protect against newly discovered threats.
Now you can start installing the browser. Its choice also entirely depends on the user’s personal preferences. When a new search engine is installed, the first thing to do is update Flash Player, because without it it will be impossible to watch videos or listen to music on many resources. This can be done in a matter of seconds on the official website. 
Using a freshly installed browser, start filling the system with new programs that no system can do without:
- office applications (Microsoft Office, OpenOffice);
- archivers (WinRAR, 7-Zip);
- programs for listening to music and watching videos;
- useful utilities (CCleaner);
- communication applications (Skype, Mumble);
- other software you need.
Installing any operating system is a matter that requires a thorough and careful approach. Despite this, you should not be afraid of him. Just follow the simple instructions, and very soon your PC will be able to boast a new OS.
>