For each smartphone or tablet, there are both official and custom firmware. Their installation is carried out in different ways: OTA updates come over the air, firmware in ZIP archives are installed manually via CWM, TWRP Recovery or ROM application Manager, using a computer, you can flash Android using the Fastboot and SP Flash Tool utilities.
After Android firmware, all data from internal memory will be erased, so to save contacts, settings and applications, first .
Android firmware via Recovery
Unofficial firmware in ZIP format, such as CyanogenMod, can be installed through custom Recovery: CWM or TWRP, as well as applications that use Recovery, for example, ROM Manager. Cores and patches are sewn in the same way. To download the official “Update.zip”, the capabilities of the standard recovery mode are enough, for more details, see the article at the link above.
Install the ZIP file in CWM
On all devices out of the box it is Stock Recovery from the manufacturer, you need to install CWM by . Then find and download the ZIP archive with the firmware. Please note that firmware of other formats cannot be installed via CWM.
1. Now go to Recovery. To do this, turn off the device and press a certain combination of buttons. Depending on the manufacturer, the key combination differs, all are presented below possible options(the new one says how to enter Recovery on specific models):
- Volume up + power button
- Volume down + power button
- Volume up/down + power button + “Home”
- Volume up + volume down + power button
Great, you are in Recovery. Movement is carried out using the volume buttons, and confirmation of the choice is done with the power button.
2. Before installing the firmware, you must first reset the settings: select “wipe data/factory reset”.


4. Great! Return to the main menu and select "install zip".

5. After that “Choose zip from /sdcard”.

6. Navigate to the folder where you saved the firmware and select it.

7. A confirmation message will appear. Click “Yes – Install...”.

8. The firmware installation process will go through and at the end the message “Install from sdcard complete” will appear at the bottom of the screen.
Great, Android is flashed. Returning to the main menu CWM Recovery and reboot the system. To do this, select “reboot system now”.

How to install firmware via TWRP Recovery
If you prefer TWRP Recovery rather than CWM, flash it using . You can also install firmware from a ZIP archive through it:
1. Download the firmware and place it in any convenient location in your smartphone’s memory.
2. Go to TWRP. This is done in the same way as CWM.
3. Now you need to reset the system. To do this, select "Wipe" from the main menu.

4. To initiate a factory reset, drag the slider to the right.

5. When you finish cleaning your smartphone or tablet, press the “Back” button.

6. You will be returned to the main menu of TWRP Recovery. Now let's move directly to the firmware itself. To do this, select “Install”.

7. Navigate to the location in memory where the firmware is saved. Click on it.

8. Drag the slider to the right to begin installing the firmware.

9. The process will begin. It usually lasts 2-3 minutes.

10. At the end, a message indicating the successful completion of the firmware will appear. Click on "Reboot System" to boot into Android.

Considered another way to flash Android using a ZIP update. You can also use special application. More on this below.
Using ROM Manager
The ROM Manager application allows . By the way, I advise you to make a backup of the internal memory before flashing the firmware in order to restore the data later. Now we will use another function of the program: flashing the phone using ROM Manager.
To operate the utility you need root rights - they are obtained using exploits: , or .
A custom Recovery must be installed (essentially, using ROM Manager you flash the device through it, but at the same time you work with a simple and clear application interface, not Recovery). Links to instructions are in the previous paragraphs.
So, install ROM Manager, search and download the required firmware for your device. Open the application and follow the instructions:
1. Place the .zip archive of the firmware in the memory of your Android phone or tablet.
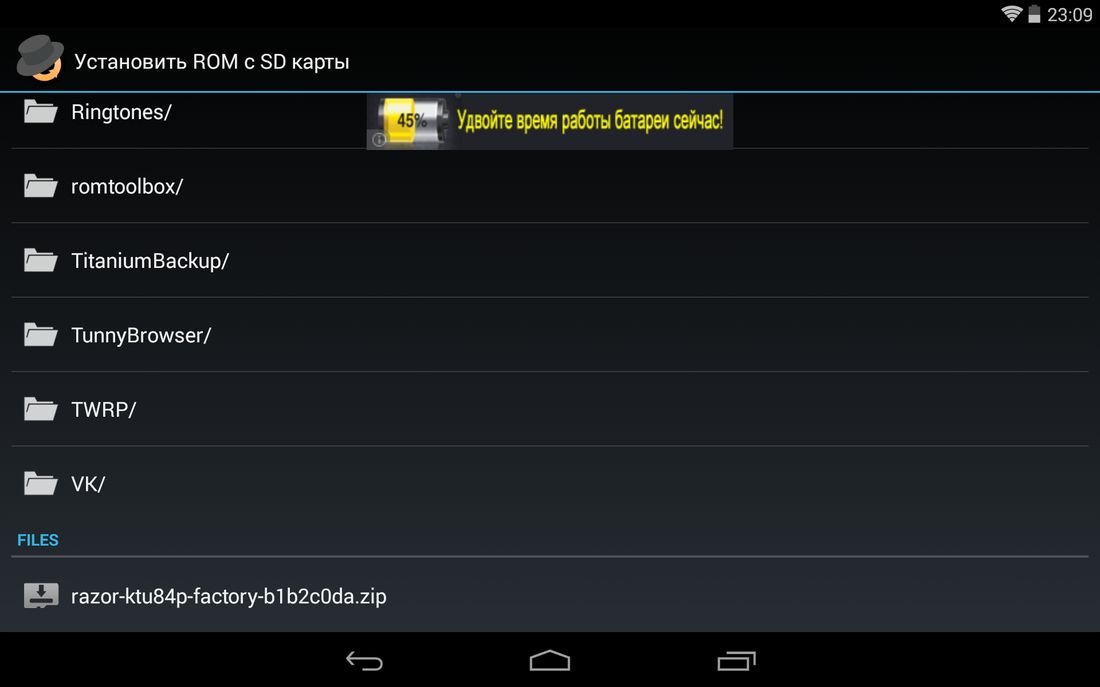
2. In the ROM Manager menu, open the “Install ROM from SD card” item.

3. Find the archive and click on it.
4. In the menu that opens, select “Reboot and Install”. I advise you to check the box next to “Save current ROM” so that you can restore the system if necessary.
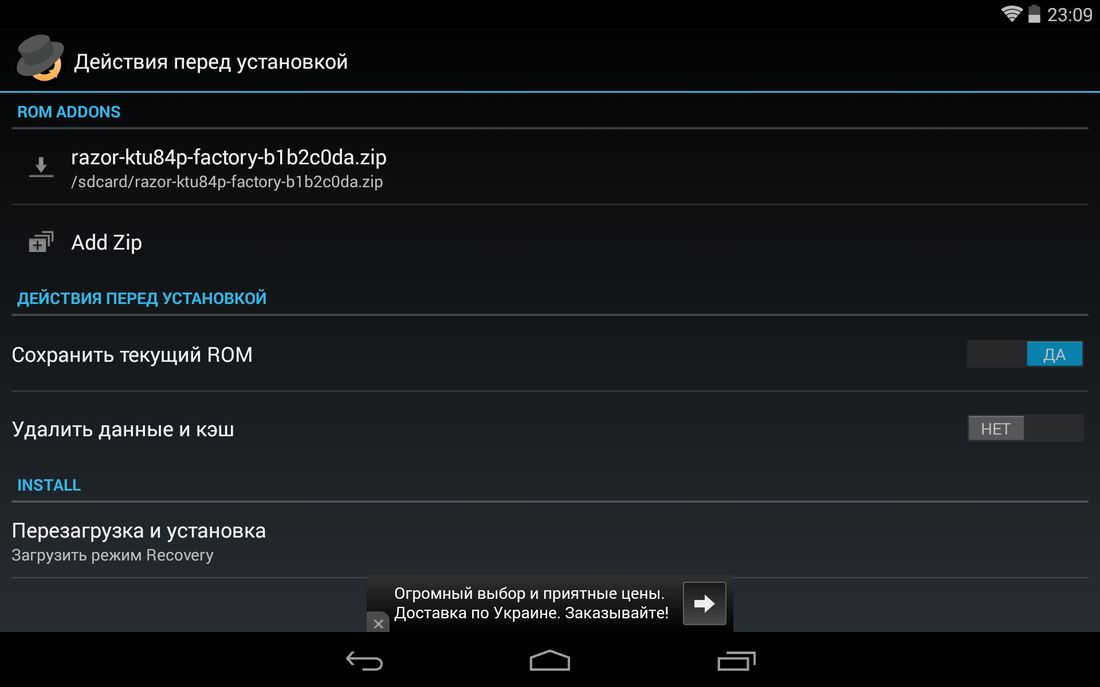
5. In the next window, click “OK”, after which the device will boot into Recovery mode and the firmware process will begin.

ROM Manager also has a function to search for ROMs for a device. In the main menu of the program, select “Download firmware”. Some of them are only available in the premium version of the program.

Above, I talked about three ways to install firmware from ZIP archives on the device itself. Next will be information about updating Android firmware using a PC.
How to flash Android via computer
Many mobile devices are flashed using special utilities for PC: below are instructions for working with Fastboot and SP Flash Tool. Through the second program various manipulations with Chinese phones are performed based on Mediatek processors.
Fastboot: instructions for flashing phone firmware
Many firmwares must be installed from a computer using the Fastboot utility, rebooting the mobile device into the mode of the same name. The program is included in Android SDK Platform Tools, the installation of which is described in . In addition, you will need drivers (all information is available at the link).
Also, on devices from some manufacturers, you must first unlock the Bootloader:
- How to do it on HTC:
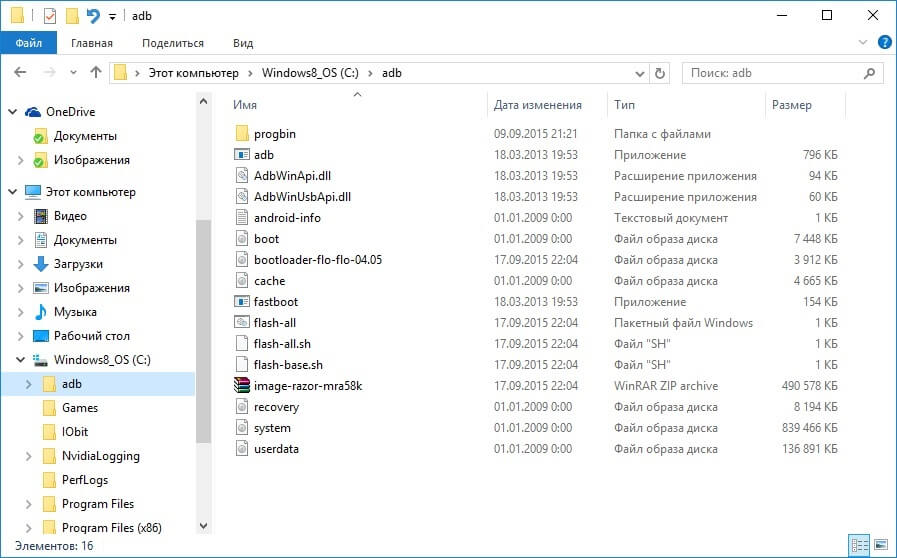
Next, download the archive with the required firmware and unzip it in the “platform-tools” folder, which contains “ADB” and “fastboot”. It should turn out something like this (I have the necessary components in a separate “adb” folder).
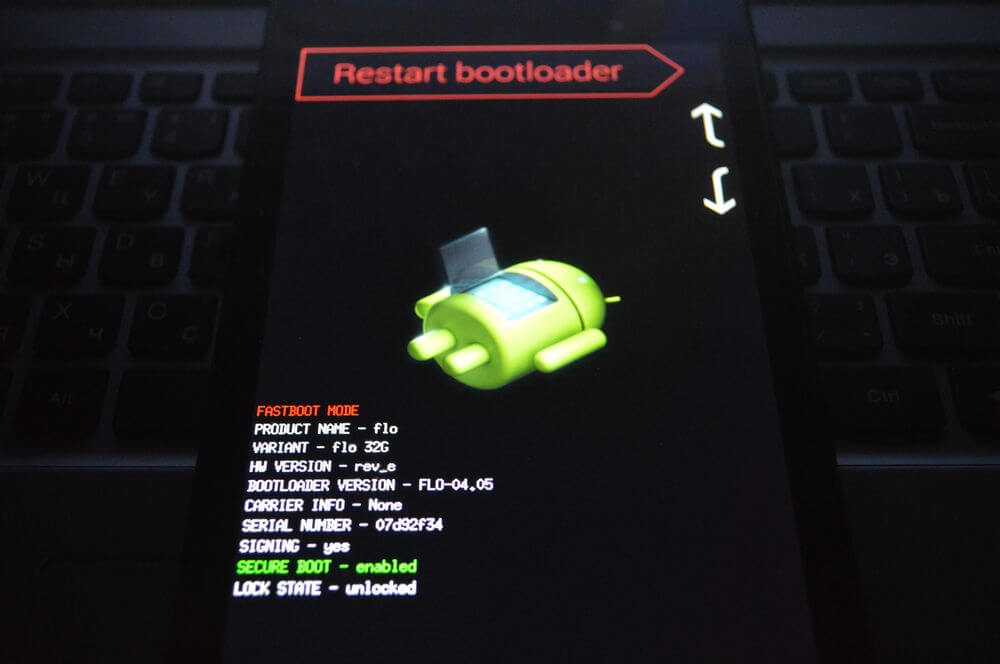
Then we connect Android to the computer via USB and put the smartphone or tablet into fastboot mode. The easiest way to do this is as follows:
- Turn on
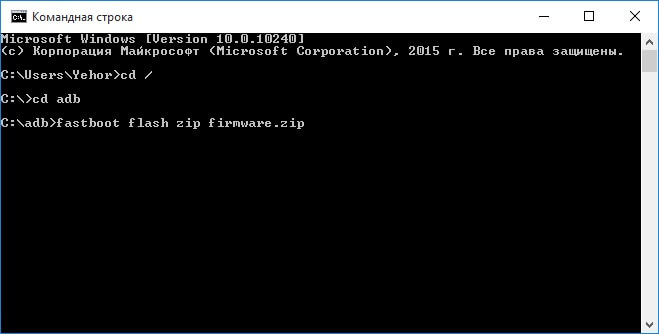
- On the computer go to command line
- We enter the commands sequentially and after each press “Enter”:
CD path to the "adb" file
For example, it is located in "C:\Program Files (x86)\Android\android-sdk\platform-tools". Then the path will look like this:
cd Program Files (x86)\Android\android-sdk\platform-tools
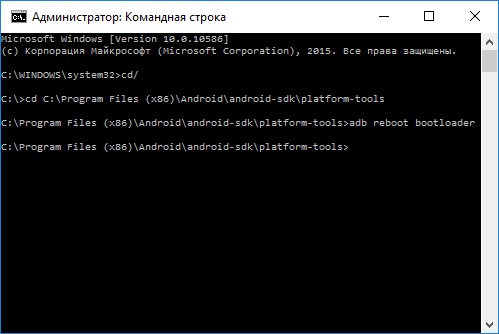
Then the Android gadget will reboot into fastboot mode.
Before flashing any partition of the system, you first need to format it so that there are no problems with operation. To do this, use the commands (after entering each one, press “Enter”):
fastboot erase boot
fastboot erase userdata
fastboot erase system
fastboot erase recovery
fastboot erase cache
After cleaning the partitions, you can flash them. Enter the commands (there may be more of them - it all depends on the presence of certain files in a particular firmware; below is a set of basic ones):
fastboot flash boot imya-fayla.img
fastboot flash userdata imya-fayla.img
fastboot flash system imya-fayla.img
fastboot flash recovery imya-fayla.img
fastboot flash cache imya-fayla.img
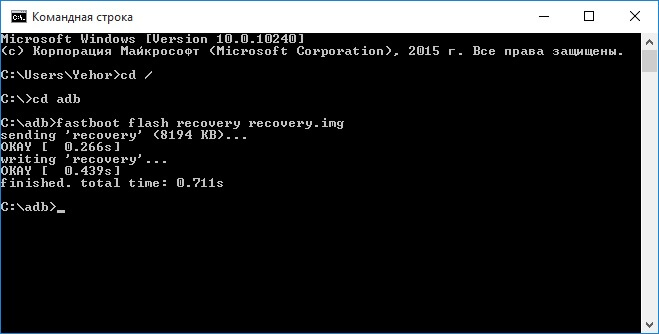
“Imya-fayla.img” is the name of the corresponding firmware file. For example, since in my case Recovery is created and its image is called “recovery.img”, I enter:
fastboot flash recovery recovery.img
Usually the firmware can be installed in its entirety, that is, flashing all the files at once. To do this, “flash-all.bat” must be located in the folder with the firmware files. If it is, then simply enter this command and the firmware installation process will begin:
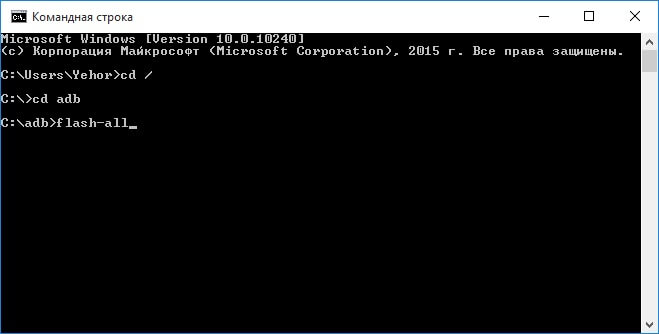
As a result, at the end a message indicating the successful completion of the firmware will appear.

You can boot the system. To do this, you need to exit fastboot mode on the device itself or using a computer. In the second case, you need to enter another command:
Installing ZIP updates in Fastboot
Using Fastboot you can install ZIP firmware. To do this, download and place the firmware in the folder where “ADB” is located. Put your smartphone or tablet into fastboot mode and enter the command:
fastboot flash zip imya-fayla.zip
“Imya-fayla.zip” is the name of your firmware, replace it with your own.
Wait for it to finish Android installations and reboot your device.
SP Flash Tool: flashing Chinese Android smartphones on MTK
Chinese Fly smartphones, Lenovo, Xiaomi, Meizu, ZTE, Doogee, Bluboo, UMI, Elephone, Oukitel, Blackview and others running on MTK processors are flashed special utility SP Flash Tool. She can sew individual partitions, format the system and create backup copies. Models based on MT6572, MT6577, MT6580, MT6582, MT6589, MT6592, MT6750, MT6737, Helio P10, Helio P20, Helio X10, Helio X20 and other less popular chips are supported.
The current version of the program is available on the website: http://spflashtool.com/. Before starting the process, install USB drivers for the MTK processor (the link to the FAQ is in the “Fastboot” paragraph of this manual).
1. Unzip the SP Flash Tool folder on the “C:\” drive and place the firmware next to it. The path to the files must not contain Cyrillic characters.
2. The folder contains the file “flash_tool”. Launch it.

3. In the “Download-agent” field the path to “MTK_AllInOne_DA.bin” will already be indicated. Next, you need to click “Scatter-loading” and select the scatter file in the folder with the firmware.


4. Leave the switch on “Download Only” and mark which partitions need to be flashed (by default, all are selected).

5. Click “Download”. Then turn off the phone, remove the battery for a few seconds, insert it back and connect the switched off Android smartphone to a computer via USB.

6. First the red bar “Download DA 100%” will appear.

7. Then yellow with the firmware process. The percentages indicate how close the installation is to completion.
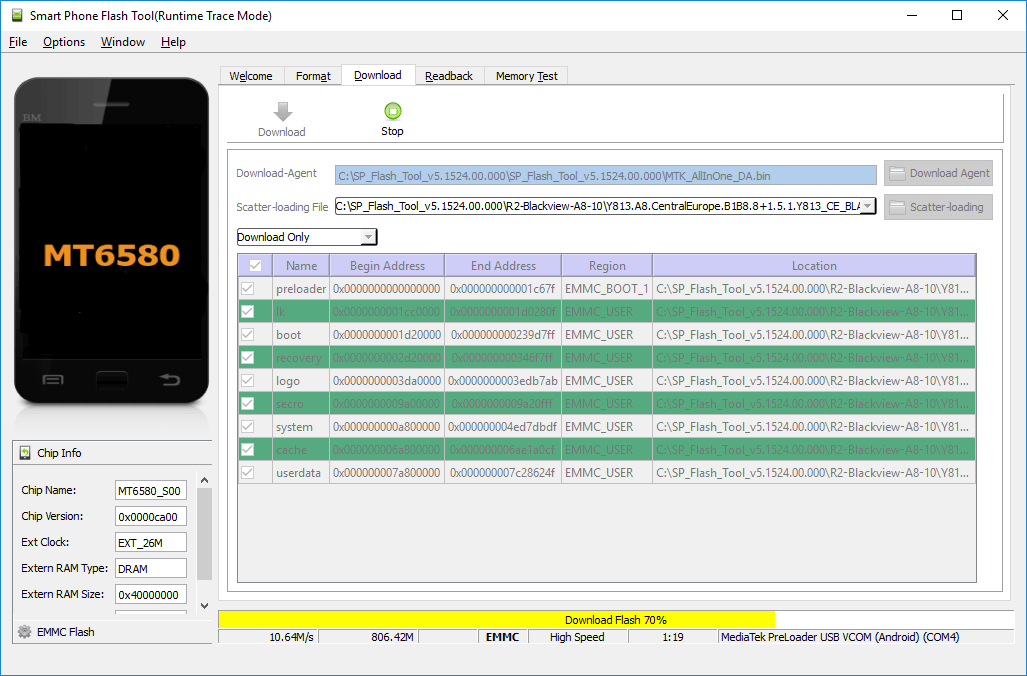
8. SP Flash Tool will notify you that the firmware of the mobile device has been completed - the “Download Ok” window will open with a checkmark.

Turn on your phone. The first launch usually lasts quite a long time.
Flashers for Samsung and LG
Devices from some manufacturers need to be flashed through special proprietary utilities(stitchers). There are instructions on this topic on our website:
- Samsung -
»
In fact, this is the same as reinstalling Windows on a desktop computer, but for smartphones and tablets the concept of flashing is usually used. Inexplicable glitches may appear in the Android operating system. There may be irreparable errors that constantly arise and interfere with the normal operation of the tablet. For example, refusing to work Wi-Fi module, which turns itself off. Or it refuses to connect to the Internet or something like that. In this case, if you have tried all the ways to fix the problem and these actions did not help, then you can fix the situation if you change the firmware operating system.Problems with the current operating system
Expansion of functions
The next serious reason why you need to change the operating system firmware is the desire to expand the functionality of your tablet.
Initially, manufacturers may not provide some functions on the device. Later, during operation, the user will find out on the Internet that it is possible to change the firmware on his tablet, as a result of which he will have more options when working with it.
Ways to change the firmware
There are at least two ways to change the firmware on your tablet.
- One of them involves connecting the tablet to a computer via a USB cable. In this case, a special program is installed on the computer.
This method has a significant advantage, since the process occurs quickly. The disadvantage is that if, for example, a contact failure occurs, then the tablet most likely cannot be restored.
- The second method involves changing the OS firmware from the tablet itself, which does not require connecting to anything.
It is enough to install the necessary firmware on the tablet itself from the Internet and download the ROM Manager program onto it.
The advantage of the method is that you do not need to be afraid of damage to the device due to poor contact when connecting, but there is also a disadvantage.
The program only works on devices with . If you don’t have such rights, then you won’t be able to use this program.
How to change firmware on a tablet
- First you need to download the firmware directly to your tablet or computer. To do this, launch a search engine in the browser and write the phrase “firmware for” in the search bar.
- Next we indicate the model of our tablet, for example, huawei mediapad t2 7.0 and look on the Internet for a site where you can find firmware for it.
For example, one of the popular sites on these issues is the w3bsit3-dns.com service.
On w3bsit3-dns.com huge amount various firmwares that are uploaded here by enthusiasts.
Anyone, if necessary, can download the necessary firmware for their own tablet, if the model is popular enough.
- If the firmware is found, you need to download it to your computer and then upload it to the root of the SD card connected to the tablet.
It should be borne in mind that the firmware must be in zip format and there is no need to unzip it, but upload it in the same form onto the tablet’s SD card.
The root of an SD card is the space that opens immediately after connecting to it for the first time.
When you enter the SD card, a number of folders open and at the very bottom free space copy our firmware.
- Now you can start flashing. We launch the ROM Manager program, which can be downloaded for free on Google Play.
There are two versions of this program - free and paid. The difference between them is functional, but in order to change the tablet firmware demon paid version quite enough.
So, we launch ROM Manager and here a message appears that you need to get Root rights, otherwise you won’t be able to change the firmware on the tablet. This, as already noted, is the disadvantage of this method.
If Root rights received, then upon first launch the program will offer to install Recovery ClockworkMod specific version.

After installation, you can start flashing. There are again two ways.
- In the first case, in the paid version of ROM Manager it is possible to download and change the firmware directly from this program.
- If you found the firmware on the Internet yourself, then this item will not be needed.
So, in the first case, the program itself will determine the model of your device, find it on the Internet available firmware and will allow you to download them, if of course they are available.
- In the program, select the item Install ROM from SD card.
- Then you need to find the firmware on your tablet and, having previously created backup copy current operating system, reflash the tablet.
- The program has a point for security purposes - Save current ROM, because there is always a chance that something will go wrong in the process. Or the firmware itself will turn out to be unsuitable and everything will need to be returned.
With the help of such a backup, you can return the tablet to its original state.
There is another option to install ROM. In the program you need to select the item Boot into Recovery mode, if, for example, the first method did not work out.
After loading Recovery mode, the tablet will reboot and a menu will appear on the screen in which you need to select the item - reboot system now.
In this mode, the sensor does not work and you need to use mechanical buttons, that is, the volume rocker.
This way you can switch between items. To enter the selected item, press the power button, which is used in this case as confirmation of the action.
Will open file manager, in which we find the folder with the tablet firmware.
Select the firmware and click Install. The installation process takes some time, the duration of which depends on the performance of the tablet and the size of the firmware.
During the firmware update process, the tablet may heat up and upon completion it will reboot itself if the firmware update was successful.
The startup process itself after the firmware can last quite a long time - 15 - 20 minutes. Therefore, it is important to be patient and wait for everything to happen safely.
It should also be said that the firmware process is in progress offline mode, so before doing this you need to make sure that the battery charge is sufficient and is at least 80%.
That’s all for the question of how to change the firmware on a tablet yourself.
![]()
From this guide you will learn how to install all kinds of firmware for Android devices yourself (official factory/stock and custom/modified) at home. in various ways: via Recovery (any tablet) and using Odin (only Samsung devices). You can find and download some of them on the same website.
How to flash a regular tablet
You can also flash and reflash the tablet yourself, at home, in several ways. For the simplest, there is already an instruction, it can be found in the article, it uses Android’s ability to automatically find updates for itself. Suitable for any manufacturer. If you don’t want to bother and do everything as quickly and safely as possible, I recommend this method. The rest are more difficult.
How to install factory (stock) official firmware
Firmware programs:
— Drivers for Android tablet. They are installed automatically when installing the included software, for example Kies from Samsung. If you are not sure that your computer has them, download them to a flash drive from the Internet by simply entering something like “drivers” in the search terms on Yandex or Google Galaxy Tab 2". Or search on the manufacturer's website. I would love to give you direct links to download drivers, but I can’t. There are a lot of Android tablets, and posting a link for each is unrealistic. If you have Windows 7, install drivers as an administrator. Right button mouse on the driver file -> “Run as administrator”).
— Herself official firmware . You also download it yourself by entering similar queries in search engines- “official firmware Samsung Galaxy Tab 2". Well, or also download it to a flash drive from the manufacturer’s website.
— Odin program . Download it from wherever you want. It does not require installation, just unzip it somewhere (for example, on the same flash drive) so that it is at hand. I warn you once again that this program can only flash Android tablets from Samsung.
1. Turn off the antivirus and all third-party ones on the computer background programs, it is advisable to turn off the Internet.
2. Copy the archive with the firmware to a folder with an English name!
3. Launch Odin.
Further actions depend on the type of firmware you have. If it consists of one archive, proceed according to paragraph 4.1, but if it consists of three files, then follow paragraph 4.2. Most likely you will come across a single-file one, they are more modern than three-file ones.
4.1. Press the button PDA in Odin and select the firmware.
4.2. Pressing the buttons PDA(system), PHONE(modem), C.S.C.(region) and select the necessary files, it will be clear what corresponds to what.
5. Turn off the tablet completely, wait a little, and then press the “ Volume+" and then quickly click " Enabling» ( Other combinations are possible, they depend on the tablet model, for some you need to press not “ Volume+", A " Volume-"), hold until the text menu appears.
6. Click " Volume-» to confirm (depending on the model, this action can be performed differently).
7. Connect the tablet to the computer (it is better to use the original cable), Odin will detect the port - COM- and the green square will light up.
8. Click Start in Odin, the firmware process has begun.
9. Sound signal and message PASS Odin will tell us in a green window that the installation is complete. The tablet will reboot itself, you can disconnect the cable.
10. I recommend doing a wipe (data reset) after you manage to reflash the device. To do this, click " Volume-" and the button " Enabling", wait without releasing the buttons of another text menu. In it you select using the volume buttons Wipe data/factory reset, and confirm your choice with the “ Enabling". After completing the process, select “ Reboot system now", the tablet will reboot. Now everything is ready.
Here is a short video, better watch it, it will become clearer.
How to install custom firmware on a tablet from an SD card
Installing custom firmware is relatively easier than installing official firmware.
1. Download the custom firmware you want and applications from Google (gapps.zip). These applications are needed for correct operation devices. Some programs don't work without Google applications, in particular without . It is better to download those Google applications that come with the firmware (as a rule, gapps.zip is also installed with it) so that there are no conflicts.
2. Copy the archive with the software and gapps.zip to the tablet’s memory. You can use a memory card, but it’s better to use internal memory.
3. Download ClockWorkMod if it is not already installed.
4. Enter the mode Recovery, to do this, click “ Volume-" and the button " Enabling«
5. Do a Wipe data/factory reset, as described above, point 10 from the instructions for installing the official firmware.
6. Select an item there Install zip from sdcard volume and power buttons. Then - Chooze zip from sdcard, and select your firmware. Once it is installed, restart your tablet by selecting Reboot system now.
7. Now you need to install Google programs. We do the same as in the previous paragraph, only select gapps.zip. We reboot again.
8. And we do it again Wipe data/factory reset. And now that’s it, you managed to successfully reflash the device.
How to flash a Chinese tablet (Armix, ZTE, Prestigio, Ritmix...)
Now let's tell you how to flash a Chinese tablet. First of all, look for firmware for your tablet model. It’s trivial to ask a search engine for “firmware for full_name_of_tablet”. It is advisable to indicate the exact name of the device, otherwise a difference of a couple of numbers can be fatal. After we have found them, we carefully read the description of the firmware. If you are convinced that this is what you need, download it. If you can’t find it, try searching on the English-speaking Internet by entering “firmware for full_name of the tablet.”
Next, we format the memory card, just in case, in the FAT32 system and copy what we downloaded to it. Most likely it will be an archive, so you will have to unpack it, but it’s better to read how exactly in the file attached to it.
We turn off the Chinese friend, check that there is enough battery charge and turn it on. The tablet will do everything itself. At least it should.
How much charging does it take to flash the tablet firmware?
It’s better not to take risks here and charge 100%. But generally half the charge is enough. In some cases, Android itself will tell you that the battery charge is not enough for the firmware. If the tablet is discharged during the firmware, there will be big problems. We'll have to.
If you have questions, ask them in the comments.
Updating or installing firmware can eliminate many problems related to the operation of Android devices A. During long-term use system memory mobile gadgets are clogged with residual files () (“casts” of previously downloaded programs), malicious code() and other unnecessary data. All this leads to a decrease in the performance and speed of the processor and RAM. As a result, the smartphone (tablet) often begins to freeze and reboot on its own. And if factory reset() does not lead to a positive result, the user can only perform the software update himself. Let's look at how to reflash a phone running on Android OS.
Types of firmware and methods of installing them
Installing Android firmware at home differs in many ways from installing other software. This process is more labor-intensive and associated with many risks. If you select the wrong software version or violate the update process, there is a possibility that your phone or tablet will become useless. However, having learned how much reflashing costs from professionals, many still decide to change the version software on one's own.
For flashing Android there is no single instruction that would fit all models mobile devices. It all depends on the manufacturer of the device and what software you plan to install.
All Android firmware is divided into two types:
- Official. Supplied directly by smartphone manufacturers and usually only suitable for a specific brand. Such programs are considered the most reliable, so they should be used whenever possible.
- Unofficial (custom). Developed by Android device users and small companies. They are used when reinstalling Android on Chinese devices (for example, Lenovo, Meizu, Xiaomi, etc.).
When using custom software, there is a possibility of installing a low-quality update, as a result of which the gadget will begin to slow down even more. Therefore, you need to download the executable file only after reading its description in detail and reading user reviews.
There are several ways to change the firmware on Android:
Preparing for self-flashing
Before reinstalling the software on your Android device, you need to make a number of preparatory measures:
- download a software update program to your PC (Odin, Kies or SP Flash Tool and find a high-quality usb cable(if the reinstallation will take place using a computer);
- (if you plan to reinstall Android to an unofficial version);
- charge the gadget's battery to 100%;
Functionality established collateral largely depends on its version and build. To new firmware after some time it did not start to conflict with the hardware, you need to find out serial number mobile device:

Let's look at a more detailed procedure for updating Android on a phone using the example of Samsung and Lenovo, although this instruction also suitable for many other brands.
Smartphone firmware from Samsung
Software updates on Samsung devices are carried out using Kies programs. This utility allows you not only to reflash your tablet or phone, but also to make a backup copy of the old system, synchronize personal data with your PC, and much more.
Before changing the firmware to latest software, you need to configure Kies correctly. This is done as follows:
 After setting up Kies, create a backup of the software available on your smartphone. This will allow you to restore system functionality in case unsuccessful firmware. To backup Android via PC, in the initial application window, select “ Backup", mark the items you want to save and start the procedure by clicking the corresponding button.
After creating a backup copy, feel free to reflash your phone or tablet via your computer. To do this, open the “Tools” section in Kies and activate the item marked in the figure, thereby starting the update process. 
While the device is being flashed, do not under any circumstances disconnect it from the PC or perform other actions that could lead to a disconnection.
After flashing your Android phone through a computer, check the functionality of all its functions. If nothing fails, then the software update was successful.
Replacing firmware on a Lenovo tablet via PC
Before flashing a Lenovo tablet, you need to understand that there is no software developed specifically for this brand. Therefore, we have to be content with universal developments. One such application is SP Flash Tool. Let's look at how to update software on Lenovo using this utility:

After you have succeeded in updating the firmware, check that all functions of the tablet are working.
It often happens that each time a gadget manufacturer updates Android versions, it stops supporting a particular phone or tablet. The user may also want to return the previous version, which he liked better. Or the device stopped turning on. In this case, you need to know how to flash an Android tablet via a computer yourself.
How to update firmware on a tablet
Let's consider this issue using the example of Oysters t72 3g. Before you begin to carry out any manipulations that affect the firmware on the tablet, you need to make sure that the following conditions are met:
- The Oysters t72 3g tablet has a battery level of at least 50%.
- The SP Flash Tool program is installed on the computer.
- The firmware file has been downloaded in advance.
It is advisable to download the firmware update file from the manufacturer’s official website. After all preparations have been made, you can begin the update:
- turn off the device and connect it to the PC using a cord;
- press the “Reset” button, which is located next to the power button;
- now launch the SP Flash Tool program;
- in it click “Download Agent”, this will open the folder in which this utility is located;
- find the file called “MTK_AllInOne_DA.bin” and open it;
- Now in the utility window, click on the “Scatter-loading” button and in the window that opens, find and open the “FW_rom” folder;
- in it you need to select a file called “MT6582_Android_scatter.txt”;
- after that, a list of tablet software modules will open in the utility window;
- to select the firmware mode, you need to select “Firmware Upgrade” in the drop-down list above the modules;
- click “Download”;
- check again whether the tablet is connected to the PC and click on “Reset”;
- reflash.
If the process does not start, you need to click “Reset” again. If Android on the tablet has been successfully updated, a notification will appear in the utility window. After this, you need to disconnect the device and press “Reset” again, but only for a second, and then turn on the gadget.
The most important condition for this entire procedure is to never disconnect the device from the computer, otherwise all steps will have to be repeated again.
Install the desired version
Before flashing Android using a computer, you must make a full backup of the system. This applies to both updating and reverting to any previous version.
Let's look at how to flash a Lenovo A3500-H tablet via a home PC. The only difference in this case is that for Lenovo a3500-H you can download any firmware version, even an alternative one. Just for security, the source site must be verified.
To change the Android version on the Lenovo a3500-H, you will need the same SP Flash Tool utility. In the path to the folder where the downloaded file with the firmware will be located, you cannot use any extra symbols or letters of any other alphabet except English.
Procedure for installing the desired version of Android on Lenovo a3500-H:
- repeat steps 3, 6 and 7 from the previous paragraph;
- be sure to enable the DA DL All With Check Sum option to avoid the possibility of turning your gadget into a “brick”;
- in the Options menu we also make sure to enable USB Mode and DA Download All;
- click on “Firmware Upgrade”;
- Now you can connect a switched off device;
- After notification of the success of the operation, you can turn off your Lenovo a3500-H and use it.
How to flash a Chinese tablet
Problems can arise not only chinese phone, but also a Chinese tablet. The whole point is that when various errors system or failure to work at all, the owner will have to spend quite a lot of time searching for the required firmware version. You also need a special bootloader to transfer the firmware to a memory card.
To make your device more efficient, you need:
- find the file with the firmware itself, for which it is advisable to enter the exact name of the model in a search engine;
- We format a separate memory card (no more than 2 GB) in FAT32 format in advance, and then upload this file to it (it is better to do it using a PC or laptop with card readers);
- fully charge the device;
- insert the prepared flash drive;
- turn on the device again;
- the firmware will download automatically, after which the flash drive needs to be removed;
- reboot the tablet and check the result.
In case of unsuccessful firmware
It also happens that devices are reflashed, but the result is disastrous - it begins to have problems in operation or it simply does not start. In other words, the user received an ordinary “brick”.
How to reflash an Android tablet if it does not turn on or does not load beyond the initial screen with the logo? Let's look at an example Asus tablets on Android:
- go to Recovery by holding the volume rocker down and the power button;
- 3 shortcuts will appear, and at the top of the screen you can find a line with information about current version firmware, in the name of which the first 2 letters indicate the territorial affiliation of the device (WW);
- at this time on the computer we find and download latest version firmware, for which we go to the official Asus website;
- at the root system disk On the PC, you need to create a folder called “Asus” and unpack the downloaded file into it, and inside there will be another archive, which also needs to be unpacked here;
- find the “blob” file;
- download the necessary drivers from a well-known and trusted site, which need to be unpacked into a separate folder;
- The tablet now needs to be connected to the computer, while it should still be in Recovery mode;
- in Device Manager you need to find “ASUS Android Bootloader Interface”, call it context menu and select driver update (specify the folder with them);
- the device will be renamed “Asus Fastboot Interface”;
- Now download the Fastboot utility and unpack it into the “Asus” folder;
- after that, a file for launching the utility will appear near the “blob” file;
- now you need to launch the command line (Win + R / cmd / enter);
- in it we write cd:\asus\, and below fastboot –I 0x0B05 flash system blob;
- flashing begins, the completion of which will be notified on the command line;
- Now you need to reboot the device with the fastboot –I 0x0B05 reboot command.