Before you try to find out how to turn on the camera on your laptop, you need to make sure that it is available.
Most laptop models are equipped with built-in. But its presence is more an option than a design requirement.
If there is no built-in camera, you can always connect it via the USB connector.
If there is a need for a video call, then usually no special steps need to be taken to turn on the webcam.
Just press the video call button on Skype and during the conversation you will be able to see what the camera is transmitting in a small window at the edge of the screen.
The same goes for online services that provide
This is just how the camera works - it does not show signs of life until it is accessed by a program that can work with it.
Ways to use the camera functionality
Many laptops come with a set of programs, including programs for working with the camera.
Typically, these programs can be launched via a shortcut on the desktop, in the Start menu, or via keyboard shortcuts, a keyboard shortcut that instantly launches the program.
Sequence of actions to enable video communication on windows laptop 8 or windows 7 is not fundamentally different.
Let's consider shortcut keys and programs that support the camera for some common brands of laptops.
To turn on the device on an ACER laptop, you must press the key combination FN+V.
The standard software package accompanying the new Aser includes the laconic Acer CrystalEye utility, designed for working with the camera. It can be found in the Start menu.

To turn on the video device on an Asus laptop, you will need to use the Fn + V command.
The package of programs and drivers for Asus laptops usually contains three programs related to the operation of the built-in camera: Virtual Camera Utility, Life Frame Utility, ECap Camera.
With their help, you can adjust the parameters of the transmitted image, record a video, and even apply simple effects.

To turn on the device on an HP laptop, hold down the Fn button and look for the button with the camera icon.
If it is not marked, then most likely the combination FN+V works. By default, your HP laptop should have HP Camera or HP MediaSmart installed.

To turn on the video device on a Lenovo laptop, in most cases you need to press Fn+ESC, but there are exceptions.
To manipulate the camera on laptops of this brand, you can use the EasyCapture program.
It is unknown whether it is included in the standard package, but you can download it from the Lenovo technical support website.

If the camera still doesn't work
If you were unable to turn on the device using the above method, you need to find out the following:
- Is the video camera detected by the system?
- Are the necessary drivers installed?
- Is the camera enabled in the current system configuration?
All three questions are answered in the Device Manager utility.

Most quick way open this program window:
- click the Start button;
- in the “Search programs and files” field, enter “Device Manager”;
- press Enter.
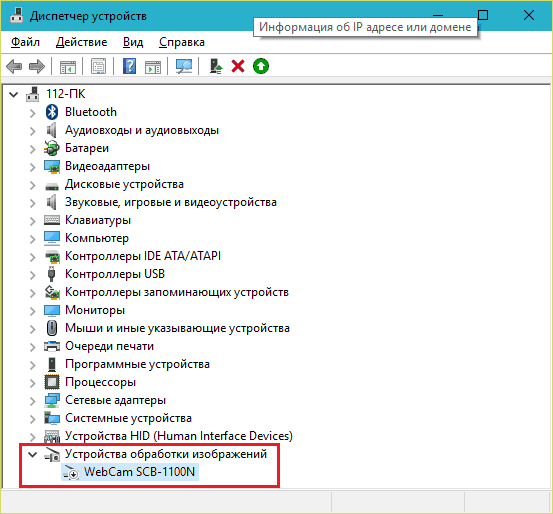
In the window that opens, look for the Image processing devices item and expand it by clicking the triangle at the beginning of the line.
Important! If the list under this item is empty, the camera is not detected, and you need to look to see if there are any lines marked in this window exclamation point on a yellow background.
If there are exclamation marks, this means that the system has detected a device for which there is no suitable driver.
Go to the “Searching and installing a driver” section.

If the list contains a line with a set of letters, numbers and words, then the camera is detected by the system and drivers are available.
If at the beginning of the line there is an icon in the form of a white circle with a black arrow pointing down, then the use of the camera is disabled.
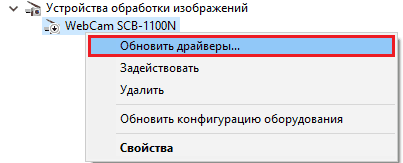
To enable camera use, click on the stock right click and select in context menu"Enable" item. The device should work.
We check again using special programs or.
How to enable the camera on an Asus laptop
The devices of this company are very popular due to their compactness, reasonable ease of use, reliability and the presence of a wide range of various functions.
It's impossible not to notice that one of the most useful features of the Asus laptop is the webcam. However, it still needs to be turned on.
What is needed for the camera to work?
First of all, you should correctly configure the operating system, as well as install and run all drivers. Please note that you cannot do without the latter, even if your model allows you to turn on the camera using buttons.
It is best to download drivers from the official website for the safety of the device. You will also need to download a special program. For Windows 8, 7, XP and Vista none additional tools the connection does not exist only if the operating system was not installed independently. Otherwise, you'll have to install them yourself, among other things. Specialists from the official ASUS service center will also be happy to help you.
Owners with a preinstallation system on their laptops can easily turn on the camera on their Asus without unnecessary problems using the buttons.
How to enable the camera on an Asus laptop?
Before you start the activation action, please note the following point. The camera program can be anything, but the drivers used to enable it on an Asus laptop should be standard and intended only for Asus. Once you understand this point, you can proceed directly to activating the camera.
Find the key on your keyboard that has a camera or camera on it. Then click"Fn" and the newly found button at the same time.
Thus, you will successfully turn on the webcam quickly.
You can also find the Life Frame shortcut on your desktop or find the program in a search engine and open it. You can clarify your webcam settings using the Asus Camera Screen Saver program. All you need to do is just double click on this program shortcut.
With each new laptop model, Asus developers strive to bring not only improvements in functionality, but also additional ease of use. This manifests itself in special button layouts that save space or combinations of buttons that enable specific tasks and functions of the operating system. Many may be interested in the question of how to set up the camera on an Asus laptop? We will talk about this, and also about its inclusion, in as much detail as possible below.
Turning on the power for the web camera
Before you have to go directly to the settings, you need to turn on the camera first. In Asus laptops this sometimes causes certain difficulties due to the special functionality of the keyboard. In order to turn on and use the camera, you need to perform a number of completely simple steps:
After this procedure, you will see that it has turned on and the light bulb located next to it will also notify you about this. Please pay close attention to the fact that for inclusion can be used different ways depending on what Asus laptop model you have.
Typically, a button with such an image is located in the top row. For example, F5 or F11, on which, in addition to numbers, the corresponding image is also indicated.
But you may also encounter a separate switch, which is located near the camera itself, and can easily be switched to one of the available positions - On or Off. 
Camera setup
Once you have turned on the camera, you can safely begin setting it up. Usually this is already used installed program called Life Frame. This is what allows you to make adjustments for images from your laptop. Most often, you do not need to launch the camera separately, and it turns on automatically when the camera starts. If it is not on your desktop computer, you can download it from the Asus website. 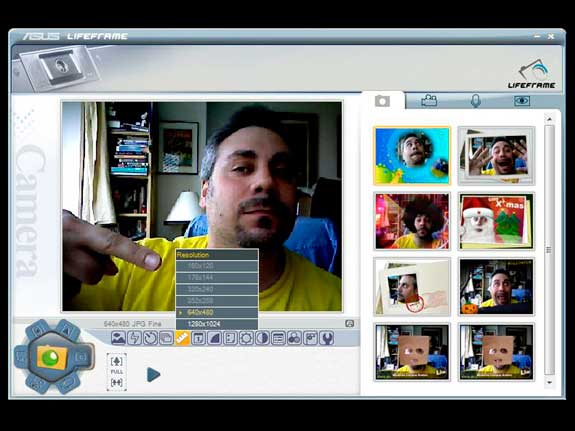 With its help, you can adjust the contrast and brightness of the image for a conversation on Skype or similar programs, as well as add special effects for pictures. In addition, you can easily edit the resulting photo or record sound.
For those who want to protect themselves, it is possible to install a monitoring function in Life Frame. This means that when there is movement near the monitor, the camera will turn on automatically.
The presence of a built-in webcam is one of the significant advantages of laptops over desktop computers. You do not need to buy a separate camera in order to communicate with relatives, friends or acquaintances. However, such communication will not be possible if your laptop does not have drivers for the device mentioned above. Today we will tell you in detail how to install webcam software on any ASUS laptop.
Looking ahead a little, I would like to note that not all webcams on ASUS laptops require driver installation. The fact is that some devices have cameras in the format "USB video class" or "UVC". As a rule, the name of such devices contains the indicated abbreviation, so you can easily identify such equipment in "Device Manager".
Necessary information before installing the software
Before you start searching and installing the software, you will need to find out the identifier value for your video card. To do this you need to do the following.

In addition, you will definitely need to know the model of your laptop. As a rule, this information is indicated on the laptop itself on the front and back sides. But if your stickers have worn off, here's what you can do.

Now let's get down to the methods themselves.
Method 1: Official website of the laptop manufacturer
Once you have a window open with the webcam ID values and you know the laptop model, you need to do the following steps.
- Let's go to the official one.
- At the top of the page that opens, you will find the search field shown in the screenshot below. In this field you must enter the model of your ASUS laptop. Don’t forget to press the button after entering the model "Enter" on the keyboard.
- As a result, a page with search results for your request will open. You need to select your laptop from the list and click on the link in the form of its name.
- By clicking on the link, you will be taken to a page with a description of your product. At this stage you need to open the section .
- The next step is to select the operating system installed on your laptop and its bitness. This can be done in the corresponding drop-down menu on the page that opens.
- As a result, you will see a list of all drivers, which are divided into groups for convenience. We are looking for a section in the list "Camera" and open it. As a result, you will see a list of all software available for your laptop. Please note that the description of each driver contains a list of webcam IDs that are supported by the selected software. This is where you need the identifier value that you learned at the beginning of the article. You just need to find the driver whose description includes your device ID. When such software is found, click the line "Global" at the very bottom of the driver window.
- After this, you will start downloading the archive with the files that are necessary for installation. After downloading, extract the contents of the archive into a separate folder. In it we look for a file called "PNPINST" and launch it.
- You will see a window on the screen in which you need to confirm the launch of the installation program. Click "Yes".
- The entire further process will take place virtually automatic mode. You will only need to follow the further simple instructions. At the end of the process, you will see a message indicating successful installation of the software. Now you can fully use your webcam. This will complete this method.


Method 2: ASUS Special Program
To use this method we need the ASUS Live Update utility. You can download it on the page with driver groups, which we mentioned in the first method.

Method 3: General solutions for updating software
To install ASUS laptop webcam drivers, you can also use any program that specializes in automatic search and installing software like ASUS Live Update. The only difference is that such products are suitable for absolutely any laptop and computer, and not just for ASUS brand devices. View the list the best utilities You can do this kind of thing by reading our special lesson.
Of all the representatives of such programs, it is worth highlighting. These utilities have a significantly larger base of drivers and supported hardware compared to other similar software. If you decide to opt for specified programs, then you may find our educational article useful.
Method 4: Hardware ID
At the beginning of our lesson, we told you how to find out the ID of your webcam. You will need this information when using this method. All you need to do is enter your device ID on one of the special sites, which will find the corresponding software using this identifier. Please note that it will not be possible to detect drivers for UVC cameras this way. Online services will simply write to you that the software you need was not found. We described the entire process of searching and loading a driver using this method in more detail in a separate lesson.
Method 5: Device Manager
This method is mainly suitable for UVC webcams, which we mentioned at the beginning of the article. If you encounter problems with such devices, you need to do the following.

Laptop webcams are among those devices with which problems arise relatively rarely. However, if you are faced with a malfunction of such equipment, this article will definitely help you solve it. If the problem cannot be fixed using the described methods, be sure to write in the comments. Let's look at the current situation together and try to find a way out.
A webcam (webcam) is an integral part of the vast majority of laptops. By default, after the first start of the device, it is immediately ready for use. But what if you are trying to get an image from the camera, but there is none?
The main thing is not to panic. Situations when mobile computer the webcam does not work, most often due to the fact that it is simply turned off or not installed in the operating system (breakdowns of this device, fortunately, are rare). Read below to learn how to turn on the camera on a laptop and troubleshoot related problems.
How to quickly check if the camera is working
To find out if your webcam works at all (perhaps it doesn’t work in only one program, since it’s disabled in the settings), go to the service and click “ Check webcam».

If you see a request to allow access to the device for Adobe Flash Player, then everything is in order: the camera is working. Check " Allow» and check if the image appears on the screen.

If you see a message like in the screenshot below, it means the camera really isn’t working. We’ll figure out what to do in this case further.

Checking the status of the webcam in the system
We begin diagnosing any hardware problems by checking how it appears in Device Manager. To open the manager, press hot Windows keys+ R (this will launch the “Run” application), enter the command in the “Open” field devmgmt.msc and click OK. The method is convenient because it works in all versions of Windows.

In the dispatcher window, expand the list “ Imaging devices» and see if our webcam is there. The following options are possible:
- The web camera is not in the list of equipment - the computer does not see it. This happens due to a hardware failure or physical failure.
- There is no camera, but there is an unknown device, which most likely is it. This means that the computer sees it, but cannot recognize it. The reason is the lack of a driver.
- There is a camera in the list, but next to it there is a yellow triangle with an exclamation mark or a black arrow in a circle. The first indicates a malfunction, the second indicates a shutdown operating system.
Turn on the webcam from the keyboard
The function of turning on/off the webcam from the keyboard is not implemented on all laptop models. Where there is one, a miniature image of a camera is applied to one of the keys. Most often this is the “V” key, sometimes “Escape” or others from F1-F12.

To turn on the web camera, press this key simultaneously with “Fn”. After this, the webcam should appear in the device manager. If it's still not there, you probably have that rare case where it's physically faulty or not connected.
Installing the driver
If, after turning on the webcam hardware, something unidentified appears in the device manager, install the driver for it. It is best to download it from the website of the laptop manufacturer or the webcam itself, if you know exactly its model. Or install from a disk, if one was included with your device.
If you do not know the exact name of the laptop model, turn it over. There is a sticker on the bottom cover of every laptop stating this.
This is what a company label looks like MSI laptop MS-1757:

Having determined the model, find it on the manufacturer’s website and download the driver for your operating system in the “Support” section. Install as normal application, after installation, reboot the machine.
By the way , there may not be a separate webcam driver for some OS versions, since it is included inWindows (USB Video Class Driver). Problems with this group of drivers can be resolved by installing updates or .
Fixing webcam recognition errors in the system
If the webcam is marked with a black arrow in Device Manager (disabled in Windows), right-click on it and click “ Engage».

When disabled in the operating system (by the user or programs), this is enough for it to work.
If the webcam is marked with an exclamation mark on a yellow triangle, which means: “the device is not working properly,” click the command “ Delete" and restart your computer. The system will recognize it again and automatically reinstall the driver.
If it doesn’t help, click “ Update drivers»:
Specify the search location as the Internet (if you are not sure that the correct driver is present in the system) or this computer (if the camera worked properly with the old driver before the problem occurred or you have a recent version).