After you have selected the mail settings item, you will see a connection window. Here you need to correctly enter the email address you are using and the password for the mailbox. You can enter any name in the “Your name” field; in the future it will be used to sign the letter. In this window, you can connect an account to absolutely any email service, for example, Google or. To connect a mailbox, you must first register on the website of your postal service, for example, for Gmail, register a Google account.
In some Outlook versions you will have access to a link to register a mailbox account from Outlook.
The section “ Manual setting or additional server types." By selecting this item, you can manually enter the types (POP3 or IMAP) and specify the addresses of the incoming and outgoing mail servers, as well as configure the ports for accessing them. This item should be selected when setting up corporate mail or mail registered on separate servers with different types encryption.
When registering a mailbox, problems may arise with Outlook connecting to an encrypted server; this can happen if the server does not use encrypted connections, in which case the program will automatically switch to using an open connection. When such a notification appears, click “Next” again so that the program switches to a different type of connection to the server.
We recommend using email services that provide a secure connection to the email server. By using this type of connection, you can be sure that no one will intercept your letter on the way to the server.
After completing the settings, you can immediately start working with mail; the program interface will open in front of you, in which you will immediately see all your incoming letters. For more fine tuning read
Mail settings in Outlook
Now we will look at the instructions, which will describe how to connect an additional box through the program settings.
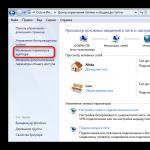
To enter the mail settings menu, you need to open the “File” menu, which is located in the upper left corner of the program window.
After opening the "File" menu, you need to go to the "Information" section. Opening this menu You need to left-click on the “Account Settings” section and select the same section again in the drop-down menu.
After you have selected the “Account Settings” item, a window will open in front of you in which to create an additional mailbox you need to go to the “ tab E-mail", then select the "Create" button.
If you need to change the settings of a previously registered mail, to do this, select the desired mailbox from the list and click “Change”.
After clicking on the “Create” button, a registration window will open; further steps will be exactly the same as described above.
The "Default" button will help you determine the main mailbox. By marking the desired box with this button, you will set this email as standard for writing and sending letters.
In order to delete a mailbox registered in the program, you need to select the one you want and click the “Delete” button. After this action, the mailbox will be deleted from Outlook client, but not from your email service's servers, so you can connect it again in the future.
When you delete a mailbox from your Outlook email list, there remains a mailbox file in which all emails are saved, so to complete removal all information from your computer, you need to go to the “Data Files” tab and delete the desired file from there.
Interface
The interface of the Outlook email client is quite simple and intuitive; it is also similar to the interfaces of the bazaar versions of email clients. Now we will describe the main components of the interface and its capabilities.
Let's start with the panel on the left side of the window. At the bottom there are 4 icons that will open “Mail”, “Calendar”, “Contacts” and “Notes”. The main section is mail; when you select the next section, its interface will open.
Above are lists of the main sections with separated folders for ease of working with mail. The first list is “Favorites”, in it you can view shared folder letters for all connected mailboxes. This list can be collapsed if necessary.
Below the Favorites list is a list of Outlook Data Files folders. Initially, all folders contained in it should be empty. Messages from all connected mailboxes will be duplicated there, but only fresh ones: those messages that were in the mailbox before it was registered by the system in Outlook will not be included in this list. If you want to move old messages to this list, you can do this manually.
Below there will be sections with folders of incoming and outgoing letters of all other connected electronic mailboxes. All sent and received messages will be stored in Outlook data files.
When you select one of the folders from the left panel, the entire contents of this folder will be displayed to the right of it, namely the list of messages. The dimensions of such panels can be changed; to do this, it is enough to move the cursor over the border and, holding the left mouse button, move it to the desired distance.
When you select a letter from the central panel, you can display its contents in the panel on the right. Here you will see the complete detailed information, as well as the body of the email. 
In order for you to be able to read all incoming messages from all mailboxes at once, you should place all folders with incoming messages in the “Favorites” list. This way you won’t have to view each inbox separately for each mailbox; all letters will arrive in one folder. To do this you need to click right click mouse over the desired folder and select “Show in favorites” in the drop-down menu.
If you need to duplicate all old messages located in different folders different mailboxes in order to read all these messages in one big list. To do this, you need to select the folder from which you want to duplicate messages, then select any message or press the Ctrl+A key combination to select all messages. After selecting the required letters, right-click on any of the selected ones and in the drop-down menu click on the “Move” item, then “Copy to folder...”. After these steps, a window will open in which you need to select the folder corresponding to the type of messages and click OK.
Basic Outlook tools and features
In this section, we will examine in detail the main functions of the Outlook email client for which it was designed.
Creating and sending letters
In order to send a letter, you must click the “Create message” button, which is located in the upper left corner of the window in the “Home” tab. Do not forget that letters will be sent on behalf of the mailbox that is selected by default in the account settings.
In the window that opens to create a letter, everything is quite simple, fill out the fields and write the right letter. To attach files, you can either drag x into this window or use the “Attach File” button 
Deleting and restoring emails
Messages are deleted equally for all mailbox folders. To delete a letter, right-click on it and select “Delete” in the drop-down menu, or you can select the desired letter and click the Delete button.
All such messages will not be deleted immediately; they will first be placed in the “Deleted Items” folder and then, after a period of time, they will be permanently deleted. This is done to ensure that you do not accidentally lose important information.
To recover a previously deleted email, do the following: click on the “Deleted Items” folder and the email you want to recover, right-click on it and select “Move” and “Another folder...” in the drop-down menu. After this, a window will open with a list of folders, select the one you need and click “OK”. After that, look for your recovered email in the selected folder.
Error when deleting a message
If an error occurs during deletion, you should take some steps. First you need to clean out the “Deleted Items” folder, right-click on it and select “Empty Deleted Items”. When emptying this folder, a window will appear with two deletion options, you need to perform each option in turn.
If after the above steps the error does not disappear and the letter still cannot be deleted, then right-click on the problematic message and select “Move”, then “Another folder...”. In the window that opens with a list of folders, select any from the list and click “OK”. After this, restart the program and try again to delete this message, which is now located in a new folder.
Mail update
In order to update your mailbox and receive or send letters, open the “Sending and Receiving” tab, then click on the “Send and receive mail - all folders” button. After this, the program will connect to the servers to receive incoming letters and send outgoing ones. If you need to update only one mailbox, to do this, select the desired mailbox and in the same tab click the “Update folder” button.
Additional features
The Outlook email client provides maximum opportunities for ease of working with a large number mailboxes. One of required functions is to create your own folder hierarchy for your mailbox, you can add your own folders and send letters to them for convenient sorting. This function is not present in all similar programs.
Creating folders
To create a folder, right-click on the mailbox in which you want to create additional folder, then in the drop-down list select “Create a folder...”, after which your folder will appear in the hierarchy, then you will need to enter a name for it. To change the order of folders, you just need to hold down the left mouse button the desired folder and drag it to the desired location.
Creating tasks
The task creation function is also very useful. You can create a task in the task list, set due dates, importance and reminder. You will then be able to stay on top of important tasks and complete them on time.
To create a task, open the task tab; to do this, click on the icon of this function located in the lower left corner. After this, a window will open; to create a task, right-click on the empty area and click “Create task” in the drop-down menu.
When creating a task, a window will open in which you can set parameters, due dates, etc. Once created, this task will be displayed both in the task list and in the calendar.
Create a meeting
Using this feature, you can schedule a meeting of employees by notifying them by mail. In the event that everyone who receives this notification uses mail client Outlook will be able to automatically mark the meeting date in your calendar.
To create a meeting, you need to go to the “Calendar” section, which is located in the lower left corner and select “Create a meeting” in the top menu, after which a window will open in which you can create a list of meeting participants, set a time limit and date for the meeting. After creating a meeting, click the “Send” button, and everyone who was on the mailing list will receive your email with information about the meeting
Conclusion
The article described only the most basic functions of the Outlook email client. This program has a fairly large number of functions and tools, and can be a good alternative to web versions of email clients.
It is worth noting a very convenient and intuitive interface, which is very important when working with a large number of mailboxes.
Cloud service Outlook.com is a free cloud version of Microsoft's email service. Outlook.com provides a personal email account and is tightly integrated with Microsoft cloud services.
This new cloud email service has several differences from its competitors.
Outlook.com users get virtually unlimited mailbox size for free, so there's no shortage of free space, and therefore possible loss mail messages, there is no threat to users of this service. Gmail, for example, allocates 10 GB for free to its users disk space on your server.
The maximum attachment size for messages in Outlook.com is up to 100 MB, and when using cloud OneDrive storage(SkyDrive), the size of the moved file will increase to 300 MB (via the web interface). In Gmail, the maximum attachment size for messages is now 25 MB.
This good news for video and photography lovers who send their files by email. However, you can send any other files as an attachment to the letter.
According to Microsoft, it does not analyze the contents of personal correspondence and attachments in letters in order to use the information received for advertising purposes (a stone in Google's garden).
The interface of the postal service is made in the modern Modern UI (Metro) style, which leaves a pleasant impression. It is fast and convenient to work with.
Now let's move on to an overview of Outlook.com.
Sign up for Outlook.com
To register for the service, you need to go to the company's website login.live.com. If you already have an account Microsoft entry (Windows Live ID), then you should fill in the appropriate fields and then click on the “Login” button.
This will open the main Outlook.com mail window. Hotmail, SkyDrive, Xbox LIVE, Windows Live users already have an account.
If you do not have a Microsoft account, then to get one you need to click on the “Register” link.
In the next Microsoft Account window, you will need to enter your personal information to create a Microsoft account. It is not necessary to enter real personal data; here you can enter such data that will be convenient for you when using the created electronic mailbox.
You can choose a name for your mailbox on Outlook.com. An account can be linked to a number mobile phone to recover your password or to obtain a temporary password for one-time login postal service, for example, from someone else's computer.
After filling out all the data, you need to click on the “I Accept” button.
After this, you are taken to the Outlook.com service page, where you need to click on the “Go to mail” button.
Setting up Outlook.com
This is what the main window of the Outlook.com email service looks like. Microsoft Corporation has recently been unifying appearance and style of your applications and services.
Services, applications and services are now designed in a single modern style; the design uses a tiled interface in the metro style of an operating room Windows systems 8.

If your email data has been migrated to Outlook.com, you will see your folders and messages, settings and address book will be transferred there automatically.
To create a message, you need to click on the “Create” button located on the top panel, in the upper left corner of the mail service page window. The message will be sent from the mailbox from which you signed in to Outlook.com.
You can customize the entered message text as you wish using text editor and using the commands of the “Options” button for this.
Outlook.com has a new interesting opportunity- edit messages in HTML format. Messages can be assigned varying degrees of importance.

When working with a message, you can “Add the sender to your contact list” and perform certain actions with the message.
If your email address often receives newsletter, then Outlook.com recognizes such messages and sends them to the Junk folder. You must decide for yourself what to do with such messages by right-clicking on such a message and selecting context menu specific action.
You can customize the color scheme of the Outlook.com interface to your choice if you click on the “Options” icon (gear) and select the desired color from the various colors offered by the service from the pop-up menu.
The Outlook.com email service is integrated with other Microsoft applications. After clicking on the arrow next to the “Outlook” button, a tiled panel appears with tiles for entering other services.

In Outlook.com you can restore deleted messages, even if you previously emptied the trash.
For more detailed settings Outlook.com if you're not happy with your settings cloud service By default, you will need to click on the Options (gear) icon => Other mail options. On open page you will need to make the necessary settings for the mail service.
Add contacts to Outlook.com
If you have several mailboxes in different mail services, then you can add these mailboxes to Outlook.com to receive and send messages from other mailboxes using Outlook online.
To do this, you must click on the “Options” button (gear) on the panel. In the pop-up menu, select “Other mail options.”
On the “Settings” page, click on the “Your email accounts” button. On the “Your Email Accounts” page, you need to select one of the following options: “Add an account for sending only” or “Add an account for sending and receiving.”
After setting up a new account, the added account will be available in the right sidebar under the Folders section. You can now send or receive messages using different email accounts through the Outlook.com service.

You can also import mail and settings from Outlook Express, Windows Mail or Windows Live Mail.
In the future, Microsoft intends to transfer all of its email services to the Outlook.com service, and support for older services will be discontinued. Users can continue to use addresses with the old endings, but now there is an option to choose a “pretty or desired” email address with the ending @outlook.com, while there is such an opportunity.
You can receive a new email address with the ending @outlook.com from your postal service @hotmail.com or @live.ru if in "Options" select "switch to Outlook".
You can continue to use email addresses with endings @hotmail.com, @live.com or @msn.com, and also rename your account to an address ending @outlook.com or add an alias.
Create an alias in Outlook.com
Using the Create Alias feature allows you to create multiple mailboxes with different addresses in one Microsoft account. It is possible to create up to five aliases in one account. Thus, together with the main mailbox, there will be a total of six mailboxes.
You can also create an unlimited number of Microsoft accounts, and create other aliases in them.
To create an alias, you need to click on the “Options” (gear) button in the top panel => “Other mail options” => “Create an alias for Outlook”. After confirming your name and password, you will be logged into your Microsoft account.
On the Microsoft Account page, you need to select an email address. You can choose from email addresses with endings @outlook.com, @hotmail.com, @live.ru. Next, click on the “Create an alias” button.

In the “Setting an alternative name” pop-up window, you will need to activate the radio button opposite one of the items: “To an existing folder: Inbox”, or “Create a folder: with an alias address”.
When you select “Create a folder: with an alias address,” messages will arrive in a separate folder, and when you select “To an existing folder: Inbox,” messages will arrive in the general “Inbox” folder. After selecting a folder, click on the “Finish” button.
After creating a new nickname, you will receive a confirmation email in your mailbox stating that your nickname is ready and you can use it.
Using a pseudonym is convenient for correspondence with different correspondents. In this case, you will not have to use different mailboxes in different mail services. Incoming messages sent to the aliases you create will arrive in your Outlook.com account.
To send a message, you need to click on the “Create” button and next to your account name, click on the arrow and in the pop-up window select the address of the sender of the letter (the letter can be sent on behalf of one of the pseudonyms).
The only negative is that you cannot change the name of the sender of the letter. You can create a Microsoft account using a fictitious name rather than your real name.
How to connect social networks
To communicate with your friends and acquaintances directly through Outlook.com, you will need to add your contacts from these social networks. To do this, click on the arrow next to the Outlook button and then click on the People tile.
On the “People” page you can add your contacts from the presented social networks. To add contacts you need to click on the image social network, and in the pop-up window click on the “Connect” button. After entering and confirming your registration data, your contact list will be imported into the Outlook.com email service.
To create a new contact on the “People” page, you must click on the “Create” button. On the next page, you can enter the details of your new contact manually by filling out the appropriate fields, and then click on the “Save” button.

From the Outlook.com service window you can communicate with your friends and acquaintances on social networks. After clicking on the icon on the right side of the panel in the form of the head of a smiling man, it will open sidebar with a list of available contacts from the social network Facebook networks, or from MSN.
In order to start instant messaging, you need to double-click on the name of the interlocutor.
To save the history of received and sent instant messages, you will need to click on the “Settings” icon (gear) on the panel, and then select “Other mail settings” => “Message history” in the context menu. On the “Message Log” page, you should activate the “Save instant messages” option.
OneDrive cloud storage
After clicking on the “OneDrive” tile, the OneDrive (formerly SkyDrive) cloud online file storage window will open. This cloud storage provides free storage for files with a total volume of 5 GB.
From the OneDrive service page window, you can download the OneDrive app to install on your computer. Between a computer or other device and cloud storage, you can move files through the web interface.
From the OneDrive storage window, after clicking on the “Create” button, you can proceed to using the cloud office application Office Online. When using this application, you can create, open, edit and save documents directly in the browser window Microsoft Office: Word documents, Excel tables, PowerPoint presentations, OneNote recordings.
You can read more about using OneDrive cloud file storage in the article.

Office Online Cloud Apps
Open received office documents you can immediately in the postal service window, having received a message with a document attached to it.
After opening the received letter, you need to click on the “Show contents” link. Next, you need to click on the inscription “View on the Internet” on the thumbnail of the received document.

The document will then open in Office Online. If you want to change the open document, you will need to click on the “Change” button.
The document will be moved to OneDrive online storage, where it will be opened in the cloud-based word processor Word Online.
IN online versions text Word editor, you can work with open document from this computer and then continue further work over this document, from another computer or mobile device, if on mobile device An application for working with the OneDrive service has been installed.

To save the received document to your computer, click on the “Download as ZIP archive” link.
Free calls via Skype in Outlook.com
integrated the web version of the program into the Outlook.com email service. After adding a Skype account, users can make free video calls directly from the Outlook.com mail service window, without launching the program itself, but using the web interface of the mail service.
Conclusions of the article
Outlook.com is a Microsoft cloud email service that has interesting wide functionality. Outlook cloud mail will be good choice for the user.
Outlook is a powerful email tool that is just like the web version of Gmail. Here are a few non-obvious features of this monster that may be useful to you.
A preview of each message is available in the list of messages. You see the sender's address, subject, and the first line of body text. The last parameter can be configured. To do this, open the “View” tab, find the “View message” button and select required quantity lines. If you wish, you can turn off viewing altogether to save space. Outlook will also ask if you want to apply the setting to just this folder or to all mailboxes.

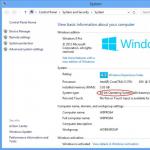
If you have several accounts in Outlook, you can select one as the main one so that the corresponding folder opens when you open mail. To do this, click “File” → “Options” and in the window that appears, select the “Advanced” tab in the left panel.
In the “Start and stop working with Outlook” section, click on the “Browse” button. In the Select Folder dialog box, find the account you want and select Inbox or another folder you want. It will now open when you start using Outlook.

If you often search for letters by typing the same words and expressions into the search bar, you can simplify your task. Outlook supports search folders, or . Set them up and you can forget about manually sorting correspondence.
Go to the Folder tab → Create Search Folder. In the window that appears, you can select a search folder from the templates provided by Outlook or create your own. For example, the Unread Emails search folder will show all messages that you haven't opened, no matter where they are or how accounts belong. Emails will not be moved anywhere: only links to them are displayed in search folders.
If you're not happy with the Outlook templates, select "Create a custom search folder" at the bottom of the list. Click Select. Then enter a name for the folder, click “Conditions” and specify the criteria by which messages should be selected for it.

This feature deletes redundant messages in the selected folder. Redundant refers to quoted copies of your letters. To test the function in action, right-click on the folder in which duplicates and copies of messages have accumulated and select “Empty Folder”.
You can specify which messages are considered redundant. To do this, select File → Options → Mail → Conversation Cleanup. Here you can configure the cleaning so that it does not affect important or flagged messages, and you can also choose which folder to move unnecessary messages to. By default, they are sent to the “Deleted Items” folder of the account to which they belong.

This feature allows you to write a letter now and send it later. Just indicate the sending time and forget about the letter - it will arrive without your participation. Gmail is proud of this feature with its , but it is also available in Outlook.
Write a new letter, specify the addressee and subject as usual. Then click the Options button in the message box and select Delay Delivery. In the window that opens, select the “Do not deliver until” checkbox and specify the date and time. You can set other parameters. For example, mark a message as important or forward a copy to another address.
Outlook stores scheduled messages in the Outbox folder until they are sent. The emails will then move to the Sent folder.
If you need to cancel a delivery delay or change the delivery date and time, open your Outbox and look for your message there. Click Delay Delivery on the Options tab and change the date and time in the Do Not Deliver By field. Or uncheck the box to disable delivery delay.

In the right hands it's incredible powerful tool, which will help cope with large volumes of correspondence. The Quick Actions feature allows you to automate any sequence of actions and perform them with one click.
On the Home tab, find the Quick Actions button. There are several templates here, but you can make your own. To do this, click on “Create New” in the “Quick Actions” section and set a name. Then, by clicking on the "Actions" button, select the operations you want to perform, step by step. You can save a quick action to the toolbar or assign a shortcut to it.
For example, you can create a Quick Action to move selected messages to a specific folder and mark them as read. Or respond en masse to your interlocutors by creating calendar reminders to meet with them. Use your imagination.

You can open multiple Outlook windows at the same time. This will allow you to view your email, calendar and tasks on large monitor without using the navigation buttons to switch between mail and calendar.
It's very easy to do. Right-click on the open email client icon in the taskbar and select Outlook from the menu that appears. A second window will open. When you close your email client, go to “File” → “Exit” in any of the open windows without clicking the close window button in the upper right corner. The next time you start Outlook, it will open with the same number of windows.

This feature allows you to automatically perform certain actions with by new mail. Click Rules on the Home tab and select Manage Rules and Alerts. Here you can create, modify and manually run them.
Click “Create Rule” and then set your settings in the window that appears. You can tell an application to serve a specific beep, displayed an alert and transferred letters that met certain criteria to the desired folder.

By default, your email is used as the account name in Outlook, but you can change the account name. At the same time, on the server of your email provider it will remain the same, so you can name yours according to their content: “Work”, “Home” and so on.
To change the account name, right-click on the account (panel on the left) and select “Account Properties”. Or go to File → Details. Then open Account Settings, select the account whose name you want to change, and click Change. Enter a new name, then click Next and Finish.

Geeky things that will help you use Outlook more efficiently are suitable for those who are used to working with a keyboard rather than a mouse. Press Win + R to open and enter the commands:
- outlook.exe /nopreview- open Outlook without a message preview window.
- outlook.exe /select folder_name - open Outlook with a specific email folder instead of the one you have assigned as your primary one. If instead folder_name enter outlook:calendar, the calendar will open.
- outlook.exe /restore- open Outlook, restoring all windows if the program was closed as a result of a system error.
- outlook.exe /finder- open powerful search tool Outlook.
If you know any other cool Outlook features, share them in the comments.
What is the Internet? Among the huge number of possible answers to this question, the possibility of delivering letters via e-mail is quite simple and very fast in terms of delivery. Many people use this service today, both for organizing personal correspondence and for delivering completely official office documents. legal entities. Naturally, such popularity makes many people look for the most convenient and practical email service, which we will try to talk about now.
To begin with, one caveat should be made: the material presented below does not pretend to determine the absolutely best “mailer” according to all criteria, because This is largely a matter of taste and predisposition of a particular person. Such subjectivity forces us to only list the main email services and talk about their advantages.
So, let's start, perhaps, with the latest achievements in this field, namely new service- mail outlook com
So far it is operating in test mode, but is expected to replace the well-known Hotmail very soon. The advantages of this service are the following: the ability to integrate with various web applications for faster and more convenient viewing of mail, integration, the ability to create mail aliases, categories and quick viewing, use virtual keyboard instead of a mouse, etc. The service is really very convenient and its prospects are very serious.
We go to the official website.
They are asked to enter.

And here’s the catch: you need a Microsoft account. Let's try to do it. Click on the link Register. The registration form pops up. We fill it out as we want (no one will check anything).


Uncheck “Send me special offers...” (I don’t feel bad even without small soft special offers...)
Press the button Create an account.

Congratulations and press the button Go to mail.

So the mail has been created.
The next group of services is the “three-headed monster”, consisting of Yandex, Mail and Hotmail. Yandex.ru is considered a leader in the provision of such services on Russian market, and such popularity can be explained by the possibility of using huge amount additional services after registering your mailbox, including such as Yandex money and Yandex wallet. In addition, Yandex mailboxes are highly reliable, and this is very important.
Mail.ru is a worthy competitor to Yandex, being the oldest mail service on the Runet. It provides its users with several email domains, access to the My World social network and many other additional services. Main disadvantage Mail.ru is security, because it is not uncommon for mailboxes of this service to become a source of spam.

A few words about Hotmail.com. This is one of the patriarchs, of his kind, global network, which is now equipped with a number of intelligent tools, including, Microsoft package Office, the ability to attach videos to emails, receive updates from YouTube, etc. In addition, this service is highly reliable and secure.
And, of course, one cannot ignore Gmail.com. This brainchild of the well-known Google is considered perhaps the most secure email service, preventing hacking of mailboxes and sending spam, however, the number of additional services here is smaller than in the above-mentioned email services.
In order to ensure ease of working with the Internet mail service, and also to be confident in the security of your mail, you need to choose a decent mail service. The choice, in this case, is quite limited, because not all email services on the Internet meet modern requirements for comfort and security. We would like to draw your attention to the new Outlook email service, which, according to experts, will very soon replace the well-known Hotmail.
Many users may confuse this mail with the Outlook Express application, which used to be built into Windows and was an email client. Microsoft then had its own Hotmail.com email, and it was this that became the basis for the new Outlook tool. However, now it is not only regular mail, it also includes several interesting functions. In fact, now this service can be called online organizer because it includes a calendar, notebook, as well as a task scheduler and contact manager. Added the ability to integrate with online services office, which allows you to plan your activities even better. There is also the possibility of using it as a regular postal service.
Registration in outlook mail
The service itself can be found at outlook.live.com. Once the user comes here, he will be able to see advertisements about latest updates and achievements, also to him will be asked Immediately log into your account and continue working. If it is not there, all you have to do is click on the create an account button in the upper right corner.
You should run it, after which you will need enter your credentials from your Microsoft account, if you don’t have one, you can click on the line below and create one. 
If there is no entry, you will have to enter more data. 
To begin with, you will need to enter your first and last name; in the second line, you can immediately begin to come up with a username for your future mailbox, or you can enter an already created one. First, you should enter an existing mailbox on any of the services, then you can click on get an email address, after which you will be prompted several options email, all you have to do is choose one of them or write your own.
What follows is not particularly difficult. You just need to come up with a password, enter your date of birth and gender, and for additional protection you can also enter your phone number. Once all fields are filled in, you can complete creating your Outlook account. Now if automatic login For some reason it didn’t happen, all you have to do is log into your account on the same page.
How to sign in to Microsoft Outlook mail
If no other settings have been made, the computer will always remember the account that was used last entry. So, next time. In order to enter, it will be enough just to enter the same page and that’s it, authorization will happen automatically. If the data is not saved, you will have to go to home page postal service, and then click on the button Login. After this you will need to enter your username and password. In the case where the user indicated a phone number, you don’t have to remember the login, but just enter the number; this can be much faster.
Interface overview
After logging in, the user will immediately be taken to the home screen.
Everything that the user can see here is quite familiar to those who have encountered postal services previously. On the left side of the window there will be sections will be displayed mail, in them you can find recent incoming letters, view sent messages, spam or deleted ones. The list of shipments itself will be displayed on the right side of the screen, at the beginning it will be written who the letter came from, and then the name of the topic. 
In order to see all the actions that can be performed with a letter, just select it and check the box in front of it. Next, the main actions will become available at the top. Basically, there will be items that are responsible for moving the letter to one category or another. 
How to format and write a letter
There is always a create button on the top line. It allows you to write a new letter; immediately after clicking it, the user will go to the creation window. 
First, you need to choose who the shipment is intended for, then you should set a topic. Icons in the letter itself will allow you to issue his in the best possible way. The first three are responsible for choosing the font; then you can set its size, choose a color, and also specify what kind of alignment is required. The penultimate item is responsible for inserting pictures or other attachments, and the last one will help to best display emotions.
Service settings
The service has a large number of different settings. 
Reading area will allow you to display information from a letter without opening it, just hover your cursor. The colors above will help you choose the most pleasant range. Rules- these are the sections that appear when writing a letter, and the categories are responsible for sorting, where the user can add his own options.
Most interesting parameters section. There are several sections: account management, composing messages, reading messages, anti-spam, and settings. The first section will help you change the data in your account, it will also help you set up an alias for sending mail and manage it, and here you can also enable an autoresponder.
Message management involves setting up emails in such a way that it is most convenient. You can immediately set desired font, size, formatting, come up with a signature for the letter, configure settings for checking attachments.
When reading email messages, you can customize your preference viewing mode, set the grouping of messages, display attachments, it is possible to configure it so that the answer can be written right there in a small window.
Junk mail displays the filters by which mail is sorted. 
In the settings you can set privacy settings, interface language, you can also create and rename categories, configure the combination shortcut keys to access the most used parameters. There is a quick actions section, these are the options that are shown next to the items.