Good afternoon, dear readers!
Today I will tell you how to configure a TP-LINK router using the TL-WR841N(d) model as an example.
My thoughts on this model:
I believe that this model TP-LINK turned out very well, as it is easy to set up and has a good price/quality ratio. It is perfect for the average home user who just needs Internet and Wi-Fi. I advise you to take this model if you are a simple user who doesn’t require anything more from a router. Many of my friends have had this model (on my recommendation) for more than 3 years. Works stably, performs its function on 5+
!
So, if you have already purchased this router, then let's configure it. Our procedure:
- Setting up a Wi-Fi network on the TL-WR841N(d)
Connecting the TL-WR841N(d) router to a PC
To begin, connect the power supply to the router and plug it into an outlet. If the indicators on it (on the router) do not light up, then turn it on with the button on the back.
You probably noticed the disk that came with the router, so here we are going to configure without its use.

We insert the second end of the wire into the network card of the laptop/computer from which we will configure the router.

If you did everything correctly, then we can move on to the next point.
Setting up an Internet connection (setting up a WAN connection) on the TL-WR841N(d)
We need to go into the settings of the TL-WR841N(d) router. To do this, on the computer to which it is connected, open any browser, and in address bar go to the address 192.168.1.1 , or 192.168.0.1 . You should be prompted for your username and password. Specify admin And admin (standard password and username). By the way, how to enter the router settings, the standard IP and standard login/password are indicated on the bottom of the router on a sticker

So, we entered everything correctly, entered the username and password. The router settings page should open to us.
The most important thing is to configure the router to work with your Internet provider. If this is not done, or done incorrectly, the Internet through the router will not work. A Wi-Fi network will appear, but without Internet access.
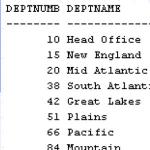
In settings go to the tab Network - WAN. Us in the dropdown list WAN Connection Type you need to select the type of connection that your Internet provider uses. It could be: Dynamic IP, Static IP, PPPoE, L2TP, or PPTP. For example, for me personally PPPoE(the most common connection type).

Setting up PPPoE, L2TP, and PPTP
If your provider uses one of the above connection methods, then select the one you need and set the necessary parameters that the provider should give you: username, password, IP address. This depends on the type of connection and provider you choose.
The main thing that needs to be achieved from the settings on this page is that the router connects to the Internet and starts distributing it. If the Internet works, then press the button Save, and we continue. If you can’t set it up, then call your Internet provider and ask them for all the information that is necessary to set up the router.
If your computer is configured high speed connection to the Internet, then we no longer need it. There is no need to run it. Our router will now launch such a connection. You can remove it altogether.
It may also be that the provider binds by MAC address (you need to check with the provider), in which case you can clone the MAC in the router settings, on the tab Network - MAC Clone. Or, there you can change the MAC address of the router. You can also call your provider and ask them to remove the old MAC from the binding and bind your new MAC address.

If the router has connected to the provider and is distributing the Internet, then you can continue setting up. To check whether the router distributes the Internet, just try to go to any website from the computer with which you are setting up the router (which is connected to the router port LAN)
Setting up a Wi-Fi network on the TL-WR841N(d) and setting a Wi-Fi password
For Wi-Fi settings you need to open the tab on the settings page Wireless - Wireless Settings. On this page we need in the field Wireless Network Name come up with and write down a name for your WiFi network, and in the Region drop-down menu select the country where you live. Leave the rest of the settings as they are in the screenshot below.
To protect our wireless network with a password, go to the tab Wireless - Wireless Security. There you need to select the security type WPA/WPA2 - Personal(Recommended).
In the field PSK Password create and write down a password that will protect your WiFi net.

Save the settings by clicking the button Save.
Changing the default admin user password
While we are in the settings Tp-link TL-WR841N, I advise you to immediately change the standard password that is set to protect your router settings. So that everyone who connects to your network will not be able to go into the router settings and change them (for example, we gave the Wi-Fi password to a neighbor/friend).
Open the tab System Tools - Password. Enter your old username and password first (default is admin). Then, below, enter a new username (you can leave admin) And New Password. I advise you to write down this password somewhere so you don’t forget. Save the settings with the button Save.
That's it, setup Tp-link router TL-WR841N is complete.
All that remains is to reboot the router. This can be done by turning off/on the power, or from the settings, on the tab System Tools - Reboot, you need to press the button Reboot.
After setup and reboot, a Wi-Fi network will appear with the name that we set during the setup process. And to connect to a wireless network, use the password that we also set when setting up the router.
I hope this article helped you! I tried. If you have any questions, ask them in the comments to the post. If you have a suggestion, you can send it to the email address
In the next article I will tell you
Thank you for your attention! See you again!
Good afternoon.
In today's next article dedicated to setting up home Wi-Fi router, I would like to go with TP-Link (300M Wireless N Router TL-WR841N/TL-WR841ND).
Quite a lot of questions are asked about TP-Link routers, although in general, the setup is not much different from many other routers of this type. And so, let's look at what you need to do step by step so that both the Internet and local work for you. Wi-Fi network.
1. Connecting a router: features
There are several outputs on the back wall of the router; we are most interested in LAN1-LAN4 (they are yellow in the picture below) and INTRNET/WAN (blue).
So, using a cable (see picture below, white) we connect one of the LAN outputs of the router to the computer’s network card. Connect the cable from the Internet provider that enters your apartment from the entrance to the WAN output.
That's all. Yes, by the way, after turning on the device, you should notice the LEDs blinking + a local network should appear on the computer, without access to the Internet for now (we haven’t set it up yet).
Now you need go to settings router. To do this, in any browser, type in the address bar: 192.168.1.1.
Then enter the password and login: admin. In general, in order not to repeat myself, here is a detailed article about that, by the way, all the typical questions are discussed there.
2. Setting up the router
In our example, we use the PPPoE connection type. Which type you choose depends on your provider; all information on logins and passwords, connection types, IP, DNS, etc. should be in the contract. We now include this information in the settings.
2.1. Setting up the Internet (PPPoE type)
In the left column, select the Network section, WAN tab. Three points are key here:
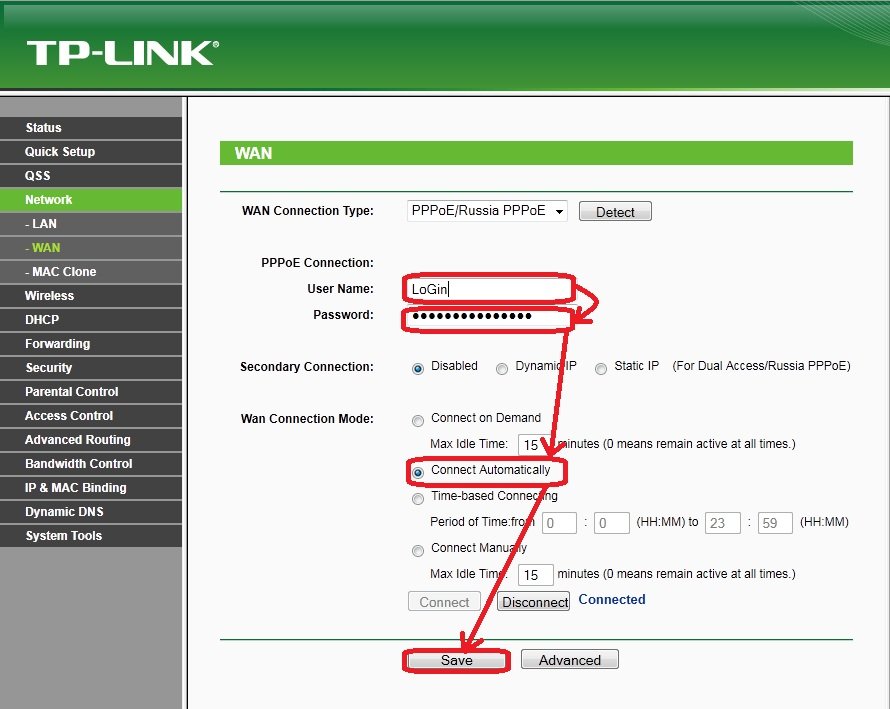
1) WAN Connection Type - indicate the type of connection. It will determine what data you will need to enter to connect to the network. In our case, PPPoE/Russia PPPoE.
2) Username, Password - enter your login and password to access the Internet via PPPoE.
3) Set the Connect Automatically mode - this will allow your router to automatically connect to the Internet. There are modes and manual connection(inconvenient).
That’s it, the Internet is configured, click the Save button.
2.2. Setting up a wireless Wi-Fi network
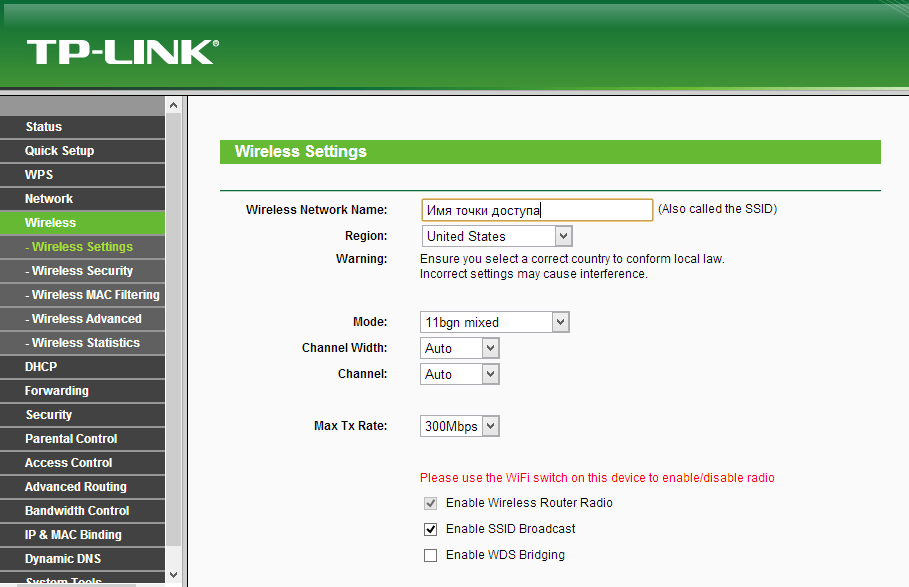
To configure wireless wifi network, go to the Wireless settings section, then open the Wireless Settings tab.
Here you also need to pay attention to three key parameters:
1) SSID - the name of your wireless network. You can enter any name, the one that will be convenient for you to search for later. The default is “tp-link”, you can leave it like that.
2) Region - choose Russia (or your own, if someone is reading the blog not from Russia). This setting is not found in all routers, by the way.
3) Check the boxes at the very bottom of the window, opposite Enable Wireless Router Radio, Enable SSID Broadcast (thereby you enable Wi-Fi work networks).
Save the settings, the Wi-Fi network should start working. By the way, I recommend protecting it with a password. More on this below.
2.3. Enabling a password for a Wi-Fi network
To protect your network Wi-Fi password, go to the Wireless section, Wireless Security tab.
At the very bottom of the page there is an option to select the WPA-PSK/WPA2-PSK mode - select it. And then enter the password (PSK Password) that will be used every time you connect to your wireless network.
Then save the settings and reboot the router (you can simply turn off the power for 10-20 seconds).
Important! Some ISPs log your MAC address. network card. Thus, if your MAC address changes, the Internet may become unavailable to you. When you change the network card or when installing a router, this address changes. There are two ways:
first- this (I will not repeat here, everything is described in detail in the article; TP-Link routers have a special section for cloning: Network->Mac Clone);
second- register your new MAC address with your provider (most likely it will be enough phone call in those support).
That's all. Good luck!
There are more and more devices in our homes that have access to the Internet.
Computers, laptops, tablets, smartphones, Wi-Fi printers, and even TVs, but in order for you to take full advantage of their capabilities, they must have access to the Internet.
For this reason, in most homes, it is necessary to install a router to ensure wireless communication for the Internet.
One of the most popular manufacturers of such equipment is the TP-LINK router.
There are a lot of such routers on sale today. Here are the most popular today:
Tp link tl wr841n, wr740n, tp link td 786, wr741nd, wr840n, wr940n, w8901n, wr841nd, tp link wr842nd, w8151n, mr3420, wr941nd, w8951nd, tp link td w8961n, w8960n, link archer c20, w8968, wr741nd, mr3220, wr842n, wr340gd, mr3020, tp link stork, wr1045nd, w8950n, mr3420, wr743nd, ac750, wr1042nd, tp link archer c2, wa701nd, wr1043nd, wa801nd, wr942n, td854w, 801nd, wr340g, w9970, adsl2, n150, n600 , w8951, dir 615, wa901nd, dir 320, w8101g, n750, dsl 2740u, wn722n.
As you can see there are a lot of them, but the settings are almost the same. Therefore, I will not stop, but will write step-by-step instructions that are common to everyone, so that you can independently connect and configure your tp link router on a computer or laptop.
NOTE: from Windows versions: windows 7, windows 8, windows 8, windows 10, windows 8.1 does not depend on anything, as well as on the operator (except if password protection, name and others are provided), be it for Rostelecom, Beeline Kyivstar, Ukrtelecom, Dom ru , Ufanet, Luganet, Volya and so on.
The easiest way to set up the router mode yourself or yourself is if a disk is included, but you can do it manually without the disk and even without the Internet, only if there is no Internet, then you don’t need a router, because its task is to distribute the Internet via wifi.
Usually you only need to configure a new one, but there are cases when it goes wrong, then you will need to configure wifi in a new way, and in some cases, reflash it.
I will use the configuration of the cheapest and most popular TP-LINK routers present on the CIS market.
Step-by-step instructions in Russian on how to configure a TP-LINK router to distribute wifi
The first step is to turn on the adapter AC supplied with the router and connect the power.
Press the big black button and some of the LEDs on the router panel should light up.
You will also need two cables: one for the internet (attached to the router) and the other should be connected to the computer/laptop.
These cables (commonly called "twisted pair") terminate in a distinctive connector and are visible in the picture.

Connect the cable connected to the computer to the blue connector on the back of the router.

Connect one end of the cable that comes with the router to the yellow socket numbered 1 on the router, and the other end is connected to the computer instead of the disconnected cable Internet.
Step two in setting up a TP-LINK router via cable
Launch your browser (for example, Internet Explorer, Google Chrome, Mozilla Firefox etc.) and in the address bar enter: 192.168.0.1, and then press ENTER.
You should see a window asking you to enter your username and password. In both fields, enter "admin" and click "OK".

You should see the router configuration page. By clicking LMB on the “Quick Setup” option (this way you can quickly set it up, and if you don’t have it in Russian, then click – Quick Setup).


The tab will change. Select your location and provider. If you don’t find your Internet provider in the list, check the box next to the line: “I didn’t find any suitable settings” and click “Next.”

Step three in setting up a TP-LINK router without a disk
Here you may need your provider to find out which item to choose. If the settings are automatic, select the first item and click next.

All these settings can only be obtained from your Internet provider (for example, I select the first item).
Now you have to indicate or not indicate the mas address, which also depends on the provider. In general, the MAS address is unnecessary; it is assigned only to prohibit unauthorized access to the Internet.
If you need to specify, the provider will tell you which one. Write it down and click next again. I'm not giving an example.


Step four in setting up a TP-LINK router for WIFI distribution
In the menu on the left, click on the line: “Wireless mode”, enter the name of the network (any) and the wifi mode (see picture).


The first time you connect your device to wireless wifi networks in your home, you will need to enter this password (in the future it will be stored in the device and you will not need to enter it).
The password must be at least 8 characters. After clicking the "Next" button, the last mode quick settings windows.
After clicking the “reboot” button, the router will reboot - wait until the page refreshes itself.
After rebooting, the device is ready for use - check that the Internet is working - to do this, open any web page.
Of course, only general, one might say the most common (basic) settings are provided here.
Sometimes you need to specify a few more settings, but these are known only to the Internet provider.
If you can’t configure your TP-LINK router yourself, then in the comments I can only suggest basic settings, for example, speed, ports, and so on, but some providers (especially well-known ones) install powerful protection so that their Internet is not “stolen” .
This data is known only to them. Then call and ask. Usually they will guide you through all the settings, even over the phone, and I say goodbye and wish you success.
Hello everyone!! Did you know that connecting and setting up a network on a router is even intimidating? experienced users computers. Why set it up yourself if you can call a specialist who will do everything quickly.
However, I will tell you that you don’t need to suffer yourself; the process of setting up and connecting TP-link router models is quite simple, especially if you follow these steps according to my instructions. In today's article step by step explanation will allow you to set up and distribute the Internet to all devices in literally an hour. Yes, yes, and you shouldn’t spend extra money to call a specialist when you can set up a tp link router yourself easily and quickly.
Explanation: the instructions are suitable for modern models TP-link (not older than 5 years). The settings menu may be slightly different, but you will find the same items. So, let's go...
How to set up a tp link router preface
Before you proceed to setting up your router, you need to understand the network settings for connecting to the Internet on your computer. Let's say a cable is connected to a laptop or PC. Today, the following network settings options are most often used:
— PPPoE– users can use the Internet only after entering their login and password;
--- Dynamic IP– the system automatically sets parameters of this type, they are issued via DHCP;
--- Static IP– this option is used extremely rarely today, since the user needs to manually enter the parameters.
As for the operating system, the process is performed similarly on Windows Vista, 7, 8 and even on Windows 10. We need to go to the “ Start" and find the tab " Control Panel" - go to " Network Control Center and shared access ».

Now go to the tab " Changing adapter settings».

Select active " Connection via local network "(the icon should be blue). Click right click mouse and select context menu paragraph " Properties».

Don't be intimidated by the large number of items and settings. Usually, many users panic when they see a large number of settings, and they do not know how to configure a tp link router. There is nothing complicated. In the window we need to select “ Internet Protocol Version 4", and then click on the " Properties».

There may be two options here:
1. If the automatic IP address acquisition mode is selected in the settings, then it will be easy for you to connect the router and set the parameters, because the settings will be received automatically via DHCP (this is the Dynamic IP option).
2. If you see filled items in the window and the active inscription “ Use the following IP address", then rewrite all settings. You have selected static provider settings that do not change - this is Static IP. Place a checkmark next to the item “ Obtain an IP address automatically" and confirm your action by clicking on the " OK».

Block Internet access by MAC address
This item applies only to those users whose provider automatically blocks new connections. You can find out this information for sure in the contract. To get around this point, we need to make sure that the router receives the same MAC address that is registered with the provider. Finding out the MAC address is quite simple.
We go to the menu and search bar enter the command “ CMD" and press the "Enter" button.

After this, you will see command console. We need to enter the command ipconfig /all and confirm your action by clicking on the “ Enter».

A list will appear in front of you all kinds of parameters, but we need data from the section " Ethernet adapter – connection via local network" More details on how to find out mac address and what it is you will learn from this article:
How to set up a tp-link router: Detailed connection
So, you can move on to setting up, check that you have the following elements at hand:
A — TP-Link router– the basis that will distribute the Internet to all kinds of devices;
B— provider cable;
C— laptop or personal computer.
The connection is made in an elementary way - this can be seen from the diagram. We insert the cable from the power supply that comes with the router into the connector called Power. We insert the cable from your provider into the main WAN connector of the router, usually it is highlighted in blue. The computer will connect to the TP-link router using network cable, which connects to any yellow LAN port.

Done, other devices (tablets, phones, TVs, laptops) can be connected via a Wi-Fi connection. It's time to move on to the next point of our question today - how to configure a tp link router.
The process of setting up a tp-link router
Setup begins by logging into Internet browser Explorer. In the input line enter the following address: 192.168.1.1 . If you once installed a proxy server, then you need to disable it. After entering the address, a security window will appear in front of you: login – admin, password - admin. By the way, on the bottom of the router itself you will find your username and password, take a look, don’t be lazy!

The router window will appear in front of you. We need to choose a master " Quick Setup» ( quick setup) and press " Next"(further).

Instructions for Dynamic IP - automatic settings.
If your provider provides exactly these settings, then check the box next to Dynamic IP and click the “Next” button.

Now let's set the basic settings:
- In the field SSID the name of the future point is specified Wi-Fi connections.
- Chapter Wireless Security is responsible for the encryption type - specify WPA-PSK.
- In the field Password you must enter a password.

The remaining settings in this window can be left untouched. Click " Next" The installer will notify us that the settings have taken effect. Click on " Finish"and use Wi-Fi from all devices.

Explanation for users whose provider blocks access to the MAC address: go back to the router menu and select the item on the left “ Network", and then - " MAC Clone" We enter the characters we wrote down into the appropriate field. If you see that in the field " You PC's MAC"there is already data, then just click " Clone MAC" Don't forget to save your settings by clicking on the " Save" I also suggest that you find out how to set up tp link router with static parameters.

Instructions for Static IP - static parameters
At the beginning of the instructions we determined which network settings are on your computer. And if you have a Static IP, then select the appropriate item in the TP-link customizer.

The settings correspond to the data from the local network connection, so there should be no problems, but if the installer is in English, you may not understand some terms:
Default Gateway– main gateway;
Primary DNS– preferred DNS server;
Secondary DNS– alternative DNS server;
Subnet Mask– subnet mask.
After completing data entry, click “ Next».

Next come standard settings. In the section " Wireless Security"You need to select the encryption type - check the box next to " WPA-PSK" Field SSID is for entering the name of the wireless network. Don't forget to put the password in the field PSK Password(at least 8 characters).

Done, the installer tells us that for the settings to take effect, we need to reboot the router - click on the " Reboot" If you have problems with the MAC address, then use the instructions above - it works for all connection types.

Instructions for PPOE - login to the network using login and password
If you have the PPPoE protocol set, then check the box next to the item with the corresponding name.


The setup here is no different from other connection options. We enter a password to protect our wireless network from “uninvited guests” - it must be at least 8 characters. In the field Wireless Security you need to set the option " WPA-PSK" Regarding the field SSID, then it is intended for the name of your network.

Done, setup completed successfully. Click on the button " Reboot"—after a reboot, the settings will take effect and you will be able to connect to the wireless network. So, we looked at how to configure a tp link router if your provider uses automatic or static parameters.
I suggest you take care of the security of your Internet. I can recommend you to read my articles:
Setting up security for a wireless network
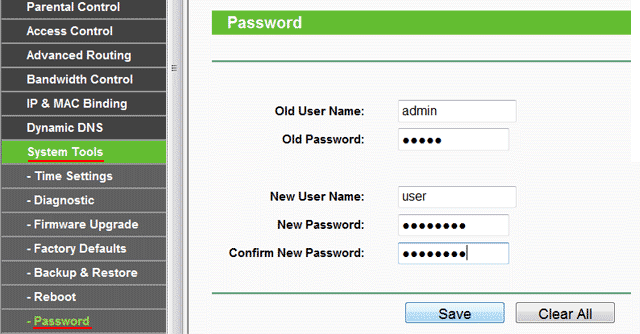
A password does not guarantee that third parties will not be able to use your Internet. They can simply go into the settings of the router itself and look at your password. To prevent this from happening, go to the router setup program and enter the following parameters:
Old User Name– enter admin in the column
Old Password– this is the old password, we set it to admin by default – enter it
New User Name– this does not affect security, so you can leave it the same
New Password– enter a new password to configure the router (not to connect to it).
Confirm New Password– enter the new password again to confirm.

Connect to a wireless network
We have created a wireless network, but users may have questions about connecting to it. Using a laptop as an example, I will explain this process. The process is exactly the same on phones, tablets and TVs.
In the lower right corner, click on the wireless networks icon.

The router will ask you for a password - enter it and press the “ Connection».
Important!!!: Enter the password that was specified in the field PSK Password. Sometimes users get confused and enter a password to edit the router settings. If the data was entered correctly, then you should have wireless Internet. The password will be automatically saved, so you won't have to enter it again each time.
I am attaching a video to this article that clearly and clearly shows how to set up a tp-link router
At the end of today’s article - how to set up a tp link router, I suggest you familiarize yourself with the most frequently encountered problems when setting up a router.
1. If you forgot your password
The problem can be solved very simply. We pick up the router and find a small button on the back called “RESET”. Press it for 10 seconds, after which the router will return to factory settings. Go to Internet Explorer again and enter the address 192.168.1.1, login – admin, password – admin. After this, you can configure access again and specify a password that suits you.
2. Problems with connection and operation of the router
Some problems that may arise when trying to connect to a router can be resolved on your own. Sometimes the reason for the lack of connection is a mechanical malfunction of the gadget.
3. I can’t access the address to configure the router
This problem is common among TP-link users. To get rid of it, you need to follow these steps.
First of all, you need to check what is set in the wireless connection settings. If the DNS and IP address should be set automatically, but your checkboxes are unchecked, then check them again. After this, you can go to the address again and configure the router.
4. Can’t connect to the router
Sometimes the router does not allow a certain device to connect to the wireless network. To find out what the problem is, you need to try connecting from another gadget - a computer, tablet or smartphone. If the router does not accept all devices, then try rebooting it. After this, everything should return to its place.
If we're talking about about a separate device, then the problem is most likely there. Check if the corresponding boxes are checked in the Wi-Fi connection settings. Sometimes the gadget perceives your network as unsecured, so it does not allow you to connect to it. Set the settings to allow connections to unidentified wireless networks.
Sometimes it helps full reset settings. To do this, you need to hold the RESET button for about 10 seconds (located on the back of the router). After this action, the chance of proper operation will increase significantly. The main thing is not to forget to enter new parameters.
5. The device does not see the network
Unfortunately, there are many reasons for this problem, so it is necessary to go through them all. If the laptop does not find the network, then first of all you should check whether the Wi-Fi module is running. To do this, go to the Network and Sharing Center, then click on the “Adapter Settings” tab. If wireless connection is inactive (gray), then it should be turned on. Most likely, after this action you will be able to safely connect to the network. We also recommend checking the hardware switch to turn on and off the Wi-Fi module.
If the module is running and everything is turned on, then it’s worth checking the drivers. This applies primarily to laptops. Not always in operating system there are the necessary ones network drivers for a specific laptop model. It’s very easy to check this guess: right-click on the “my computer” icon and select “ Properties" and go to the tab " device Manager».

The screenshot shows a list of network devices. In this case, they are all working properly and have the appropriate driver package. You can see a yellow triangle opposite the network icon, which indicates that the device is not working properly.
The problem can be solved simply: go to the website of your laptop manufacturer, find your model and download network drivers. You will then be able to connect to your wireless network.
6. Problem with the device
Sometimes it is not possible to detect a defect because the fault lies in the device itself. Therefore, you don’t have to rack your brains over the question: how to set up a tp-link router if I complied with all the above requirements and everything was configured successfully. In this case, you need to take the router to service center under warranty (if any).
The defect can be mechanical or software. If everything is clear mechanically, then a software defect implies a malfunction in the router firmware. You can restore it yourself, but this process is much more complicated than setting it up. Also, incorrect installation of the firmware or a failure can completely disable the router.
So, to summarize today’s article, I would like to tell you that you cannot always connect to the Internet because of the router. There may be some network problems. To check this, unplug your ISP cable from your router and connect it directly to your computer. After that, go to the Network and Sharing Center. Turn on your local network connection and try to access the Internet.
If it works, then the problem is really in the router. Sometimes the device does not allow a certain device to connect. To correct the situation, you can try pressing the automatic router button, which is located on the back wall of the router. All active devices with Wi-Fi enabled modules will connect automatically.
Well, that’s all for today that I wanted to tell you about today in terms of: how to set up a tp-link router. I hope you found the article interesting. I would be glad if you have something to add to all of the above. See you in . Bye-bye everyone!
Good day. Several times visitors wrote in the comments that their network Wi-Fi device does not cover the entire area of the apartment and asked how to increase wireless coverage. Also, a similar question was related to the fact that two neighbors decided to install high-speed Internet from a provider, but at the same time access the network via Wi-Fi and use only one channel for both of them. Of course, in the first case, you can use Wi-Fi Repeater to increase the range of the signal.
Moreover, it is already in stock network equipment in the form of a portable access point, which has a repeater (repeater) and works as a router. At the same time, you can strengthen the signal and increase the coverage area, as well as use one Internet provider channel for two people using two routers. Everyone will choose their own solution, but if you don’t mind learning how to connect a router to a router via a wireless network or a LAN cable, then we will look at both options using the example of the Asus RT-N14U and TP-LINK WR741ND models.
Connecting an Asus router and TP-Link to a network via Wi-Fi.
The whole point is that one network device will expand the wireless coverage area of another. It should be said that previously routers only had a repeater function (repeater mode), which was not supported by all network devices, and then the developers introduced WDS technology.
WDS (Wireless Distribution System) - the technology is designed to expand the Wi-Fi wireless zone by combining several wireless points (for example, Wi-Fi routers) V single network without application LAN cable between them.
However, in WDS technology, when creating a network, all devices must follow the same rules when setting up:
- Be on the same frequency.
- Use one encryption method.
- Use the same encryption key.
At the same time, in order to connect the router to the router via Wi-Fi and expand the wireless coverage area, the first network device additional settings no need to do it. His task is to work in normal mode and distribute Wi-Fi. But the second router must have a repeater/repeater function or be compatible with WDS technology. What exactly your network device supports is not important, because in essence both are the same thing. You can find out which of the mentioned things your router has in its arsenal on the manufacturer’s official website or look at the available functionality in the router interface.
Setting up an Asus router in repeater mode.
Translate Asus router Switching to repeater mode is quite simple. You need to go to the “Administration” - “Operation Mode” tab. On this page, activate the switch next to the “Repeater mode” item and click the “Save” button.
We wait until the device completes the reboot process and after that the “Internet Settings” tab will open and the process of scanning available wireless networks will automatically begin.
In the generated list of wireless networks, you must find your existing network and enter the access key (password) and click on the “Connect” button. The router will connect to your network, it will be assigned an address and the wireless coverage will be expanded.
Setting up a TP-Link router via WDS.
Many routers from TP-Link have WDS on board. First of all, log into the administrative panel and go to the “Wireless Settings” tab and check the box next to “Enable WDS”.
After that, on this page, you will have access to one more settings. To get a list of wireless networks to connect to, click the "Search" button. Upon completion of the process, you will receive a list of access points. Find your network and click on the “Connect” button and confirm the actions.

The router will reboot and automatically redirect to the Settings page. wireless mode" All that remains is to enter the password for the wireless network from the selected list and the router will connect to the access point as a repeater and expand the Wi-Fi wireless coverage area.
Connecting router to router via LAN cable.
Typically, routers are connected to each other using if the distance between these network devices exceeds 25-30 meters. I know of two connection schemes and I will talk about them below.
Scheme No. 1.
Since we already have a router configured with Internet from the provider, we will conventionally designate it as the first one. Let's call the router we want to connect the second one.
In the first network device, the DHCP function should be active and there is no need to configure anything else, but on the second router to be connected, I immediately recommend that the settings previously made on it do not interfere with the creation of our scheme. After this, you can connect the two routers to each other. I will use an Asus router as my main router, and I will connect a second TP-Link device to it.

Plug one end of the patch cord into the LAN port of the first router on which we have Internet, and insert the other end of the cable into WAN port second router. As I already mentioned, on the first one the DHCP function should only be active, and on the second one you need to make sure that the settings indicate automatic IP acquisition. Go to the settings of the second router (mine is TP-Link) and go to the Network - WAN tab.
On this page you should check and, if necessary, change the settings of the “WAN Connection Type” line - the value “Dynamic” IP address(Dynamic IP)". Also make sure that there is an IP address, subnet mask and default gateway. Thus, the second network device works as a client of the first and has its own separate Wi-Fi network. Therefore, if necessary, do not forget to configure it.
Scheme No. 2.
In this connection, you need to connect network devices to each other via LAN ports. That is, you need to insert the patch cord into the LAN port of one and the other router. With this connection, both devices will be located in the same logical network segment. However, wireless networks will have different SSID name despite the fact that their addressing will be the same.

Go to the settings of the router you are connecting to and first go to the “Network” - “Local Network” tab. If your network devices on the local network have the same IP address, then to avoid conflicts, the second device needs to be assigned a different IP or change the subnet.

On the second TP-Link device I changed the IP address from 192.168.1.1 to 192.168.1.253 because it was the same on Asus and TP-Link. It is important that the IP range of the second network device is assigned from the end. It could be something in the area from 192.168.1.250 to 192.168.1.254. All that remains is to go to the tab and disable the DHCP server.

At the end of the publication, it must be said that in this scheme, with pre-connected network devices to each other using a patch cord when setting up a second router, a conflict may immediately arise while saving the changes. In this case, I recommend assigning an IP address to the second router without associating it with the first device.
I will end here. Bye!