Introduction.
Most laptop owners sooner or later face the problem of running out of space. As a rule, laptops with screen sizes up to 15 inches inclusive do not have a free second slot for a 2.5-inch device. Therefore, owners are forced to think about either replacing the laptop itself or replacing its hard drive. After replacing the hard drive, there is always an old drive left, which can easily be turned into external USB storage device for carrying data.
Naturally, you can purchase a 2.5 inch mobile hard drive and turn it into an external drive. Fortunately, the cost of external drives allows this. For example, at the time of writing, for a 250 GB mobile hard drive they are asking $40, and for a 500 GB device from WD they are asking only $45.
We decide on the type of hard drive.
To be fair, it should be noted that an ordinary desktop 3.5-inch hard drive can also be turned into an external drive - you just can’t call it mobile. If you have an unused 2.5 or 3.5 inch hard drive, then first of all you need to decide on the type of its interface.
Today on the market there are the following types of interface: IDE (ATA) and various SATA options. As a rule, all SATA interfaces are backward compatible with each other, and we will not dwell on their variations. The situation is completely different between IDE and SATA interfaces, which are absolutely incompatible with each other and have different connectors.
The picture is clickable --
The figure shows two hard drives with different interfaces. Hard drives have a mobile format of 2.5 inches. On the left is a hard drive with SATA interface, on the right is a hard drive with an IDE interface.

The picture is clickable --
In our hands was a 250 GB hard drive from Western Digital Scorpio Blue series with SATA interface. This drive long time used in Acer laptop, but its capacity became insufficient, and it was replaced with a more capacious 500 GB solution.

The picture is clickable --
Despite long-term use, the operation of the hard drive did not cause any complaints, so it was decided to use it as an external mobile drive. To do this, we had to find an external case for it, which is what we did. External case AGESTAR for 2.5 inch mobile hard drive.
Computer hardware stores offer a wide variety of external cases for 2.5-inch hard drives. Their key difference is as follows:
- body material,
- type external port(interface),
- cost.
As a rule, stores offer various cases with USB interface 2.0, there are significantly fewer cases with an eSATA interface, and even fewer cases with a combination of USB 2.0&eSATA. Several cases with a modern USB 3.0 interface were found on sale, but their cost exceeded the cost of the hard drive itself, so we did not consider them.
The key difference between USB 2.0 and eSATA interfaces is data transfer speed. Using the USB 2.0 interface allows for maximum compatibility, since these ports are available on all computers. A significant disadvantage of the USB 2.0 interface is - low speed data transfer, which will not allow you to unlock the full speed potential of your hard drive.
The eSATA port is more promising, but it is not widespread and is found only in expensive versions of motherboards, cases and laptops. The eSATA interface allows you to fully unleash the potential of SATA devices.
The material used can also be very different. In a simple case, it is plastic. In more expensive variations, an aluminum case with a leather cover is included.
The cost of external cases also varies. The cheapest option will cost the user $3, expensive versions will cost more than $100.
Buying a $100 case for a hard drive that costs less than $40 when new and is half the price once it's in use is, to say the least, wasteful. Therefore, for testing we were provided with a case costing a symbolic 3 dollars - AgeStar SUB2P1. Equipment and external inspection of AgeStar SUB2P1.

The picture is clickable --
We didn't expect any miracles from a device that costs three dollars, both in terms of equipment and in terms of performance. The device comes modestly packaged in a package. The front wall of the device is covered with a cardboard listing the key characteristics of the device. This is support for 2.5 inch mobile hard drives or solid state drives with SATA interface, USB 2.0 data transfer interface and various color options.
To be fair, it should be noted that our suppliers confirmed that they had not seen any other color for this case other than black.

The picture is clickable --
After opening the package, we were pleasantly surprised by the fact that the kit included an instruction manual entirely in Russian.

The picture is clickable --
The case is completely made of plastic. There are paper stickers on the front wall indicating the model, which will be erased in any case, so we recommend immediately removing them from the surface of the device.

The picture is clickable --
The material used to make the case is soft black plastic, which does not smell of anything and is uniform throughout its structure.

The picture is clickable --
The covers of the device come off in two different directions, which ensures easy removal and installation of the hard drive in an external case.

The picture is clickable --
The two sides of the outer case are secured using a plastic latch made from the material of the case. Thanks to the recesses on the walls, the lids are securely fixed and spilling any glass of liquid, or leaving the device in the rain, is unlikely to lead to any problems.

The picture is clickable --
The device is designed for SATA hard drives, which we have repeatedly emphasized. Inside there are controllers with SATA ports for power and data transfer.

The picture is clickable --
Mini is soldered on the side wall USB port for data transfer and power supply of the hard drive. There is no additional port to provide power to the drive, which may cause some problems for users. With a weak power supply that underestimates the voltage along the 5 volt line, you often have to deal with problems starting the hard drive. Typically, connecting the drive directly to a port on the motherboard rather than on the case system unit, the use of quality USB cable allows you to forget about this problem.

The picture is clickable --
Sellers of computer components often, as an advantage of this or that external case, talk about the presence of a USB data cable in the kit or offer to purchase it separately if it is not there. We advise our users not to pay attention to this, since a mini-USB-USB cable, as a rule, is available in almost every family and is often supplied with mobile phones. In our case, we successfully used a stale data cable from mobile phone Nokia.

The picture is clickable --
The next step was to install the hard drive into the case. This is done quite simply - by lightly pressing. The most important thing is to first correctly rotate the hard drive according to the power and SATA data ports located in the case.

The picture is clickable --
The absence of any protruding elements on the hard drive controller circuit allows you not to worry about its rear surface when transporting and using the device.

The picture is clickable --
Some users may argue that the plastic case does not provide adequate heat dissipation from the hard drive. Naturally, external cases made of aluminum cope with this task much more effectively. At the same time, we should not forget that mobile hard drives do not have such high power consumption that they suffer from overheating, and in laptops, as a rule, they are not additionally cooled with anything.

The picture is clickable --
After completing the assembly of the device, the stage of its testing and use begins. The supply of voltage to the device is accompanied by the glow of a blue LED, which also symbolizes the user about the process of data transfer. It should be noted that not everyone will have a smooth start when starting to work with the created external drive. If the hard drive has already been used, has been formatted and partitions have been created on it, you will not have any problems getting started. It works like a regular flash drive using the Plug&Play method. But those users who purchased a new hard drive without formatting and with no partitions will have a problem that will be associated with the absence of a drive letter in the “My Computer” tab.
To do this, you need to create partitions on the hard drive and format it. This can be done through various boot disks, but it’s better not to bother and do it in the operating room itself Windows system.

The picture is clickable --
To do this, you need to go to the "Control Panel" through the "Start" section, then visit the "Administration" section. IN this section select "Computer Management", where in the "Disk Management" tab you can partition and format the newly connected external drive. After creating partitions and formatting them, you will have access to them through the “My Computer” tab and you will be able to exchange with the drive as with a regular hard drive. Test configuration.
The assembled external drive was tested both on a desktop computer, based on a modern Core processor i7 and no less modern motherboard, and on a laptop Acer Aspire 7730 based on Core 2 Duo processor. It should be noted that the performance level at two various systems turned out to be comparable.
1. Data reading speed was tested in the HD Tach 3.0.4.0 program

The picture is clickable --
It's nice to note that the external drive we assembled shows much more high level performance than the WD My Passport Essential external hard drive we previously tested. Maximum speed data transfer was 34.3 Mb/s, and the average latency was about 17.9 ms.
2. Data reading speed in HD Tune 4.5.

The picture is clickable --
In the second synthetic test, we received data similar to the previous ones, which also turned out to be slightly better than that of the official external hard drive WD My Passport Essential.
3. Write speed of 64 MB files in HD Tune 4.5.

The picture is clickable --
Testing that is closer to practice is somewhat more valuable, by recording files of 64 MB in size. IN this test we got quite expected results, which were also limited only by the capabilities of the USB 2.0 interface.
Separately, I would like to note that throughout the entire testing, the temperature of the hard drive did not exceed 35 degrees Celsius, while a similar hard drive installed in the laptop had a temperature of about 43 degrees. Therefore, worrying about the operating conditions of the hard drive in this case on the part of users will be unnecessary.
4. Boot speed of the Windows 7 operating system.

During practical testing of the loading speed of the Windows 7 operating system image, we received results similar to other external drives with a USB 2.0 interface.
5. Assessing the drive's performance in Windows environment 7.

We tested the performance of the external drive we assembled using the Windows 7 operating system. To do this, command line you need to call the command: "winsat disk-drive g -ran -write -count 10", where "g" is the letter of the drive being tested on the system.
From the test results it is clear that the drive we assembled received a much higher rating than the factory solution WD My Passport Essential.  Conclusion.
Based on the materials in this article, it is clear that any mobile hard drive can be turned into a good external drive without any hassle. Especially for testing, we asked for the cheapest external case, costing $3. Three dollars allows you to get an excellent external drive from a mobile hard drive, at least for data storage. Not to mention the fact that the same external case makes it easier to recover data from the hard drive of “dead” laptops.
Despite the fact that many people criticize AgeStar's products for their low quality, after many years of using them I have only a positive impression of them. First of all, it is at an affordable price. Defects occur in all manufacturers, although AgeStar has a slightly higher rate than Thermaltake. But the latter has no analogue to the presented external case for three dollars and with a 6-month warranty. We award AgeStar products with a gold medal of honor for their optimal performance/price ratio.
You can click right click mouse to “Start” and select “Device Manager”.

In “Disk devices” you need to select the connected flash drive and double-click on it with the left mouse button to launch “Properties”.


Open the downloaded file from the archive using notepad. Right-click on it and select “Open with...”.

Select Notepad.

Go to section: . Remove the first four lines from it up to %attach_drv% = f2d_install,USBSTORGenDisk.

Then paste the copied value from Device Manager in place of the deleted one. Before each line that will be inserted, add %attach_drv% = f2d_install.

Save the changed text document. Next, switch to “Device Manager” and right-click on the flash drive, and then select “Update drivers...”.

The best method is to use the “Browse this computer for driver software” method.

Click on “Browse” and indicate the location of the file that was edited.

Confirm your actions and click “Continue installation”. When the installation is complete, open Explorer, where the flash drive will be displayed as “Local Disk”.
For Windows x86 (32-bit)
Download and unpack the Hitachi_Microdrive.rar archive. Do everything as described above. Then select the “Details” tab, and in the “Property” line insert “Path to the device instance.” In the “Value” line, copy the line that is displayed.

From the downloaded archive, open the cfadisk.inf file using Notepad. How to do this is also written above. Find the partition and go to the line %Microdrive_devdesc% = cfadisk_install,USBSTORDISK&VEN_&PROD_USB_DISK_2.0&REV_P.
In this article we will show you how to make sure that USBflash drive or SDthe card was detected in the Windows system like a regular local hard drive. You might ask, why is this necessary? The fact is that Windows defines by default USB flash drives and memory cards as removable storage devices, which are standard using Windows cannot be divided into several sections. And even if you split the flash drive into two or more partitions using third party utilities(in the same Linux), then in the OS Windows family Only the first of them will be available (by the way, built-in appeared in Windows 10 1703). Those. Windows supports normal operation with multi-partitions only for HDD drives, which are defined in the system as local (i.e. non-removable).
RMB bit and USB media
Windows operating systems recognize USB flash drives as removable/removable devices due to the presence of a special bit descriptor on each device R.M.B.(removablemediabit) . If, when polling a connected device through the StorageDeviceProperty function, the system determines that RMB=1, it concludes that the connected device is a removable drive. Thus, in order to convert a USB flash drive into a hard drive from the system's point of view, it is enough to modify this descriptor. This can be done directly (which is quite risky due to differences in hardware implementations specific devices, and not always possible), or indirectly, by replacing the answer USB devices using a special driver that allows you to filter information in the device response.
Advice. Some manufacturers produce special utilities to flash the controller of your flash drives. First of all, try to find such a utility and/or firmware on the manufacturer’s website. This is the most correct way. If you don’t find such a utility, follow the recommendations from this article.
Let's connect to any free port computer USB flash drive, then open Disk Management Manager ( diskmgmt.msc) and make sure that its type is defined in the system as Removable(Removable device) .
You can also see the device type on the Volumes tab in the disk properties (as we see here Type: Removable). 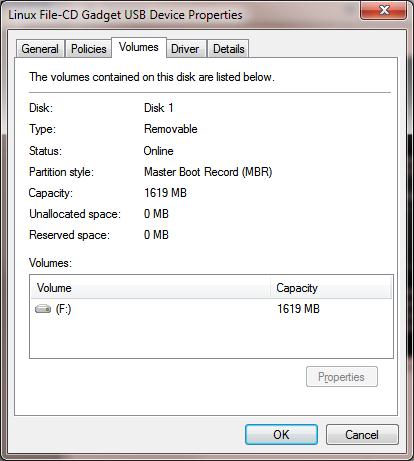
Or using the diskpart command:
List volume

In this article we will look at two ways to change the RMB bit on a USB flash drive - by using the Hitachi filter driver (changes are made only at the driver level on a specific computer) and changing the bit in the controller firmware using the BootIt utility from Lexar (more universal method, but there are a number of restrictions and are not applicable to all models of flash drives and SD cards). Although both of these methods are quite old and I originally tested them on Windows 7, they continue to be relevant and work equally well in modern Windows 10.
Lexar BootIt utility
Recently I came across a rather interesting utility - LexarBootIt. This is a free, portable program that can change the RMB of a removable drive to make a removable USB device fixed (or vice versa). Even though the Lexar BootIt utility is designed for Lexar devices (Micron, Crucial), it can also work with flash drives from other manufacturers. BootIt utility supports everything Windows versions, starting with Windows XP and ending with Windows 10.
Important. The utility is guaranteed to work for Lexar drives. Judging by the reviews, the “Flip removable bit” function does not work on fast USB 3.0 flash drives. In addition, when flashing the controller, you will lose the warranty on the flash drive and can make it inoperable.
You can download BootIt on the Lexar website (lexar_usb_tool) or from our website ().
- Run BootIt.exe with administrator rights
- Select your flash drive from the list of devices
- Click on the button Flip Removable Bit
- Save your changes by clicking OK.

Reconnect the device and use Device Manager to make sure that its type has changed from Removable to Basic.

If the BootIt utility did not help change the RMB bit on a removable drive, try using the following method, based on the Hitachi Microdrive filter driver
Filter driver for Hitachi Microdrive flash drives
In order for a USB flash drive or SD card to be recognized in the system as a hard drive, we need a special filter driver that allows us to modify the data transmitted through the system stack of the current device driver. We will use a filter driver to USB flash drives from Hitachi ( Hitachi Microdrive driver), which at the OS driver level allows you to change the type of flash drive device from removable to fixed (USB-ZIP -> USB-HDD). Thanks to the use of this driver, you can hide from the system that the connected device is removable. As a result, the system will consider that it is working with a regular hard drive, which can be divided into partitions that will be simultaneously accessible in the system.
Archives with Hitachi Microdrive driver:
- 32 bit systems - (3.0 KB)
- Hitachi Microdrive version for 64 bit systems - (3.8 KB)
You need to download the driver version for your system according to its bit capacity. Both archives have the same structure and consist of two files:
- cfadisk.inf– installation file, with driver settings
- cfadisk.sys- Hitachi driver file
The next stage is identifying the device code of our flash drive. To do this, in the disk properties on the tab Details in the parameter Device Instance Path select and copy ( Ctrl+C) device instance code. 
In our example it would be:
USBSTOR\Disk&Ven_Linux&Prod_File-CD_Gadget&Rev_0000\0123456789ABCDEF&0
Let's say we plan to install the driver on 64 bit system. Using any test editor, open the file for editing cfadisk.inf. We are interested in the cfadisk_device and cfadisk_device.NTamd64 sections.
%Microdrive_devdesc% = cfadisk_install,IDE\DiskTS64GCF400______________________________20101008 %Microdrive_devdesc% = cfadisk_install,IDE\DiskTS64GCF400______________________________20101008
We change the value DiskTS64GCF400______________________________20101008 to the code of our device.
Important! In the device instance code, it is necessary to discard the part after the second “\” (in our example we discard 0123456789ABCDEF&0).
We get:
%Microdrive_devdesc% = cfadisk_install,IDE\USBSTOR\Disk&Ven_Linux&Prod_File-CD_Gadget&Rev_0000 %Microdrive_devdesc% = cfadisk_install,IDE\USBSTOR\Disk&Ven_Linux&Prod_File-CD_Gadget&Rev_0000
Save the file.
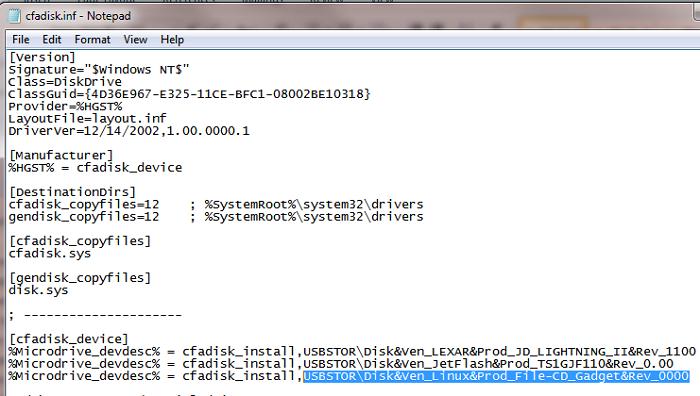
If the driver is installed on a 32 bit system, you need to download the recommended archive, unpack it and open the cfadisk.inf file for editing. Let's find the section :
%Microdrive_devdesc% = cfadisk_install,USBSTOR\Disk&Ven_LEXAR&Prod_JD_LIGHTNING_II&Rev_1100 %Microdrive_devdesc% = cfadisk_install,USBSTOR\Disk&Ven_JetFlash&Prod_TS1GJF110&Rev_0.00 %Microdrive_devdesc% = cfadisk_install,USBSTOR\ DISK&VEN_&PROD_USB_DISK_2.0&REV_P
Then we will change the data in the last line, indicating the code of the instance of our flash drive, i.e. in our example we get:
%Microdrive_devdesc% = cfadisk_install,USBSTOR\Disk&Ven_LEXAR&Prod_JD_LIGHTNING_II&Rev_1100 %Microdrive_devdesc% = cfadisk_install,USBSTOR\Disk&Ven_JetFlash&Prod_TS1GJF110&Rev_0.00 %Microdrive_devdesc% = cfadisk_install,USBSTOR\ Disk&Ven_Linux&Prod_File-CD_Gadget&Rev_0000
Advice. If you want the USB flash drive to be displayed with a specific name in the device manager, you need to edit the value of the Microdrive_devdesc variable, for example like this:
Microdrive_devdesc = "Transcend 64GB DIY SSD"
Installing the Hitachi Microdrive driver instead of the native USB drive driver
All that remains is to replace the driver used by the USB flash drive.
Important! If USB driver Hitachi Microdrive is installed on a 64-bit system, because... There is no digital signature for this driver, you will have to either.
Open the Drivers tab and click the button Update Drivers. 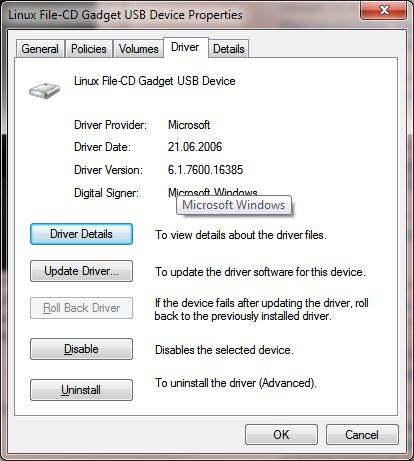
Let's indicate the folder to the directory into which the downloaded archive with the Hitachi driver is unpacked: 
Let's choose new driver. 
We ignore the warning about missing digital signature drivers. 
Advice. In Windows 10 and Windows 8, when installing the driver, the following error appears:
Windows found drivers for this device, but an error occurred when trying to install the drivers.
Hitachi Microdrive
Third party inf does not contain signature information

To disable driver digital signature verification, run the following commands:
bcdedit.exe /set nointegritychecks ON
bcdedit.exe /set TESTSIGNING ON
Restart your computer and try to install the driver again.
All that remains is to restart the computer and, by opening the disk manager, make sure that your flash drive is now recognized as a regular hard drive ( Type: Basic), and the Hitachi driver is used as the driver.

By opening Explorer, you can also make sure that the icon of the flash drive has changed; it is now displayed as a hard drive, a regular drive. 
Now you can work with this flash drive like a regular HDD: create partitions, specify active section, create dynamic disks, install software that does not work from flash drives, etc.
Important. On others Windows computers Without this driver, the second partition of the device will not be accessible.
To remove the Hitachi Microdrive driver, open the disk properties and on the Driver tab, click the Update Driver button - the system will install the native driver itself.

Advice. If after installing the Hitachi driver the system stops booting with BSOD, you need to boot the computer from installation disk Windows/Live CD and manually remove the following files:
- cfadisk.sys in the %windir%\System32\drivers directory
- Directory "cfadisk.inf_amd64_..." from %windir%\System32\DriverStore\FileRepositoty
Restart your computer
You need to understand that this solution will only work on the system on which the appropriate driver is installed.
Many users may have noticed that any programmer who comes to fix problems related to the system carries with him. This trick is very useful, because in case of any problem with the system or hard drive, the user will always be able to restore access to the computer and understand what the problem with the computer is. In this case, not everyone wants to have the system on a computer, since it is much easier to carry a small system disk With additional files. Therefore, anyone should know how to make a hard drive from a flash drive.
But how to turn a flash drive into a hard drive? It would seem that such a process should be difficult and resource-intensive, but in fact everything is done quite simply, and the size and “age” of the flash drive does not matter. The main condition for a flash drive is that it works properly. Also, not only a USB flash drive, but also an SD card is suitable for this role; the process of changing properties is identical.
It is worth knowing that multi-partitioning should not be applied to such external media, since many operating systems support only the first partition in disks that are not HDD-type. HDDs are non-removable media that are installed in a computer. You can remove them, but it takes a lot of time and effort, so people use cards and external drives to make the whole process of transferring information or an operating system directly with them easier.
First, you need to make Windows recognize the USB flash drive as a non-removable device. In this case, any flash card has a reverse parameter as standard, then you need to start making changes. Some people don’t think at all about the security of their equipment, so they simply modify the flash drive. But this method is dangerous because many flash drives simply will not be able to change to the selected parameter, which is why they will break and will have to be carried to service center. It is much easier and safer to replace the response from the device with the desired result. A special driver is installed for this. Flash drive instead hard drive on Windows 7 will work the same as with any other operating system.
Before making a flash drive hard drive, the device must be connected to the computer, and then determine the type of flash drive.
First option
Open Media Manager. You can find it using the “Run” button, enter “diskmgmt.msc” here and press “Enter”. Now you can see what type of drive it is, removable or non-removable.

Second option
You can also view the device type by opening the Volumes tab in the properties of the flash drive.
Third option
You can also enter the command diskpart.

So, now the user knows whether the flash drive is a removable or non-removable device in this case.
Second step
If the device is defined as “non-removable”, then it can already be used as a hard drive. Otherwise, before using a flash drive instead of a hard drive, its type must be changed to “non-removable”. For this, a special filter driver is used, which can easily change the incoming information, changing it to the necessary one. One of the most common and simple filters is the Hitachi Microdrive driver. Thus, the user does not invade the microclimate of the flash drive, while simply deceiving his system by giving it a false answer.
After the media becomes non-removable, the computer will consider it a full-fledged hard drive, which can be divided into partitions, each of which will function simultaneously. The main thing at this point is to download a program that is suitable for the bit size of your operating system.
Third stage
After the user has been able to deceive the computer, the device code can be identified. You can find the code in the “Details”, “Device Instance Path” tab.

As a result, it is necessary to copy the information; it will then be manipulated in the Hitachi Microdrive program. When copying, you must remove all information after the second “\”.
On a 64 bit system
Now you need to find the cfadisk file in the Hitachi Microdrive folder, where we find the cfadisk_device and cfadisk_device.NTamd64 sections.
In the sections, instead of information after “\”, we insert the code of our device.
On the system 32 bits
The process is similar, only in the file for the 32-bit version you need to find the “cfadisk_device” section.
Here you need to replace “DISK&VEN_&PROD_USB_DISK_2.0&REV_P” with the device code.
If you want to set your own name for the device, then you need to replace “Microdrive_devdesc” with the desired name, for example “USB_hard”.
Fourth stage
The last stage is replacing drivers. On 64-bit operating systems Before this action, you must disable driver digital signature verification so that it does not update on its own due to third-party intervention.
You need to open the “Drivers” => “Update Drivers” tab. Next is the folder with the Hitachi Microdrive driver. This driver is selected, all that remains is to ignore the message about the absence of a digital signature, then restart the computer and see the result of the work. The drive has become non-removable.
The driver is removed using the “Update drivers” button.
Here's how to easily make a hard drive from a flash drive. This procedure can be carried out by anyone if you follow the instructions, and the computer and the drive system cannot be damaged at all. If you use a high-quality, voluminous external drive with good performance, then there is no question whether a flash drive can be used instead of a hard drive. In this case, it will cope with the task no worse than hard drives.
Increase disk space Eee PC without any soldering will be helped by a simple solution, namely, using the SD slot, like additional disk systems. In this case, the system will recognize it as a hard drive and allow you to install on it additional programs. I recommend using an SD HC card - 8GB 6 series, manufacturer to suit your taste. As a result, we get +8 GB of “disk space”.
Goal: make the flash drive visible Partition programs Magic, Acronis Disk Director etc. for creating partitions on a flash drive, including hidden ones, formatting and other operations.
Load the Hitachi Microdrive mini-hard drive driver. Unpack it into a temporary directory. Opening text editor file cfadisk.inf
Finding the section:
USBSTOR\DISK&VEN_&PROD_USB_DISK_2.0&REV_P
We connect the flash drive, go to the device manager. Right mouse click on My Computer → Manage → Device Manager → Disk Devices. Find the flash drive in the list, open its properties, and go to the Details tab. Select and copy to the clipboard (Ctrl+C) “Device instance code” (in windows se7en - “Children”). In our case, this is the line
USBSTOR\DISK&VEN_USB_2.0&PROD_FLASH_DISK&REV_1.00\7&138BF0DA&0
Let's move on to editing the file cfadisk.inf. Replace the highlighted line below
%Microdrive_devdesc% = cfadisk_install,USBSTOR\Disk&Ven_LEXAR&Prod_JD_LIGHTNING_II&Rev_1100
%Microdrive_devdesc% = cfadisk_install,USBSTOR\Disk&Ven_JetFlash&Prod_TS1GJF110&Rev_0.00
%Microdrive_devdesc% = cfadisk_install, USBSTOR\DISK&VEN_&PROD_USB_DISK_2.0&REV_P
to the “device instance code” (xp) or “children” (se7en) of our flash drive, as a result we get:
%Microdrive_devdesc% = cfadisk_install,USBSTOR\Disk&Ven_LEXAR&Prod_JD_LIGHTNING_II&Rev_1100
%Microdrive_devdesc% = cfadisk_install,USBSTOR\Disk&Ven_JetFlash&Prod_TS1GJF110&Rev_0.00
%Microdrive_devdesc% = cfadisk_install, USBSTOR\DISK&VEN_USB_2.0&PROD_FLASH_DISK&REV_1.00
Device instance code string \7&138BF0DA&0 We don't write it down. Save the file cfadisk.inf.
We replace standard driver on Hitachi Microdrive.
In XP: In the device manager, in the flash properties, go to the tab Driver → Update → Install from a specified location → Do not search → Install from disk
In Se7en: In the device manager, in the properties of the flash, go to the tab Driver → Update → Search for drivers on this computer → Select a driver from the list of already installed ones → Install from disk
select a file cfadisk.inf, ignore the message about an unsigned driver.
Let's do safe removal flash and connect it again. (note: For SD, the procedure is optional)
Well that's all!! Your flash drive HDD is ready for use. Good luck!!!